詳解iOS應用UI開發中的九宮格坐標計算與字典轉換模型
九宮格坐標計算
一、要求
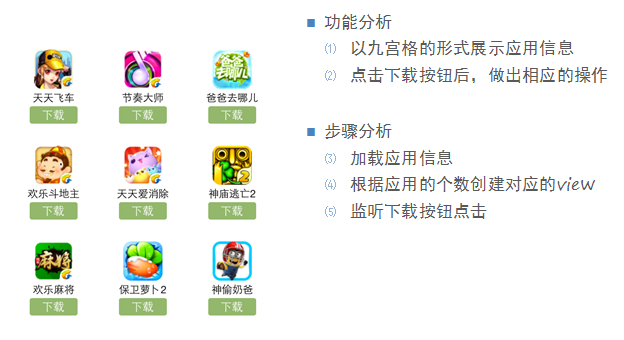
完成下面的布局
二、分析
尋找左邊的規律,每一個uiview的x坐標和y坐標。
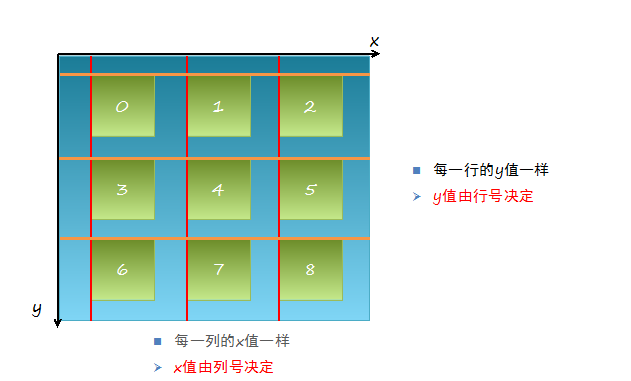
三、實現思路
(1)明確每一塊用得是什麼view
(2)明確每個view之間的父子關系,每個視圖都只有一個父視圖,擁有很多的子視圖。
(3)可以先嘗試逐個的添加格子,最後考慮使用for循環,完成所有uiview的創建
(4)加載app數據,根據數據長度創建對應個數的格子
(5)添加格子內部的子控件
(6)給內部的子控件裝配數據
四、代碼示例
代碼如下:
//
// YYViewController.m
// 九宮格練習
//
// Created by 孔醫己 on 14-5-22.
// Copyright (c) 2014年 itcast. All rights reserved.
//
#import "YYViewController.h"
@interface YYViewController ()
@property(nonatomic,strong)NSArray *apps;
@end
代碼如下:
@implementation YYViewController
//1.加載數據
- (NSArray *)apps
{
if (!_apps) {
NSString *path=[[NSBundle mainBundle]pathForResource:@"app.plist" ofType:nil];
_apps=[NSArray arrayWithContentsOfFile:path];
}
return _apps;
}
- (void)viewDidLoad
{
[super viewDidLoad];
NSLog(@"%d",self.apps.count);
//2.完成布局設計
//三列
int totalloc=3;
CGFloat appvieww=80;
CGFloat appviewh=90;
CGFloat margin=(self.view.frame.size.width-totalloc*appvieww)/(totalloc+1);
int count=self.apps.count;
for (int i=0; i<count; i++) {
int row=i/totalloc;//行號
//1/3=0,2/3=0,3/3=1;
int loc=i%totalloc;//列號
CGFloat appviewx=margin+(margin+appvieww)*loc;
CGFloat appviewy=margin+(margin+appviewh)*row;
//創建uiview控件
UIView *appview=[[UIView alloc]initWithFrame:CGRectMake(appviewx, appviewy, appvieww, appviewh)];
//[appview setBackgroundColor:[UIColor purpleColor]];
[self.view addSubview:appview];
//創建uiview控件中的子視圖
UIImageView *appimageview=[[UIImageView alloc]initWithFrame:CGRectMake(0, 0, 80, 50)];
UIImage *appimage=[UIImage imageNamed:self.apps[i][@"icon"]];
appimageview.image=appimage;
[appimageview setContentMode:UIViewContentModeScaleAspectFit];
// NSLog(@"%@",self.apps[i][@"icon"]);
[appview addSubview:appimageview];
//創建文本標簽
UILabel *applable=[[UILabel alloc]initWithFrame:CGRectMake(0, 50, 80, 20)];
[applable setText:self.apps[i][@"name"]];
[applable setTextAlignment:NSTextAlignmentCenter];
[applable setFont:[UIFont systemFontOfSize:12.0]];
[appview addSubview:applable];
//創建按鈕
UIButton *appbtn=[UIButton buttonWithType:UIButtonTypeCustom];
appbtn.frame= CGRectMake(10, 70, 60, 20);
[appbtn setBackgroundImage:[UIImage imageNamed:@"buttongreen"] forState:UIControlStateNormal];
[appbtn setBackgroundImage:[UIImage imageNamed:@"buttongreen_highlighted"] forState:UIControlStateHighlighted];
[appbtn setTitle:@"下載" forState:UIControlStateNormal];
appbtn.titleLabel.font=[UIFont systemFontOfSize:12.0];
[appview addSubview:appbtn];
[appbtn addTarget:self action:@selector(click) forControlEvents:UIControlEventTouchUpInside];
}
}
-(void)click
{
//動畫標簽
UILabel *animalab=[[UILabel alloc]initWithFrame:CGRectMake(self.view.center.x-100, self.view.center.y+20, 200, 40)];
[animalab setText:@"下載成功"];
animalab.font=[UIFont systemFontOfSize:12.0];
[animalab setBackgroundColor:[UIColor brownColor]];
[animalab setAlpha:0];
[self.view addSubview:animalab];
// [UIView beginAnimations:Nil context:Nil];
// [animalab setAlpha:1];
// [UIView setAnimationDuration:4.0];
// [UIView commitAnimations];
//執行完之後,還得把這給刪除了,推薦使用block動畫
[UIView animateWithDuration:4.0 animations:^{
[animalab setAlpha:1];
} completion:^(BOOL finished) {
//[self.view re];
}];
}
- (void)didReceiveMemoryWarning
{
[super didReceiveMemoryWarning];
}
@end
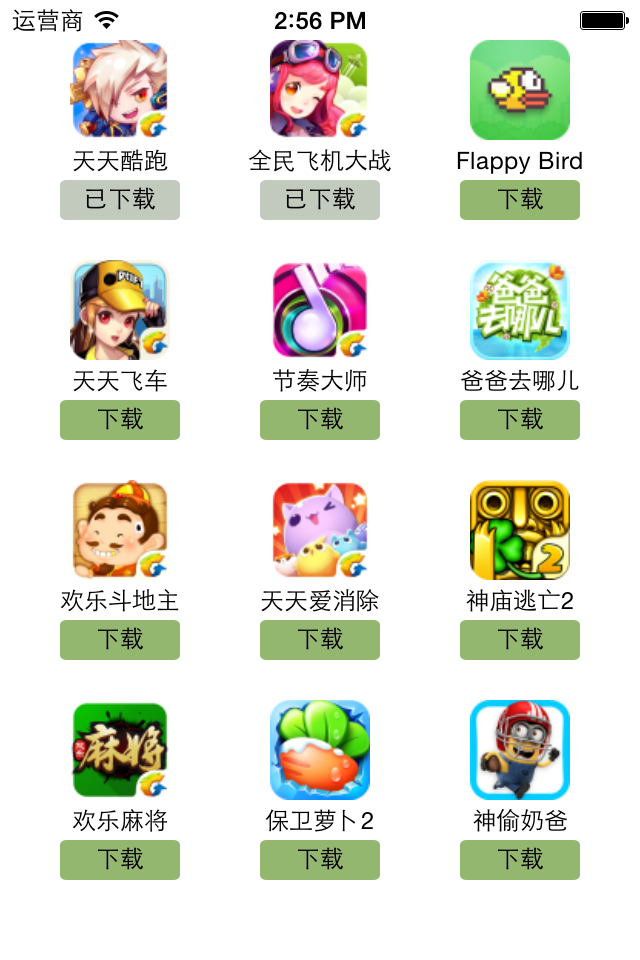
執行效果:
字典轉模型
一、能完成功能的“問題代碼”
1.從plist中加載的數據
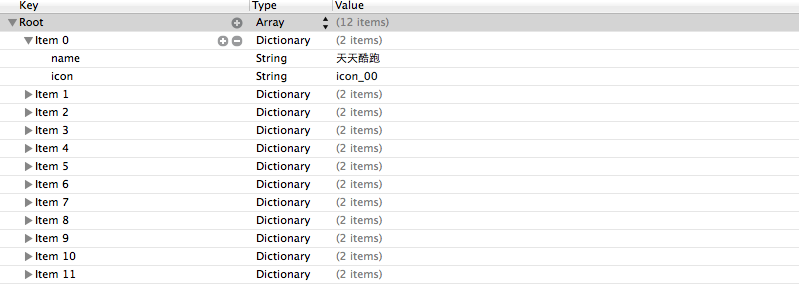
2.實現的代碼
代碼如下:
//
// LFViewController.m
// 03-應用管理
//
// Created by apple on 14-5-22.
// Copyright (c) 2014年 heima. All rights reserved.
//
#import "LFViewController.h"
@interface LFViewController ()
@property (nonatomic, strong) NSArray *appList;
@end
@implementation LFViewController
- (NSArray *)appList
{
if (!_appList) {
// 1. 從mainBundle加載
NSBundle *bundle = [NSBundle mainBundle];
NSString *path = [bundle pathForResource:@"app.plist" ofType:nil];
_appList = [NSArray arrayWithContentsOfFile:path];
NSLog(@"%@", _appList);
}
return _appList;
}
- (void)viewDidLoad
{
[super viewDidLoad];
// 總共有3列
int totalCol = 3;
CGFloat viewW = 80;
CGFloat viewH = 90;
CGFloat marginX = (self.view.bounds.size.width - totalCol * viewW) / (totalCol + 1);
CGFloat marginY = 10;
CGFloat startY = 20;
for (int i = 0; i < self.appList.count; i++) {
int row = i / totalCol;
int col = i % totalCol;
CGFloat x = marginX + (viewW + marginX) * col;
CGFloat y = startY + marginY + (viewH + marginY) * row;
UIView *appView = [[UIView alloc] initWithFrame:CGRectMake(x, y, viewW, viewH)];
[self.view addSubview:appView];
// 創建appView內部的細節
// 0> 讀取數組中的字典
NSDictionary *dict = self.appList[i];
// 1> UIImageView
UIImageView *imageView = [[UIImageView alloc] initWithFrame:CGRectMake(0, 0, viewW, 50)];
imageView.image = [UIImage imageNamed:dict[@"icon"]];
imageView.contentMode = UIViewContentModeScaleAspectFit;
[appView addSubview:imageView];
// 2> UILabel
UILabel *label = [[UILabel alloc] initWithFrame:CGRectMake(0, imageView.bounds.size.height, viewW, 20)];
// 設置文字
label.text = dict[@"name"];
label.font = [UIFont systemFontOfSize:12.0];
label.textAlignment = NSTextAlignmentCenter;
[appView addSubview:label];
// 3> UIButton
// UIButtonTypeCustom和[[UIButton alloc] init]是等價的
UIButton *button = [UIButton buttonWithType:UIButtonTypeCustom];
button.frame = CGRectMake(15, 70, viewW - 30, 20);
[button setTitle:@"下載" forState:UIControlStateNormal];
// *** 不能使用如下代碼直接設置title
// button.titleLabel.text = @"下載";
// @property中readonly表示不允許修改對象的指針地址,但是可以修改對象的屬性
button.titleLabel.font= [UIFont systemFontOfSize:14.0];
[button setBackgroundImage:[UIImage imageNamed:@"buttongreen"] forState:UIControlStateNormal];
[button setBackgroundImage:[UIImage imageNamed:@"buttongreen_highlighted"] forState:UIControlStateHighlighted];
[appView addSubview:button];
}
}
@end
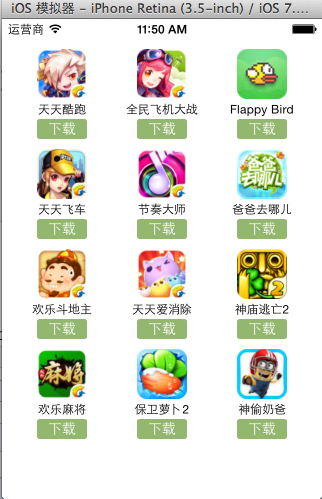
3.實現效果
4.代碼問題
在上述代碼的第62,69行,我們是直接通過字典的鍵名獲取plist中的數據信息,在viewController中需要直接和數據打交道,如果需要多次使用可能會因為不小心把鍵名寫錯,而程序並不報錯。鑒於此,可以考慮把字典數據轉換成一個模型,把數據封裝到一個模型中去,讓viewController不再直接和數據打交道,而是和模型交互。
一般情況下,設置數據和取出數據都使用“字符串類型的key”,編寫這些key時,編輯器沒有智能提示,需要手敲。如:
代碼如下:
dict[@"name"] = @"Jack";
NSString *name = dict[@"name"];
手敲字符串key,key容易寫錯
Key如果寫錯了,編譯器不會有任何警告和報錯,造成設錯數據或者取錯數據
二、字典轉模型
1.字典轉模型介紹
示意圖:
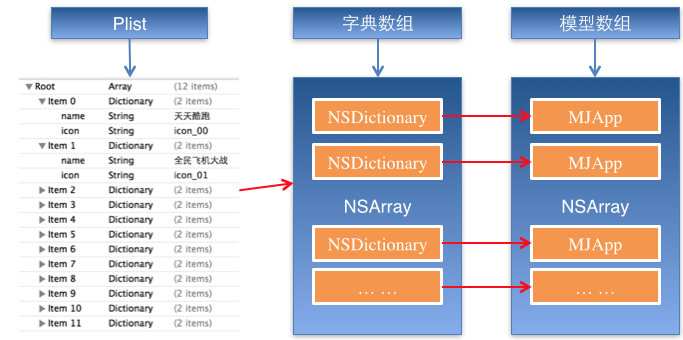
字典轉模型的好處:
(1)降低代碼的耦合度
(2)所有字典轉模型部分的代碼統一集中在一處處理,降低代碼出錯的幾率
(3)在程序中直接使用模型的屬性操作,提高編碼效率
(4)調用方不用關心模型內部的任何處理細節
字典轉模型的注意點:
模型應該提供一個可以傳入字典參數的構造方法
代碼如下:
- (instancetype)initWithDict:(NSDictionary *)dict;
+ (instancetype)xxxWithDict:(NSDictionary *)dict;
提示:在模型中合理地使用只讀屬性,可以進一步降低代碼的耦合度。
2.代碼示例(一)
新建一個類,用來作為數據模型
代碼如下:
viewController.m文件代碼(字典轉模型)
#import "LFViewController.h"
#import "LFAppInfo.h"
@interface LFViewController ()
@property (nonatomic, strong) NSArray *appList;
@end
@implementation LFViewController
// 字典轉模型
- (NSArray *)appList
{
if (!_appList) {
// 1. 從mainBundle加載
NSBundle *bundle = [NSBundle mainBundle];
NSString *path = [bundle pathForResource:@"app.plist" ofType:nil];
// _appList = [NSArray arrayWithContentsOfFile:path];
NSArray *array = [NSArray arrayWithContentsOfFile:path];
// 將數組轉換成模型,意味著self.appList中存儲的是LFAppInfo對象
// 1. 遍歷數組,將數組中的字典依次轉換成AppInfo對象,添加到一個臨時數組
// 2. self.appList = 臨時數組
NSMutableArray *arrayM = [NSMutableArray array];
for (NSDictionary *dict in array) {
//用字典來實例化對象的工廠方法
[arrayM addObject:[LFAppInfo appInfoWithDict:dict]];
}
_appList = arrayM;
}
return _appList;
}
- (void)viewDidLoad
{
[super viewDidLoad];
// 總共有3列
int totalCol = 3;
CGFloat viewW = 80;
CGFloat viewH = 90;
CGFloat marginX = (self.view.bounds.size.width - totalCol * viewW) / (totalCol + 1);
CGFloat marginY = 10;
CGFloat startY = 20;
for (int i = 0; i < self.appList.count; i++) {
int row = i / totalCol;
int col = i % totalCol;
CGFloat x = marginX + (viewW + marginX) * col;
CGFloat y = startY + marginY + (viewH + marginY) * row;
UIView *appView = [[UIView alloc] initWithFrame:CGRectMake(x, y, viewW, viewH)];
[self.view addSubview:appView];
// 創建appView內部的細節
// 0> 讀取數組中的AppInfo
// NSDictionary *dict = self.appList[i];
LFAppInfo *appInfo = self.appList[i];
// 1> UIImageView
UIImageView *imageView = [[UIImageView alloc] initWithFrame:CGRectMake(0, 0, viewW, 50)];
imageView.image = appInfo.image;
imageView.contentMode = UIViewContentModeScaleAspectFit;
[appView addSubview:imageView];
// 2> UILabel
UILabel *label = [[UILabel alloc] initWithFrame:CGRectMake(0, imageView.bounds.size.height, viewW, 20)];
// 設置文字
label.text = appInfo.name;
label.font = [UIFont systemFontOfSize:12.0];
label.textAlignment = NSTextAlignmentCenter;
[appView addSubview:label];
// 3> UIButton
// UIButtonTypeCustom和[[UIButton alloc] init]是等價的
UIButton *button = [UIButton buttonWithType:UIButtonTypeCustom];
button.frame = CGRectMake(15, 70, viewW - 30, 20);
[button setTitle:@"下載" forState:UIControlStateNormal];
button.titleLabel.font= [UIFont systemFontOfSize:14.0];
[button setBackgroundImage:[UIImage imageNamed:@"buttongreen"] forState:UIControlStateNormal];
[button setBackgroundImage:[UIImage imageNamed:@"buttongreen_highlighted"] forState:UIControlStateHighlighted];
[appView addSubview:button];
button.tag = i;
[button addTarget:self action:@selector(downloadClick:) forControlEvents:UIControlEventTouchUpInside];
}
}
- (void)downloadClick:(UIButton *)button
{
NSLog(@"%d", button.tag);
// 實例化一個UILabel顯示在視圖上,提示用戶下載完成
UILabel *label = [[UILabel alloc] initWithFrame:CGRectMake(80, 400, 160, 40)];
label.textAlignment = NSTextAlignmentCenter;
label.backgroundColor = [UIColor lightGrayColor];
LFAppInfo *appInfo = self.appList[button.tag];
label.text = [NSString stringWithFormat:@"下載%@完成", appInfo.name];
label.font = [UIFont systemFontOfSize:13.0];
label.alpha = 1.0;
[self.view addSubview:label];
// 動畫效果
// 動畫效果完成之後,將Label從視圖中刪除
// 首尾式動畫,只能做動畫,要處理完成後的操作不方便
// [UIView beginAnimations:nil context:nil];
// [UIView setAnimationDuration:1.0];
// label.alpha = 1.0;
// [UIView commitAnimations];
// block動畫比首尾式動畫簡單,而且能夠控制動畫結束後的操作
// 在iOS中,基本都使用首尾式動畫
[UIView animateWithDuration:2.0 animations:^{
label.alpha = 0.0;
} completion:^(BOOL finished) {
// 刪除label
[label removeFromSuperview];
}];
}
@end
模型.h文件代碼
代碼如下:
#import <Foundation/Foundation.h>
@interface LFAppInfo : NSObject
// 應用程序名稱
@property (nonatomic, copy) NSString *name;
// 應用程序圖標名稱
@property (nonatomic, copy) NSString *icon;
// 圖像
// 定義屬性時,會生成getter&setter方法,還會生成一個帶下劃線的成員變量
// 如果是readonly屬性,只會生成getter方法,同時沒有成員變量
@property (nonatomic, strong, readonly) UIImage *image;
// instancetype會讓編譯器檢查實例化對象的准確類型
// instancetype只能用於返回類型,不能當做參數使用
- (instancetype)initWithDict:(NSDictionary *)dict;
/** 工廠方法 */
+ (instancetype)appInfoWithDict:(NSDictionary *)dict;
@end
模型.m文件數據處理代碼
代碼如下:
#import "LFAppInfo.h"
@interface LFAppInfo()
{
UIImage *_imageABC;
}
@end
代碼如下:
@implementation LFAppInfo
- (instancetype)initWithDict:(NSDictionary *)dict
{
self = [super init];
if (self) {
self.name = dict[@"name"];
self.icon = dict[@"icon"];
}
return self;
}
+ (instancetype)appInfoWithDict:(NSDictionary *)dict
{
return [[self alloc] initWithDict:dict];
}
- (UIImage *)image
{
if (!_imageABC) {
_imageABC = [UIImage imageNamed:self.icon];
}
return _imageABC;
}
@end
3.代碼示例(二)
數據信息:plist文件
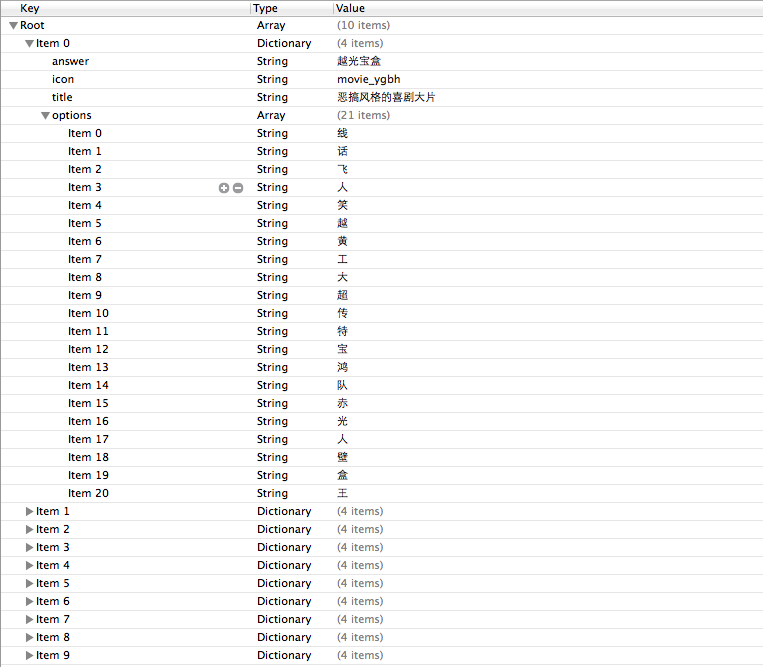
字典轉模型(初步)
模型.h文件
代碼如下:
#import <Foundation/Foundation.h>
@interface LFQuestion : NSObject
@property (nonatomic, copy) NSString *answer;
@property (nonatomic, copy) NSString *title;
@property (nonatomic, copy) NSString *icon;
@property (nonatomic, strong) NSArray *options;
@property (nonatomic, strong) UIImage *image;
/** 用字典實例化對象的成員方法 */
- (instancetype)initWithDict:(NSDictionary *)dict;
/** 用字典實例化對象的類方法,又稱工廠方法 */
+ (instancetype)questionWithDict:(NSDictionary *)dict;
@end
模型.m文件
代碼如下:
#import "LFQuestion.h"
@implementation LFQuestion
+ (instancetype)questionWithDict:(NSDictionary *)dict
{
return [[self alloc] initWithDict:dict];
}
- (instancetype)initWithDict:(NSDictionary *)dict
{
self = [super init];
if (self) {
self.answer = dict[@"answer"];
self.icon = dict[@"icon"];
self.title = dict[@"title"];
self.options = dict[@"options"];
[self setValuesForKeysWithDictionary:dict];
}
return self;
}
viewController.m文件中的數據處理
- (NSArray *)questions
{
if (!_questions) {
NSArray *array = [NSArray arrayWithContentsOfFile:[[NSBundle mainBundle] pathForResource:@"questions.plist" ofType:nil]];
NSMutableArray *arrayM = [NSMutableArray array];
for (NSDictionary *dict in array) {
[arrayM addObject:[LFQuestion questionWithDict:dict]];
}
_questions=arrayM;
}
return _questions;
}
字典轉模型(優化)
上面代碼可以做進一步的優化,從plist文件中讀取數據是可以交給模型去處理的,優化後代碼如下:
模型.h文件
代碼如下:
#import <Foundation/Foundation.h>
@interface LFQuestion : NSObject
@property (nonatomic, copy) NSString *answer;
@property (nonatomic, copy) NSString *title;
@property (nonatomic, copy) NSString *icon;
@property (nonatomic, strong) NSArray *options;
@property (nonatomic, strong) UIImage *image;
/** 用字典實例化對象的成員方法 */
- (instancetype)initWithDict:(NSDictionary *)dict;
/** 用字典實例化對象的類方法,又稱工廠方法 */
+ (instancetype)questionWithDict:(NSDictionary *)dict;
/** 從plist加載對象數組 */
+ (NSArray *)questions;
@end
模型.m文件
代碼如下:
#import "LFQuestion.h"
@implementation LFQuestion
+ (instancetype)questionWithDict:(NSDictionary *)dict
{
return [[self alloc] initWithDict:dict];
}
- (instancetype)initWithDict:(NSDictionary *)dict
{
self = [super init];
if (self) {
self.answer = dict[@"answer"];
self.icon = dict[@"icon"];
self.title = dict[@"title"];
self.options = dict[@"options"];
[self setValuesForKeysWithDictionary:dict];
}
return self;
}
+ (NSArray *)questions
{
NSArray *array = [NSArray arrayWithContentsOfFile:[[NSBundle mainBundle] pathForResource:@"questions.plist" ofType:nil]];
NSMutableArray *arrayM = [NSMutableArray array];
for (NSDictionary *dict in array) {
[arrayM addObject:[LFQuestion questionWithDict:dict]];
}
return arrayM;
}
@end
viewController.m文件中的數據處理代碼部分
代碼如下:
- (NSArray *)questions
{
if (!_questions) {
_questions = [LFQuestion questions];
}
return _questions;
}
補充內容:(KVC)的使用
(1)在模型內部的數據處理部分,可以使用鍵值編碼來進行處理
代碼如下:
- (instancetype)initWithDict:(NSDictionary *)dict
{
self = [super init];
if (self) {
// self.answer = dict[@"answer"];
// self.icon = dict[@"icon"];
// self.title = dict[@"title"];
// self.options = dict[@"options"];
// KVC (key value coding)鍵值編碼
// cocoa 的大招,允許間接修改對象的屬性值
// 第一個參數是字典的數值
// 第二個參數是類的屬性
[self setValue:dict[@"answer"] forKeyPath:@"answer"];
[self setValue:dict[@"icon"] forKeyPath:@"icon"];
[self setValue:dict[@"title"] forKeyPath:@"title"];
[self setValue:dict[@"options"] forKeyPath:@"options"];
}
return self;
}
(2)setValuesForKeys的使用
上述數據操作細節,可以直接通過setValuesForKeys方法來完成。
代碼如下:
- (instancetype)initWithDict:(NSDictionary *)dict
{
self = [super init];
if (self) {
// 使用setValuesForKeys要求類的屬性必須在字典中存在,可以比字典中的鍵值多,但是不能少。
[self setValuesForKeysWithDictionary:dict];
}
return self;
}
三、補充說明
1.readonly屬性
(1)@property中readonly表示不允許修改對象的指針地址,但是可以修改對象的屬性。
(2)通常使用@property關鍵字定義屬性時,會生成getter&setter方法,還會生成一個帶下劃線的成員變量。
(3)如果是readonly屬性,只會生成getter方法,不會生成帶下劃線的成員變量.
2.instancetype類型
(1)instancetype會讓編譯器檢查實例化對象的准確類型
(2)instancetype只能用於返回類型,不能當做參數使用
3.instancetype & id的比較
(1) instancetype在類型表示上,跟id一樣,可以表示任何對象類型
(2) instancetype只能用在返回值類型上,不能像id一樣用在參數類型上
(3) instancetype比id多一個好處:編譯器會檢測instancetype的真實類型


