iOS開發中Subview的事件響應以及獲取subview的方法
Subview的事件響應
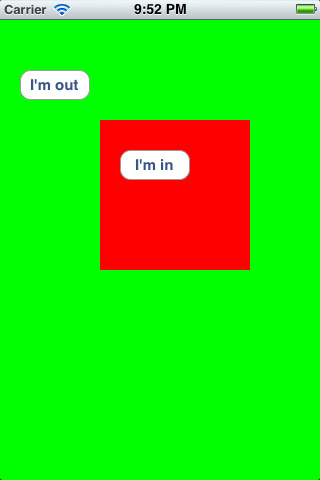
在view的層級裡面,默認情況下subview是可以顯示到其父view的frame區域以外的,通過設置clipToBounds屬性為YES,可以限制subview的顯示區域。但是touch在各個UIView中傳遞的時候,區域時限制在view的frame內,此處包含兩個信息:1、在當前view的frame以外所做的操作是不會傳遞到該view中的,這一點很容易理解。2、如果touch事件是發生在當前view的frame以外,該view所有的subview將也不會再收到該消息。這一點通常容易被我們忽略,很多奇怪的問題就是這個引起的。
下面請看一個小例子,定制view的代碼如下:
代碼如下:
SvTestClipSubviewEvent.h
//
// SvTestClipSubviewEvent.h
// SvUIViewSample
//
// Created by maple on 3/19/12.
// Copyright (c) 2012 smileEvday. All rights reserved.
//
// 默認的情況下,subView可以超出父view的frame,即可以顯示到父View的外邊
// 但是消息的接受返回卻是由於父View的大小限制,即出了父View的subView將不能收到消息
// 在程序中一定要注意當前程序view的最底層是充滿整個window的可用區域的,
// 否則將會導致某些區域明明有按鈕但是卻點不中的問題
#import <UIKit/UIKit.h>
@interface SvTestClipSubviewEvent : UIView
@end
代碼如下:
//
// SvTestClipSubviewEvent.m
// SvUIViewSample
//
// Created by maple on 3/19/12.
// Copyright (c) 2012 smileEvday. All rights reserved.
//
#import "SvTestClipSubviewEvent.h"
@interface SvTestClipSubviewEvent()
- (void)btnAction:(UIButton*)btn;
@end
@implementation SvTestClipSubviewEvent
- (id)initWithFrame:(CGRect)frame
{
self = [super initWithFrame:frame];
if (self) {
// Initialization code
self.backgroundColor = [UIColor redColor];
UIButton *testOutBtn = [UIButton buttonWithType:UIButtonTypeRoundedRect]; testOutBtn.frame = CGRectMake(-80, -50, 70, 30);
[testOutBtn addTarget:self action:@selecto (btnAction: forControlEvents:UIControlEventTouchUpInside];
[testOutBtn setTitle:@"I'm out" forState:UIControlStateNormal];
[self addSubview:testOutBtn];
UIButton *testInBtn = [UIButton buttonWithType:UIButtonTypeRoundedRect]; testInBtn.frame = CGRectMake(20, 30, 70, 30);
[testInBtn setTitle:@"I'm in" forState:UIControlStateNormal];
[testInBtn addTarget:self action:@selector(btnAction: forControlEvents:UIControlEventTouchUpInside];
[self addSubview:testInBtn];
}
return self;
}
/*
// Only override drawRect: if you perform custom drawing.
// An empty implementation adversely affects performance during animation.
- (void)drawRect:(CGRect)rect
{
// Drawing code
}
*/
- (void)btnAction:(UIButton*)sender
{
NSLog(@"HI, you tap button %@", [sender titleForState:UIControlStateNormal]);
}
@end
在程序的ViewController中添加如下測試代碼:
代碼如下:
SvTestClipSubviewEvent *testClipSubView = [[SvTestClipSubviewEvent alloc]initWithFrame:CGRectMake(100, 100, 150, 150)];
[self.view addSubview:testClipSubView];
[testClipSubView release];
運行可以看到如下界面:

獲取subview
通常我們在view層級裡面對subView的操作可以通過兩種方式:1、保留一個subview的引用,然後在類中通過該引用對該subview進行操作,但是要注意在適當的位置添加內存維護的代碼,退出前手動釋放。2、設置subview的Tag,讓後在要使用的時候,通過viewWithTag獲取到相應的subview,這種方法比較簡潔,也不用自己去維護內存。
ViewWithTag: 通常采用深度遍歷優先的算法,返回第一個tag和給定Tag相等的subview。這就導致了一個當一個view的多個subview的tag相同的時候,我們通過該方法得到的view可能並不是自己想要的。
下面通過一個小例子驗證一下,代碼如下:
代碼如下:
//
// SvTestViewTag.h
// SvUIViewSample
//
// Created by maple on 3/18/12.
// Copyright (c) 2012 smileEvday. All rights reserved.
//
// view根據Tag獲取subView的時候執行的是深度優先遍歷的算法
// 返回第一個Tag和請求tag相等的子View
// 從subViews中查找,最下層的優先找到
#import <UIKit/UIKit.h>
@interface SvTestViewWithTag : UIView
@end

例子中每個subview都是一個UILabel,而且設置了相應的內容。按鈕的響應函數的實現思路:首先隱藏所有類型為UILabel的subview(排除UIButton,因為button需要一直顯示),然後根據指定的Tag獲取到相應的subview,該subview及其superView的hidden屬性為NO。這樣就可以保證點擊按鈕的時候只顯示的是第一個tag和指定tag相等的subview。
為了驗證viewWithTag獲取subview的原理:
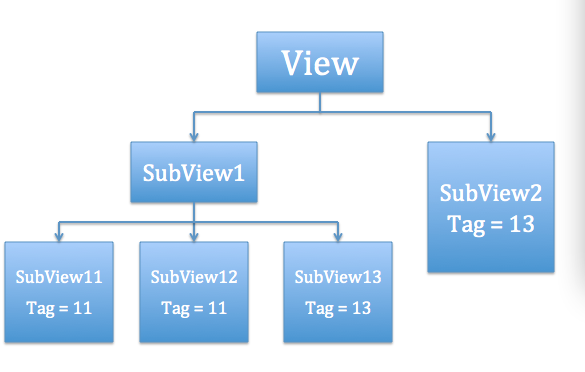
首先我在subview1中添加了兩個tag都為11的subview11和subview12。 運行程序可以,當我們點擊"Show Tag 11"按鈕的時候屏幕上將顯示“SubView11”,而非“SubView12”。同時不管你點擊幾次該按鈕,始終只顯示“SubView11”。這樣可以看出來同一層級中獲取subview時候查找順序為index從小到大的原則,即位於相對下層的將首先被找到。
其次我還在subview1中添加了tag均為13的subview13,同時向view中添加了tag也為13的subview2,運行程序點擊“Show Tag 13”按鈕,屏幕上將會顯示“SubView13”,而非“SubView2”。這可以驗證viewWithTag在搜索的時候遵循深度優先遍歷的原則,即會首先查找最下層的view並遞歸查詢其subview。
綜上兩點我們可以看出來viewWithTag獲取subview的基本原則,即遵循深度優先,下層優先兩個原則。


