ios開發之UIButton左邊圖片,圖片後面緊跟文字效果
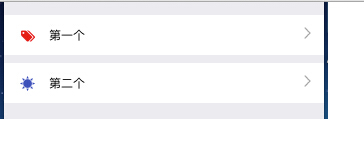
在使用UIButton的時候,需要實現UIButton左邊圖片,圖片後面緊跟文字效果比較麻煩,簡單實現方法具體代碼如下:
- (void)viewDidLoad {
[super viewDidLoad];
self.view.backgroundColor = RGB(235, 235, 240);
UIButton *oneButton = [[UIButton alloc] initWithFrame:CGRectMake(0, kHeaderHeight + 8, kScreenWidth, 40)];
[oneButton setImage:[UIImage imageNamed:@"icon_party_knowledge_rights_obligations"] forState:UIControlStateNormal];
[oneButton setTitle:@"第一個" forState:UIControlStateNormal];
oneButton.titleLabel.font = FONT(12);
[oneButton setTitleColor:[UIColor blackColor] forState:UIControlStateNormal];
[oneButton setImageEdgeInsets:UIEdgeInsetsMake(2, 8, 0, kScreenWidth - 50)];
[oneButton setTitleEdgeInsets:UIEdgeInsetsMake(0, 0, 0, kScreenWidth - 100)];
oneButton.backgroundColor = [UIColor whiteColor];
[oneButton addTarget:self action:@selector(oneButtonAction:) forControlEvents:UIControlEventTouchUpInside];
[self.view addSubview:oneButton];
UIButton *twoButton = [[UIButton alloc] initWithFrame:CGRectMake(0, oneButton.maxY + 8, kScreenWidth, 40)];
[twoButton setImage:[UIImage imageNamed:@"icon_party_knowledge_dues_collection_standard"] forState:UIControlStateNormal];
[twoButton setTitle:@"第二個" forState:UIControlStateNormal];
twoButton.titleLabel.font = FONT(12);
[twoButton setTitleColor:[UIColor blackColor] forState:UIControlStateNormal];
[twoButton setImageEdgeInsets:UIEdgeInsetsMake(2, 8, 0, kScreenWidth - 50)];
[twoButton setTitleEdgeInsets:UIEdgeInsetsMake(0, 0, 0, kScreenWidth - 100)];
twoButton.backgroundColor = [UIColor whiteColor];
[twoButton addTarget:self action:@selector(twoButtonAction:) forControlEvents:UIControlEventTouchUpInside];
[self.view addSubview:twoButton];
//右箭頭
for (int i = 0; i < 2; i++) {
UIImageView *rightImgView = [[UIImageView alloc] initWithFrame:CGRectMake(kScreenWidth - 20, kHeaderHeight + 20 + i * 48, 7, 12)];
rightImgView.image = [UIImage imageNamed:@"icon_right"];
[self.view addSubview:rightImgView];
}
}
效果如下所示


