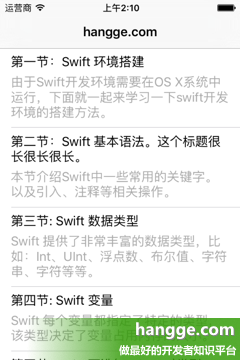
Swift中tableView單元格高度自適應的例子
2,StoryBoard設置
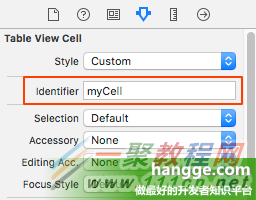
(1)將單元格 cell 的 identifier 設置成“myCell”
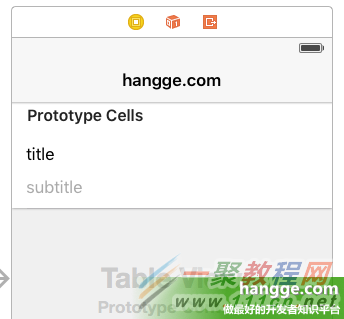
 (2)從對象庫中拖入2個 Label 控件到 cell 中,分別用於顯示標題和內容。
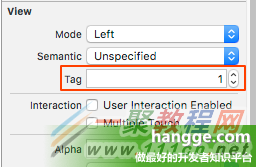
 (3)並在 Attributes 面板中將兩個 Label 的 Tag 值分別設置為 1 和 2,供代碼中獲取標簽。
 (4)最後為了讓兩個 Label 標簽能自動增長,將其 Lines 屬性設置為 0。
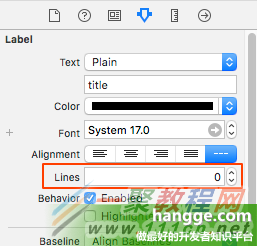 3,約束設置
除了單元格 Cell 需要使用 Auto Layout 約束,單元格內的標簽也要設置正確的約束,否則無法實現 Self Sizing Cells。
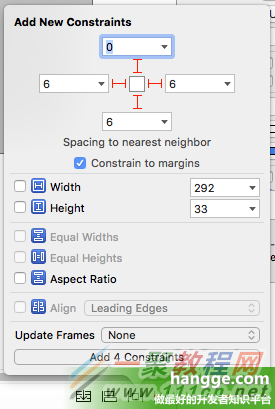
(1)第一個 Label(用於顯示標題)設置上下左右 4 個約束。
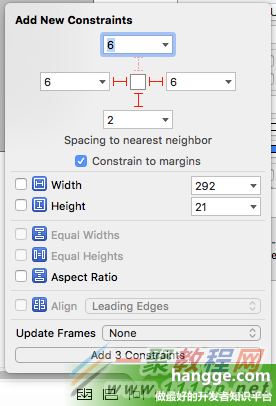
 (2)第二個 Label(用於顯示內容簡介)設置左右下 3 個約束。
例子
import UIKit
class ViewController: UIViewController , UITableViewDelegate, UITableViewDataSource {
var catalog = [[String]]()
@IBOutlet weak var tableView: UITableView!
override func viewDidLoad() {
super.viewDidLoad()
//初始化列表數據
catalog.append(["第一節:Swift 環境搭建",
"由於Swift開發環境需要在OS X系統中運行,下面就一起來學習一下swift開發環境的搭建方法。"])
catalog.append(["第二節:Swift 基本語法。這個標題很長很長很長。",
"本節介紹Swift中一些常用的關鍵字。以及引入、注釋等相關操作。"])
catalog.append(["第三節: Swift 數據類型",
"Swift 提供了非常豐富的數據類型,比如:Int、UInt、浮點數、布爾值、字符串、字符等等。"])
catalog.append(["第四節: Swift 變量",
"Swift 每個變量都指定了特定的類型,該類型決定了變量占用內存的大小。"])
catalog.append(["第五節: Swift 可選(Optionals)類型",
"Swift 的可選(Optional)類型,用於處理值缺失的情況。"])
//創建表視圖
self.tableView.delegate = self
self.tableView.dataSource = self
//設置estimatedRowHeight屬性默認值
self.tableView.estimatedRowHeight = 44.0;
//rowHeight屬性設置為UITableViewAutomaticDimension
self.tableView.rowHeight = UITableViewAutomaticDimension;
}
//在本例中,只有一個分區
func numberOfSectionsInTableView(tableView: UITableView) -> Int {
return 1;
}
//返回表格行數(也就是返回控件數)
func tableView(tableView: UITableView, numberOfRowsInSection section: Int) -> Int {
return self.catalog.count
}
//創建各單元顯示內容(創建參數indexPath指定的單元)
func tableView(tableView: UITableView, cellForRowAtIndexPath indexPath: NSIndexPath)
-> UITableViewCell
{
let cell = tableView.dequeueReusableCellWithIdentifier("myCell",
forIndexPath: indexPath) as UITableViewCell
//獲取對應的條目內容
let entry = catalog[indexPath.row]
let titleLabel = cell.viewWithTag(1) as! UILabel
let subtitleLabel = cell.viewWithTag(2) as! UILabel
titleLabel.text = entry[0]
subtitleLabel.text = entry[1]
return cell
}
override func didReceiveMemoryWarning() {
super.didReceiveMemoryWarning()
}
}
- iOS10告訴框架UserNotification懂得與運用
- iOS Webview自順應現實內容高度的4種辦法詳解
- iOS10 App適配權限 Push Notifications 字體Frame 碰到的成績
- iOS獲得以後裝備WiFi信息的辦法
- iPhone/iPad開辟經由過程LocalNotification完成iOS准時當地推送功效
- iOS推送之當地告訴UILocalNotification
- iOS開辟之widget完成詳解
- iOS10添加當地推送(Local Notification)實例
- iOS Remote Notification長途新聞推送處置
- IOS上iframe的轉動條掉效的處理方法
- Swift 同享文件操作小結(iOS 8 +)
- Swift 2.1 為 UIView 添加點擊事宜和點擊後果
- 在Swift中應用JSONModel 實例代碼
- 應用Swift代碼完成iOS手勢解鎖、指紋解鎖實例詳解
- 詳解iOS App中UISwitch開關組件的根本創立及應用辦法


