一行代碼,快速為UITableView創建Delegate和DataSource
只需一行代碼,快速為UITableView創建Delegate和DataSource。
簡介
CBTableViewDataSource是一個輕量級的用於快速創建UITableView的DataSource和Delegate的框架。它提供了一些方便的API,幫助用戶以一種快速和有邏輯的方式創建DataSource和Delegate。
最偷懶的使用方式如下:
[_tableView cb_makeSectionWithData:self.viewModel.data andCellClass:[CustomCell class]];
[size=1.75em]
//
 Native vision
//
 define a enum to split section
typedef
NS_ENUM(NSInteger,
SectionNameDefine) {
SECTION_ONE,
SECTION_TWO,
SECTION_THREE,
SECTION_FOUR,
//...
COUNT_OF_STORE_SECTION
};
//
 define identifier for section
#define
 IDENTIFIER_ONE @"IDENTIFIER_ONE"
#define
 IDENTIFIER_TWO @"IDENTIFIER_TWO"
#define
 IDENTIFIER_THREE @"IDENTIFIER_THREE"
#define
 IDENTIFIER_FOUR @"IDENTIFIER_FOUR"
//...
//
 register cell class for section
[self.tableView
registerClass:[OneCell class]
forCellWithReuseIdentifier:IDENTIFIER_ONE];
[self.tableView
registerClass:[TwoCell class]
forCellWithReuseIdentifier:IDENTIFIER_TWO];
[self.tableView
registerClass:[ThreeCell class]
forCellWithReuseIdentifier:IDENTIFIER_THREE];
[self.tableView
registerClass:[FourCell class]
forCellWithReuseIdentifier:IDENTIFIER_FOUR];
//
 implementation datasource protocol
-
(NSInteger)numberOfSectionsInTableView:(UITableView
*)tableView {
return
COUNT_OF_STORE_SECTION;
}
-
(NSInteger)tableView:(UITableView
*)tableView numberOfRowsInSection:(NSInteger)section
{
return
((NSArray*)self.data[section]).count;
}
-
 (UITableViewCell *)tableView:(UITableView *)tableView cellForRowAtIndexPath:(
NSIndexPath
*)indexPath {
NSUInteger
section = (NSUInteger)
indexPath.section;
NSUInteger
index = (NSUInteger)
indexPath.row;
switch(section)
{
case
SECTION_ONE:
//
 to do something
return
cell;
case
SECTION_TWO:
//
 to do something
return
cell;
case
SECTION_THREE:
//
 to do something
return
cell;
//...
}
return
cell;
}
//
 ...
可以看到,步驟多而繁瑣,維護十分困難。 而使用CBTableViewDataSource後
[_tableView
 cb_makeDataSource:^(CBTableViewDataSourceMaker * make) {
//
 section one
[make
 makeSection:^(CBTableViewSectionMaker *section) {
section.cell([OneCell
class])
.data(self.viewModel.oneDate)
.adapter(^(OneCell
 * cell,
id
data,NSUInteger
index){
[cell
 configure:data];
})
.autoHeight();
}];
//
 section two
[make
 makeSection:^(CBTableViewSectionMaker *section) {
section.cell([TwoCell
class])
.data(self.viewModel.twoData)
.adapter(^(FeedCell
 * cell,
id
data,NSUInteger
index){
[cell
 configure:data];
})
.autoHeight();
}];
//
 ... so on
}];
代碼變得簡練而富有層次感,更加符合人類的思維方式。
用法安裝使用cocoapods下載
pod
'CBTableViewDataSource'
導入包
[Objective-C]查看源文件復制代碼 ? 1#import
<CBTableViewDataSource/CBTableViewDataSource.h>
創建DataSource和Delegate
[Objective-C]查看源文件復制代碼 ? 01 02 03 04 05 06 07 08 09 10 11 12 13 14 15 16 17 18 19 20 21 22[_tableView
cb_makeDataSource:^(CBTableViewDataSourceMaker * make) {
//
 section one
[make
 makeSection:^(CBTableViewSectionMaker *section) {
section.cell([OneCell
class])
.data(self.viewModel.oneDate)
.adapter(^(OneCell
 * cell,
id
data,NSUInteger
index){
[cell
 configure:data];
})
.autoHeight();
}];
//
 section two
[make
 makeSection:^(CBTableViewSectionMaker *section) {
section.cell([TwoCell
class])
.data(self.viewModel.twoData)
.adapter(^(FeedCell
 * cell,
id
data,NSUInteger
index){
[cell
 configure:data];
})
.autoHeight();
}];
//
 ... so on
}];
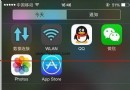
例子僅使用Data
[Objective-C]查看源文件復制代碼 ? 1_data
= @[ @{[color=#183691]@"text"[/color]:[color=#183691]@"Following"[/color],[color=#183691]@"value"[/color]:[color=#183691]@"45"[/color]},
@{[color=#183691]@"text"[/color]:[color=#183691]@"Follower"[/color],[color=#183691]@"value"[/color]:[color=#183691]@"10"[/color]},
@{[color=#183691]@"text"[/color]:[color=#183691]@"Star"[/color],[color=#183691]@"value"[/color]:[color=#183691]@"234"[/color]},
@{[color=#183691]@"text"[/color]:[color=#183691]@"Setting"[/color],[color=#183691]@"accessoryType"[/color]:@(UITableViewCellAccessoryDisclosureIndicator)},
@{[color=#183691]@"text"[/color]:[color=#183691]@"Share"[/color],[color=#183691]@"accessoryType"[/color]:@(UITableViewCellAccessoryDisclosureIndicator)}];
則顯示樣式如下:

具體詳情請下載該項目,查看DemoTwoViewController.h和DemoTwoViewController.m.
使用自定義Cell
[size=13.6px]-
([color=#a71d5d]void[/color])configure:([color=#086b3]NSDictionary[/color]
*)row index:([color=#086b3]NSNumber[/color]
* )index { [color=#a71d5d]if[/color]
(row[[color=#183691]@"avatar"[/color]])
{ [[color=#ed6a43]self[/color].avatarView
[color=#086b3]setImage:[/color][UIImage [color=#086b3]imageNamed:[/color]row[[color=#183691]@"avatar"[/color]]]];
} [color=#a71d5d]else[/color]
{ [[color=#ed6a43]self[/color].avatarView
[color=#086b3]setImage:[/color][color=#086b3]nil[/color]];
} [[color=#ed6a43]self[/color].nameLabel
[color=#086b3]setText:[/color]row[[color=#183691]@"name"[/color]]];
[[color=#ed6a43]self[/color].titleLabel
[color=#086b3]setText:[/color]row[[color=#183691]@"title"[/color]]];
[[color=#ed6a43]self[/color].detailLabel
[color=#086b3]setText:[/color]row[[color=#183691]@"detail"[/color]]];
self.[color=#333333]circleView[/color].[color=#333333]hidden[/color]
= row[[color=#183691]@"unread"[/color]]
== [color=#086b3]nil[/color];
[color=#a71d5d]if[/color]([[color=#086b3]index[/color]
[color=#086b3]intValue[/color]] &[color=#086b3]1[/color]) { self.[color=#333333]contentView[/color].[color=#333333]backgroundColor[/color]
= [UIColor [color=#086b3]colorWithRed:[/color][color=#086b3]0.95[/color] [color=#086b3]green:[/color][color=#086b3]0.96[/color] [color=#086b3]blue:[/color][color=#086b3]0.96[/color] [color=#086b3]alpha:[/color][color=#086b3]1.00[/color]]; } [color=#a71d5d]else[/color]
{ self.[color=#333333]contentView[/color].[color=#333333]backgroundColor[/color]
= [UIColor [color=#086b3]whiteColor[/color]]; }}
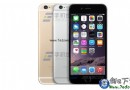
具體用法請查看項目中CustomCell.h和CustomCell.m文件 頁面樣式如下:

詳情請查看項目中DemoOneViewController.h和DemoOneViewController.m文件。
更靈活的設置
[tableView
[color=#086b3]cb_makeSection:[/color]^(CBTableViewSectionMaker * section) { section.[color=#086b3]data[/color](@[]); section.[color=#086b3]cell[/color]([CustomCell [color=#086b3]class[/color]]);
section.[color=#086b3]adapter[/color](^(CustomCell cell,[color=#a71d5d]id[/color]
row,[color=#a71d5d]NSUInteger[/color]
[color=#086b3]index[/color]) { cell.[color=#086b3]configure[/color](row); }); section.[color=#086b3]event[/color](^() { [color=#969896]//
do something[/color] }) [color=#969896]// other setting[/color]}];[mw_shl_code]
這裡展示的是單個section的情況。[b]CBTableViewSectionMaker對象支持設置以下屬性:[/b]注意,這些設置都是針對單獨的section設置的
[b]data[/b]設置UITableView所要展示的數據。參數是一個NSArray。
如下:
[mw_shl_code=objc,true]section.data(@[@(goods1),@(goods2),...]);
cell設置UITableView展示數據用的Cell Class。該Class會自動注冊identifier,無需手動注冊
如:
section.cell([CustomCell
[color=#086b3]class[/color]]);
adapter用於適配Cell和Data,如:
section.adapter(^(CustomCell
 * cell,
id
row,NSUInteger
index) { [cell configure:row]; //
...});
event設置點擊cell的響應事件。如:
section.event(^([color=#a71d5d]NSUInteger[/color]
index,[color=#a71d5d]id[/color]
row) { CustomViewController * controller = [CustomViewController [color=#086b3]new[/color]];
controller.[color=#333333]viewModel[/color].[color=#333333]data[/color] = row; [[color=#ed6a43]self[/color].navigationController
[color=#086b3]pushViewController:[/color]controller [color=#086b3]animated:[/color][color=#086b3]YES[/color]];});
height用於設置cell的高度。傳一個固定的值。該高度只對該section有效。如:
section.height([color=#086b3]100[/color]);
autoHeight設置自動動態計算cell高度。用於cell高度不一的場景。
section.autoHeight();
該屬性與height沖突,優先級是autoHeight > height。 也就是說當設置了autoHeight,則height失效,高度以autoHeight為准
headerTitle;設置section的headerTitle。用法如:
section.headerTitle([color=#183691]"title"[/color]);[mw_shl_code]
[b]footerTitle;[/b]設置section的footerTitle。用法同上。
[b]headerView;[/b]設置section的Header
 View。用法如下:
[mw_shl_code=objc,true]section.headerView(^(){
UIView * headerView = [UIView [color=#086b3]alloc[/color]]initWithFrame:[color=#086b3]CGRectMake[/color]([color=#086b3]0[/color],[color=#086b3]0[/color],[color=#086b3]320[/color],[color=#086b3]40[/color]); [color=#969896]//
...[/color] [color=#a71d5d]return[/color] headerView;})
該屬性與headerTitle沖突,當設置了headerView,以headerView為准。footerView;設置section的Footer View。用法同上 該屬性與footerTitle沖突,當設置了footerView,以footerView為准。
多個section的情況
[tableView
[color=#086b3]cb_makeDataSource:[/color]^(CBTableViewDataSourceMaker * make) { [make [color=#086b3]headerView:[/color]^{ [color=#a71d5d]return[/color]
[HeaderView [color=#086b3]new[/color]];
}]; [make [color=#086b3]makeSection:[/color] ^(CBTableViewSectionMaker * section) { section.[color=#086b3]data[/color](@[]); section.[color=#086b3]cell[/color](); section.[color=#086b3]adapter[/color](); section.[color=#086b3]event[/color]();
[color=#969896]//
... so on[/color] }]; [make [color=#086b3]makeSection:[/color] ^(CBTableViewSectionMaker * section) { section.[color=#086b3]data[/color](@[]); section.[color=#086b3]cell[/color](); section.[color=#086b3]adapter[/color]();
section.[color=#086b3]event[/color](); [color=#969896]// ... so on[/color] }]; [make [color=#086b3]makeSection:[/color] ^(CBTableViewSectionMaker * section) { section.[color=#086b3]data[/color](@[]); section.[color=#086b3]cell[/color]();
section.[color=#086b3]adapter[/color](); section.[color=#086b3]event[/color](); [color=#969896]// ... so on[/color] }]; [color=#969896]// .. so on[/color] [make [color=#086b3]footView:[/color]^{ [color=#a71d5d]return[/color] [FooterView
[color=#086b3]new[/color]]; }];}]
頁面樣式如下:

 具體的代碼請查看項目中DemoThreeViewController.h和DemoThreeViewController.m文件。CBTableViewDataSourceMaker支持設置以下屬性:注意這些屬性都是針對整個UITableView
makeSection用於為UITableView添加一個section。用法如下:
[tableView
 [color=#086b3]cb_makeDataSource:[/color]^(CBTableViewDataSourceMaker * make) { [make [color=#086b3]makeSection:[/color] ^(CBTableViewSectionMaker * section) { [color=#969896]
//
...[/color] }}]
height為整個UITableView的Cell設置默認高度。用法如下:
make.height([color=#086b3]100[/color]);
該屬性與CBTableViewSectionMaker設置的height和autoHeight沖突。優先級是autoHeight > height(section) > height(UITableView)
也就是說,當一個section設置了autoHeight,則以autoHeight為准,其他section未設置autoHeight,而設置了height(section),則以height(section)為准,如果兩者都沒有,則以height(UITableView)為准。height默認為40。
headerView設置UITableView的tableHeaderView,注意與section的headerView的區別,一個UITableView只有一個tableHeaderView。用法如下:
make.headerView(^(){
 UIView * headerView = [[UIView [color=#086b3]alloc[/color]]init]; [color=#969896]
//
...[/color] [color=#a71d5d]return[/color] headerView;});
footerView設置UITableView的tableFooterView,同上。
commitEditing設置UITableView的commitEditing代理方法,設置了該方法,則cell側滑可以出現刪除按鈕。 可以在剛方法設置當cell處於編輯狀態需要處理的事件。用法如下:
[make
[color=#086b3]commitEditing:[/color]^(UITableView * tableView, UITableViewCellEditingStyle * editingStyle, [color=#086b3]NSIndexPath[/color]
* indexPath) { [color=#969896]//
do somethings. [/color]}];
scrollViewDidScroll設置UITableView的scrollViewDidScroll代理方法,當UITableView滾動時會調用該方法。 可以使用該方法處理UITableView的滾動事件。
[make
 [color=#086b3]scrollViewDidScroll:[/color]^(UIScrollView * scrollView) { [color=#969896]
//
do somethings [/color]}];
鳴謝感謝您的使用和支持。歡迎issue和pull request,我會在第一時間內處理。
在這個框架中,我參考了許多大神們設計的框架。比如API的設計就參考了著名的AutoLayout框架Masonry。而在動態計算cell的高度上,則參考了@forkingdog的UITableView-FDTemplateLayoutCell的做法。
感謝他們帶給我的靈感。
代碼下載:
http://www.code4app.com/thread-8859-1-1.html
- 上一頁:cocoapods pod setup
- 下一頁:iOS開發集成微信支付