最好用的 iOS 快速布局UI庫
原文
NerdyUI
最好用的快速布局 UI 庫,適用於 iOS 8 及以上版本。
github: https://github.com/nerdycat/NerdyUI
序言
眾所周知,UI在一個App中所占的比重是很大的,如果能快速的布局UI,則會大大的提高App整體的開發效率,NerdyUI正是基於這個理由創建的。
NerdyUI使用非常緊湊的鏈式語法,提供一些常用但系統控件又缺失的功能,更為簡便的約束創建方式和更好理解的布局系統,勢必能大大減少您的代碼量和開發時間。
快速創建 NSString, UIFont, UIColor, UIImage 和常用的 structs
你可以用 Str() 來轉換大部分類型到NSString。同理,你可以用 Log() 來打印大部分的變量。
Str(100);                     //@"100"
Str(3.14);                    //@"3.14"
Str(@0.618);                  //@"0.618"
Str(view.frame);              //@"{{0, 0}, {100, 100}}"
Str(view.center);             //@"50, 50}"
Str(_cmd);                    //@"viewDidLoad"
Str(NSString.class);          //@"NSString"
Str("c string");              //@"c string"
Str(@"1 + 1 = %d", 1 + 1);    //@"1 + 1 = 2

Log(100);
Log(3.14);
Log(@0.618);
Log(view.frame);
...
Log(@"1 + 1 = %d", 1 + 1);

//拼接字符串
@"1".a(@"2").a(3).a(nil).a(4.0f).a(@5).a(@"%d", 6);    //@"123456"
你可以用 AttStr() 來創建NSAttributedString。
AttStr(@"hello, 101").match(@"[0-9]+").underline;
AttStr(@"A smile ", Img(@"smile"), @" !!");        //attributedString with image attachment
你可以用 Fnt() 來創建UIFont。
Fnt(15);                     //[UIFont systemFontOfSize:15]
Fnt(@15);                    //[UIFont boldSystemFontOfSize:15]
Fnt(@"body");                //UIFontTextStyleBody
Fnt(@"Helvetica,15");        //helvetica font with size 15
你可以用 Color() 來創建UIColor。
Color(@"red");                //[UIColor redColor]
Color(@"green,0.5");          //green color with 0.5 alpha
Color(@"0,0,255");            //blue color
Color(@"#0000FF");            //blue color
Color(@"#00F,0.5");           //blue color with 0.5 alpha
Color(@"random");             //random color
你可以用 Img() 來創建UIImage。
Img(@"imageName");            //[UIImage imageNamed:@"imageName"]
Img(@"#imageName");           //加上#號會返回一個可拉伸的圖片
Img(@"red");                  //返回一個 1x1 大小的紅色圖片
你可以用 XY(), WH(), XYWH(), Range(), Insets() 來創建CGPoint, CGSize, CGRect, NSRange, UIEdgeInsets。
CGPoint        p = XY(20, 20);
CGSize         s = WH(50, 50);

CGRect        f1 = XYWH(20, 20, 50, 50);
CGRect        f2 = XYWH(f1.origin, f1.size);
CGRect        f3 = XYWH(f2.origin, 50, 50);
CGRect        f4 = XYWH(20, 20, f3.size);

NSRange        r = Range(10, 20);

UIEdgeInsets i1 = Insets(10);                //{10, 10, 10, 10}
UIEdgeInsets i2 = Insets(10, 20);            //{10, 20, 10, 20}
UIEdgeInsets i3 = Insets(10, 20, 30);        //{10, 20, 30, 20}
UIEdgeInsets i4 = Insets(10, 20, 30, 40);    //{10, 20, 30, 40}
使用這些宏可以簡化一些常見類型的創建過程,更重要的是你可以用同樣的方式來設置視圖的屬性值,稍後你就會明白是什麼意思。
快速訪問frame屬性和屏幕大小
someView.x = 10;
someView.y = someView.x;
someView.xy = XY(10, 10);
someView.w = 50;                //width
someView.h = someView.w;        //height
someView.wh = WH(50, 50);
someView.frame = XYWH(10, 10, 50, 50);

someView.cx = 25;
someView.cy = someView.cx;
someView.center = XY(25, 25);

someView.maxX = 60;
someView.maxY = someView.maxX;
someView.maxXY = XY(60, 60);

//Screen只是 [UIScreen mainScreen] 的宏定義
someView.wh = WH(Screen.width, Screen.height);
我猜大部分人都有類似的擴展吧
快速的創建UI控件
NerdyUI 使用鏈式語法來快速的創建和設置 UI 控件。
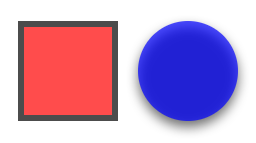
UIView *view1 = View.xywh(20, 30, 50, 50).bgColor(@"red").opacity(0.7).border(3, @"3d3d3d");
UIView *view2 = View.xy(80, 30).wh(view1.wh).bgColor(@"blue,0.7").cornerRadius(25).shadow(0.8).onClick(^{
    Log(@"view2");
});
view
UIImageView *moose = ImageView.img(@"moose").x(20).y(100).shadow(0.6, 2, -3, -1);
UILabel *quiz = Label.str(@"%d+%d=?", 1, 1).fnt(@17).color(@"66,66,66").fitSize.x(moose.maxX + 10).cy(moose.cy);

moose
//如果後續不需要再訪問 title 的屬性,定義為 id 可以減少一些代碼量
id title = AttStr(@"TAP ME").fnt(15).underline.range(0, 3).fnt(@18).color(@"random");
UIButton *button1 = Button.str(title).insets(5, 10).fitSize.border(1).xy(20, 150).onClick(^(UIButton *btn) {
    //Exp() 可在任何位置執行任意代碼
    quiz.text = Str(@"%d+%d=%d", 1, 1, Exp(btn.tag += 1));
    [quiz sizeToFit];
});

UIButton *button2 = Button.str(@"HAT").highColor(@"brown").img(@"hat").gap(8);
button2.xywh(button1.frame).x(button1.maxX + 10).cornerRadius(5).bgImg(@"blue,0.5").highBgImg(@"orange");
//.highBgImg() 可以用來設置 UIButton 的 highlightedBackgroundColor,這是一個非常有用的功能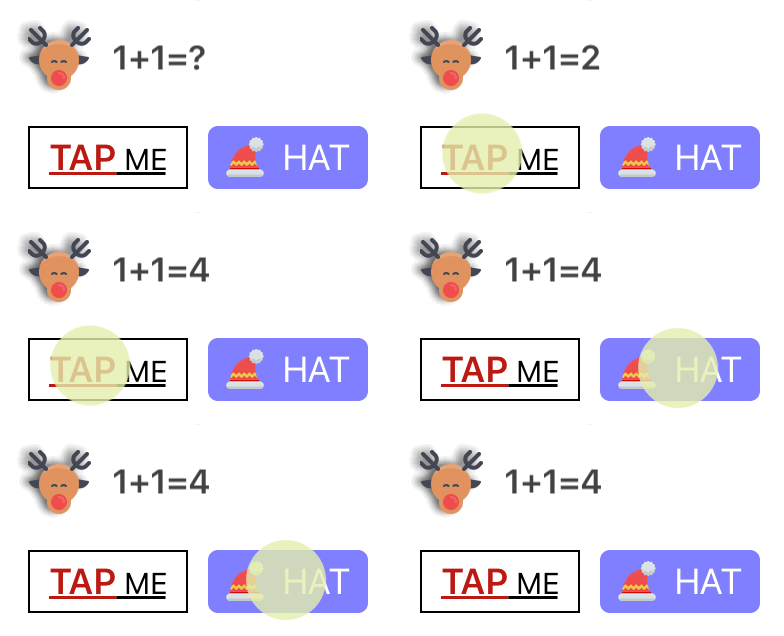
button
id pinField = TextField.x(button1.x).y(button1.maxY + 15).wh(170, 30).onChange(^(NSString *text) {
    //這裡的 self 已經自動做了 weakify 處理, 不用擔心會有引用循環
    [(id)[self.view viewWithTag:101] setText:text];
}).numberKeyboard.maxLength(4).hint(@"pin code").fnt(15).roundStyle;

id textView = TextView.xywh(20, 240, 170, 100).border(1).insets(8).hint(@"placeholder").fnt([pinField font]).tg(101);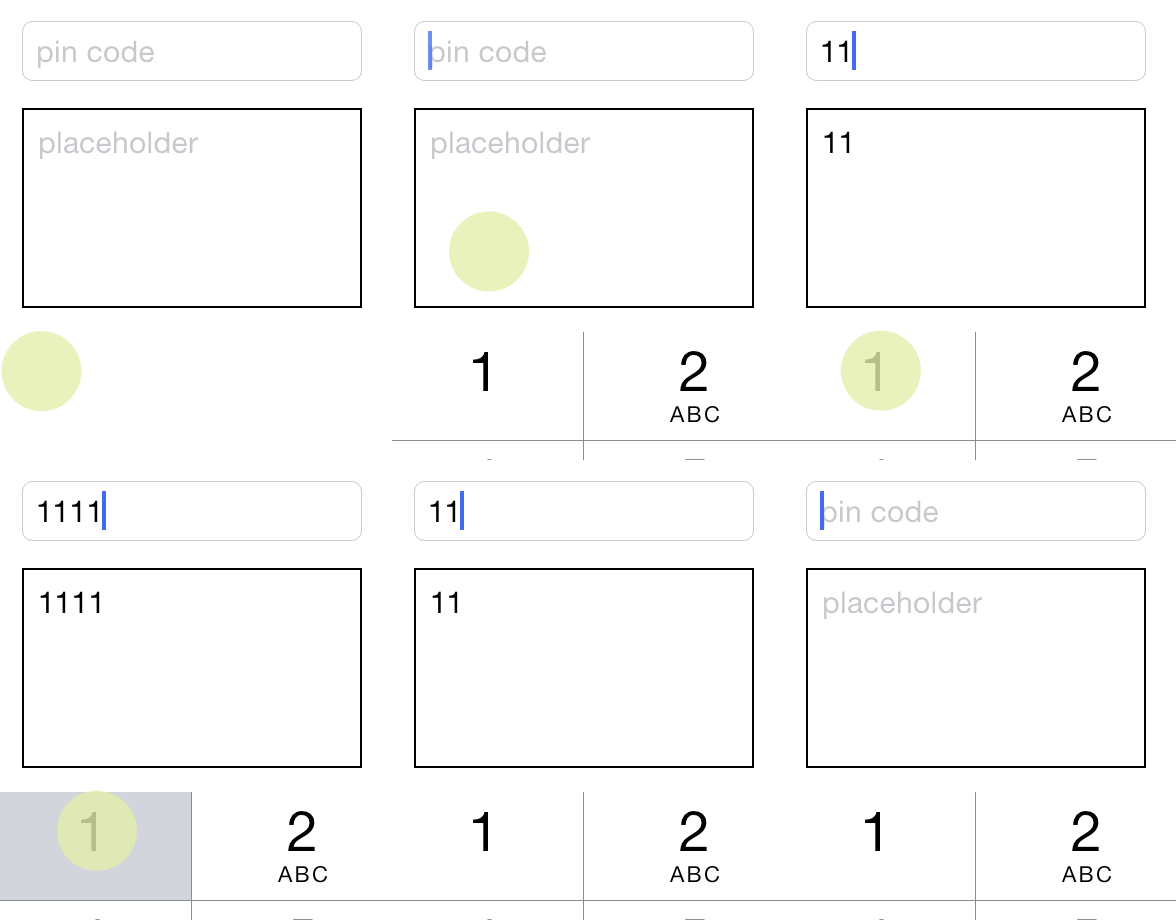
input
正如你所看到的,大部分鏈式屬性還是比較簡單明了的。有一些屬性非常的靈活,可以接受不同類型的參數。順便說一下,View 只是 [UIView new] 的宏定義,其他的也一樣(就是類名去掉 UI )。
你可以用 .opacity() 和 .tg() 來設置視圖的 alpha 和 tag 值.
你可以用 .x(), .y(), .xy(), .w(), .h(), .wh(), .xywh(), .cx(), .cy(), .cxy(), .maxX(), .maxY(), .maxXY() 等來設置視圖的大小和位置。
你可以用 .touchEnabled, .touchDisabled, .invisible 來設置視圖是否可點和是否可見。
你可以用 .flexibleLeft, .flexibleRight, .flexibleTop, .flexibleBottom, .flexibleLR, .flexibleTB, .flexibleLRTB, .flexibleWidth, .flexibleHeight, .flexibleWH 等來設置autoresizingMask。
你可以用 .fnt() 來設置字體,它能接受的參數跟 Fnt() 一樣。
你可以用 .str() 來設置 text 或者 attribtedText, 它能接受的參數跟 Str() 一樣。
你可以用 .img(), .highImg(), .bgImg() 和 .highBgImg() 來設置 image, highlightedImage, backgroundImage 和 highlightedBackgroundImage。 他們能接受的參數跟 Img() 一樣。
你可以用 .tint(), .color(), .bgColor(), .highColor() 來設置 tintColor, textColor, backgroundColor 和 highlightedTextColor, 它們能接受的參數跟 Color() 一樣。
你可以用 .border(), .cornerRadius() 和 .shadow() 來設置邊框和陰影。
你可以用 .fitWidth, .fitHeight 和 .fitSize 來改變視圖的大小,使它的大小剛好能包含視圖的內容。
你可以用 .onClick() 來給任何視圖添加一個單擊事件。
至於 UITextField 和 UITextView, 你可以用 .hint() 來設置 placeholder, .maxLength() 來限制輸入文本的長度, .onChange() 來添加一個文本改變事件。
如果是 UIButton, UITextField 和 UITextView, 你還可以使用 .insets() 來添加一些padding。
這裡列出的只是一部分屬性,你可以到對應的擴展頭文件裡看完整的屬性列表。
UILabel擴展
以前如果想給UILabel添加行間距,必須使用NSAttributedString。現在你只需要使用 .lineGap() 設置一下就行了。
另一個很有的擴展功能是鏈接,你只需要使用 AttStr() 來創建一個NSAttributedString, 並標記其中一部分為 .linkForLabel,那麼標記的那部分自動就會變成鏈接。然後你只需要用 .onLink() 來給UILabel 添加一個鏈接點擊事件就行了。
id str = @"Lorem ipsum 20 dolor sit er elit lamet, consectetaur cillium #adipisicing pecu, sed do #eiusmod tempor incididunt ut labore et 3.14 dolore magna aliqua.";
id attStr = AttStr(str).range(0, 5).match(@"lamet").match(@"[0-9.]+").matchHashTag.linkForLabel;

Label.str(attStr).multiline.lineGap(10).xywh(self.view.bounds).onLink(^(NSString *text) {
    Log(text);
}).addTo(self.view);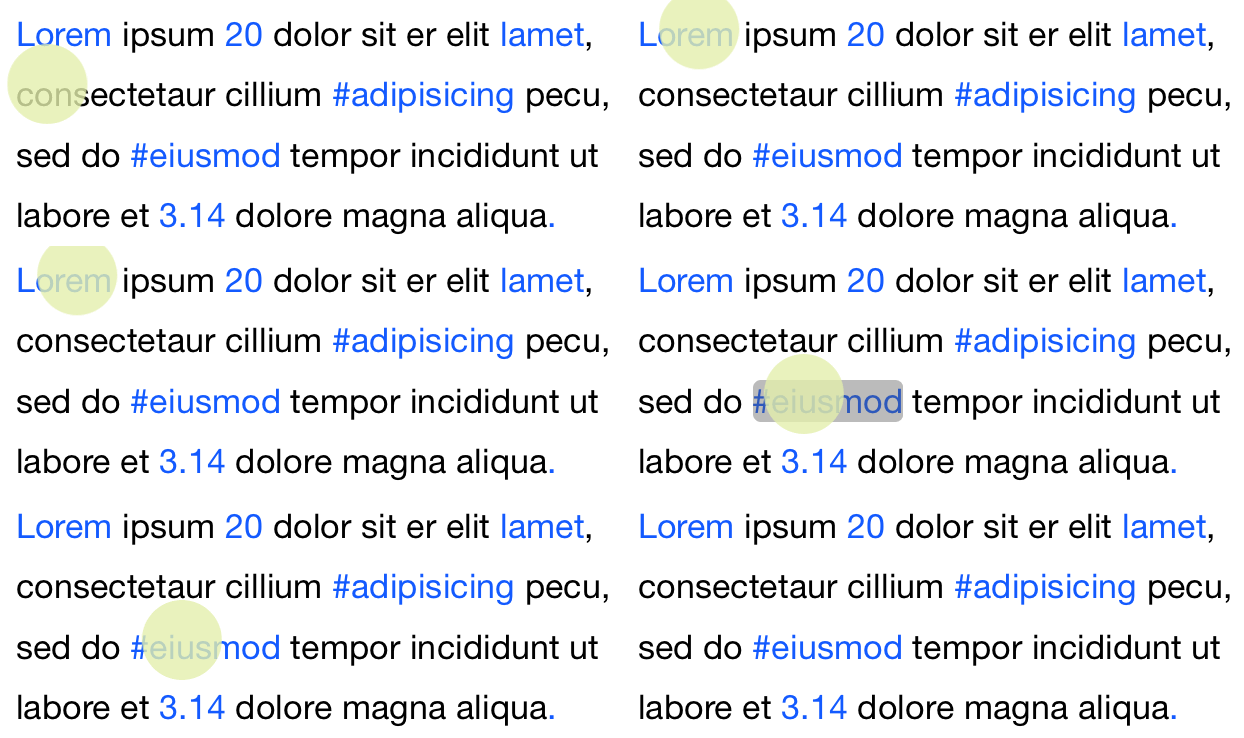
label
快速的創建約束
有的時候手動修改 frame 會顯得很麻煩。NerdyUI 提供一些鏈式屬性和一個跟 Masonry 類似的方式來創建約束。
你可以用 .fixWidth(), .fixHeight(), .fixWH() 來添加寬高約束。
你可以用 .embedIn() 來把一個視圖嵌入到它的父視圖裡, 這會添加上下左右的約束。
你可以用 .horHugging(), .horResistance(), .verHugging(), .verResistance(), .lowHugging, .lowResistance, .highHugging 和 .highResistance 來設置 contentHuggingPriority 和 contentCompressionResistancePriority。當有多個視圖在 StackView 裡時,可以用這些屬性來設置允許哪些視圖可以拉伸,哪些視圖不可以拉伸。
對於更復雜的約束, 你可以用 .makeCons(), .remakeCons() 和 .updateCons() 來設置約束, 就像Masonry一樣。
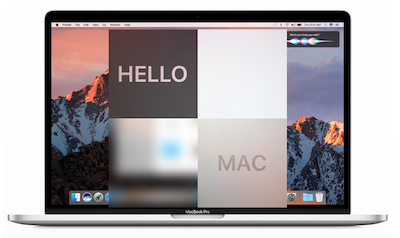
ImageView.img(@"macbook").embedIn(self.view).centerMode;

id hello = Label.str(@"HELLO").fnt(@20).wh(80, 80).centerAlignment;
id mac = Label.str(@"MAC").fnt(@20).wh(80, 80).centerAlignment;

//使用 .makeCons() 之前必須把當前視圖加到父視圖裡,這裡使用 .addTo() 來執行此操作
EffectView.darkBlur.fixWH(80, 80).addTo(self.view).makeCons(^{
    //在 .makeCons() 裡你可以直接使用 make 變量,不需要顯示的定義它
    make.right.equal.superview.centerX.constants(0);
    make.bottom.equal.superview.centerY.constants(0);
}).addVibrancyChild(hello).tg(101);

EffectView.extraLightBlur.fixWidth(80).fixHeight(80).addTo(self.view).makeCons(^{
    make.left.bottom.equal.view(self.view).center.constants(0, 0);
});

EffectView.lightBlur.addTo(self.view).makeCons(^{
    make.size.equal.constants(80, 80).And.center.equal.constants(40, 40);
}).addVibrancyChild(mac);

id subImg = Img(@"macbook").subImg(95, 110, 80, 80).blur(10);
ImageView.img(subImg).addTo(self.view).makeCons(^{
    make.centerX.top.equal.view([self.view viewWithTag:101]).centerX.bottom.constants(0);
});
constraints
快速布局
手動給每個視圖添加約束稍微想一下就知道會很麻煩。幸好大部分的 UI 可以用 HorStack() 和 VerStack() 來實現。使用這兩個簡易版 StackView,加上上面介紹的那些屬性,很多時候你根本不需要手動顯示的創建任何約束。
_indexLabel = Label.fnt(17).color(@"darkGray").fixWidth(44).centerAlignment;
_iconView = ImageView.fixWH(64, 64).cornerRadius(10).border(Screen.onePixel, @"#CCCCCC");

//用 .preferWidth() 來設置 preferredMaxLayoutWidth,有助於提高性能
_titleLabel = Label.fnt(15).lines(2).preferWidth(Screen.width - 205);
_categoryLabel = Label.fnt(13).color(@"darkGray");

_ratingLabel = Label.fnt(11).color(@"orange");
_countLabel = Label.fnt(11).color(@"darkGray");

_actionButton = Button.fnt(@15).color(@"#0065F7").border(1, @"#0065F7").cornerRadius(3);
_actionButton.highColor(@"white").highBgImg(@"#0065F7").insets(5, 10);
_iapLabel = Label.fnt(9).color(@"darkGray").lines(2).str(@"In-App\nPurchases").centerAlignment;

//.gap() 會在每一個StackView Item 之間添加間隙
id ratingStack = HorStack(_ratingLabel, _countLabel).gap(5);
id midStack = VerStack(_titleLabel, _categoryLabel, ratingStack).gap(4);
id actionStack = VerStack(_actionButton, _iapLabel).gap(4).centerAlignment;

HorStack(
         _indexLabel,
         _iconView,
         @10,           //使用NSNumber可在兩個 Item 之間添加間隙
         midStack,
         NERSpring,     //NERSpring是一個特殊的變量,它相當於一個彈簧,保證actionStack始終停留在最右邊
         actionStack
).embedIn(self.contentView, 10, 0, 10, 15);

appcell
這裡我們模仿 AppStore 排行榜來創建一個類似的 Cell 。可以看出 HorStack 和 VerStack 的用法非常的簡單。你只需要找出最小的 Stack ,然後把它嵌到上一層的 Stack 裡,重復這個過程直到最外層的 Stack 用 embedIn 來添加到它的父視圖裡。最後你還可以給這些視圖加上一些間隙(gap)。
使用 "Debug View Hierarchy" 可以看到這些視圖是怎麼嵌套再一起的。

appcell2
一旦布局完,剩下的就是設置要顯示的內容,其他的都不需要再動了。
輕量級 Style
大部分鏈式屬性都可以設置為 style。
//全局Style
Style(@"h1").color(@"#333333").fnt(17);
Style(@"button").fixHeight(30).insets(0, 10).cornerRadius(5);
//局部Style
id actionButtonStyle = Style().styles(@"button h1").bgImg(@"red").highBgImg(@"blue").highColor(@"white");
這裡我們創建了兩個全局 Style 和一個局部 Style。局部 Style 使用 .styles() 來繼承那兩個全局 Style。創建完之後,全局 Style 可以使用 Style 名來全局引用,局部 Style 只能使用變量名來引用。所有的 UIView(及其子類) 和 NSAttributedString 都可以引用這些 Style。
id foo = Label.styles(@"h1").str(@"hello world");
id bar = Button.styles(actionButtonStyle).str(@"Send Email");
其他
你可以用 PlainTV 和 GroupTV 來創建靜態的 UITableView,比如說設置頁面。
PlainTV(Row.str(@"Row1"), Row.str(@"Row2"), Row.str(@"Row3")).embedIn(self.view);
你可以用 Alert 和 ActionSheet 來創建並顯示 UIAlert 和 UIActionSheet。
Alert.title(@"Title").message(@"Message").action(@"OK",^{}), cancel(@"Cancel").show();
ActionSheet.title(@"Title").message(@"Message").action(@"OK",^{}), cancel(@"Cancel").show();
對於NSArray, 我們提供了 .forEach(), .map(), .filter() 和 .reduce() 等這幾個鏈式屬性。
id result = @[@1, @2, @3, @4].map(^(NSInteger n) {
    return n * 2;
}).filter(^(NSInteger n) {
    return n < 5;
}).reduce(^(NSInteger ac, NSInteger n) {
    return ac + n;
});
注意
在鏈式屬性裡直接使用中文字符串常量會導致後續的自動補全提示失效,一個解決方案是把中文字符串單獨拿出來定義為一個變量,或者把 .str(), .hint() 等 放在最後面。
當你使用 .onClick(), .onLink(), .onChange() 和 .onFinish() 時, 裡面的 self 已經做了 weakify 處理了,所以你不需要擔心會有引用循環問題。有時候你可能需要對它做個強引用來保證它不會被提前釋放。這幾個屬性除了可以傳一個 block 之外,還可以傳一個方法名來作為回調方法。
NerdyUI 使用了非常多的宏定義和類別方法,而且為了方便使用沒添加任何前綴。雖然所有的名字都是經過精心挑選的,不排除有跟您自己代碼或其他第三方庫沖突的可能,請注意。
用CocoaPods安裝
pod "NerdyUI"
- 上一頁:iOS內存探秘
- 下一頁:iOS超全開源框架、項目和學習資料匯總
- 分享一些iOS開辟適用的小技能
- IOS 運用內顯示 AppStore 某個運用的概況
- iOS開辟中經常使用的各類動畫、頁面切面後果
- 詳解iOS運用的設計形式開辟中Mediator中介者形式的應用
- iOS App設計形式開辟之適配器形式應用的實戰練習訓練
- 實例講授iOS運用的設計形式開辟中的Visitor拜訪者形式
- IOS框架Spring經常使用的動畫後果
- iOS開辟中應用Picker View完成一個點菜運用的UI示例
- 解析iOS運用的UI開辟中懶加載和xib的簡略應用辦法
- 懂得iOS多線程運用的開辟和線程的創立辦法
- 一個iOS上的秒表小運用的完成辦法分享
- iOS開辟中CALayer應用的根本教程
- 僅需幾行代碼完成便利易用的狀況欄指導器
- iOS開發中運用Picker View完成一個點菜使用的UI示例
- IOS 運用XIB制造Storyboard運用的自定義控件


