幾句代碼快速集成自定義轉場效果+ 全手勢驅動
寫在前面
在簡書寫完第一篇的自定義轉場文章後,已經很久沒有碰過轉場了,畢竟在公司,功能實現才是最重要的,這些轉場的動效,只能是點睛之筆,不太容易被重視,不過我的第一篇文章還是很多人的喜歡和討論,很多人還提出些建議,非常感謝大家,這是我第一篇文章的地址自定義轉場動畫,裡面包含了一些轉場的基礎知識,這篇文章我就不再討論這些基礎知識了。
為什麼會有這第二篇文章,主要原因有如下幾點:
1、能不能更簡單?當我很久沒有使用轉場的時候,再次來使用它,感覺還是比較煩瑣,有一大堆記不住的長長的代理方法,都要去copy,長長的代理方法也把控制器弄得有點亂,雖然蘋果已經將整個過程充分解耦了,我在想,要是能簡單的一兩句話就能集成轉場效果多好,或者通過繼承和復寫一兩個方法就能輕松實現自己的轉場效果,無需關注轉場邏輯,只需關注動畫邏輯
2、閃爍和生硬?在第一篇文章中有人提到的部分的bug,比如小圓點擴散效果,如果手勢在中途取消,不會有取消動畫,非常生硬,而且會有閃爍的bug,我在想能不能解決這兩個問題,強迫症接受不了o(╯□╰)o,我現在找到了一個比較好的方式來解決問題,原理和對比圖會在後面給出
3、能不能多添加一些效果?所以我把自己寫的效果封裝,再參照網絡一些效果,總過添加了將近20個效果
4、手勢萬歲!任何效果我都想能夠手勢驅動
效果圖(圖比較多,請手機用戶慎重,可下載demo真機運行效果更好)
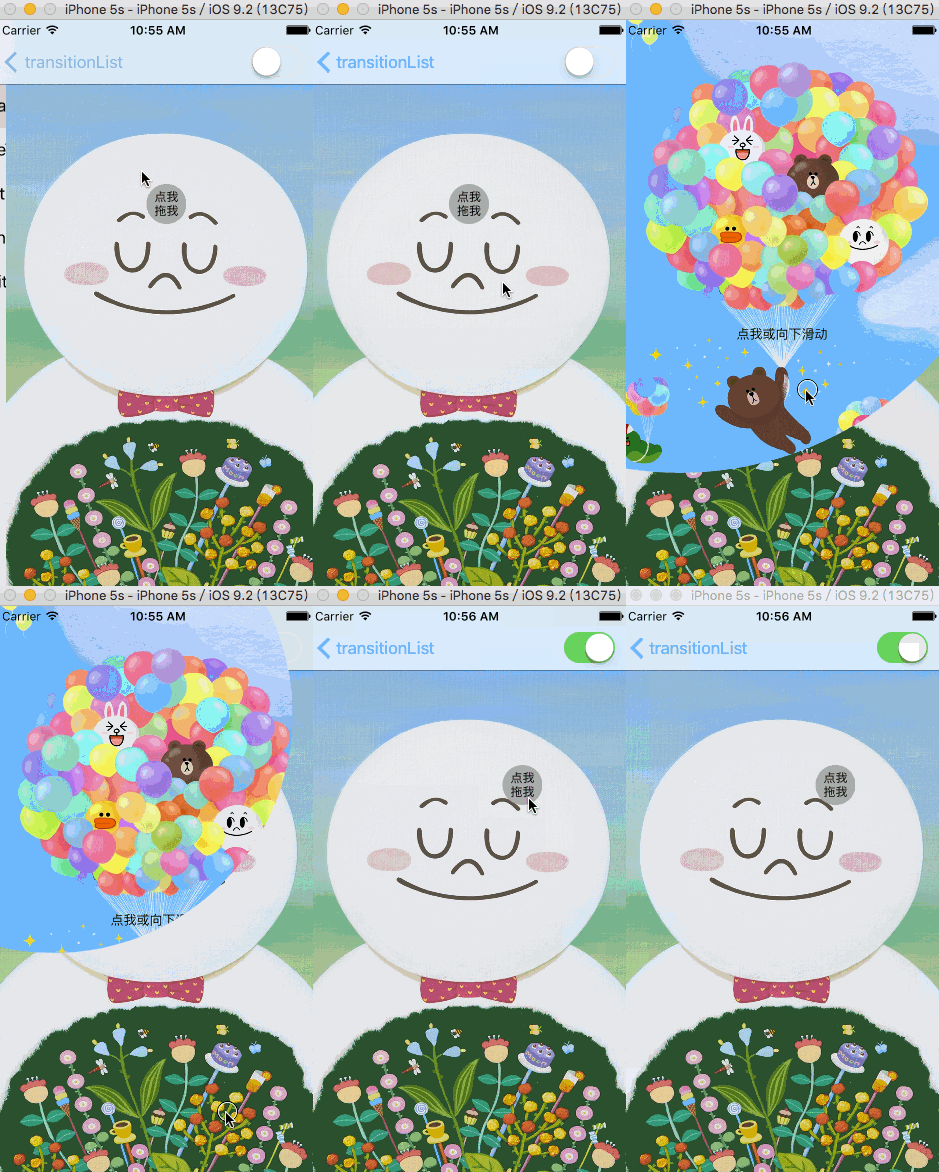
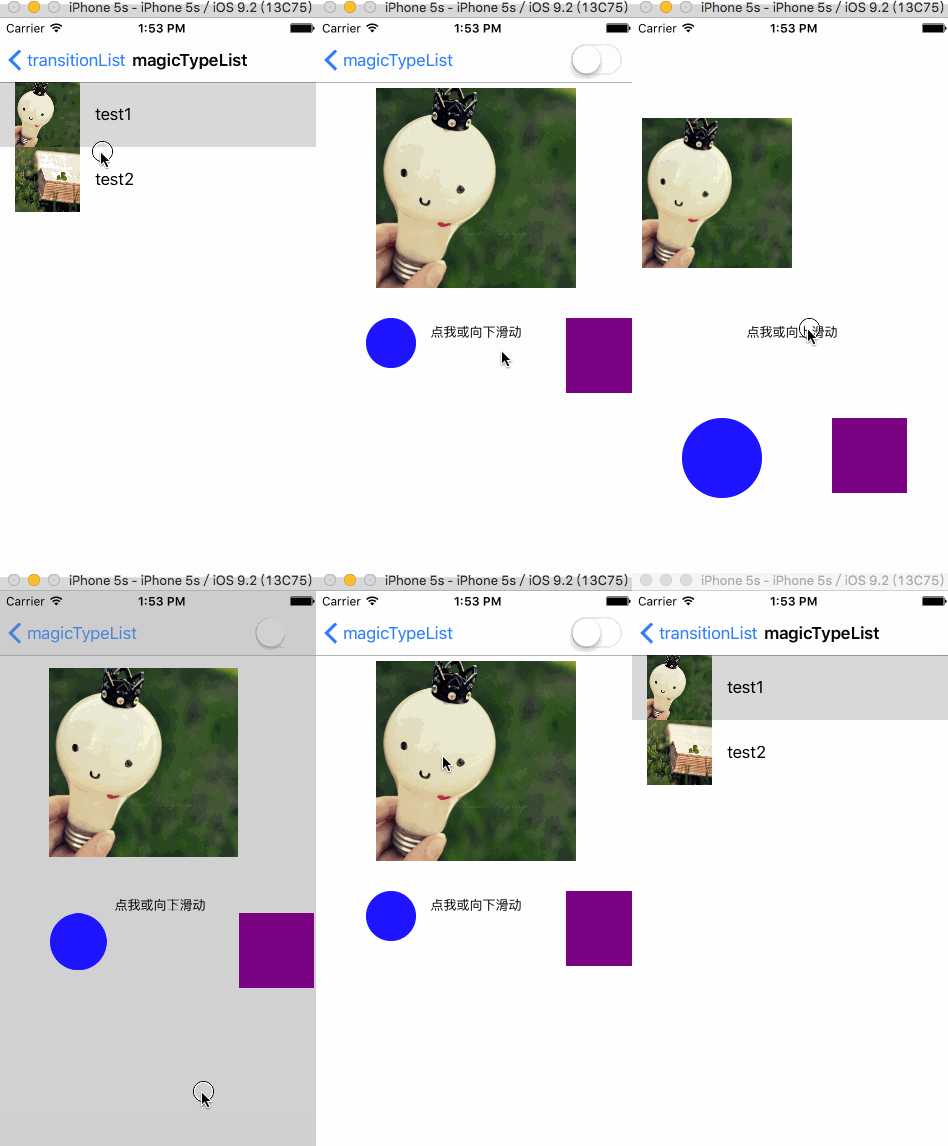
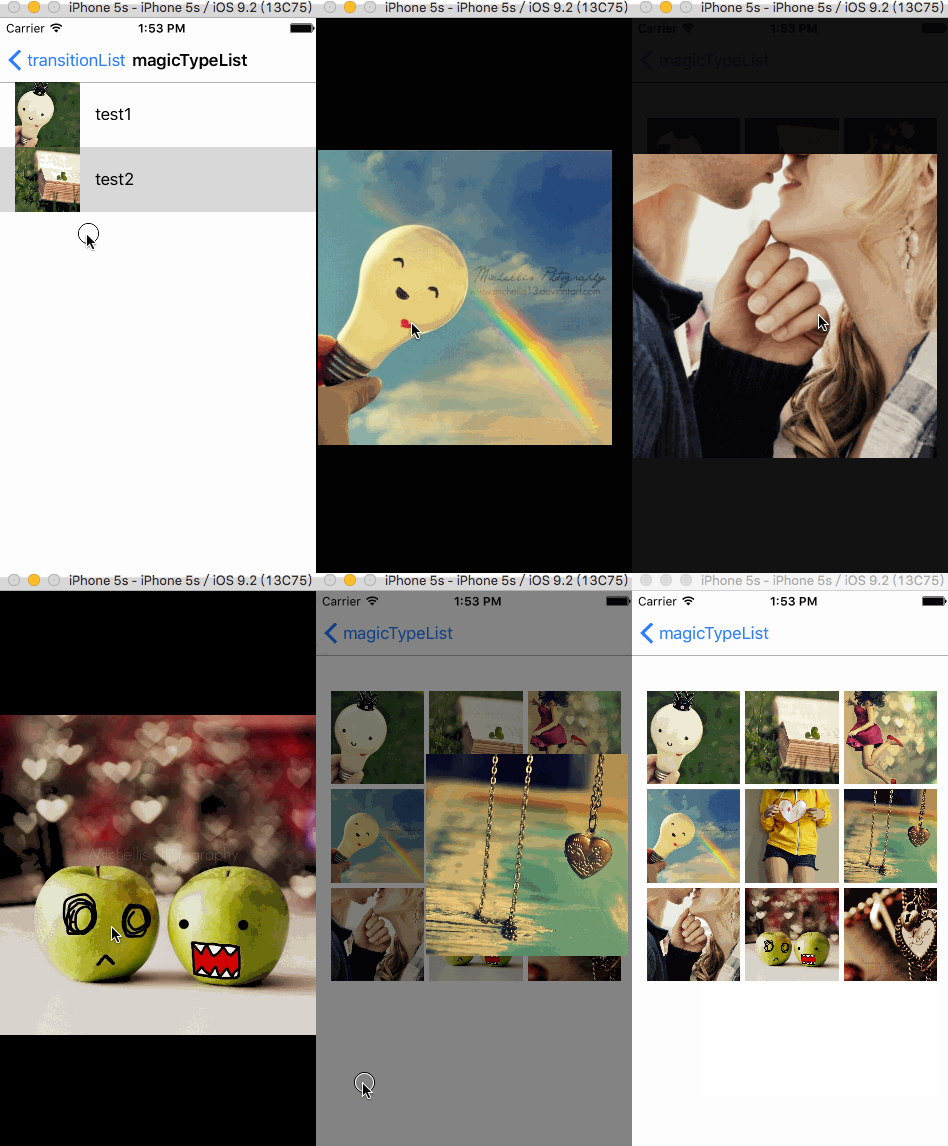
截圖中,右上角的switch開關代表push和present,所有效果都支持手勢,我就不一一演示了
1、CircleSpreadTransition 小圓點擴散
CircleSpreadTransition.gif
2、MagicMoveTransition 神奇移動
MagicMoveTransition1.gif
MagicMoveTransition2.gif
3、XWDrawerAnimator 抽屜效果,仿照QQ和淘寶
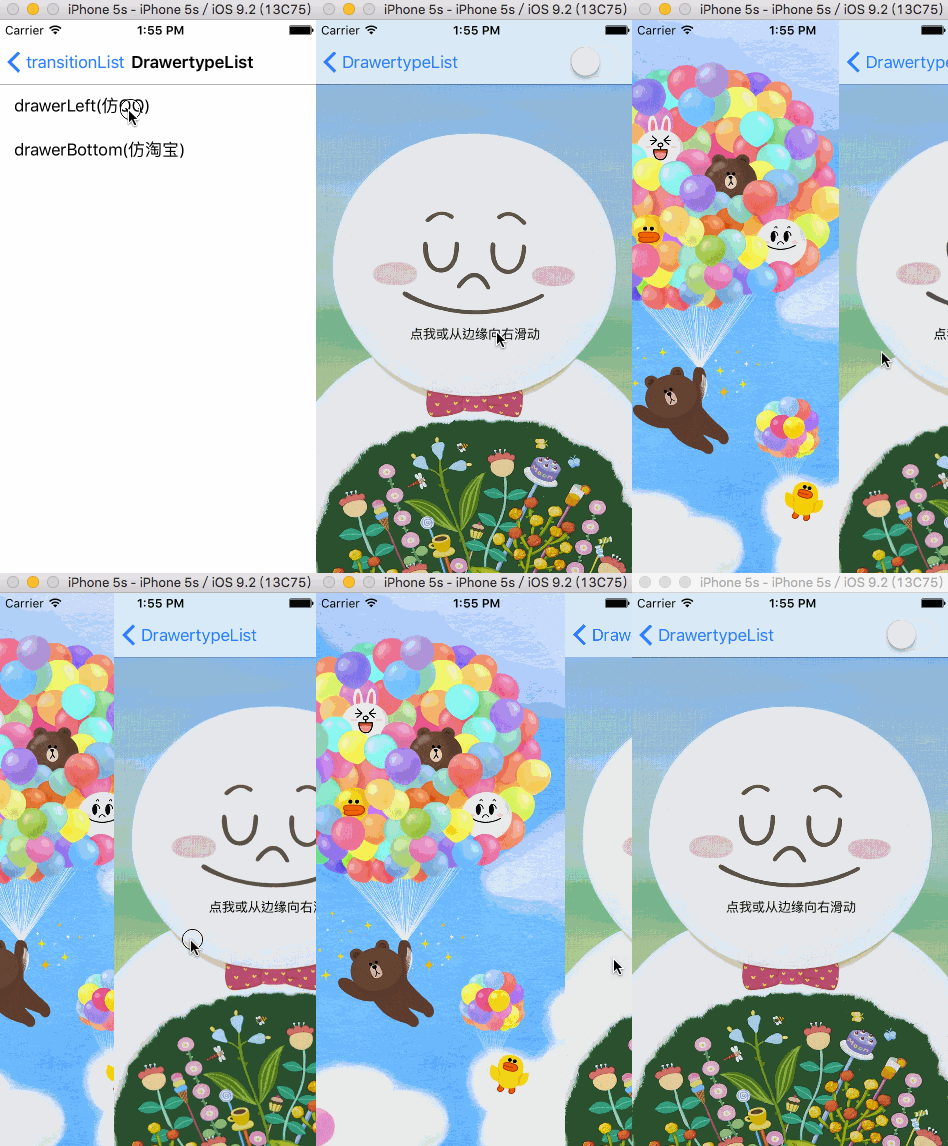
XWDrawerAnimator1.gif
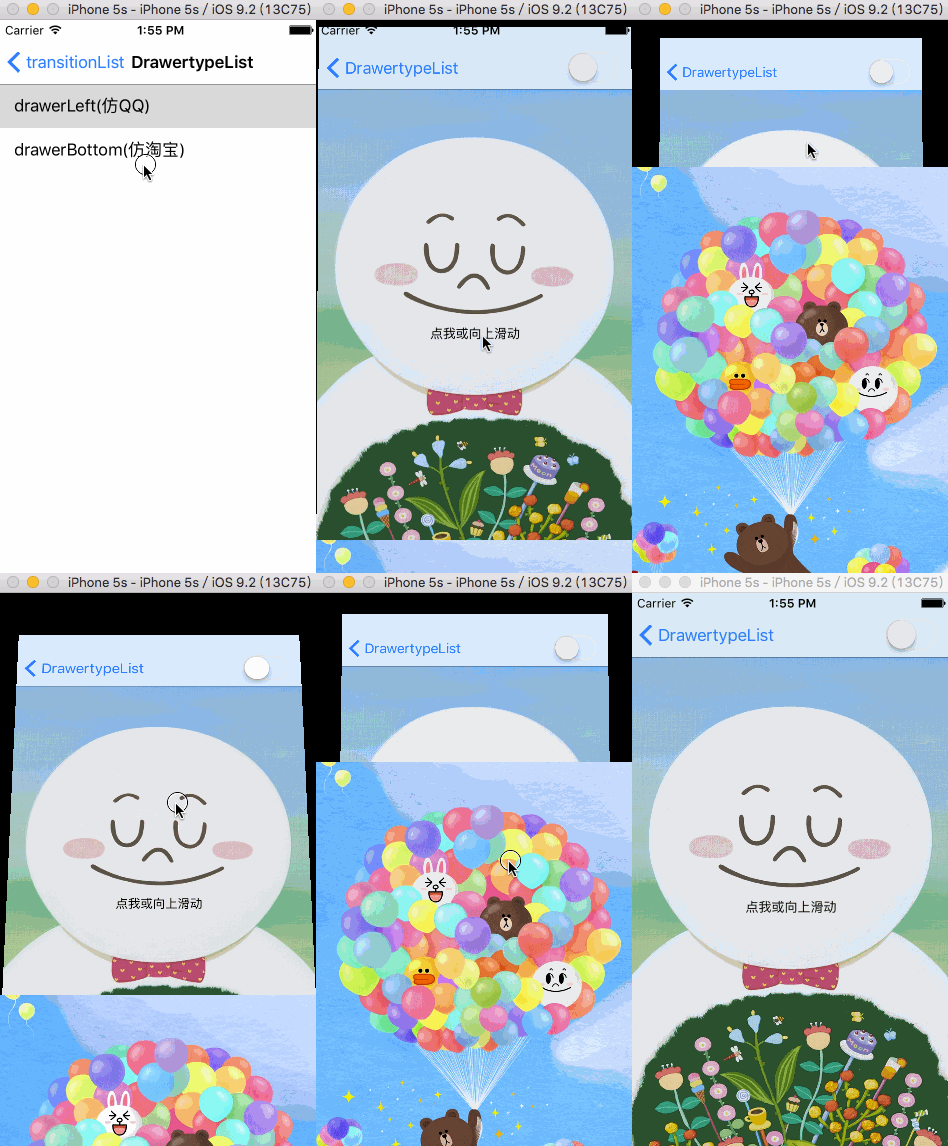
XWDrawerAnimator2.gif
4、XWCoolAnimator 自定義一些效果

XWCoolAnimator2.gif

XWCoolAnimator1.gif

XWCoolAnimator3.gif

XWCoolAnimator4.gif

XWCoolAnimator5.gif

XWCoolAnimator6.gif

XWCoolAnimator7.gif
5、XWFilterAnimator 通過CIFilter濾鏡自定義一些效果,請在真機上運行

XWFilterAnimator1.gif

XWFilterAnimator6.gif

XWFilterAnimator5.gif

XWFilterAnimator4.gif

XWFilterAnimator3.gif

XWFilterAnimator2.gif

XWFilterAnimator8.gif

XWFilterAnimator7.gif
如何使用
1、git地址:幾句代碼快速集成自定義轉場效果+ 全手勢驅動,clone後將整個XWTranstion文件夾導入工程
2、導入UINavigationController+XWTransition.h或者UIViewController+XWTransition.h兩個分類
3、選擇你需要的效果器進行根據初始化方法進行初始化,比如下面的小圓點擴散,初始化指定開始圓心和半徑
XWCircleSpreadAnimator *animator = [XWCircleSpreadAnimator xw_animatorWithStartCenter:self.button.center radius:20];
4、通過初始化的效果器轉場,根據分類提供的方法進行push或者present,就完成了!
[self.navigationController xw_pushViewController:toVC withAnimator:animator];
或者
[self xw_presentViewController:toVC withAnimator:animator];
手勢驅動
1、在UIViewController+XWTransition.h分類中提供了兩個方法,用來注冊手勢驅動,在viewDidLoad的時候調用注冊手勢就可以了,詳見demo,注意避免循環引用,手勢支持邊緣屬性
/**
 *  注冊to手勢(push或者Present手勢)
 *
 *  @param direction       手勢方向
 *  @param tansitionConfig 手勢觸發的block,block中需要包含你的push或者Present的邏輯代碼,注意避免循環引用問題
 *  @param edgeSpacing     手勢觸發的邊緣距離,該值為0,表示在整個控制器視圖上都有效,否者這在邊緣的edgeSpacing之類有效
 */

- (void)xw_registerToInteractiveTransitionWithDirection:(XWInteractiveTransitionGestureDirection)direction transitonBlock:(dispatch_block_t)tansitionConfig edgeSpacing:(CGFloat)edgeSpacing;

/**
 *  注冊back手勢(pop或者dismiss手勢)
 *
 *  @param direction       手勢方向
 *  @param tansitionConfig 手勢觸發的block,block中需要包含你的pop或者dismiss的邏輯代碼,注意避免循環引用問題
 *  @param edgeSpacing     手勢觸發的邊緣距離,該值為0,表示在整個控制器視圖上都有效,否者這在邊緣的edgeSpacing之類有效
 */

- (void)xw_registerBackInteractiveTransitionWithDirection:(XWInteractiveTransitionGestureDirection)direction transitonBlock:(dispatch_block_t)tansitionConfig edgeSpacing:(CGFloat)edgeSpacing;
2、事例代碼
    __weak typeof(self)weakSelf = self;
    //注冊一個全屏的back轉場
    [self xw_registerBackInteractiveTransitionWithDirection:XWInteractiveTransitionGestureDirectionDown transitonBlock:^{
    //pop或者dismiss操作
        [weakSelf xw_transiton];
    } edgeSpacing:0];
關於神奇移動效果
1、在UIViewController+XWTransition.h分類中提供了三個關於神奇移動的方法,你需要在轉場前和轉場後的控制器中分別注冊神奇移動前後的視圖(用來告知神奇移動前後的frame),然後通過神奇移動效果器就可以觸發神奇移動轉場了
/**
 * 注冊神奇移動起始視圖
 *
 * @param group 神奇移動起始視圖數組
 */
- (void)xw_addMagicMoveStartViewGroup:(NSArray{UIView *} *)group;(因識別問題,此處括號替換尖括號)
5
/**
 * 注冊神奇移動終止視圖
 *
 * @param group 神奇移動終止視圖數組,注意起始視圖數組和終止視圖數組的視圖需要一一對應才能有正確的效果
 */
- (void)xw_addMagicMoveEndViewGroup:(NSArray{UIView *} *)group;(因識別問題,此處括號替換尖括號)
5
/**
 * 改變神奇移動起始視圖,因為在back的時候,有可能不需要再回到原來起始的位置,需要去一個新的視圖位置,所以在back前需要調用該方法改變起始視圖數組
 *
 * @param group 新的起始視圖數組
 */
- (void)xw_changeMagicMoveStartViewGroup:{NSArrayUIView *} *)group;(因識別問題,此處括號替換尖括號)
2、實例代碼
    //fromVC轉場前控制器中注冊神奇移動前視圖
    [self xw_addMagicMoveStartViewGroup:@[imgView, view1, view2]];
    //toVC轉場後控制器中注冊神奇移動前視圖
    [self xw_addMagicMoveEndViewGroup:@[imgView, view1, view2]];
    //初始化神奇移動效果器轉場
    XWMagicMoveToController *toVC = [XWMagicMoveToController new];
    [self xw_presentViewController:toVC withAnimator:animator];
3、轉場中存在cell,由於在轉場過程中cell還沒有加載,所以無法注冊cell為神奇移動視圖,這種情況需要生產一個零時視圖注冊為轉場視圖來使用,具體請參考demo中的九宮格例子
4、關於提供的imageMode屬性:在神奇移動中,有個問題,就是移動中的臨時視圖一般都是用截圖大法截圖而來的,但是如果從從小圖變成大圖,由於截圖為小圖截圖,變大過程中會有模糊的現象,如果設置了該屬性,我會對神奇移動視圖中的包含了image的視圖進行檢測,如果能檢測到image則直接取image,而不截圖,就能解決模糊的問題,代碼如下
- (UIView *)_xw_snapshotView:(UIView *)view{
    CALayer *layer = view.layer;
    UIView *snapView = [UIView new];
    snapView.frame = view.frame;
    BOOL imgMode = [objc_getAssociatedObject(view, &kXWMagicMovePropertyInViewKey) boolValue] || _imageMode;
    UIImage *img = nil;
    if (imgMode) {//如果開啟imgMode,優先直接獲取圖片,避免截圖時時從小到大造成的模糊
        if ([view isKindOfClass:[UIImageView class]]) {//取imageView中的image
            img = [(UIImageView *)view image];
        }else if ([view isKindOfClass:[UIButton class]]){//取button中的image
            img = [(UIButton *)view currentImage];
        }
        if (!img && [view isKindOfClass:[UIView class]]) {//沒取到嘗試取content
            img = [UIImage imageWithCGImage:(__bridge CGImageRef)view.layer.contents];
        }
    }
    //若都沒有取到,則截圖
    if (!img) {
        UIGraphicsBeginImageContextWithOptions(layer.bounds.size, layer.opaque, 0);
        CGContextRef context = UIGraphicsGetCurrentContext();
        [layer renderInContext:context];
        img = UIGraphicsGetImageFromCurrentImageContext();
        UIGraphicsEndImageContext();
    }
    snapView.layer.contents = (__bridge id)img.CGImage;
    return snapView;
}
關於抽屜效果的全屏拖動
1、抽屜效果由於注冊的手勢都是在控制器的的視圖上,如果做QQ設置界面的效果,不可能在toVC之外點擊和拖動能夠back,我的思路是會在toVC沒有覆蓋的區域添加一個透明視圖,給透明視圖加上點擊和拖動手勢,具體代碼如下
//首先需要設置點擊和拖動的back操作,block中應該包含你的dismiss或者pop邏輯
/**
 *  開啟邊緣(就是屏幕除開toView所占用的部分)back手勢和邊緣點擊返回效果,類似於QQ設置界面的返回效果
 *
 *  @param backConfig 返回操作,您的dismiss或者pop操作
 */
- (void)xw_enableEdgeGestureAndBackTapWithConfig:(dispatch_block_t)backConfig;


//添加全屏手勢代碼如下
/**
 *  添加全局手勢和點擊視圖
 */
- (void)_xw_addFullGestureAndTapBackViewInContainerView:(UIView *)containerView toView:(UIView *)toView distance:(CGFloat)distance{
    CGFloat width = _vertical ? containerView.frame.size.width : containerView.frame.size.width - fabs(distance);
    CGFloat height = _vertical ? containerView.frame.size.height - fabs(distance) : containerView.frame.size.height;
    //如果toVC是全屏鋪滿則無需添加全局手勢,直接使用toVC的view的手勢就好了
    if (width == 0 || height == 0)return;
    if (!_backConfig) return;
    //如果toView注冊過手勢,我們直接獲取這個手勢
    NSArray *gestures = toView.gestureRecognizers;
    __block id target = nil;
    [gestures enumerateObjectsUsingBlock:^(UIGestureRecognizer * _Nonnull obj, NSUInteger idx, BOOL * _Nonnull stop) {
        NSString *panType = objc_getAssociatedObject(obj, "xw_interactivePanKey");
        if ([panType isEqualToString:@"xw_interactiveBackPan"] && obj.delegate) {
            target = obj.delegate;
            *stop = YES;
        }
    }];
    CGFloat x = _vertical || _direction == XWDrawerAnimatorDirectionRight ? 0 : -distance;
    CGFloat y = !_vertical || _direction == XWDrawerAnimatorDirectionBottom ? 0 : -distance;
    UIControl *gestureView = [UIControl new];
    //添加點擊事件
    [gestureView addTarget:self action:@selector(_xw_backConfig) forControlEvents:UIControlEventTouchUpInside];
    gestureView.frame = CGRectMake(x, y, width, height);
    gestureView.backgroundColor = [UIColor clearColor];
    //第一種情況,toView已經添加了返回手勢,我們直接拿到該手勢的target和action
    if (target) {
        //給containerView添加全局手勢
        UIPanGestureRecognizer *pan = [[UIPanGestureRecognizer alloc] initWithTarget:target action:NSSelectorFromString(@"_xw_handleGesture:")];
        [containerView addGestureRecognizer:pan];

    }else{
        //第二種情況,toView沒有添加手勢,我們需要創建一個
        __weak typeof(self)weakSelf = self;
        XWInteractiveTransition *backTransition = [XWInteractiveTransition xw_interactiveTransitionWithDirection:(XWInteractiveTransitionGestureDirection)_direction config:^{
            weakSelf.backConfig();
        } edgeSpacing:0];
        backTransition.panRatioBaseValue = _vertical ? containerView.frame.size.height : containerView.frame.size.width;
        [backTransition xw_addPanGestureForView:gestureView to:NO];
//        [self xw_setBackInteractiveTransition:backTransition];
        [self setValue:backTransition forKey:@"backTransition"];
    }
    [containerView addSubview:gestureView];
}
解決動畫生硬
1、先看小圓點效果的例子,前面是解決前寫的,後面是現在的
未解決
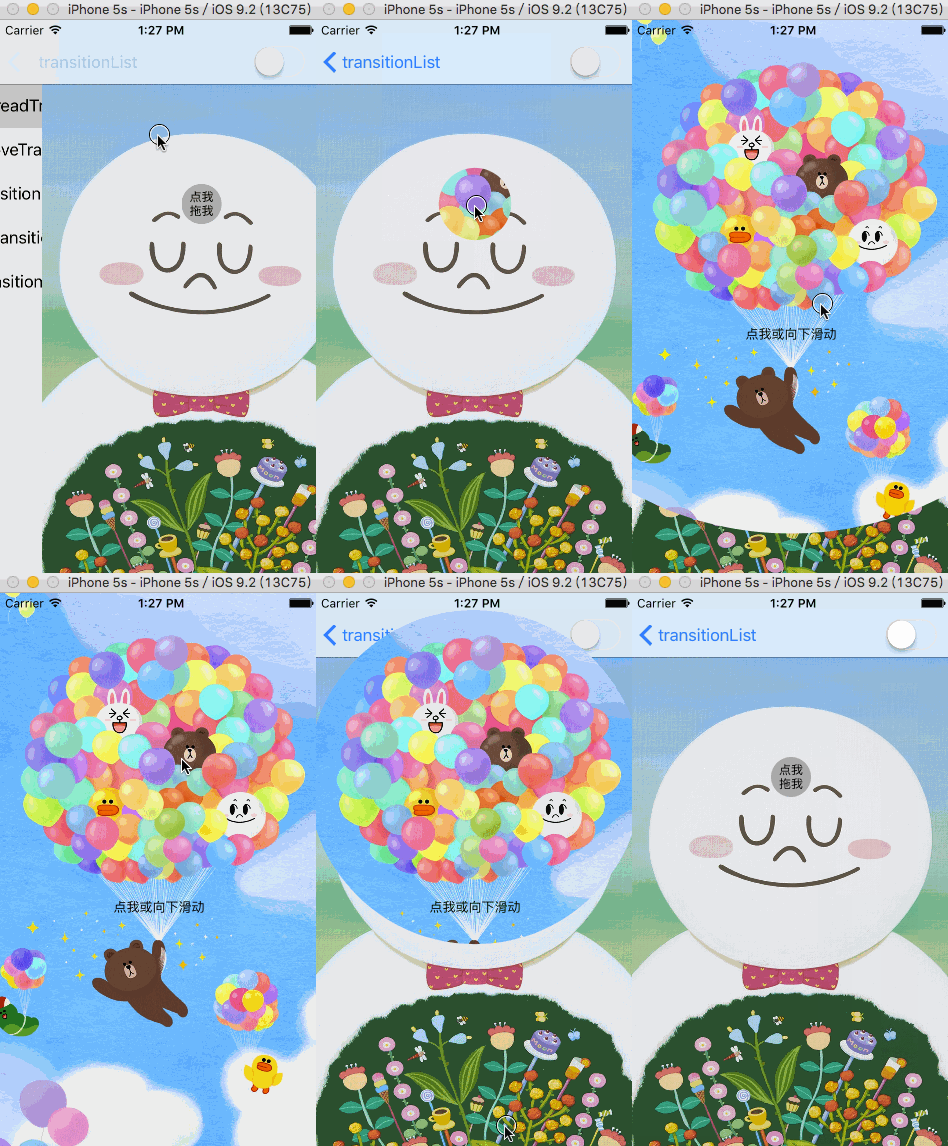
小圓點未開啟timer.gif
解決後
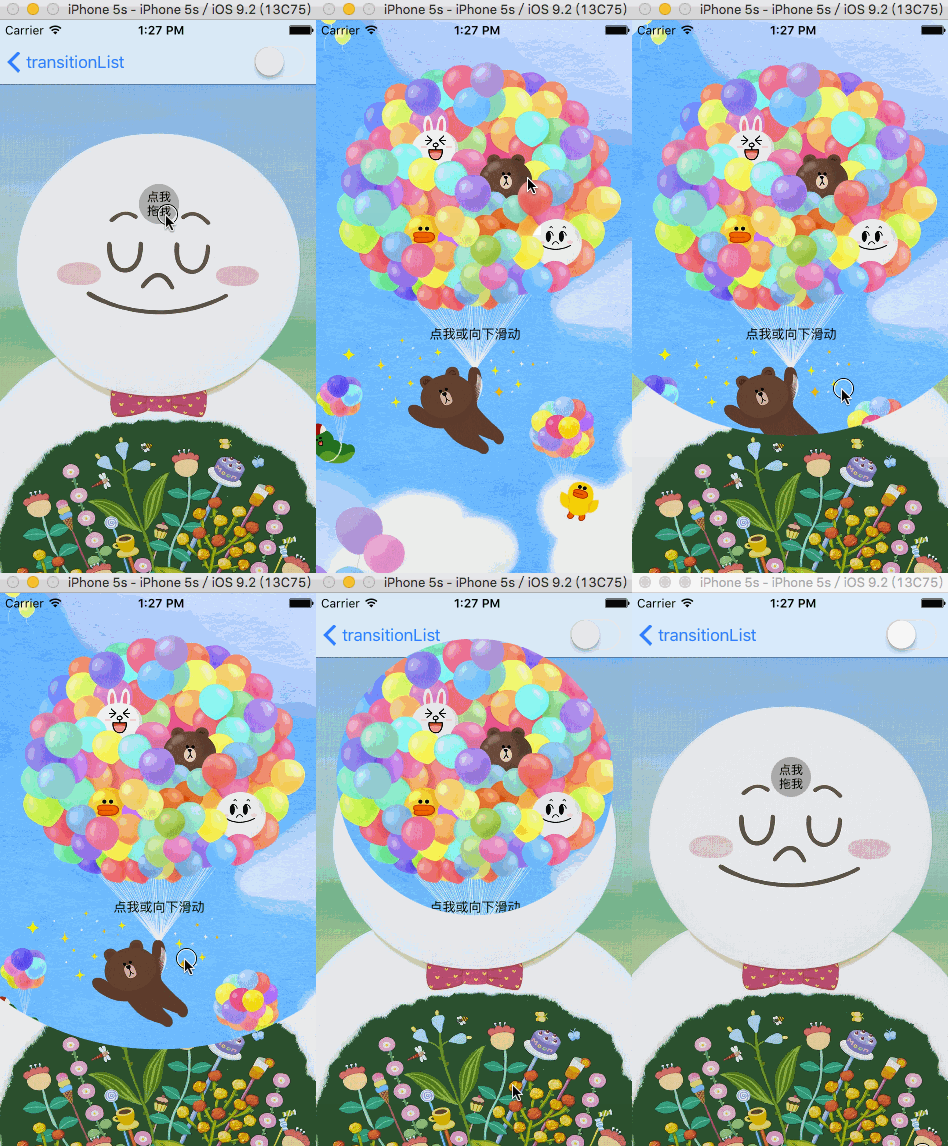
小圓開啟timer.gif
2、問題原因:在手勢結束後該效果不會動畫的過渡到成功或者失敗,而是整個轉場進度會直接update到0或者1,就木有動畫了
3、解決:在手指松開的時候,我會開啟一個CADisplayLink來不斷的刷新整個轉場進度到1或者0,來達到動畫的效果,具體代碼如下
case UIGestureRecognizerStateEnded:{//轉場結束後
            //判斷是否需要timer
            if (!_timerEable) {
                _percent >= 0.5 ? [self _xw_finish] : [self _xw_cancle];
                return;
            }
            //判斷此時是否已經轉場完成,大於1或者小於0
            BOOL canEnd = [self _xw_canEndInteractiveTransitionWithPercent:_percent];
            if (canEnd) return;
            //開啟timer
            [self _xw_setEndAnimationTimerWithPercent:_percent];


//設置開啟timer
- (void)_xw_setEndAnimationTimerWithPercent:(CGFloat)percent{
    _percent = percent;
    //根據失敗還是成功設置刷新間隔
    if (percent > 0.5) {
        _timeDis = (1 - percent) / ((1 - percent) * 60);
    }else{
        _timeDis = percent / (percent * 60);
    }
    //開啟timer
    [self _xw_startTimer];
}
//開啟timer
- (void)_xw_startTimer{
    if (_timer) {
        return;
    }
    _timer = [CADisplayLink displayLinkWithTarget:self selector:@selector(_xw_timerEvent)];
    [_timer addToRunLoop:[NSRunLoop currentRunLoop] forMode:NSRunLoopCommonModes];
}

//timer 事件
- (void)_xw_timerEvent{
    if (_percent > 0.5) {
        _percent += _timeDis;
    }else{
        _percent -= _timeDis;
    }
    //通過timer不斷刷新轉場進度,達到動畫效果
    [self _xw_updatingWithPercent:_percent];
    //判斷進度是否達到0和1,達到則結束timer,結束轉場
    BOOL canEnd = [self _xw_canEndInteractiveTransitionWithPercent:_percent];
    if (canEnd) {
        [self _xw_stopTimer];
    }
}
解決閃爍問題
1、閃爍原因:在不使用UIView的動畫block時,我們直接為layer添加一個CAAnimtion,此時會先設置modelLayer為轉場成功的狀態,比如小圓點效果會設置path為大圓的path,但是如果轉場失敗,presentLayer依然會先變為modelLayer設置的成功值,然後動畫才結束,走我們的轉場失敗邏輯,所以就會閃爍
2、解決:我把手勢改變的一些關鍵狀態通過代理傳出來,在手勢結束前,我們如果檢查到失敗,可以先將modelLayer的值標記為失敗時候的值,也就是初始值,就解決了該問題
3、事例代碼
//手勢轉場時的代理事件,animator默認為為其手勢的代理,復寫對應的代理事件可處理一些手勢失敗閃爍的情況
@protocol XWInteractiveTransitionDelegate {NSObject}(因識別問題此處花括號替換尖括號)

@optional
/**手勢轉場即將開始時調用*/
- (void)xw_interactiveTransitionWillBegin:(XWInteractiveTransition *)interactiveTransition;
/**手勢轉場中調用*/
- (void)xw_interactiveTransition:(XWInteractiveTransition *)interactiveTransition isUpdating:(CGFloat)percent;
/**如果開始了轉場手勢timer,會在松開手指,timer開始的時候調用*/
- (void)xw_interactiveTransitionWillBeginTimerAnimation:(XWInteractiveTransition *)interactiveTransition;
/**手勢轉場結束的時候調用*/
- (void)xw_interactiveTransition:(XWInteractiveTransition *)interactiveTransition willEndWithSuccessFlag:(BOOL)flag percent:(CGFloat)percent;

@end

//我在小圓點擴散效果中處理的如下
- (void)xw_interactiveTransition:(XWInteractiveTransition *)interactiveTransition willEndWithSuccessFlag:(BOOL)flag percent:(CGFloat)percent{
    if (!flag) {
        //防止失敗後的閃爍,如果失敗將遮罩的path設置為其實的小圓path
        _maskLayer.path = _startPath.CGPath;
    }
    _containerView.userInteractionEnabled = YES;
}
關於coolTransiton
1、直接通過枚舉初始化就有已經集成的部分效果,具體如下:
typedef NS_ENUM(NSUInteger, XWCoolTransitionAnimatorType){
    //全屏翻頁
    XWCoolTransitionAnimatorTypePageFlip,
    //中間翻頁
    XWCoolTransitionAnimatorTypePageMiddleFlipFromLeft,
    XWCoolTransitionAnimatorTypePageMiddleFlipFromRight,
    XWCoolTransitionAnimatorTypePageMiddleFlipFromTop,
    XWCoolTransitionAnimatorTypePageMiddleFlipFromBottom,
    //開窗
    XWCoolTransitionAnimatorTypePortal,
    //折疊
    XWCoolTransitionAnimatorTypeFoldFromLeft,
    XWCoolTransitionAnimatorTypeFoldFromRight,
    //爆炸
    XWCoolTransitionAnimatorTypeExplode,
    //酷炫線條效果
    XWCoolTransitionAnimatorTypeHorizontalLines,
    XWCoolTransitionAnimatorTypeVerticalLines,
    //掃描效果
    XWCoolTransitionAnimatorTypeScanningFromLeft,
    XWCoolTransitionAnimatorTypeScanningFromRight,
    XWCoolTransitionAnimatorTypeScanningFromTop,
    XWCoolTransitionAnimatorTypeScanningFromBottom,
};
2、 cool轉場效果中的Portal、Fold、Explode效果的部分代碼邏輯來源於ColinEberhardt/VCTransitionsLibrary,非常感謝作者,我只是將其進行了部分改動,以便對手勢的支持更加完善,裡面還有許多其他效果,本人經歷有限就沒有再集成進來了,大家可以自行查看;cool轉場效果的Lines的想法來自於cinkster/HUAnimator, 非常感謝作者,但是由於作者在對toVC截圖采用了延遲的方式來處理,導致了不好處理的bug和一些手勢上的bug,對此我采用了另一種方式來解決截圖的問題,使用了layer的contentRect屬性,解決了發現的問題,相關代碼請自行查看
關於FilterTransition
1、XWFilterAnimator 全都是基於不同的CIFilter產生的一些濾鏡效果,貌似在模擬器無法運行這些效果,請在真機上測試,直接通過枚舉初始化就有已經集成的部分效果,具體如下:
typedef NS_ENUM(NSUInteger, XWFilterAnimatorType) {
    XWFilterAnimatorTypeBoxBlur,//模糊轉場,對應CIBoxBlur
    XWFilterAnimatorTypeSwipe,//滑動過渡轉場,對應CISwipeTranstion
    XWFilterAnimatorTypeBarSwipe,//對應CIBarSwipeTranstion
    XWFilterAnimatorTypeMask,//按指定遮罩圖片轉場,對應CIDisintegrateWithMaskTransition
    XWFilterAnimatorTypeFlash,//閃爍轉場,對應CIFlashTransition
    XWFilterAnimatorTypeMod,//條紋轉場 對應CIModTransition
    XWFilterAnimatorTypePageCurl,//翻頁轉場 對應CIPageCurlWithShadowTransition
    XWFilterAnimatorTypeRipple,//波紋轉場,對應CIRippleTransition
    XWFilterAnimatorTypeCopyMachine, //效果和XWCoolAnimator中的Scanning效果類似,對應CICopyMachineTransition
};
2、如果想要添加其他濾鏡轉場,可以嘗試我的FilterTransition中書寫分類的方式,只需要指定CIFilter和相關邏輯即可
關於自定義轉場效果
1、你只需要繼承於XWTransitionAnimator,就像我上面所有的效果器一樣,然後復寫需要的屬性和兩個必須的方法即可,然後你就可以使用你自定義的效果器轉場,XWTransitionAnimator頭文件如下:
@interface XWTransitionAnimator : NSObject{UIViewControllerTransitioningDelegate, UINavigationControllerDelegate, UITabBarControllerDelegate, XWInteractiveTransitionDelegate}(花括號替換尖括號)

//to轉場時間 默認0.5
@property (nonatomic, assign) NSTimeInterval toDuration;
//back轉場時間 默認0.5
@property (nonatomic, assign) NSTimeInterval backDuration;
//是否需要開啟手勢timer,某些轉場如果在轉成過程中所開手指,不會有動畫過渡,顯得很生硬,開啟timer後,松開手指,會用timer不斷的刷新轉場百分比,消除生硬的缺點
@property (nonatomic, assign) BOOL needInteractiveTimer;

/**
 *  配置To過程動畫(push, present),自定義轉場動畫應該復寫該方法
 */
- (void)xw_setToAnimation:(id{UIViewControllerContextTransitioning})transitionContext;
/**
 *  配置back過程動畫(pop, dismiss),自定義轉場動畫應該復寫該方法
 */
- (void)xw_setBackAnimation:(id{UIViewControllerContextTransitioning})transitionContext;

@end
2、這樣就只需要關心動畫的邏輯,其余的事情就不用管了,不過如果遇到閃爍問題,你只需要復寫相關的手勢代理方法,就像我在小圓點轉場中一樣,因為XWTransitionAnimator默認是手勢管理者的代理,所以直接實現代理方法就好了
寫在最後
陸陸續續的就這些了,東西比較多,可能我的敘述也還有一定問題,某些內容可能描述的不太清楚,請大家多多參考demo,希望本文能讓大家以後再設計到自定義轉場的時候能夠迅速解決問題,再次復習一下地址幾句代碼快速集成自定義轉場效果+ 全手勢驅動 ,如果對您有幫助歡迎給予star支持!
更新 2016-06-24
今天早上思考了一下,優化了一下DrawerAnimator,之前的toVC的frame不會隨著設置的distance改變,默認一般都是屏幕的寬和高,也就是說顯示之後,toVC的有一部分實際是在屏幕外面的,這對於後續的布局是不太方便的,所以我修改了一下,現在toVC的frame是和設置的distance相關的,所看見的toVC的部分就是toVC的全部
更新 2016-07-05
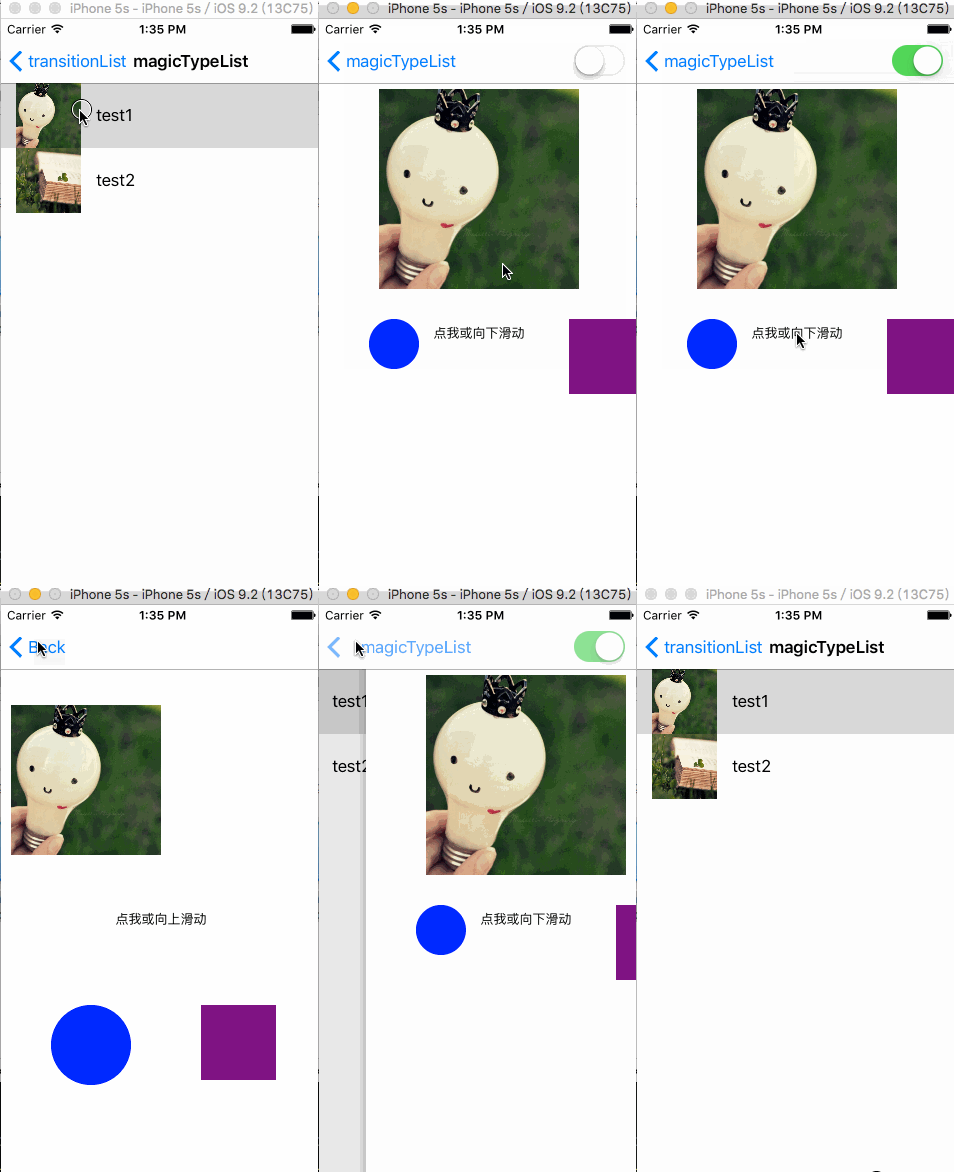
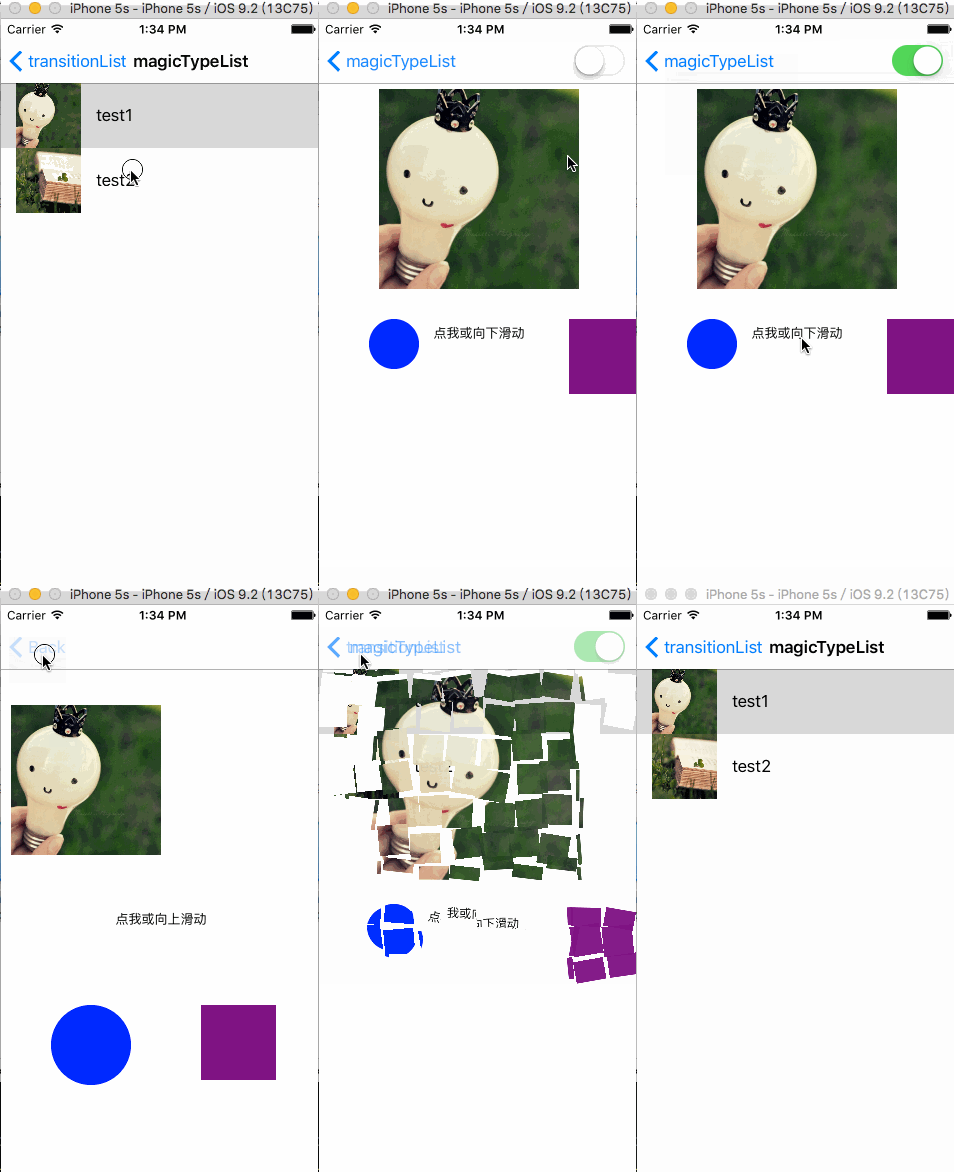
1、今天發現了一個問題,就是在進行不同的效果多次push的時候,在pop的時候,之前的效果會失效,我修復了這個問題,請看截圖,上面是修復前,下面是修復後
修正之前.gif
修正之後.gif
可以看見,修復前,在最後一次back的時候,那個爆炸的效果已經失效了。
2、問題原因:在每次push時我會切換navigationController的delegate為當前效果器,從而能完成轉場效果的邏輯,所以多次push後,代理始終是最後一個效果器,而在pop的時候那個效果器隨著對應的pop操作已經被銷毀了,而代理並沒有切換為之前的爆炸效果器,所以自定義轉場就無法觸發了
3、解決:由於我每一個效果器是和被push出的VC綁定的,所以當被pushVC被銷毀的時候,效果器就會銷毀,此刻,應該去檢測一下代理,如果上一個VC存在效果器,則需要切換回該效果器,所以需要在pushVC的dealloc方法中需要對代理進行檢測和切換,為了達到目的,需要對VC的dealloc方法進行調劑,調劑的方法稍微有點復雜,具體請看我另一篇簡書文章:一句代碼,更加優雅的調用KVO和通知中關於調劑dealloc方法的相關代碼,在dealloc中添加了代理檢測和切換的方法來達到目的
- 上一頁:iOS10裡的通知與推送
- 下一頁:iOS代碼設計中的開放與封閉

