UITableView的Cell復用原理和源碼分析
簡介
在我們的日常開發中,絕大多數情況下只要詳細閱讀類頭文件裡的注釋,組合UIKit框架裡的大量控件就能很好的滿足工作的需求。但僅僅會使用UIKit裡的控件還遠遠不夠,假如現在產品需要一個類似 Excel 樣式的控件來呈現數據,需要這個控件能上下左右滑動,這時候你會發現UIKit裡就沒有現成的控件可用了。UITableView 可以看做一個只可以上下滾動的 Excel,所以我們的直覺是應該仿寫 UITableView 來實現這個自定義的控件。這篇文章我將會通過開源項目 Chameleon 來分析UITableView的 hacking 源碼,閱讀完這篇文章後你將會了解 UITableView 的繪制過程和 UITableViewCell 的復用原理。 並且我會在下一篇文章中實現一個類似 Excel 的自定義控件。
Chameleon
Chameleon 是一個移植 iOS 的 UIKit 框架到 Mac OS X 下的開源項目。該項目的目的在於盡可能給出 UIKit 的可替代方案,並且讓 Mac OS 的開發者盡可能的開發出類似 iOS 的 UI 界面。
UITableView的簡單使用
//創建UITableView對象,並設置代代理和數據源為包含該視圖的視圖控制器
UITableView *tableView = [[UITableView alloc] initWithFrame:frame style:UITableViewStyleGrouped];
tableView.delegate = self;
tableView.dataSource = self;
[tableView registerClass:[UITableViewCell class] forCellReuseIdentifier:kReuseCellIdentifier];
[self.view addSubview:tableView];

//實現代理和數據源協議中的方法
#pragma mark - UITableViewDelegate

- (CGFloat)tableView:(UITableView *)tableView heightForRowAtIndexPath:(NSIndexPath *)indexPath
{
    return kDefaultCellHeight;
}

#pragma mark - UITableViewDataSource

- (UITableViewCell *)tableView:(UITableView *)tableView cellForRowAtIndexPath:(NSIndexPath *)indexPath
{
    UITableViewCell *cell = [tableView dequeueReusableCellWithIdentifier:kReuseCellIdentifier];
    return cell;
}

- (NSInteger)tableView:(UITableView *)tableView numberOfRowsInSection:(NSInteger)section
{
    return self.dataArray.count;
}
創建UITableView實例對象
UITableView *tableView = [[UITableView alloc] initWithFrame:frame style:UITableViewStyleGrouped];
initWithFrame: style: 方法源碼如下:
- (id)initWithFrame:(CGRect)frame style:(UITableViewStyle)theStyle
{
    if ((self=[super initWithFrame:frame])) {
        _style = theStyle;

        //_cachedCells 用於保存正在顯示的Cell對象的引用
        _cachedCells = [[NSMutableDictionary alloc] init];

        //在計算完每個 section 包含的 section 頭部,尾部視圖的高度,和包含的每個 row 的整體高度後,
        //使用 UITableViewSection 對象對這些高度值進行保存,並將該 UITableViewSection 對象的引用
        //保存到 _sections中。在指定完 dataSource 後,至下一次數據源變化調用 reloadData 方法,
        //由於數據源沒有變化,section 相關的高度值是不會變化,只需計算一次,所以需要緩存起來。
        _sections = [[NSMutableArray alloc] init];

        //_reusableCells用於保存存在但未顯示在界面上的可復用的Cell
        _reusableCells = [[NSMutableSet alloc] init];

        self.separatorColor = [UIColor colorWithRed:.88f green:.88f blue:.88f alpha:1];
        self.separatorStyle = UITableViewCellSeparatorStyleSingleLine;
        self.showsHorizontalScrollIndicator = NO;
        self.allowsSelection = YES;
        self.allowsSelectionDuringEditing = NO;
        self.sectionHeaderHeight = self.sectionFooterHeight = 22;
        self.alwaysBounceVertical = YES;

        if (_style == UITableViewStylePlain) {
            self.backgroundColor = [UIColor whiteColor];
        }
        [self _setNeedsReload];
    }
    return self;
}
我將需要關注的地方做了詳細的注釋,這裡我們需要關注_cachedCells, _sections, _reusableCells 這三個變量的作用。
設置數據源
tableView.dataSource = self;
下面是 dataSrouce 的 setter 方法源碼:
- (void)setDataSource:(id)newSource
{
    _dataSource = newSource;

    _dataSourceHas.numberOfSectionsInTableView = [_dataSource respondsToSelector:@selector(numberOfSectionsInTableView:)];
    _dataSourceHas.titleForHeaderInSection = [_dataSource respondsToSelector:@selector(tableView:titleForHeaderInSection:)];
    _dataSourceHas.titleForFooterInSection = [_dataSource respondsToSelector:@selector(tableView:titleForFooterInSection:)];
    _dataSourceHas.commitEditingStyle = [_dataSource respondsToSelector:@selector(tableView:commitEditingStyle:forRowAtIndexPath:)];
    _dataSourceHas.canEditRowAtIndexPath = [_dataSource respondsToSelector:@selector(tableView:canEditRowAtIndexPath:)];

    [self _setNeedsReload];
}
_dataSourceHas 是用於記錄該數據源實現了哪些協議方法的結構體,該結構體源碼如下:
struct {
        unsigned numberOfSectionsInTableView : 1;
        unsigned titleForHeaderInSection : 1;
        unsigned titleForFooterInSection : 1;
        unsigned commitEditingStyle : 1;
        unsigned canEditRowAtIndexPath : 1;
    } _dataSourceHas;
記錄是否實現了某協議可以使用布爾值來表示,布爾變量占用的內存大小一般為一個字節,即8比特。但該結構體使用了 bitfields 用一個比特(0或1)來記錄是否實現了某協議,大大縮小了占用的內存。
在設置好了數據源後需要打一個標記,告訴NSRunLoop數據源已經設置好了,需要在下一次循環中使用數據源進行布局。下面看看 _setNeedReload 的源碼:
- (void)_setNeedsReload
{
    _needsReload = YES;
    [self setNeedsLayout];
}
在調用了 setNeedsLayout 方法後,NSRunloop 會在下一次循環中自動調用 layoutSubViews 方法。
視圖的內容需要重繪時可以調用 setNeedsDisplay 方法,該方法會設置該視圖的 displayIfNeeded 變量為 YES ,NSRunLoop 在下一次循環檢中測到該值為 YES 則會自動調用 drawRect 進行重繪。
視圖的內容沒有變化,但在父視圖中位置變化了可以調用 setNeedsLayout,該方法會設置該視圖的 layoutIfNeeded 變量為YES,NSRunLoop 在下一次循環檢中測到該值為 YES 則會自動調用 layoutSubViews 進行重繪。
更詳細的內容可參考 When is layoutSubviews called?
設置代理
tableView.delegate = self;
下面是 delegate 的 setter 方法源碼:
- (void)setDelegate:(id)newDelegate
{
    [super setDelegate:newDelegate];
    _delegateHas.heightForRowAtIndexPath = [newDelegate respondsToSelector:@selector(tableView:heightForRowAtIndexPath:)];
    _delegateHas.heightForHeaderInSection = [newDelegate respondsToSelector:@selector(tableView:heightForHeaderInSection:)];
    _delegateHas.heightForFooterInSection = [newDelegate respondsToSelector:@selector(tableView:heightForFooterInSection:)];
    _delegateHas.viewForHeaderInSection = [newDelegate respondsToSelector:@selector(tableView:viewForHeaderInSection:)];
    _delegateHas.viewForFooterInSection = [newDelegate respondsToSelector:@selector(tableView:viewForFooterInSection:)];
    _delegateHas.willSelectRowAtIndexPath = [newDelegate respondsToSelector:@selector(tableView:willSelectRowAtIndexPath:)];
    _delegateHas.didSelectRowAtIndexPath = [newDelegate respondsToSelector:@selector(tableView:didSelectRowAtIndexPath:)];
    _delegateHas.willDeselectRowAtIndexPath = [newDelegate respondsToSelector:@selector(tableView:willDeselectRowAtIndexPath:)];
    _delegateHas.didDeselectRowAtIndexPath = [newDelegate respondsToSelector:@selector(tableView:didDeselectRowAtIndexPath:)];
    _delegateHas.willBeginEditingRowAtIndexPath = [newDelegate respondsToSelector:@selector(tableView:willBeginEditingRowAtIndexPath:)];
    _delegateHas.didEndEditingRowAtIndexPath = [newDelegate respondsToSelector:@selector(tableView:didEndEditingRowAtIndexPath:)];
    _delegateHas.titleForDeleteConfirmationButtonForRowAtIndexPath = [newDelegate respondsToSelector:@selector(tableView:titleForDeleteConfirmationButtonForRowAtIndexPath:)];
}
與設置數據源一樣,這裡使用了類似的結構體來記錄代理實現了哪些協議方法。
UITableView繪制
由於在設置數據源中調用了 setNeedsLayout 方法打上了需要布局的 flag,所以會在 1/60 秒(NSRunLoop的循環周期)後自動調用 layoutSubViews。layoutSubViews 的源碼如下:
- (void)layoutSubviews
{
    //對子視圖進行布局,該方法會在第一次設置數據源調用 setNeedsLayout 方法後自動調用。
    //並且 UITableView 是繼承自 UIScrollview ,當滾動時也會觸發該方法的調用
    _backgroundView.frame = self.bounds;

    //在進行布局前必須確保 section 已經緩存了所有高度相關的信息
    [self _reloadDataIfNeeded];

    //對 UITableView 的 section 進行布局,包含 section 的頭部,尾部,每一行 Cell
    [self _layoutTableView];

    //對 UITableView 的頭視圖,尾視圖進行布局
    [super layoutSubviews];
}
需要注意的是由於 UITableView 是繼承於 UIScrollView,所以在 UITableView 滾動時會自動調用該方法,詳細內容可以參考 When is layoutSubviews called?
下面依次來看三個主要方法的實現。
_reloadDataIfNeeded 的源碼如下:
- (void)_reloadDataIfNeeded
{
    if (_needsReload) {
        [self reloadData];
    }
}

- (void)reloadData
{
    //當數據源更新後,需要將所有顯示的UITableViewCell和未顯示可復用的UITableViewCell全部從父視圖移除,
    //重新創建
    [[_cachedCells allValues] makeObjectsPerformSelector:@selector(removeFromSuperview)];
    [_reusableCells makeObjectsPerformSelector:@selector(removeFromSuperview)];
    [_reusableCells removeAllObjects];
    [_cachedCells removeAllObjects];

    _selectedRow = nil;
    _highlightedRow = nil;

    // 重新計算 section 相關的高度值,並緩存起來
    [self _updateSectionsCache];
    [self _setContentSize];

    _needsReload = NO;
}
其中 _updateSectionsCashe 方法是最重要的,該方法在數據源更新後至下一次數據源更新期間只能調用一次,該方法的源碼如下:
- (void)_updateSectionsCache
{
//該逆向源碼只復用了 section 中的每個 UITableViewCell,並沒有復用每個 section 的頭視圖和尾視圖,
//UIKit肯定是實現了所有視圖的復用
// remove all previous section header/footer views
for (UITableViewSection *previousSectionRecord in _sections) {
[previousSectionRecord.headerView removeFromSuperview];
[previousSectionRecord.footerView removeFromSuperview];
}
// clear the previous cache
[_sections removeAllObjects];
//如果數據源為空,不做任何處理
if (_dataSource) {
// compute the heights/offsets of everything
const CGFloat defaultRowHeight = _rowHeight ?: _UITableViewDefaultRowHeight;
const NSInteger numberOfSections = [self numberOfSections];
for (NSInteger section=0; section 0 && _delegateHas.viewForHeaderInSection)? [self.delegate tableView:self viewForHeaderInSection:section] : nil;
sectionRecord.footerView = (sectionRecord.footerHeight > 0 && _delegateHas.viewForFooterInSection)? [self.delegate tableView:self viewForFooterInSection:section] : nil;
// make a default section header view if there's a title for it and no overriding view
if (!sectionRecord.headerView && sectionRecord.headerHeight > 0 && sectionRecord.headerTitle) {
sectionRecord.headerView = [UITableViewSectionLabel sectionLabelWithTitle:sectionRecord.headerTitle];
}
// make a default section footer view if there's a title for it and no overriding view
if (!sectionRecord.footerView && sectionRecord.footerHeight > 0 && sectionRecord.footerTitle) {
sectionRecord.footerView = [UITableViewSectionLabel sectionLabelWithTitle:sectionRecord.footerTitle];
}
if (sectionRecord.headerView) {
[self addSubview:sectionRecord.headerView];
} else {
sectionRecord.headerHeight = 0;
}
if (sectionRecord.footerView) {
[self addSubview:sectionRecord.footerView];
} else {
sectionRecord.footerHeight = 0;
}
//section 中每個 row 的高度使用了數組指針來保存
CGFloat *rowHeights = malloc(numberOfRowsInSection * sizeof(CGFloat));
CGFloat totalRowsHeight = 0;
//每行 row 的高度通過數據源實現的協議方法 heightForRowAtIndexPath: 返回,
//若數據源沒有實現該協議方法則使用默認的高度
for (NSInteger row=0; row我在需要注意的地方加了注釋,上面方法主要是記錄每個 Cell 的高度和整個 section 的高度,並把結果同過 UITableViewSection 對象緩存起來。
_layoutTableView 的源碼實現如下:
- (void)_layoutTableView
{
//這裡實現了 UITableViewCell 的復用
const CGSize boundsSize = self.bounds.size;
const CGFloat contentOffset = self.contentOffset.y;
//由於 UITableView 繼承於 UIScrollview,所以通過滾動偏移量得到當前可視的 bounds
const CGRect visibleBounds = CGRectMake(0,contentOffset,boundsSize.width,boundsSize.height);
CGFloat tableHeight = 0;
//若有頭部視圖,則計算頭部視圖在父視圖中的 frame
if (_tableHeaderView) {
CGRect tableHeaderFrame = _tableHeaderView.frame;
tableHeaderFrame.origin = CGPointZero;
tableHeaderFrame.size.width = boundsSize.width;
_tableHeaderView.frame = tableHeaderFrame;
tableHeight += tableHeaderFrame.size.height;
}
//_cashedCells 用於記錄正在顯示的 UITableViewCell 的引用
//avaliableCells 用於記錄當前正在顯示但在滾動後不再顯示的 UITableViewCell(該 Cell 可以復用)
//在滾動後將該字典中的所有數據都添加到 _reusableCells 中,
//記錄下所有當前在可視但由於滾動而變得不再可視的 Cell 的引用
NSMutableDictionary *availableCells = [_cachedCells mutableCopy];
const NSInteger numberOfSections = [_sections count];
[_cachedCells removeAllObjects];
for (NSInteger section=0; section 0) {
//在滾動時,如果向上滾動,除去頂部要隱藏的 Cell 和底部要顯示的 Cell,中部的 Cell 都可以
//根據 indexPath 直接獲取
UITableViewCell *cell = [availableCells objectForKey:indexPath] ?: [self.dataSource tableView:self cellForRowAtIndexPath:indexPath];
if (cell) {
[_cachedCells setObject:cell forKey:indexPath];
//將當前仍留在可視區域的 Cell 從 availableCells 中移除,
//availableCells 中剩下的即為頂部已經隱藏的 Cell
//後面會將該 Cell 加入 _reusableCells 中以便下次取出進行復用。
[availableCells removeObjectForKey:indexPath];
cell.highlighted = [_highlightedRow isEqual:indexPath];
cell.selected = [_selectedRow isEqual:indexPath];
cell.frame = rowRect;
cell.backgroundColor = self.backgroundColor;
[cell _setSeparatorStyle:_separatorStyle color:_separatorColor];
[self addSubview:cell];
}
}
}
}
}
//把所有因滾動而不再可視的 Cell 從父視圖移除並加入 _reusableCells 中,以便下次取出復用
for (UITableViewCell *cell in [availableCells allValues]) {
if (cell.reuseIdentifier) {
[_reusableCells addObject:cell];
} else {
[cell removeFromSuperview];
}
}
//把仍在可視區域的 Cell(但不應該在父視圖上顯示) 但已經被回收至可復用的 _reusableCells 中的 Cell從父視圖移除
NSArray* allCachedCells = [_cachedCells allValues];
for (UITableViewCell *cell in _reusableCells) {
if (CGRectIntersectsRect(cell.frame,visibleBounds) && ![allCachedCells containsObject: cell]) {
[cell removeFromSuperview];
}
}
if (_tableFooterView) {
CGRect tableFooterFrame = _tableFooterView.frame;
tableFooterFrame.origin = CGPointMake(0,tableHeight);
tableFooterFrame.size.width = boundsSize.width;
_tableFooterView.frame = tableFooterFrame;
}
} 關於 UIView 的 frame 和bounds 的區別可以參考 What's the difference between the frame and the bounds?
這裡使用了三個容器 _cachedCells, availableCells, _reusableCells 完成了 Cell 的復用,這是 UITableView 最核心的地方。
下面一起看看三個容器在創建到滾動整個過程中所包含的元素的變化情況。
在第一次設置了數據源調用該方法時,三個容器的內容都為空,在調用完該方法後 _cachedCells 包含了當前所有可視 Cell 與其對應的indexPath 的鍵值對,availableCells 與 _reusableCells 仍然為空。只有在滾動起來後 _reusableCells 中才會出現多余的未顯示可復用的 Cell。
剛創建 UITableView 時的狀態如下圖(紅色為屏幕內容即可視區域,藍色為超出屏幕的內容,即不可視區域):
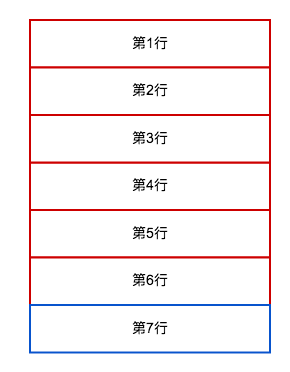 初始狀態.png
如圖,當前 _cachedCells 的元素為當前可視的所有 Cell 與其對應的 indexPath 的鍵值對。
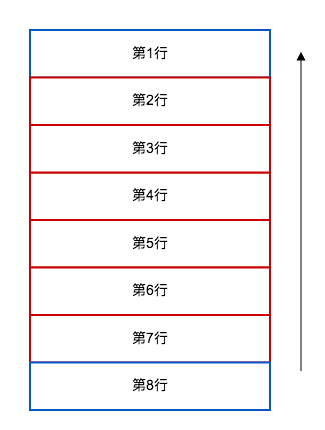
向上滾動一個 Cell 的過程中,由於 availableCells 為 _cachedCells 的拷貝,所以可根據 indexPath 直接取到對應的 Cell,這時從底部滾上來的第7行,由於之前的 _reusableCells 為空,所以該 Cell 是直接創建的而並非復用的,由於頂部 Cell 滾動出了可視區域,所以被加入了 _reusableCells 中以便後續滾動復用。滾動完一行後的狀態變為了 _cachedCells 包含第 2 行到第 7 行 Cell 的引用,_reusableCells 包含第一行 之前滾動出可視區域的第一行 Cell 的引用。
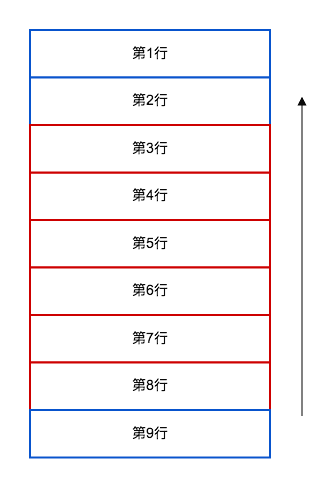
向上滾動1個Cell.png當向上滾動兩個 Cell 的過程中,同理第 3 行到第 7 行的 Cell 可以通過對應的 indexPath 從 _cachedCells 中獲取。這時 _reusableCells 中正好有一個可以復用的 Cell 用來從底部滾動上來的第 8 行。滾動出頂部的第 2 行 Cell 被加入 _reusableCells 中。
總結
到此你已經了解了 UITableView 的 Cell 的復用原理,可以根據需要定制出更復雜的控件。
- 上一頁:獲取iOS設備信息(內存
- 下一頁:iOS多線程到底不安全在哪裡?
- iOS開源一個簡略的訂餐app UI框架
- 在uiview 的tableView中點擊cell進入跳轉到另外一個界面的完成辦法
- iOS開辟之UIScrollView控件詳解
- 進修iOS自界說導航掌握器UINavigationController
- iOS仿熱點話題熱門輪播界面tableView
- IOS中UITableView轉動到指定地位
- iOS為UIView設置暗影後果
- iOS設置UIButton文字顯示地位和字體年夜小、色彩的辦法
- iOS開辟之UIPickerView完成城市選擇器的步調詳解
- iOS長按UIlabel完成可復制功效
- iOS開辟中UIWebView的加載當地數據的三種方法
- iOS中修正UITextField占位符字體色彩的辦法總結
- IOS 仿時間網選票UI實例代碼
- iOS推送之當地告訴UILocalNotification
- 應用UITextField限制只可輸出中,英文,數字的辦法

