ios實現顏色漸變的幾種方法
demo地址:https://github.com/xiaochaofeiyu/YSCAnimation
有用的話求個star,歡迎建議討論。
1. CAGradientLayer實現漸變
CAGradientLayer是CALayer的一個特殊子類,用於生成顏色漸變的圖層,使用較為方便,下面介紹下它的相關屬性:
colors 漸變的顏色
locations 漸變顏色的分割點
startPoint&endPoint 顏色漸變的方向,范圍在(0,0)與(1.0,1.0)之間,如(0,0)(1.0,0)代表水平方向漸變,(0,0)(0,1.0)代表豎直方向漸變
    CAGradientLayer *gradientLayer = [CAGradientLayer layer];
    gradientLayer.colors = @[(__bridge id)[UIColor redColor].CGColor, (__bridge id)[UIColor yellowColor].CGColor, (__bridge id)[UIColor blueColor].CGColor];
    gradientLayer.locations = @[@0.3, @0.5, @1.0];
    gradientLayer.startPoint = CGPointMake(0, 0);
    gradientLayer.endPoint = CGPointMake(1.0, 0);
    gradientLayer.frame = CGRectMake(0, 100, 300, 100);
    [self.view.layer addSublayer:gradientLayer];
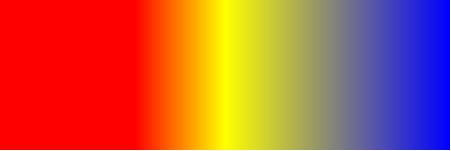
CAGradientLayer實現漸變標間簡單直觀,但存在一定的局限性,比如無法自定義整個漸變區域的形狀,如環形、曲線形的漸變。
2. Core Graphics相關方法實現漸變
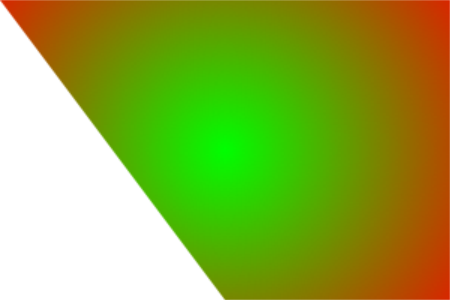
iOS Core Graphics中有兩個方法用於繪制漸變顏色,CGContextDrawLinearGradient可以用於生成線性漸變,CGContextDrawRadialGradient用於生成圓半徑方向顏色漸變。函數可以自定義path,無論是什麼形狀都可以,原理都是用來做Clip,所以需要在CGContextClip函數前調用CGContextAddPath函數把CGPathRef加入到Context中。
另外一個需要注意的地方是漸變的方向,方向是由兩個點控制的,點的單位就是坐標。因此需要正確從CGPathRef中找到正確的點,方法當然有很多種看具體實現,本例中,我就是簡單得通過調用CGPathGetBoundingBox函數,返回CGPathRef的矩形區域,然後根據這個矩形取兩個點,讀者可以根據自行需求修改具體代碼。
1-> 線性漸變
- (void)drawLinearGradient:(CGContextRef)context
                      path:(CGPathRef)path
                startColor:(CGColorRef)startColor
                  endColor:(CGColorRef)endColor
{
    CGColorSpaceRef colorSpace = CGColorSpaceCreateDeviceRGB();
    CGFloat locations[] = { 0.0, 1.0 };

    NSArray *colors = @[(__bridge id) startColor, (__bridge id) endColor];

    CGGradientRef gradient = CGGradientCreateWithColors(colorSpace, (__bridge CFArrayRef) colors, locations);


    CGRect pathRect = CGPathGetBoundingBox(path);

    //具體方向可根據需求修改
    CGPoint startPoint = CGPointMake(CGRectGetMinX(pathRect), CGRectGetMidY(pathRect));
    CGPoint endPoint = CGPointMake(CGRectGetMaxX(pathRect), CGRectGetMidY(pathRect));

    CGContextSaveGState(context);
    CGContextAddPath(context, path);
    CGContextClip(context);
    CGContextDrawLinearGradient(context, gradient, startPoint, endPoint, 0);
    CGContextRestoreGState(context);

    CGGradientRelease(gradient);
    CGColorSpaceRelease(colorSpace);
}

- (void)viewDidLoad
{
    [super viewDidLoad];
    // Do any additional setup after loading the view.

    //創建CGContextRef
    UIGraphicsBeginImageContext(self.view.bounds.size);
    CGContextRef gc = UIGraphicsGetCurrentContext();

    //創建CGMutablePathRef
    CGMutablePathRef path = CGPathCreateMutable();

    //繪制Path
    CGRect rect = CGRectMake(0, 100, 300, 200);
    CGPathMoveToPoint(path, NULL, CGRectGetMinX(rect), CGRectGetMinY(rect));
    CGPathAddLineToPoint(path, NULL, CGRectGetMidX(rect), CGRectGetMaxY(rect));
    CGPathAddLineToPoint(path, NULL, CGRectGetWidth(rect), CGRectGetMaxY(rect));
    CGPathCloseSubpath(path);

    //繪制漸變
    [self drawLinearGradient:gc path:path startColor:[UIColor greenColor].CGColor endColor:[UIColor redColor].CGColor];

    //注意釋放CGMutablePathRef
    CGPathRelease(path);

    //從Context中獲取圖像,並顯示在界面上
    UIImage *img = UIGraphicsGetImageFromCurrentImageContext();
    UIGraphicsEndImageContext();

    UIImageView *imgView = [[UIImageView alloc] initWithImage:img];
    [self.view addSubview:imgView];
}
2-> 圓半徑方向漸變
- (void)drawRadialGradient:(CGContextRef)context
                      path:(CGPathRef)path
                startColor:(CGColorRef)startColor
                  endColor:(CGColorRef)endColor
{
    CGColorSpaceRef colorSpace = CGColorSpaceCreateDeviceRGB();
    CGFloat locations[] = { 0.0, 1.0 };

    NSArray *colors = @[(__bridge id) startColor, (__bridge id) endColor];

    CGGradientRef gradient = CGGradientCreateWithColors(colorSpace, (__bridge CFArrayRef) colors, locations);


    CGRect pathRect = CGPathGetBoundingBox(path);
    CGPoint center = CGPointMake(CGRectGetMidX(pathRect), CGRectGetMidY(pathRect));
    CGFloat radius = MAX(pathRect.size.width / 2.0, pathRect.size.height / 2.0) * sqrt(2);

    CGContextSaveGState(context);
    CGContextAddPath(context, path);
    CGContextEOClip(context);

    CGContextDrawRadialGradient(context, gradient, center, 0, center, radius, 0);

    CGContextRestoreGState(context);

    CGGradientRelease(gradient);
    CGColorSpaceRelease(colorSpace);
}

- (void)viewDidLoad
{
    [super viewDidLoad];
    // Do any additional setup after loading the view.

    //創建CGContextRef
    UIGraphicsBeginImageContext(self.view.bounds.size);
    CGContextRef gc = UIGraphicsGetCurrentContext();

    //創建CGMutablePathRef
    CGMutablePathRef path = CGPathCreateMutable();

    //繪制Path
    CGRect rect = CGRectMake(0, 100, 300, 200);
    CGPathMoveToPoint(path, NULL, CGRectGetMinX(rect), CGRectGetMinY(rect));
    CGPathAddLineToPoint(path, NULL, CGRectGetMidX(rect), CGRectGetMaxY(rect));
    CGPathAddLineToPoint(path, NULL, CGRectGetWidth(rect), CGRectGetMaxY(rect));
    CGPathAddLineToPoint(path, NULL, CGRectGetWidth(rect), CGRectGetMinY(rect));
    CGPathCloseSubpath(path);

    //繪制漸變
    [self drawRadialGradient:gc path:path startColor:[UIColor greenColor].CGColor endColor:[UIColor redColor].CGColor];

    //注意釋放CGMutablePathRef
    CGPathRelease(path);

    //從Context中獲取圖像,並顯示在界面上
    UIImage *img = UIGraphicsGetImageFromCurrentImageContext();
    UIGraphicsEndImageContext();

    UIImageView *imgView = [[UIImageView alloc] initWithImage:img];
    [self.view addSubview:imgView];
}
3. 以CAShapeLayer作為layer的mask屬性
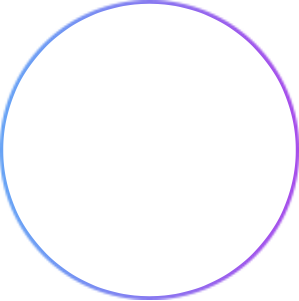
CALayer的mask屬性可以作為遮罩讓layer顯示mask遮住(非透明)的部分;CAShapeLayer為CALayer的子類,通過path屬性可以生成不同的形狀,將CAShapeLayer對象用作layer的mask屬性的話,就可以生成不同形狀的圖層。故生成顏色漸變有以下幾個步驟:
生成一個imageView(也可以為layer),image的屬性為顏色漸變的圖片
生成一個CAShapeLayer對象,根據path屬性指定所需的形狀
將CAShapeLayer對象賦值給imageView的mask屬性
- (void)viewDidLoad
{
    [super viewDidLoad];

    [self.view addSubview:self.firstCircle];
    _firstCircle.frame = CGRectMake(0, 0, 200, 200);
    _firstCircle.center = CGPointMake(CGRectGetWidth(self.view.bounds) / 2.0, CGRectGetHeight(self.view.bounds) / 2.0);
    CGFloat firsCircleWidth = 5;
    self.firstCircleShapeLayer = [self generateShapeLayerWithLineWidth:firsCircleWidth];
    _firstCircleShapeLayer.path = [self generateBezierPathWithCenter:CGPointMake(100, 100) radius:100].CGPath;
    _firstCircle.layer.mask = _firstCircleShapeLayer;
}

- (CAShapeLayer *)generateShapeLayerWithLineWidth:(CGFloat)lineWidth
{
    CAShapeLayer *waveline = [CAShapeLayer layer];
    waveline.lineCap = kCALineCapButt;
    waveline.lineJoin = kCALineJoinRound;
    waveline.strokeColor = [UIColor redColor].CGColor;
    waveline.fillColor = [[UIColor clearColor] CGColor];
    waveline.lineWidth = lineWidth;
    waveline.backgroundColor = [UIColor clearColor].CGColor;

    return waveline;
}

- (UIBezierPath *)generateBezierPathWithCenter:(CGPoint)center radius:(CGFloat)radius
{
    UIBezierPath *circlePath = [UIBezierPath bezierPathWithArcCenter:center radius:radius startAngle:0 endAngle:2*M_PI clockwise:NO];

    return circlePath;
}

- (UIImageView *)firstCircle
{
    if (!_firstCircle) {
        self.firstCircle = [[UIImageView alloc] initWithImage:[UIImage imageNamed:@"circleBackground"]];
        _firstCircle.layer.masksToBounds = YES;
        _firstCircle.alpha = 1.0;
    }

    return _firstCircle;
}
demo地址:https://github.com/xiaochaofeiyu/YSCAnimation
在YSCNewVoiceWaveView與YSCVoiceLoadingCircleView中
- 上一頁:iOS干貨:探探卡片視圖切換效果
- 下一頁:iOS原生二維碼的生成與掃描

