static cell 與 dynamic cell 混合使用
編輯:IOS開發基礎
關於靜態cell與動態cell的混合使用,google一下便會有很多相關文章,這裡也是看過一些前輩的經驗(已經忘記具體是從哪篇文章得到的幫助)之後自己做的筆記。
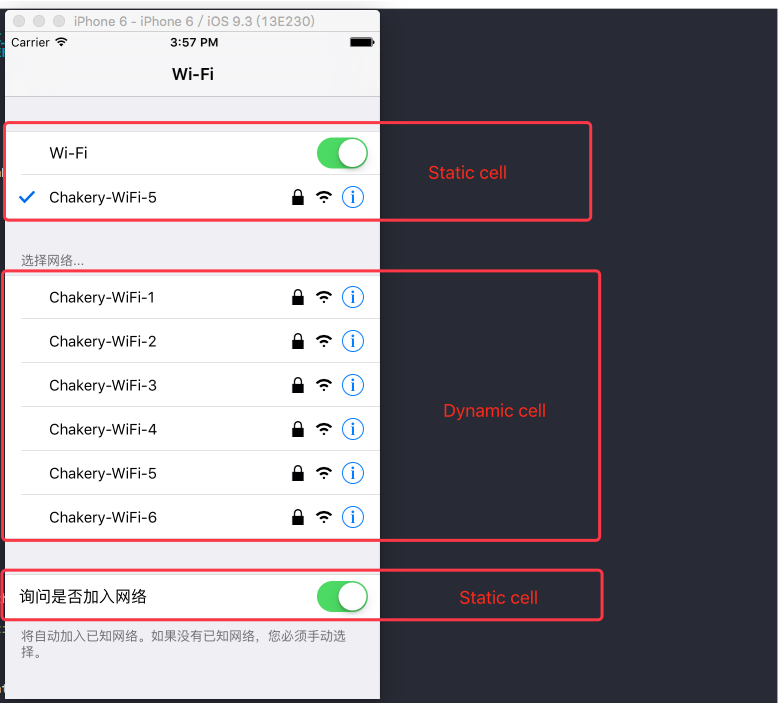
在某些界面中static cell與dynamic cell混合使用會事半功倍,比如手機上的Wi-Fi功能等,效果圖如下:

Wi-Fi界面的第一組與第三組的行數都是固定的,且布局並不相同,類似這樣的布局使用static cell很快就可以完成,然而第二組卻需要使用dynamic cell。這時候就會用到靜態cell與動態cell混合使用的情況。
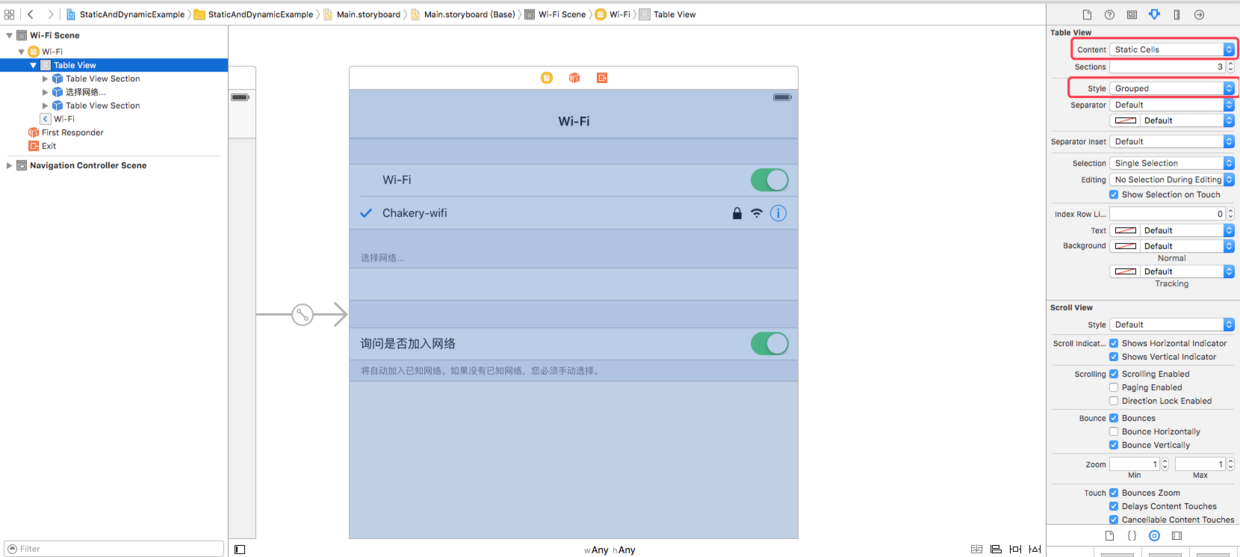
首先,在Storyboard中添加一個UITableViewController,設置為Static cell,並設置好第一組與第三組的內容,第二組需要設置一個空的Cell,如圖:

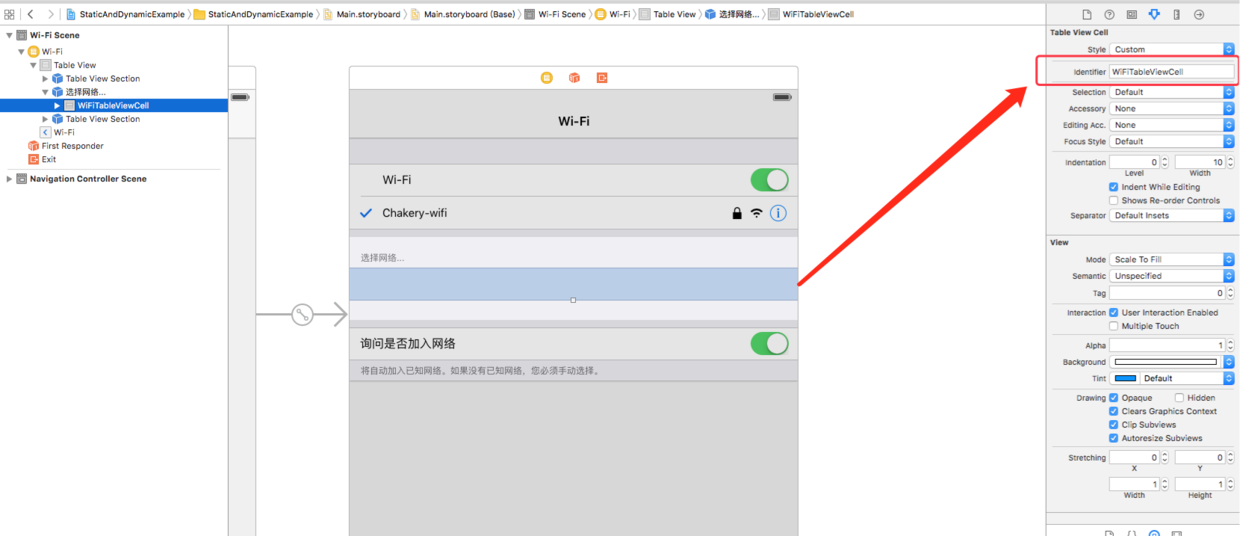
然後,給第二組的空白Cell設置identifier值,如圖:

然後,第二組需要自定義cell,這裡使用XIB來完成,如圖:

接下來需要用代碼注冊Nib,如下:
let nib = UINib(nibName: "WiFiTableViewCell", bundle: nil)
tableView.registerNib(nib, forCellReuseIdentifier: "WiFiTableViewCell")
最後,為了讓 static cell 與 dynamic cell 能夠混合使用,需要實現TableView的代理,代碼如下:
  // 以下代理方法必須實現
override func tableView(tableView: UITableView, cellForRowAtIndexPath indexPath: NSIndexPath) -> UITableViewCell {
  if indexPath.section == 1 {
    let cell = tableView.dequeueReusableCellWithIdentifier("WiFiTableViewCell") as? WiFiTableViewCell
    return cell!
  }
  return super.tableView(tableView, cellForRowAtIndexPath: indexPath)
}

override func tableView(tableView: UITableView, numberOfRowsInSection section: Int) -> Int {
  if section == 1 {
    return 10 //這裡返回第二組的行數
  }
  return super.tableView(tableView, numberOfRowsInSection: section)
}

override func tableView(tableView: UITableView, indentationLevelForRowAtIndexPath indexPath: NSIndexPath) -> Int {
  if indexPath.section == 1 {
    return super.tableView(tableView, indentationLevelForRowAtIndexPath: NSIndexPath(forRow: 0, inSection: 1))
  }
  return super.tableView(tableView, indentationLevelForRowAtIndexPath: indexPath)
}

override func tableView(tableView: UITableView, heightForRowAtIndexPath indexPath: NSIndexPath) -> CGFloat {
  if indexPath.section == 1 {
    return 44
  }
  return super.tableView(tableView, heightForRowAtIndexPath: indexPath)
}
值得注意的是:
在storyboard中需要給第二組設置一行空的Cell,並設置identifier值。
在代碼中也需要注冊Cell
上面提到的代理方法必須實現
最後,本文主要是記錄關於 static cell 與 dynamic cell 的混合使用,因此很多細節問題並沒有處理,更多關於static cell另外的一些使用,可以點擊這裡【更優雅地使用Static Cell】
【Demo下載】
- 上一頁:JS與OC的簡單交互
- 下一頁:iOS快速集成檢查更新
相關文章
+- Mac Android Studio快捷鍵整頓
- 在uiview 的tableView中點擊cell進入跳轉到另外一個界面的完成辦法
- 進修iOS自界說導航掌握器UINavigationController
- iOS仿熱點話題熱門輪播界面tableView
- IOS中UITableView轉動到指定地位
- iOS10告訴框架UserNotification懂得與運用
- iOS 開辟中 NavigationController常常湧現的成績緣由剖析
- iOS10 App適配權限 Push Notifications 字體Frame 碰到的成績
- iOS簡略登錄LoginViewController、注冊RegisterViewController等功效完成辦法
- iPhone/iPad開辟經由過程LocalNotification完成iOS准時當地推送功效
- iOS推送之當地告訴UILocalNotification
- ios開辟navigationController pushViewController 方法屢次跳轉前往到最下層前往到指定的某一層的完成辦法
- iOS10添加當地推送(Local Notification)實例
- iOS Remote Notification長途新聞推送處置
- Mac下獲得AppStore裝置包文件途徑


