帶你實現【京東收貨地址】
導讀
目前大多數APP的地址選擇是用系統的picker View,也不乏用tableview自定義的.
這裡分享一個高仿京東的地址選擇給大家.
源碼地址:https://github.com/HelloYeah/ChooseLocation
歡迎大家Checkout,Star...
下面是京東收貨地址的一些交互以及代碼思路分析
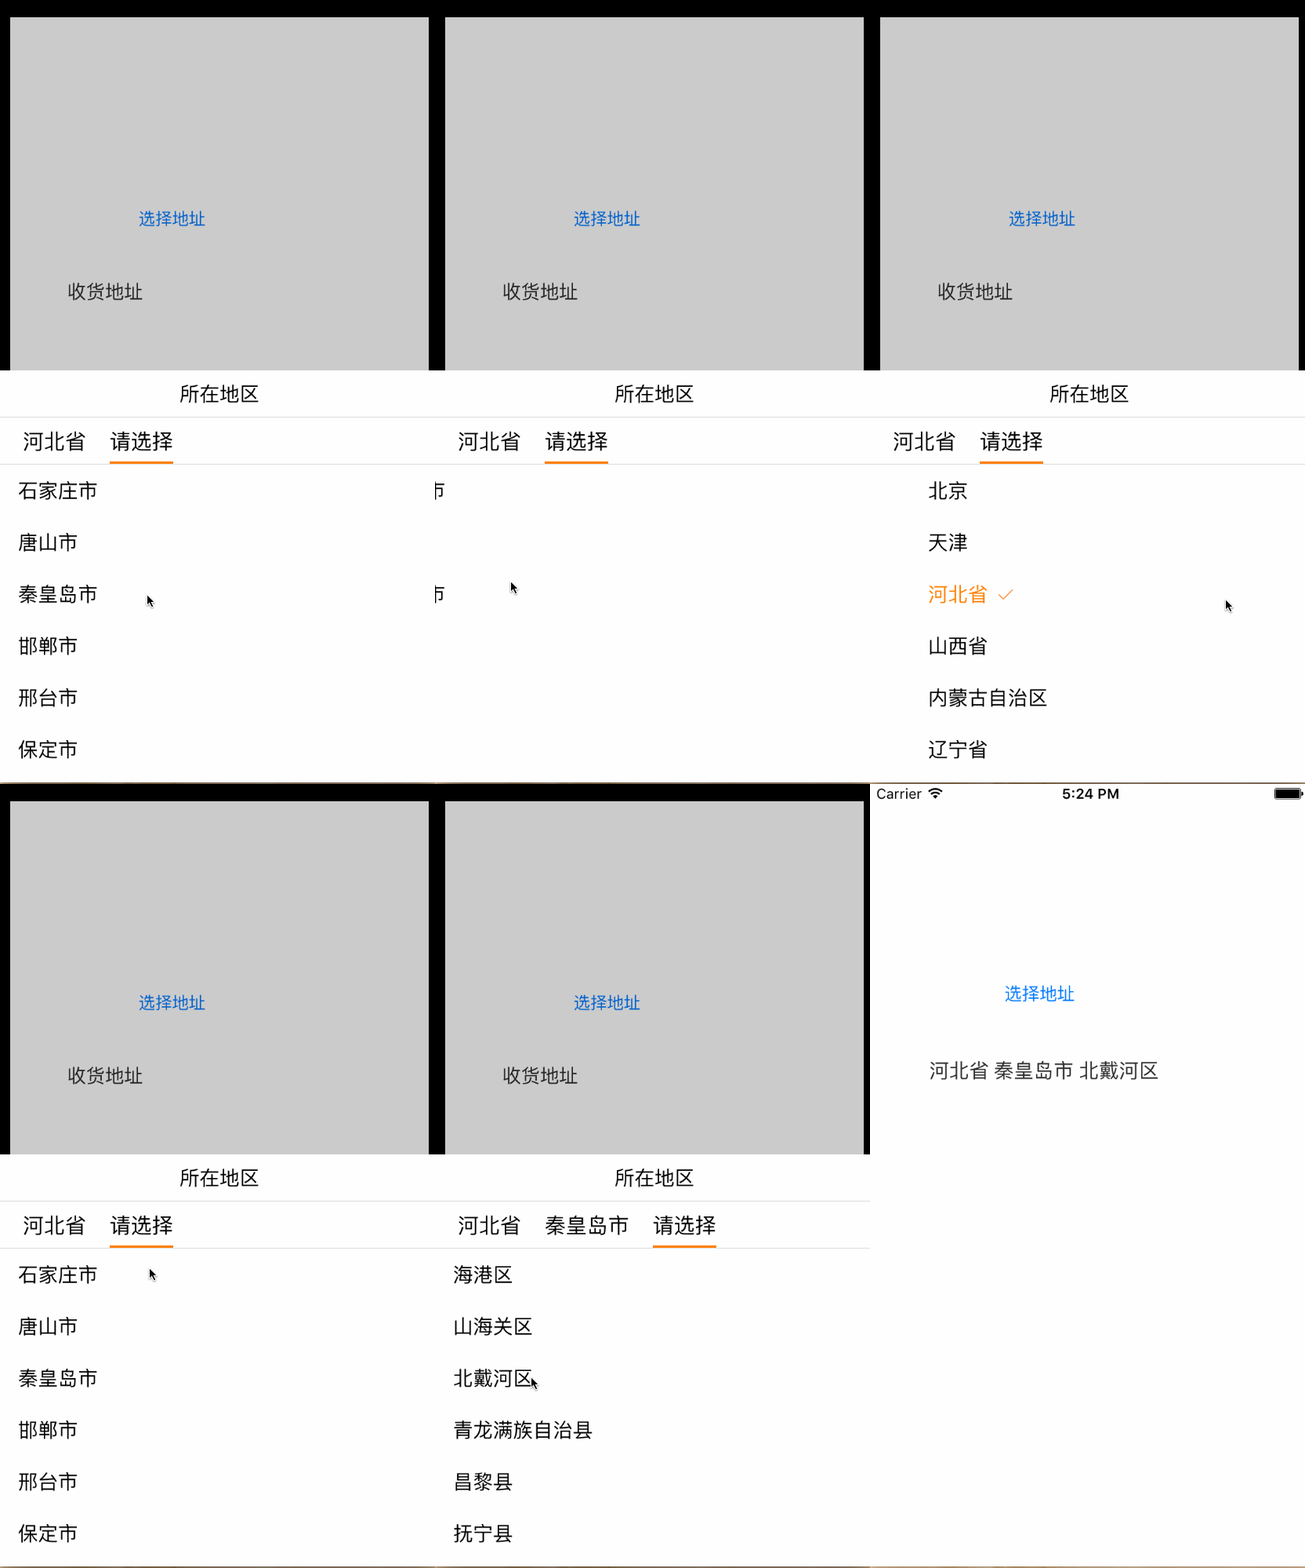
剛打開選擇地址視圖時,底部ScrollView的滾動范圍只有一屏寬.
點擊某個省時,增加對應的市級列表,底部ScrollView橫向滾動區域增加一屏寬.

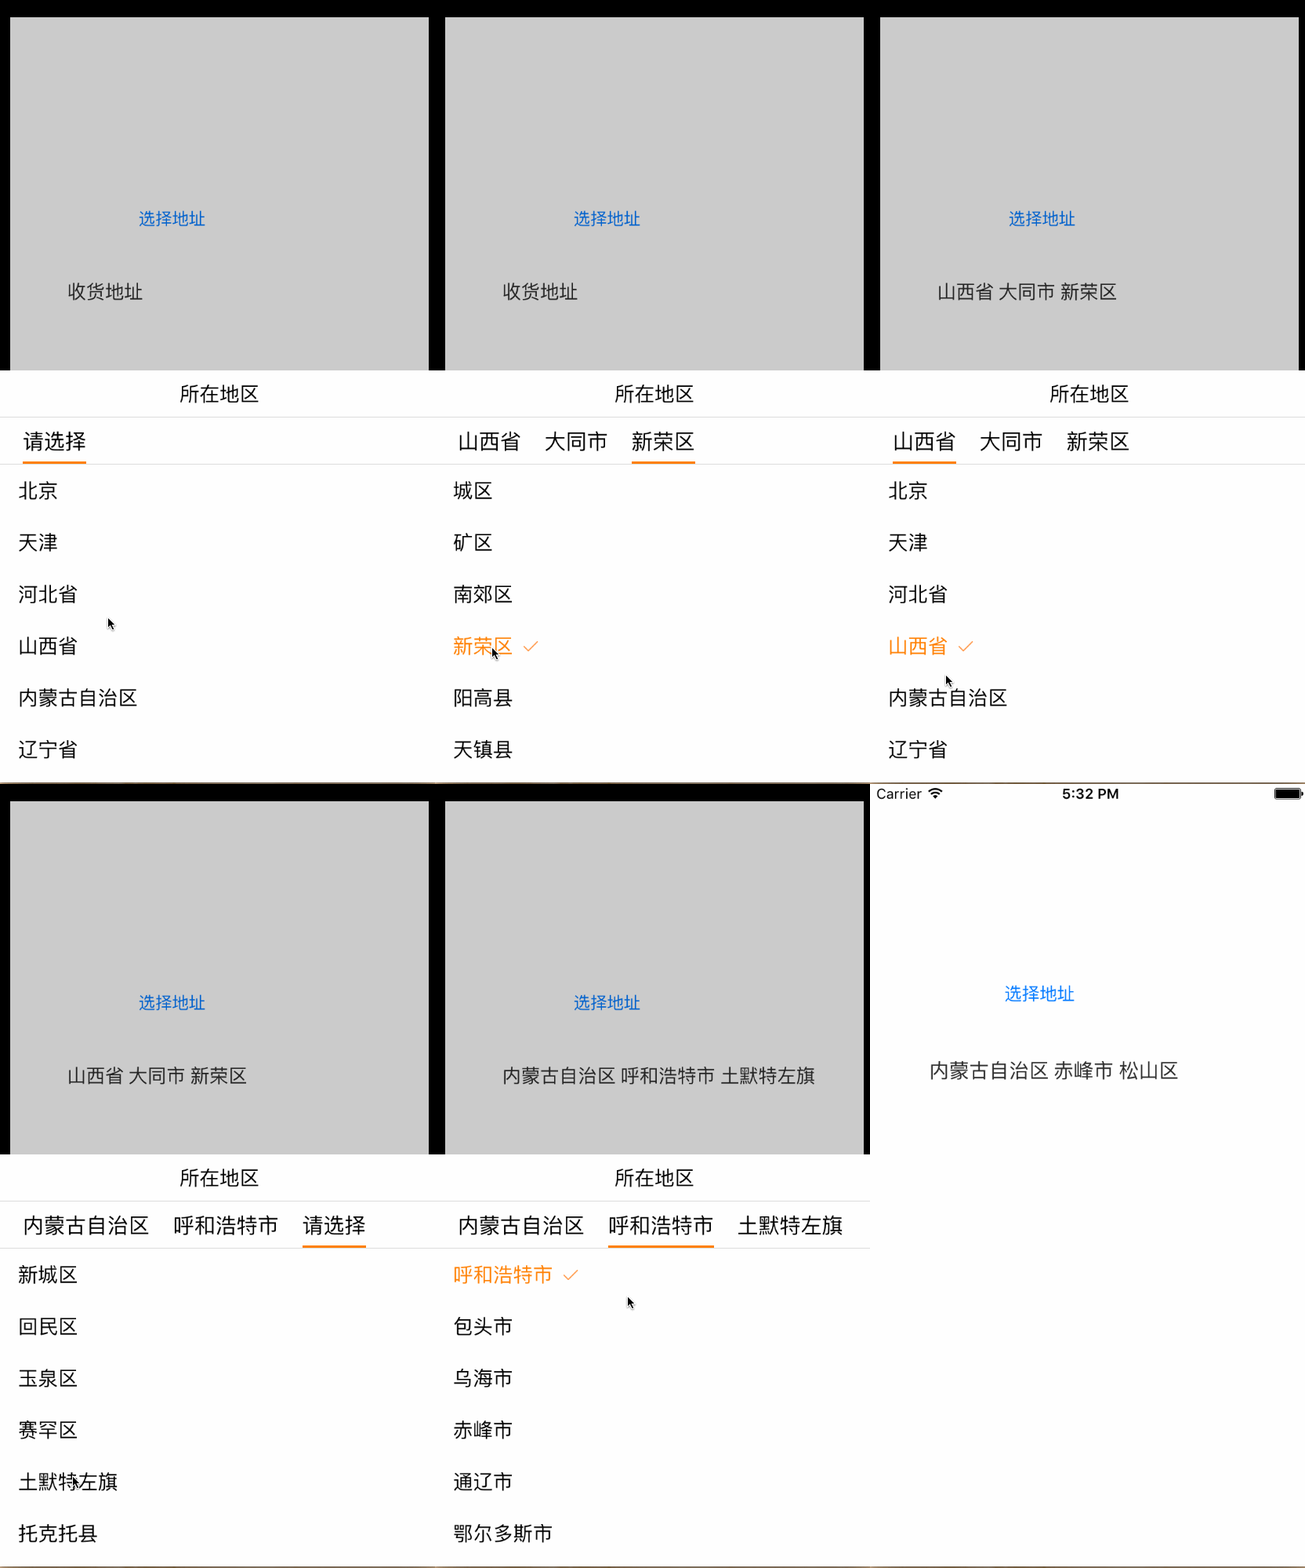
當重新選擇省的時候,移除後面的市級別列表,區級別列表
移除頂部的市按鈕,區按鈕.
並且底部ScrollView的滾動范圍減少至兩屏寬.

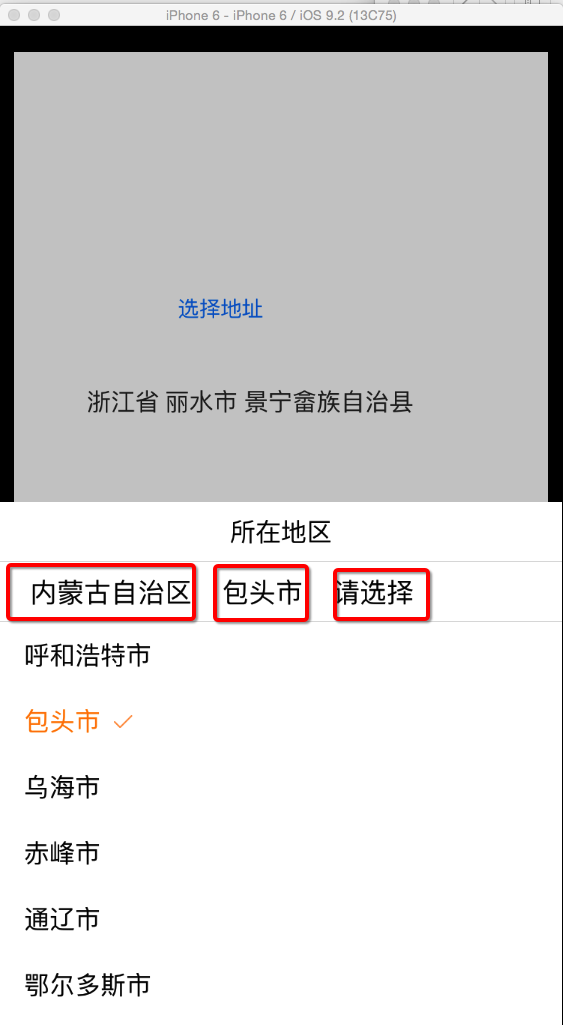
當重新選擇省市的時候,對應頂部按鈕的寬度跟著改變,對應下級的按鈕的x值要相應調整
按鈕底部的指示條的長度和位置跟著相應變化

其他注意點
點擊灰色區域,取消地址選擇,回到主界面
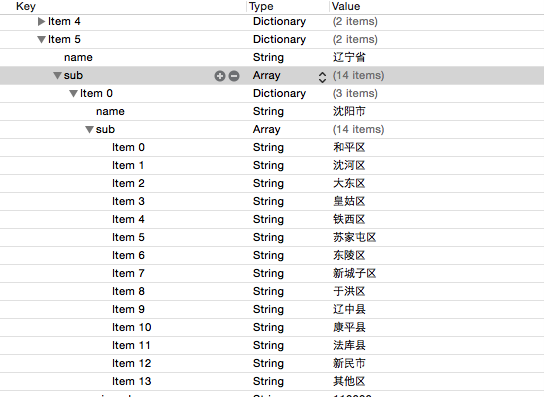
京東用的是網絡請求獲取省市區信息,每點擊一個cell,向服務器發送請求,獲取下級信息.這裡用的是本地plist表
下面是plist表的格式

大體思路已經出來了,寫代碼時的一些注意點
數據源的切換,省市區各級別數據源,如何處理。在哪裡對數據源進行賦值
地址模型
#import @interface AddressItem : NSObject

//省、市、區 地名
@property (nonatomic,copy) NSString * name;

//記錄選中狀態,根據這個值設置對應cell內label的字體顏色以及是否顯示勾選圖片
@property (nonatomic,assign) BOOL  isSelected;

+ (instancetype)initWithName:(NSString *)name isSelected:(BOOL)isSelected;

@end
省級別數據源,直接從plist表中獲取
//省級別數據源
- (NSArray *)dataSouce{

    if (_dataSouce == nil) {
       //省級別數據源,直接從plist表裡面獲取
       NSString * path = [[NSBundle mainBundle] pathForResource:@"address.plist" ofType:nil];

        NSDictionary * dict = [NSDictionary dictionaryWithContentsOfFile:path];
        NSMutableArray * mArray = [NSMutableArray array];
        for (NSDictionary * dict0 in dict[@"address"]) {
            NSMutableDictionary *mDict = [NSMutableDictionary dictionary];
            [mDict setValue:dict0[@"sub"] forKey:@"sub"];
            AddressItem * item = [AddressItem initWithName:dict0[@"name"] isSelected:NO];
            [mDict setValue:item forKey:@"addressItem"];
            [mArray addObject:mDict];
        }

        _dataSouce = mArray;
    }
    return _dataSouce;
}
市,地區級別數據源的賦值。在cell將要選中的代理方法中對下一級數據源進行處理。
//在將要選中cell的代理方法中,對下一級數據源進行處理,要注意的是,這裡需要判斷是第一次選中還是切換選中。
- (NSIndexPath *)tableView:(UITableView *)tableView willSelectRowAtIndexPath:(NSIndexPath *)indexPath{

     if([self.tableViews indexOfObject:tableView] == 0){

        NSIndexPath * indexPath0 = [tableView indexPathForSelectedRow];

        //第二級數據源
        _dataSouce1 = [self addressDictToDataSouce:self.dataSouce[indexPath.row][@"sub"]];

        if (_dataSouce1.count == 1) { //此時為直轄市,第二級的地名都是區級別
            NSMutableArray * mArray = [NSMutableArray array];
            for (NSString * name in _dataSouce1.firstObject[@"sub"]) {
                AddressItem * item = [AddressItem initWithName:name isSelected:NO];
                [mArray addObject:item];
            }
            _dataSouce1 = mArray;
        }

        //之前有選中省,重新選擇省,切換省.
        if (indexPath0 != indexPath && indexPath0) {

            for (int i = 0; i < self.tableViews.count; i++) {
                [self removeLastItem];
            }
            [self addTopBarItem];
            [self addTableView];
            AddressItem * item = self.dataSouce[indexPath.row][@"addressItem"];
            [self scrollToNextItem:item.name ];
            return indexPath;
        }

        //之前未選中省,第一次選擇省
        [self addTopBarItem];
        [self addTableView];
        AddressItem * item = self.dataSouce[indexPath.row][@"addressItem"];
        [self scrollToNextItem:item.name ];

    }else if ([self.tableViews indexOfObject:tableView] == 1){

        UITableView * tableView0 = self.tableViews[1];
        NSIndexPath * indexPath0 = [tableView0 indexPathForSelectedRow];

        //重新選擇市,切換市.
        if (indexPath0 != indexPath && indexPath0) {

            //如果發現省級別字典裡sub關聯的數組只有一個元素,說明是直轄市,這時2級界面為區級別
            if ([self.dataSouce1[indexPath.row] isKindOfClass:[AddressItem class]]){
                AddressItem * item = self.dataSouce1[indexPath.row];
                [self setUpAddress:item.name];
                return indexPath;
            }

            [self removeLastItem];
            [self addTopBarItem];
            [self addTableView];
            AddressItem * item = self.dataSouce1[indexPath.row][@"addressItem"];
            [self scrollToNextItem:item.name];

            return indexPath;
        }

        //之前未選中市,第一次選擇
        if ([self.dataSouce1[indexPath.row] isKindOfClass:[AddressItem class]]){//只有兩級,此時self.dataSouce1裝的是直轄市下面區的數組

            AddressItem * item = self.dataSouce1[indexPath.row];
            [self setUpAddress:item.name];

        }else{

            NSMutableArray * mArray = [NSMutableArray array];
            NSArray * tempArray = _dataSouce1[indexPath.row][@"sub"];
            for (NSString * name in tempArray) {
                AddressItem * item = [AddressItem initWithName:name isSelected:NO];
                [mArray addObject:item];
            }
            _dataSouce2 = mArray;

            [self addTopBarItem];
            [self addTableView];
             AddressItem * item = self.dataSouce1[indexPath.row][@"addressItem"];
            [self scrollToNextItem:item.name];
        }

    }else if ([self.tableViews indexOfObject:tableView] == 2){

        AddressItem * item = self.dataSouce2[indexPath.row];
        [self setUpAddress:item.name];
    }

    return indexPath;
}
在cell選中的代理方法中對數據源進行修改。控制cell的展示
- (void)tableView:(UITableView *)tableView didSelectRowAtIndexPath:(NSIndexPath *)indexPath{

    AddressTableViewCell * cell = [tableView cellForRowAtIndexPath:indexPath];
    AddressItem * item = cell.item;
    item.isSelected = YES;
    cell.item = item;
}

- (void)tableView:(UITableView *)tableView didDeselectRowAtIndexPath:(NSIndexPath *)indexPath{

    AddressTableViewCell * cell = [tableView cellForRowAtIndexPath:indexPath];
    AddressItem * item = cell.item;
    item.isSelected = NO;
    cell.item = item;
}
<當重新選擇省市的時候,對應頂部按鈕的寬度跟著改變,對應下級的按鈕的x值要相應調整> 的處理方案
這裡我自定義一個專門的視圖來存放地址按鈕,每一次對按鈕title重新賦值,或者有增刪按鈕時,外界只需要調用視圖的
layoutIfNeed方法,這時會調用視圖的layoutSubViews方法進行重新布局。按鈕的位置就能很方便的設置好了,這樣做的的好處是,外界不需要關心內部如何實現,邏輯會相對清晰點。
#import "AddressView.h"
#import "UIView+Frame.h"

static  CGFloat  const  HYBarItemMargin = 20;
@interface AddressView ()
@property (nonatomic,strong) NSMutableArray * btnArray;
@end

@implementation AddressView

- (void)layoutSubviews{

    [super layoutSubviews];

    for (NSInteger i = 0; i  0) {
            UIView * preView = self.btnArray[i - 1];
            view.left = HYBarItemMargin  + preView.right;
        }

    }
}

- (NSMutableArray *)btnArray{

    NSMutableArray * mArray  = [NSMutableArray array];
    for (UIView * view in self.subviews) {
        if ([view isKindOfClass:[UIButton class]]) {
            [mArray addObject:view];
        }
    }
    _btnArray = mArray;
    return _btnArray;
}

@end
源碼地址:https://github.com/HelloYeah/ChooseLocation
歡迎大家checkout,Star...
- 手把手帶你學Git
- iOS利用AFNetworking實現文件上傳的示例代碼
- iOS 使用 socket 實現即時通信示例(非第三方庫)
- ios swift3.0實現二維碼掃描、生成、識別示例代碼
- IOS 開發狀態欄隱藏的實現辦法
- IOS購物車界面實現效果示例
- iOS中UITableView Cell實現自定義單選功能
- iOS實現錄音轉碼MP3及轉碼BASE64上傳示例
- AIR Native Extension for iOS 接入第三方sdk 如何實現 AppDelegate 生命周期
- iOS使用分類(category)實現有序字典
- iOS 利用runtime 實現全局字體的改變
- 類比Spring框架來實現OC中的依賴注入
- 基於 socket.io, 簡單實現多平台類似你猜我畫 socket 數據傳輸
- iOS實現手勢密碼功能
- iOS實現視頻和圖片的上傳思路


