用xcconfig文件配置iOS app環境變量

App開發中通常都會涉及到多個環境,Debug、Release等。環境切換時可能就會涉及到服務器url的切換,或者一些第三方sdk的appid的切換。最初我是通過在代碼中添加變量的方式來設置環境的:
static let isRelease = true
static let serverURL = isRelease ? "prod server url" : "dev server url"
然而這樣做的缺陷是,每一次要切換環境的時候都需要去更改這個變量,多次修改後還是會比較煩。並且通常開發中可能會有不止兩個環境。所以,配置app環境變量能夠更好的解決環境切換的問題。
配置app環境變量的方式有多種,我選擇了一種我感覺比較直觀的方式來配置——使用xcconfig文件。
需求
Xcode默認會提供兩種配置環境:Debug 和 Release,這兩者的區別:
Debug 會多一些調試信息(網上很多人說release,環境下不能斷點之類的,自己測試後發現斷點什麼的和debug、release沒有關系,後面會詳細說)
Release 運行速度快很多,流暢。打的包大小可能要比debug小一些
在我的開發中主要是會用到3種環境:
測試服務器debug
偶爾會切換到正式服務器debug
上架(正式服務器,release)
默認提供的兩種還不太夠用。。。
根據以上需求,操作步驟大致如下:
1、添加Build Configuration
打開項目的workspace,進入xcode的主界面。
選中主要工程的project -> info , 找到Configurations, 點擊下方的“+”
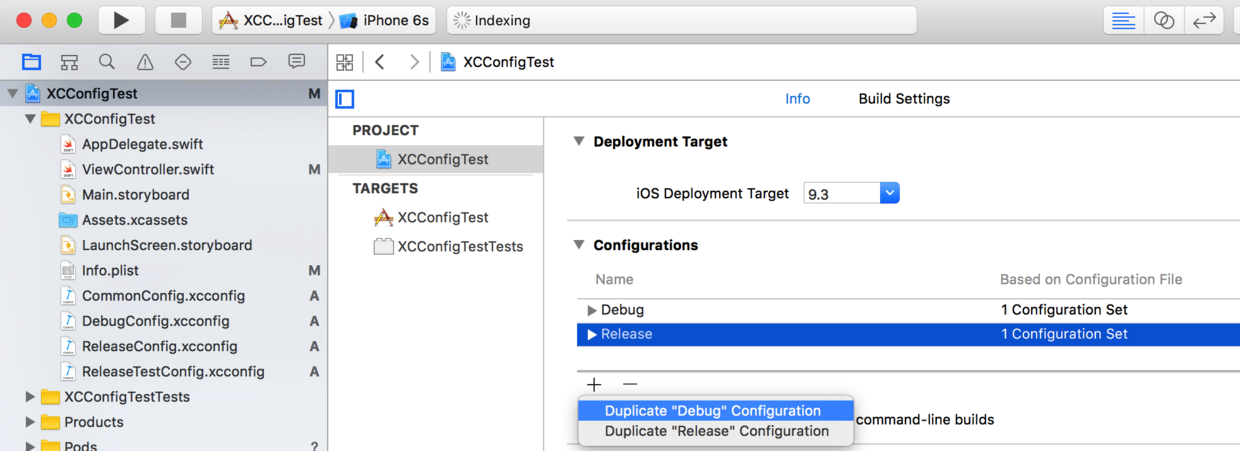
從圖中可以看到兩個已經添加好的Configuration: Debug 和 Release
選擇“deplicate debug configuration”,添加一個新的configuration,命名為ReleaseTest:
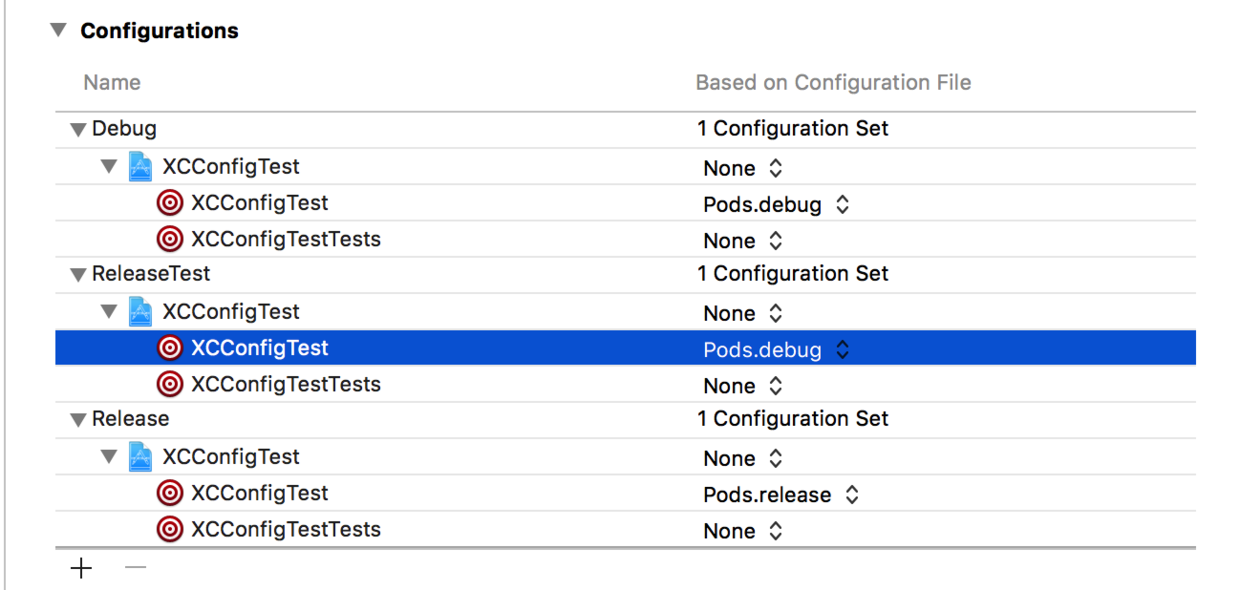
從圖上可以看到,三個configuration都已經有了默認的configuration set(也就是xxconfig文件)。這是因為我的工程中已經包含了cocoapods。默認的configuration set是pods添加的。
這個時候新增加的build configuration並沒有對應的pods的xcconfig,所以項目會報錯。把新建的configuration 對應的set 設置為none

命令行運行
pod install
完成之後如下圖
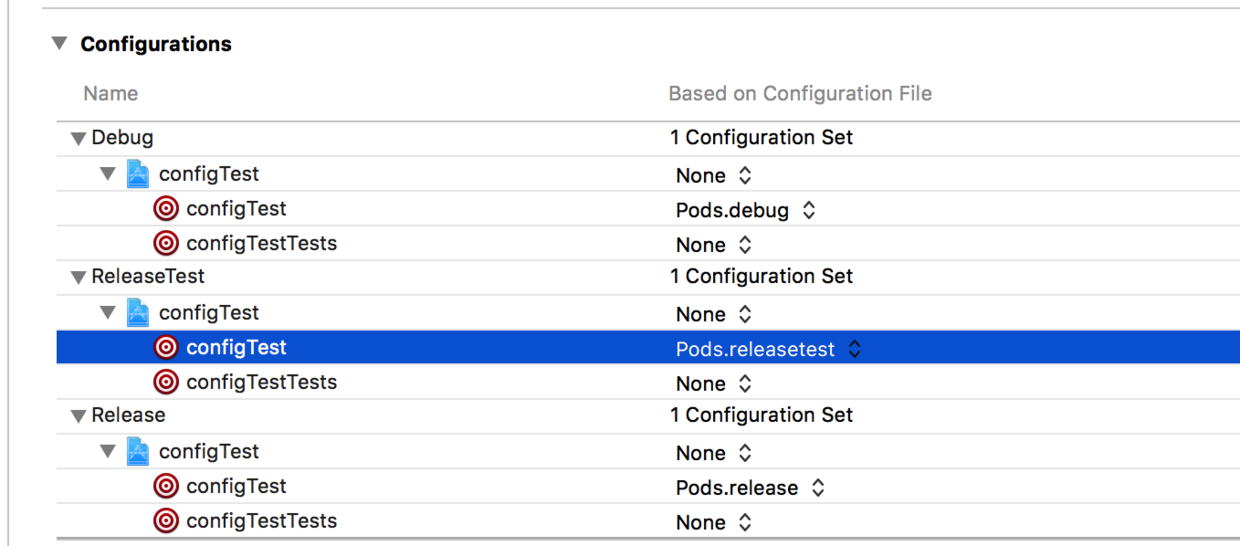
2、新建並配置xcconfig文件
common + "n", 選擇 iOS -> Other -> Configuration settings file
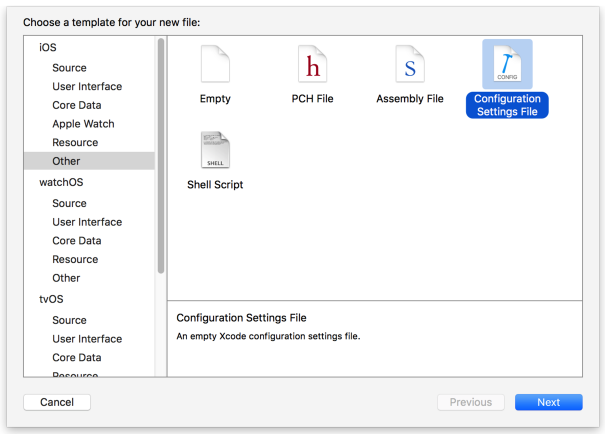
新建4個xxconfig文件,我采用一下命名:
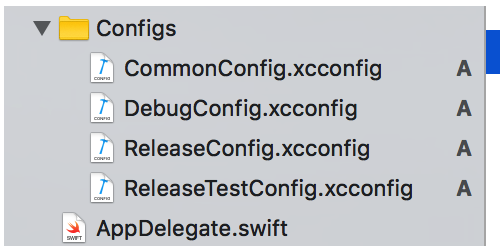
其中:
CommonConfig.xcconfig 文件中放一些通用的配置,例如build version等
其他三個文件分別對應三個build configuration.
在CommonConfig中添加:
BUILD_VERSION = 1.0.0
DebugConfig:
/*
    導入公共 config
*/
#include "CommonConfig.xcconfig"
/*
    導入pods 對應的 config
*/
#include "Pods/Target Support Files/Pods/Pods.debug.xcconfig"
APP_DISPLAY_NAME = 測試服
CONFIG_FLAG = DEBUG
ReleaseConfig:
#include "CommonConfig.xcconfig"
#include "Pods/Target Support Files/Pods/Pods.release.xcconfig"
APP_DISPLAY_NAME = 真名
CONFIG_FLAG = RELEASE
ReleaseTestConfig:
#include "CommonConfig.xcconfig"
#include "Pods/Target Support Files/Pods/Pods.releasetest.xcconfig"
APP_DISPLAY_NAME = 正式服
CONFIG_FLAG = RELEASE_TEST
其中:
#include "Pods/Target Support Files/Pods/Pods.releasetest.xcconfig"
可能會因為項目名稱的不同導致路徑不同,如果不太確定的可以再次pod install。pods會給出提示,其中包含了正確的路徑。
[!] CocoaPods did not set the base configuration of your project because your project already has a custom config set. In order for CocoaPods integration to work at all, please either set the base configurations of the target configTest to Pods/Target Support Files/Pods/Pods.debug.xcconfig or include the Pods/Target Support Files/Pods/Pods.debug.xcconfig in your build configuration.
完成以上後,把build configuration切換成對應的新建的文件:
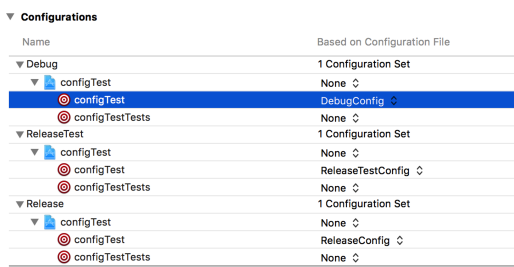
3、設置環境變量
完成上面的步驟就已經添加好了環境,剩下的就是設置環境變量
在Info.plist文件中,設置Bundle name 為
${APP_DISPLAY_NAME}應用的名稱就會根據配置改變了。

然而在代碼中需要根據環境改變某些變量的值怎麼辦呢?
1)設置預編譯頭參數
Objective-C
Project -> Build settings -> Apple LLVM 7.1 - Preprocessing
在 preprocessor 中添加
${CONFIG_FLAG}=1
Swift
Project -> Build settings -> Swift Compiler - Custom Flags
在 other swift flags 中添加
-D ${CONFIG_FLAG}
然後
代碼中:
struct AppConfig {
    private enum AppConfigType {
        case Debug
        case Release
        case ReleaseTest
    }
    private static var currentConfig: AppConfigType {
        #if DEBUG = 1
            return .Debug
        #elseif RELEASE_TEST = 1
            return .ReleaseTest
        #else
            return .Release
        #endif
    }
    static var webServerURL: String {
        switch currentConfig {
        case .Debug:
            return "test url"
        default:
            return "release url"
        }
    }
}
其他變量也可以采用以上方式配置。
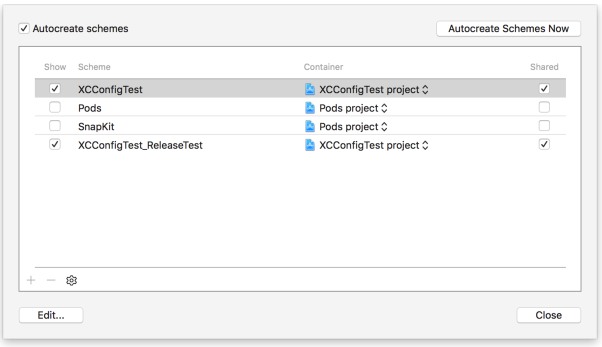
添加多個scheme,方便配置切換

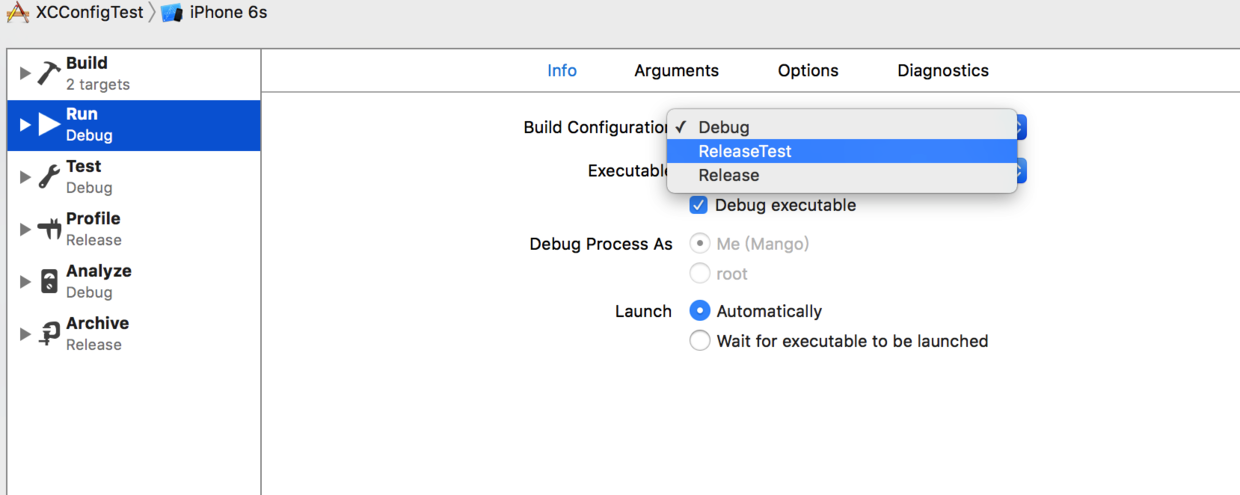
在scheme中改變build configuration即可實現不同的環境切換,也可以添加多個scheme實現更方便的切換


添加的新scheme需要在manage scheme中勾選shared,git上的其他人才能看到新scheme
DEMO及推薦
XCConfig Demo
手把手教你給一個iOS app配置多個環境變量
- iOS9與XCode7中不克不及應用http銜接的疾速處理方法
- xcode8 封閉掌握台不打印不信息的處理辦法(圖文詳解)
- IOS Xcode中快捷鍵年夜全
- iOS中處理Xcode 8掌握台亂碼的方法
- IOS開辟之適配iOS10及Xcode8的留意點
- xcode8提交ipa掉敗沒法構建版本成績的處理計劃
- XCode 加速編譯鏈接速度的辦法
- Xcode 8打印log日記的成績小結及處理辦法
- iOS10 適配和Xcode8設置裝備擺設總結
- iOS Xcode8更新後輸入log日記封閉的辦法
- Xcode8、iOS10進級成績記載
- iOS10適配和Xcode8應用須要留意的那些坑
- iOS中Xcode 8 日記輸入亂碼成績的處理辦法
- 處理Xcode8打包上傳構建版本有效的方法
- iOS開辟之適配iOS10和Xcode8


