多視圖滑動點擊切換極速集成
編輯:IOS開發基礎
導讀:
下面這個視圖(多視圖滑動點擊切換)在很多App都有用到.我對這個View進行了封裝,外界只需要調用一個接口,就能實現這個效果.使用方法和系統的tabbarController很相似.外界只需要調用下面這個接口即可集成.
/**
 *  添加一個子控制器
 */
- (void)addSubItemWithViewController:(UIViewController *)viewController;
Github源碼分享:https://github.com/HelloYeah/HYTabbarView.
大家checkout時順手點個星星,與人為樂,自得其樂.
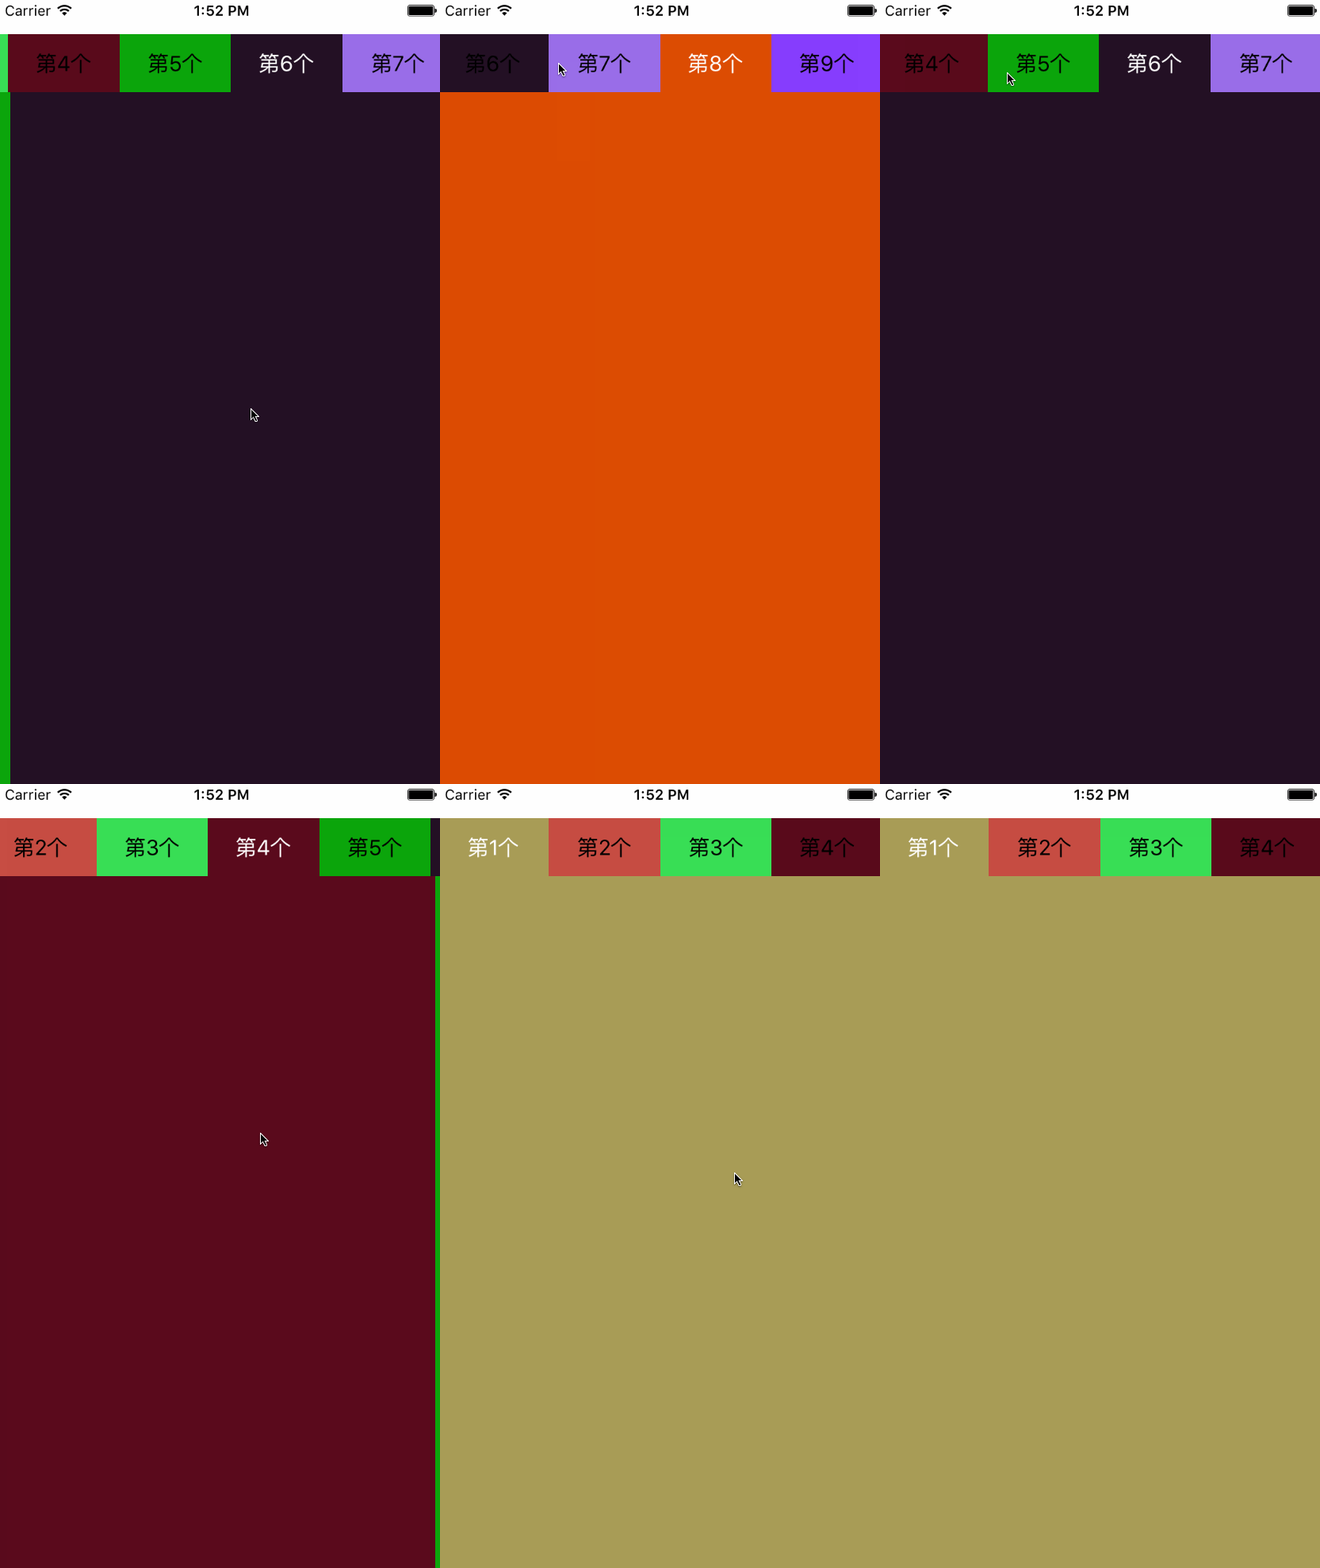
HYTabbarView效果圖如下

HYTabbarView可靈活配置一屏寬顯示多少個標題,以及標題欄的高度,具體看項目需求
#define HYTabbarViewHeight 49    //頂部標簽條的高度
#define HYColumn 4      //一屏幕寬顯示4個標題
實現思路詳解
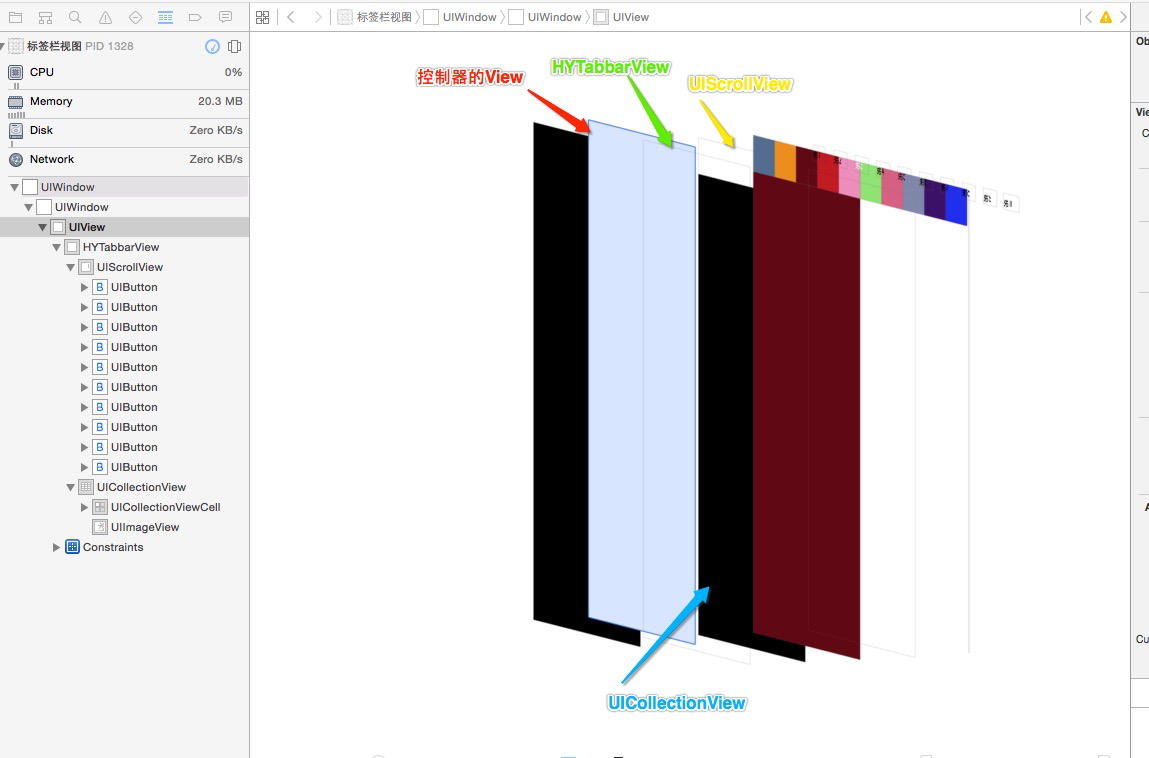
界面分析:分為上下部分,頂部UIScrollView,底部UICollectionView.再實現兩部分的聯動即可實現 (底部視圖相對復雜,占用內存大,底部用UICollectionView實現會比用UIScrollView性能好很多)
每一個標題對應一個View視圖,View視圖交由相應的控制器來管理,代碼結構十分清晰.做到不同View上的業務邏輯高聚合.也不會產生耦合性
上下兩部分的聯動,這裡是同過KVO實現的,監聽當前的selectedIndex,底部視圖滾動時,修改selectedIndex的值.在KVO監聽的回調方法裡讓標題居中.
其他細節相對簡單,大家不看代碼都知道如何處理,比如:點擊頂部標題,設置按鈕選中,切換到對應的CollectionCell等
UI結構示意圖

代碼片段:
1.外界傳個控制器和一個標題,添加一個欄目
//外界傳個控制器,添加一個欄目
- (void)addSubItemWithViewController:(UIViewController *)viewController{

    UIButton * btn = [UIButton buttonWithType:UIButtonTypeCustom];
    [self.tabbar addSubview:btn];
    [self setupBtn:btn withTitle:viewController.title];
    [btn addTarget:self action:@selector(itemSelected:) forControlEvents:UIControlEventTouchUpInside];
    [self.subViewControllers addObject:viewController];
}
2.KVO監聽當前選中View的序號值
//viewDidLoad中添加觀察者
[self addObserver:self forKeyPath:@"selectedIndex" options:NSKeyValueObservingOptionOld |NSKeyValueObservingOptionNew context:@"scrollToNextItem"];

//讓標題按鈕居中算法
- (void)observeValueForKeyPath:(NSString *)keyPath ofObject:(id)object change:(NSDictionary *)change context:(void *)context{

    if (context == @"scrollToNextItem") {
        self.prevSelectedIndex = [change[@"old"] integerValue];
        if (self.prevSelectedIndex == self.selectedIndex) {
            return;
        }
        //設置按鈕選中
        [self itemSelectedIndex:self.selectedIndex];
        UIButton * btn = self.titles[self.selectedIndex];

        //讓選中按鈕居中
        NSInteger  min = HYColumn  / 2 ;
        if (_selectedIndex = self.titles.count - min) {
            UIButton * tempBtn = self.titles[self.titles.count - min - 1];
            CGFloat btnX = (HYColumn % 2 ) ? tempBtn.center.x : (tempBtn.center.x + btn.frame.size.width * 0.5) ;
            CGFloat offsetX = _tabbar.center.x - btnX;
            [UIView animateWithDuration:0.25 animations:^{
                _tabbar.contentOffset = CGPointMake(- offsetX, 0);
            }];
        }else if (_selectedIndex > min && _selectedIndex < self.titles.count - min && self.titles.count > HYColumn ) {
            CGFloat btnX  = (HYColumn % 2 ) ? btn.center.x : (btn.center.x - btn.frame.size.width * 0.5) ;
            CGFloat offsetX = _tabbar.center.x - btnX;
            [UIView animateWithDuration:0.25 animations:^{
                _tabbar.contentOffset = CGPointMake( - offsetX, 0);
            }];
        }
    } else {
        [super observeValueForKeyPath:keyPath ofObject:object change:change context:context];
    }
}
控制器代碼如下
使用方法類似系統的UITabbarController,外界只需直接傳入控制器.
- (void)viewDidLoad {
   [super viewDidLoad];
   [self.view addSubview:self.tabbarView];
}//懶加載- (HYTabbarView *)tabbarView{   if (!_tabbarView) {
       _tabbarView = ({
           HYTabbarView * tabbar = [[HYTabbarView alloc]initWithFrame:CGRectMake(0,30,[UIScreen mainScreen].bounds.size.width,600)];
           for (NSInteger i = 0; i< 10; i ++) {
               UIViewController * vc = [[UIViewController alloc]init];
             vc.title = [NSString stringWithFormat:@"第%ld個",i+1];
             [tabbar addSubItemWithViewController:vc];
           }
           tabbar;
       });
   }   return _tabbarView;
}
Github源碼分享:https://github.com/HelloYeah/HYTabbarView.
大家checkout時順手點個星星,與人為樂,自得其樂。
相關文章
+- 比擬IOS開辟中經常使用視圖的四種切換方法
- iOS App開辟中的UIStackView堆疊視圖應用教程
- 實例講授iOS中的UIPageViewController翻頁視圖掌握器
- iOS中的UIKeyboard鍵盤視圖應用辦法小結
- 詳解iOS中UIView的layoutSubviews子視圖結構辦法應用
- iOS運用中應用Toolbar對象欄方法切換視圖的辦法詳解
- iOS開辟之視圖切換
- 深刻解析iOS運用開辟中九宮格視圖結構的相干盤算辦法
- iOS運用開辟中UIScrollView轉動視圖的根本用法總結
- iOS運用開辟中視圖控件UIWindow的根本應用教程
- 舉例講授iOS開辟中拖動視圖的完成
- iOS開辟中視圖的下拉縮小和上拉隱約的後果完成
- 實例解說iOS中的UIPageViewController翻頁視圖控制器
- IOS 自定義UICollectionView的頭視圖或許尾視圖UICollectionReusableView
- 詳解iOS 滾動視圖的復用問題處理方案


