仿BOSS直聘APP下拉刷新動畫實現
轉自微信公眾號:iOS面向編碼
BOSS直聘APP的下拉刷新動畫蠻有趣的,我們來嘗試實現一下。
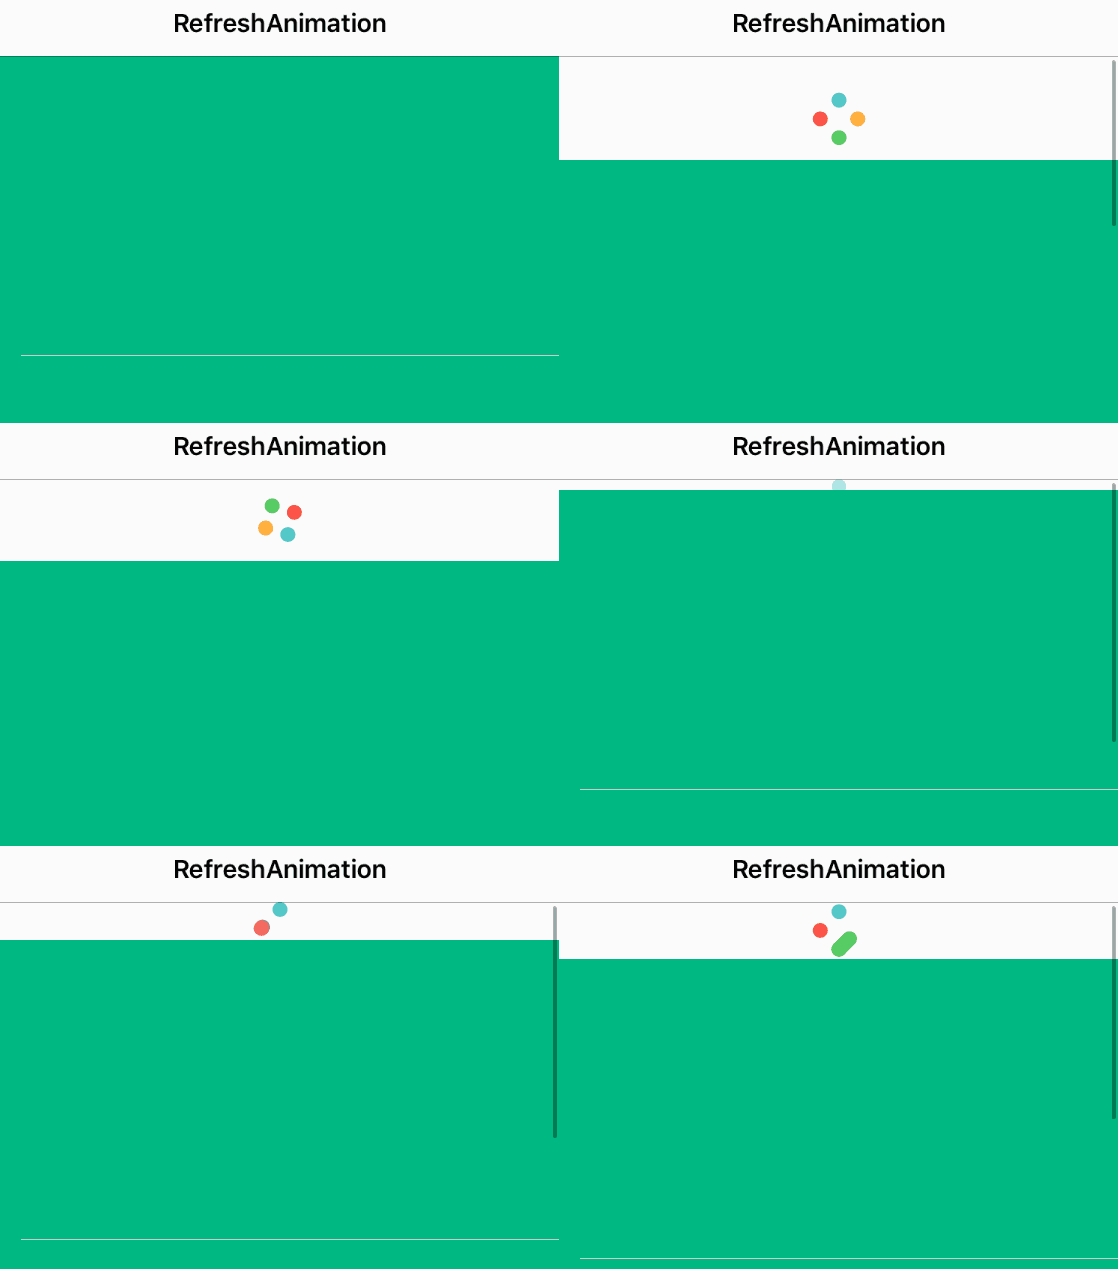
先來看看最終效果:

關於實現思路:
實現思路這東西,並不是一成不變的,每個人心中都有自己喜歡的思想和套路,這裡僅分享下我的思路,力圖起到拋磚引玉的作用,深入思考,也許你會有更好的方法和思路。
動畫拆分
再復雜的動畫都可以拆分成許多簡單的動畫組合起來,這個動畫大概可以分成兩個主體,我把它分別錄制出來給大家看看
第一個,下拉過程中的動畫

第一個動畫又可以拆分為4個大階段,對應著4個點之間的動畫過程:

每個大階段又可以拆分為2個小階段(以第一個和第二個點為例):
1)A點到B點之間的動畫:B點不出現,以A點為起點,從A點一直“伸”到B點
2)B點到A點之間的動畫:B點出現,以B點為終點,從A點一直“縮”到B點
綜上,第一個動畫可以拆分為8個階段:

第二個,進入刷新狀態的動畫

第二個動畫又可以拆分為兩個單獨動畫(旋轉+移動)的組合:
整體旋轉動畫:整體不斷重復360度旋轉
點反復移動動畫:4個點在旋轉360的周期內進行(內->外->內->外)的移動
動畫實現方式
了解了動畫的過程,我們來選擇動畫的實現方式,由於這裡僅需要畫圓形,我們選擇CAShapeLayer來實現。
CAShapeLayer的簡介:
CAShapeLayer顧名思義,就是代表一個形狀(Shape)的Layer,它是CALayer的子類。
CAShapeLayer初始化需要指定Frame,但它的形狀是由path屬性來決定,且必須指定path,不然會沒有形狀。
CAShapeLayer的重要屬性:
1、lineWidth 渲染線的寬度
2、lineCap、lineJoin 渲染線兩端和轉角的樣式
3、fillColor、strokeColor 填充、描邊的渲染顏色
4、path 指定的繪圖路徑,path不完整會自動封閉區域
5、strokeStart、strokeEnd 繪制path的起始和結束的百分比
CAShapeLayer的動畫特點:
1、CAShapeLayer跟CALayer一樣自帶動畫效果
2、CAShapeLayer的動畫效果僅限沿路徑變化,不支持填充區域的動畫效果
動畫實現
我們自定義一個RefreshHeaderView,並通過分類將其和scrollView關聯,當進行下拉操作的時候,headerView進行相應的動畫。
1)固定位置的4個點
對應4個Layer,Layer的路徑是圓形,填充顏色和路徑顏色一致
CGPoint topPoint = CGPointMake(centerLine, radius);
self.TopPointLayer = [self layerWithPoint:topPoint color:topPointColor];
self.TopPointLayer.hidden = NO;
self.TopPointLayer.opacity = 0.f;
[self.layer addSublayer:self.TopPointLayer];
CGPoint leftPoint = CGPointMake(radius, centerLine);
self.LeftPointLayer = [self layerWithPoint:leftPoint color:leftPointColor];
[self.layer addSublayer:self.LeftPointLayer];
CGPoint bottomPoint = CGPointMake(centerLine, SURefreshHeaderHeight - radius);
self.BottomPointLayer = [self layerWithPoint:bottomPoint color:bottomPointColor];
[self.layer addSublayer:self.BottomPointLayer];
CGPoint rightPoint = CGPointMake(SURefreshHeaderHeight - radius, centerLine);
self.rightPointLayer = [self layerWithPoint:rightPoint color:rightPointColor];
[self.layer addSublayer:self.rightPointLayer];
- (CAShapeLayer *)layerWithPoint:(CGPoint)center color:(CGColorRef)color {
CAShapeLayer * layer = [CAShapeLayer layer];
layer.frame = CGRectMake(center.x - SURefreshPointRadius, center.y - SURefreshPointRadius, SURefreshPointRadius * 2, SURefreshPointRadius * 2);
layer.fillColor = color;
layer.path = [self pointPath];
layer.hidden = YES;
return layer;
}
- (CGPathRef)pointPath {
return [UIBezierPath bezierPathWithArcCenter:CGPointMake(SURefreshPointRadius, SURefreshPointRadius) radius:SURefreshPointRadius startAngle:0 endAngle:M_PI * 2 clockwise:YES].CGPath;
}
2)4個點的連接介質
對應一個Layer,Layer的路徑是由4段直線拼接而成,直線的直徑和圓形的直接一致,初始的渲染結束位置為0。
8個階段的動畫,可以看成是Layer的渲染開始和結束位置不斷變化,並通過改變其渲染的起始和結束位置來改變其形狀
self.lineLayer = [CAShapeLayer layer];
self.lineLayer.frame = self.bounds;
self.lineLayer.lineWidth = SURefreshPointRadius * 2;
self.lineLayer.lineCap = kCALineCapRound;
self.lineLayer.lineJoin = kCALineJoinRound;
self.lineLayer.fillColor = topPointColor;
self.lineLayer.strokeColor = topPointColor;
UIBezierPath * path = [UIBezierPath bezierPath];
[path moveToPoint:topPoint];
[path addLineToPoint:leftPoint];
[path moveToPoint:leftPoint];
[path addLineToPoint:bottomPoint];
[path moveToPoint:bottomPoint];
[path addLineToPoint:rightPoint];
[path moveToPoint:rightPoint];
[path addLineToPoint:topPoint];
self.lineLayer.path = path.CGPath;
self.lineLayer.strokeStart = 0.f;
self.lineLayer.strokeEnd = 0.f;
[self.layer insertSublayer:self.lineLayer above:self.TopPointLayer];
3)滑動過程控制動畫進度
該步驟的核心是通過下拉的長度計算LineLayer的開始和結束位置,並在適當的時候顯示或隱藏對應的點
- (void)setLineLayerStrokeWithProgress:(CGFloat)progress {
float startProgress = 0.f;
float endProgress = 0.f;
//沒有下拉,隱藏動畫
if (progress < 0) {
self.TopPointLayer.opacity = 0.f;
[self adjustPointStateWithIndex:0];
}
//下拉前奏:頂部的Point的可見度漸變的過程
else if (progress >= 0 && progress < (SURefreshPullLen - 40)) {
self.TopPointLayer.opacity = progress / 20;
[self adjustPointStateWithIndex:0];
}
//開始動畫,這裡將下拉的進度分為4個大階段,方便處理,請看前面的描述
else if (progress >= (SURefreshPullLen - 40) && progress < SURefreshPullLen) {
self.TopPointLayer.opacity = 1.0;
//大階段 0 ~ 3
NSInteger stage = (progress - (SURefreshPullLen - 40)) / 10;
//對應每個大階段的前半段,請看前面描述
CGFloat subProgress = (progress - (SURefreshPullLen - 40)) - (stage * 10);
if (subProgress >= 0 && subProgress  5 && subProgress < 10) {
[self adjustPointStateWithIndex:stage * 2 + 1];
startProgress = stage / 4.0 + (subProgress - 5) / 40.0 * 2;
if (startProgress < (stage + 1) / 4.0 - 0.1) {
startProgress = (stage + 1) / 4.0 - 0.1;
}
endProgress = (stage + 1) / 4.0;
}
}
//下拉超過一定長度,4個點已經完全顯示
else {
self.TopPointLayer.opacity = 1.0;
[self adjustPointStateWithIndex:NSIntegerMax];
startProgress = 1.0;
endProgress = 1.0;
}
//計算完畢,設置LineLayer的開始和結束位置
self.lineLayer.strokeStart = startProgress;
self.lineLayer.strokeEnd = endProgress;
}
- (void)adjustPointStateWithIndex:(NSInteger)index { //index : 小階段: 0 ~ 7
self.LeftPointLayer.hidden = index > 1 ? NO : YES;
self.BottomPointLayer.hidden = index > 3 ? NO : YES;
self.rightPointLayer.hidden = index > 5 ? NO : YES;
self.lineLayer.strokeColor = index > 5 ? rightPointColor : index > 3 ? bottomPointColor : index > 1 ? leftPointColor : topPointColor;
}
4)達到條件時進入刷新狀態
進入刷新狀態的條件:下拉長度超過我們指定的長度,且手已離開屏幕(即scrollView沒有處於拖動的狀態),且沒有正在播放Loading動畫。
進入刷新狀態時,同時執行下拉刷新時需要執行的操作(如加載網絡數據等等)
//如果不是正在刷新,則漸變動畫
if (!self.animating) {
if (progress >= SURefreshPullLen) {
self.y = - (SURefreshPullLen - (SURefreshPullLen - SURefreshHeaderHeight) / 2);
}else {
if (progress = SURefreshPullLen && !self.animating && !self.scrollView.dragging) {
[self startAni];
if (self.handle) {
self.handle();
}
}
執行Loading動畫,我們采用CA動畫來實現
scrollView的下沉動畫
[UIView animateWithDuration:0.5 animations:^{
UIEdgeInsets inset = self.scrollView.contentInset;
inset.top = SURefreshPullLen;
self.scrollView.contentInset = inset;
}];
4個點的來回移動動畫
[self addTranslationAniToLayer:self.TopPointLayer xValue:0 yValue:SURefreshTranslatLen];
[self addTranslationAniToLayer:self.LeftPointLayer xValue:SURefreshTranslatLen yValue:0];
[self addTranslationAniToLayer:self.BottomPointLayer xValue:0 yValue:-SURefreshTranslatLen];
[self addTranslationAniToLayer:self.rightPointLayer xValue:-SURefreshTranslatLen yValue:0];
- (void)addTranslationAniToLayer:(CALayer *)layer xValue:(CGFloat)x yValue:(CGFloat)y {
CAKeyframeAnimation * translationKeyframeAni = [CAKeyframeAnimation animationWithKeyPath:@"transform"];
translationKeyframeAni.duration = 1.0;
translationKeyframeAni.repeatCount = HUGE;
translationKeyframeAni.removedOnCompletion = NO;
translationKeyframeAni.fillMode = kCAFillModeForwards;
translationKeyframeAni.timingFunction = [CAMediaTimingFunction functionWithName:kCAMediaTimingFunctionLinear];
NSValue * fromValue = [NSValue valueWithCATransform3D:CATransform3DMakeTranslation(0, 0, 0.f)];
NSValue * toValue = [NSValue valueWithCATransform3D:CATransform3DMakeTranslation(x, y, 0.f)];
translationKeyframeAni.values = @[fromValue, toValue, fromValue, toValue, fromValue];
[layer addAnimation:translationKeyframeAni forKey:@"translationKeyframeAni"];
}
RefreshHeader的整體旋轉動畫
[self addRotationAniToLayer:self.layer];
- (void)addRotationAniToLayer:(CALayer *)layer {
CABasicAnimation * rotationAni = [CABasicAnimation animationWithKeyPath:@"transform.rotation.z"];
rotationAni.fromValue = @(0);
rotationAni.toValue = @(M_PI * 2);
rotationAni.duration = 1.0;
rotationAni.timingFunction = [CAMediaTimingFunction functionWithName:kCAMediaTimingFunctionLinear];
rotationAni.repeatCount = HUGE;
rotationAni.fillMode = kCAFillModeForwards;
rotationAni.removedOnCompletion = NO;
[layer addAnimation:rotationAni forKey:@"rotationAni"];
}
5)回復初始狀態
當用戶拖動的長度達不到臨界值,或者結束Loading的狀態時,RefreshHeaderView移除所有的動畫,回復到初始狀態
- (void)removeAni {
[UIView animateWithDuration:0.5 animations:^{
UIEdgeInsets inset = self.scrollView.contentInset;
inset.top = 0.f;
self.scrollView.contentInset = inset;
} completion:^(BOOL finished) {
[self.TopPointLayer removeAllAnimations];
[self.LeftPointLayer removeAllAnimations];
[self.BottomPointLayer removeAllAnimations];
[self.rightPointLayer removeAllAnimations];
[self.layer removeAllAnimations];
[self adjustPointStateWithIndex:0];
self.animating = NO;
}];
}
動畫添加
我們創建一個UIScrollView的分類,添加一個給ScrollView添加RefreshHeader的方法
- (void)addRefreshHeaderWithHandle:(void (^)())handle {
SURefreshHeader * header = [[SURefreshHeader alloc]init];
header.handle = handle;
self.header = header;
[self insertSubview:header atIndex:0];
}
需要注意的是,由於分類中不能直接添加Property,我們采用關聯對象的方法將RefreshHeader和ScrollView綁定
objc_setAssociatedObject(self, @selector(header), header, OBJC_ASSOCIATION_ASSIGN);
思考:這裡為什麼用ASSIGN這個關聯策略
此外,由於ScrollView銷毀的時候,RefreshHeader也銷毀,但是由於RefreshHeader是ScrollView的觀察者,不移除將導致應用崩潰,因此在銷毀ScrollView之前需要將觀察者移除,這裡采用方法交換在Dealloc方法裡面將觀察者移除。
+ (void)load {
Method originalMethod = class_getInstanceMethod([self class], NSSelectorFromString(@"dealloc"));
Method swizzleMethod = class_getInstanceMethod([self class], NSSelectorFromString(@"su_dealloc"));
method_exchangeImplementations(originalMethod, swizzleMethod);
}
- (void)su_dealloc {
self.header = nil;
[self su_dealloc];
}
思考:在本代碼中ScrollView、RefreshHeader、RefreshBlock三者的引用關系是怎樣的?嘗試畫出一個示意圖,加深對內存管理的理解。
到這裡,我們就可以使用自己寫的下拉刷新庫應用在工程中了,就像使用MJRefresh一樣方便。
[self.tableView addRefreshHeaderWithHandle:^{
//請求網絡數據
}];
//請求完成後
[tableView.header endRefreshing];
Demo
本文的demo在我的github上可以下載:https://github.com/DaMingShen/SURefresh


