關於CAShapeLayer的一些實用案例和技巧

本文授權轉載,作者:@景銘巴巴
一、使用CAShapeLayer實現復雜的View的遮罩效果
1.1、案例演示
最近在整理一個聊天的項目的時候,發送圖片的時候,會有一個三角的指向效果,指向這張圖片的發送者。服務端返回給我們的圖片只是一張矩形的圖片,我們如何把一張矩形的圖片或者View,加上一層自定義遮罩效果,就是本文要講的內容。效果演示如下:第一張是一個View的遮罩效果,第二張是UIImageView的遮罩效果。
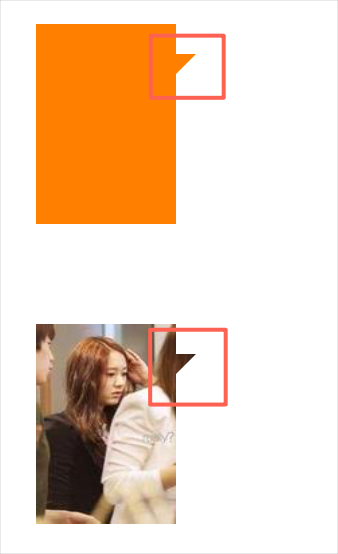
演示圖片
1.2、實現機制
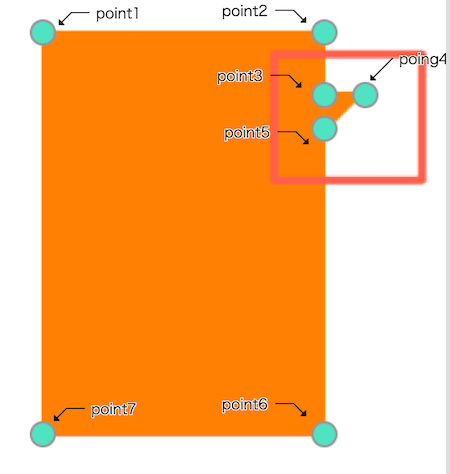
在每一View的layer層中有一個mask屬性,他就是專門來設置該View的遮罩效果的。該mask本身也是一個layer層。我們只需要生成一個自定義的layer,然後覆蓋在需要遮罩的View上面即可。問題就歸於如何生成入上圖所示的不規則圖片的Layer。CAShapeLayer可以根據幾個點的依次連線,產生一個閉合空間的layer。如下圖所示:
1.3、實現代碼
實現方式為實現了CAShapeLayer的ViewMask的Category。
@implementation CAShapeLayer (ViewMask)
+ (instancetype)createMaskLayerWithView : (UIView *)view{
    CGFloat viewWidth = CGRectGetWidth(view.frame);
    CGFloat viewHeight = CGRectGetHeight(view.frame);
    CGFloat rightSpace = 10.;
    CGFloat topSpace = 15.;
    CGPoint point1 = CGPointMake(0, 0);
    CGPoint point2 = CGPointMake(viewWidth-rightSpace, 0);
    CGPoint point3 = CGPointMake(viewWidth-rightSpace, topSpace);
    CGPoint point4 = CGPointMake(viewWidth, topSpace);
    CGPoint point5 = CGPointMake(viewWidth-rightSpace, topSpace+10.);
    CGPoint point6 = CGPointMake(viewWidth-rightSpace, viewHeight);
    CGPoint point7 = CGPointMake(0, viewHeight);
    UIBezierPath *path = [UIBezierPath bezierPath];
    [path moveToPoint:point1];
    [path addLineToPoint:point2];
    [path addLineToPoint:point3];
    [path addLineToPoint:point4];
    [path addLineToPoint:point5];
    [path addLineToPoint:point6];
    [path addLineToPoint:point7];
    [path closePath];
    CAShapeLayer *layer = [CAShapeLayer layer];
    layer.path = path.CGPath;
    return layer;
}
@end
1.4、調用方式
UIView *view = [[UIView alloc] initWithFrame:CGRectMake(40, 50, 80, 100)];
view.backgroundColor = [UIColor orangeColor];
[self.view addSubview:view];
CAShapeLayer *layer = [CAShapeLayer createMaskLayerWithView:view];
view.layer.mask = layer;
二、使用CAShapeLayer實現一個音量大小動態改變的控件
2.1、案例演示
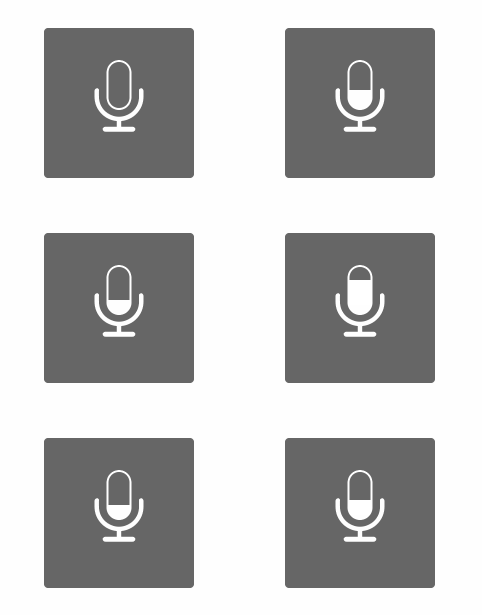
對於實時顯示語音音量大小的需求,發現很多人的實現方式通過預放置多張圖進行切換進行完成的。這樣的處理,不但會浪費App的資源存儲空間,而且效率也不高。對於符合某一定規律動態改變的圖形,我們也可以考慮通過代碼的方式來實現。
2.2、實現機制
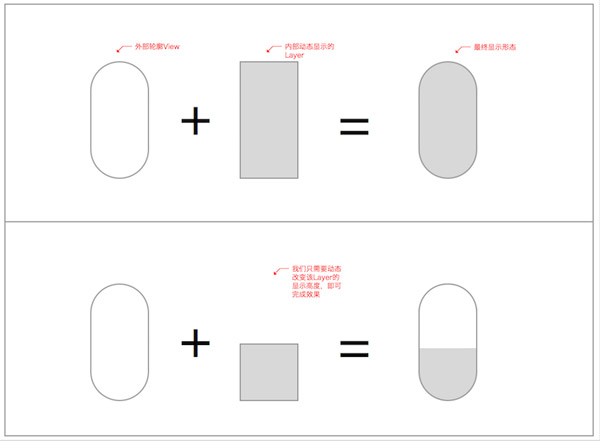
外部輪廓View主要控制顯示大小和顯示的圓角效果。內部的Layer主要控制動態顯示的高度,雖然他是矩形的。但是當把該Layer加入到View中,而該View設置了_dynamicView.clipsToBounds = YES;。內部的Layer超過外部輪廓的部分,則會被切除掉。
如此說來,我們只需要動態改變內部Layer顯示的高度,即可完成該效果顯示。是不是很簡單啊。。
2.3、實現代碼
_dynamicView 表示外部輪廓的View。
indicateLayer 表示內容動態顯示的Layer。
實現動態改變的函數如下:
-(void)refreshUIWithVoicePower : (NSInteger)voicePower{
    CGFloat height = (voicePower)*(CGRectGetHeight(_dynamicView.frame)/TOTAL_NUM);
    [_indicateLayer removeFromSuperlayer];
    _indicateLayer = nil;
    UIBezierPath *path = [UIBezierPath bezierPathWithRoundedRect:CGRectMake(0, CGRectGetHeight(_dynamicView.frame)-height, CGRectGetWidth(_dynamicView.frame), height) cornerRadius:0];
    _indicateLayer = [CAShapeLayer layer];
    _indicateLayer.path = path.CGPath;
    _indicateLayer.fillColor = [UIColor whiteColor].CGColor;
    [_dynamicView.layer addSublayer:_indicateLayer];
}
三、圓形進度條
3.1、案例演示
最近有一個小需求,就是要做一個圓形進度條,大概樣子如下:

在不知道有CAShapeLayer的strokeStart和strokeEnd屬性的時候,我采取的方法就是實時的 移除舊的CAShapeLayer 然後重繪這個圓形的CAShapeLayer。顯然這種方式的效率是不高的。後來在一次看別人Demo的時候,發現別人使用了CAShapeLayer的strokeStart和strokeEnd屬性,實現這一個效果十分的簡單方便。下面就和大家來講一講這兩個屬性的使用。
3.2、屬性詳解
蘋果官方給出這兩個屬性的解釋為:
/* These values define the subregion of the path used to draw the
stroked outline. The values must be in the range [0,1] with zero
representing the start of the path and one the end. Values in
between zero and one are interpolated linearly along the path
length. strokeStart defaults to zero and strokeEnd to one. Both are
animatable. */
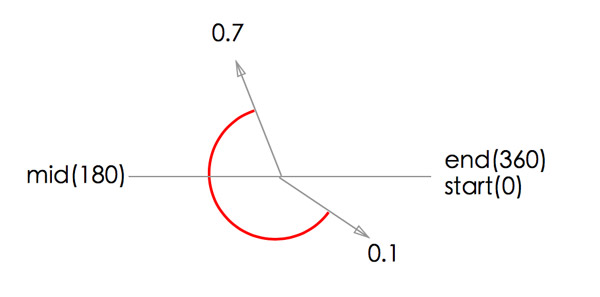
大概意思就是:我們可以對繪制的Path進行分區。這兩個屬性的值在0~1之間,0代表Path的開始位置,1代表Path的結束位置。是一種線性遞增關系。strokeStart默認值為0,strokeEnd默認值為1。這兩個屬性都支持動畫。
CAShapeLayer *shapeLayer = [CAShapeLayer layer];
shapeLayer.frame = _demoView.bounds;
shapeLayer.strokeEnd = 0.7f;
shapeLayer.strokeStart = 0.1f;
UIBezierPath *path = [UIBezierPath bezierPathWithOvalInRect:_demoView.bounds];
shapeLayer.path = path.CGPath;
shapeLayer.fillColor = [UIColor clearColor].CGColor;
shapeLayer.lineWidth = 2.0f;
shapeLayer.strokeColor = [UIColor redColor].CGColor;
[_demoView.layer addSublayer:shapeLayer];
我們通過以上代碼設置:strokeStart=0.1f; strokeEnd=0.7f則顯示如下圖所示。
3.3、圓形進度條的實現代碼
CAShapeLayer *shapeLayer = [CAShapeLayer layer];
shapeLayer.frame = _demoView.bounds;
UIBezierPath *path = [UIBezierPath bezierPathWithOvalInRect:_demoView.bounds];
shapeLayer.path = path.CGPath;
shapeLayer.fillColor = [UIColor clearColor].CGColor;
shapeLayer.lineWidth = 2.0f;
shapeLayer.strokeColor = [UIColor redColor].CGColor;
[_demoView.layer addSublayer:shapeLayer];
CABasicAnimation *pathAnima = [CABasicAnimation animationWithKeyPath:@"strokeEnd"];
pathAnima.duration = 3.0f;
pathAnima.timingFunction = [CAMediaTimingFunction functionWithName:kCAMediaTimingFunctionEaseInEaseOut];
pathAnima.fromValue = [NSNumber numberWithFloat:0.0f];
pathAnima.toValue = [NSNumber numberWithFloat:1.0f];
pathAnima.fillMode = kCAFillModeForwards;
pathAnima.removedOnCompletion = NO;
[shapeLayer addAnimation:pathAnima forKey:@"strokeEndAnimation"];
- iOS應用CALayer完成動畫加載的後果
- Mac Android Studio快捷鍵整頓
- iOS中關於信鴿推送的應用demo詳解
- iOS中關於模塊化開辟處理計劃(純干貨)
- iOS10告訴框架UserNotification懂得與運用
- iOS10 App適配權限 Push Notifications 字體Frame 碰到的成績
- iPhone/iPad開辟經由過程LocalNotification完成iOS准時當地推送功效
- iOS推送之當地告訴UILocalNotification
- iOS10添加當地推送(Local Notification)實例
- iOS突變圓環扭轉動畫CAShapeLayer CAGradientLayer
- IOS 粒子體系 (CAEmitterLayer)實例詳解
- iOS Remote Notification長途新聞推送處置
- iOS App通訊之local socket示例
- iOS App之間的通訊 local socket
- IOS關於年夜型網站搶購、距運動停止,殘剩時光倒計時的完成代碼
- iOS ReactiveCocoa 最全常用API整理(可做為手冊查詢)
- 源碼推薦(12.04B):炫酷的個人中心頁面(Swift版),動態瀑布流
- 源碼推薦(0724B):網絡數據安全
- Xcode 插件優缺點對比(推薦 20 款插件)
- 源碼推薦(11.27B):網易標題欄目功能實現,仿天貓首頁刷新效果 導航欄顏色漸變效果
- iOS:從Images.xcassets導出合適的圖片
- 【iOS10 SpeechRecognition】語音識別 現說現譯的最佳實踐
- ReactNative源碼筆記——你知道幾條?
- 源碼推薦(02.19):iOS高仿淘寶
- 源碼推薦(01.20B):JS與OC中Webview交互, 兩行代碼搞定TouchID驗證


