iOS擴展—Document Provider
投稿文章,作者:M0nk1y
1. 開發流程梗概
1.1. 創建一個文件編輯器 App,具有打開、導入其它 App 的文件;移動、導出、保存文件到其它 App 的 功能。
1.2. 創建一個可以查看自己文件的 App,具有 Document Provider 擴展。
1.3. 在 Document Provider 擴展裡編寫處理打開、導入、移動、導出文件事件的代碼
1.4. 在 File Provider 擴展裡編寫協調文件的代碼。
2. 兩個關鍵字
2.1 共享容器。
一個沙盒能與另一個沙盒進行文件交換只能在共享容器裡進行,通過創建 App Groups 就可以獲得共享容器了。
2.2 文件權限。
當需要訪問不在 App 自身的沙盒或者自身共享容器裡的資源時,需要申請權限訪問,使用到 NSURL 的兩個方法:
開始安全訪問:- (BOOL)startAccessingSecurityScopedResource
停止安全訪問:- (void)stopAccessingSecurityScopedResource
3. 文件編輯器 MKTextEdit
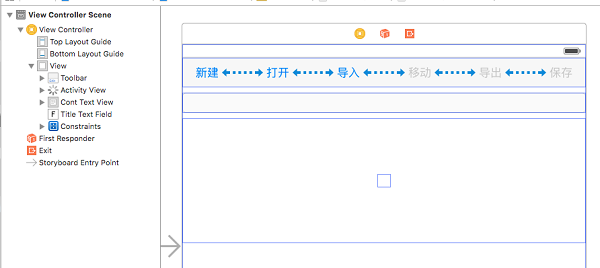
創建一個新 App 項目,界面如此:
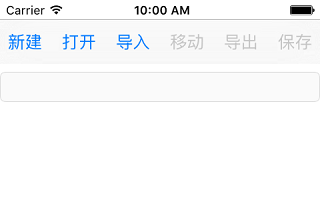
運行起來醬紫:
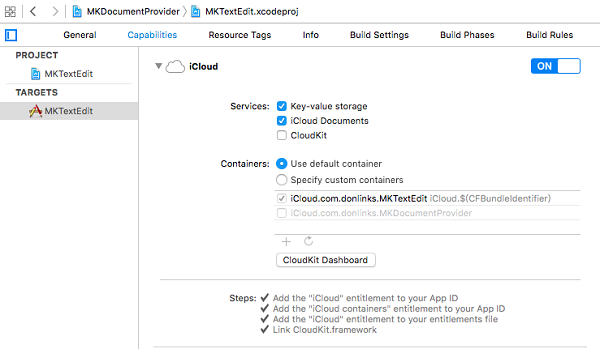
因為這個 App 需要有訪問其他 App 文件的權限,所以我們得開啟它的 iCloud 功能,打開 iCloud 需要提供蘋果開發者賬號。
3.1 新建
新建文件並輸入標題和內容後,我們可以對文件進行移動、導入和保存。移動和導入前要先保存文件,因為我們移動和導入都要提供文件的在 App 裡的地址。
3.2 打開文件
需要 UIDocumentMenuViewController 打開一個菜單選項,裡面默認提供 iCloud 具有 Document Provider 擴展的 App。
- (void)displayDocumentPickerWithURIs:(NSArray *)UTIs {
    UIDocumentMenuViewController *importMenu = [[UIDocumentMenuViewController alloc] initWithDocumentTypes:UTIs inMode:documentPickerMode];
    importMenu.delegate = self;
    [self presentViewController:importMenu animated:YES completion:nil];
}
UTI,Uniform Type Identifier 可以查詢。
documentPickerMode 為 UIDocumentPickerModeOpen。
當選擇了某個菜單時時會調用代理方法:
#pragma mark - UIDocumentMenuDelegate
-(void)documentMenu:(UIDocumentMenuViewController *)documentMenu didPickDocumentPicker:(UIDocumentPickerViewController *)documentPicker
{
    documentPicker.delegate = self;
    [self presentViewController:documentPicker animated:YES completion:nil];
}
打開一個 UIDocumentPickerViewController 控制器,以 iCloud 為例,裡面提供了一系列文件選擇,當選擇了某個文件時,調用 UIDocumentPickerViewController 的代理方法。
-(void)documentPicker:(UIDocumentPickerViewController *)controller didPickDocumentAtURL:(NSURL *)url
{
    [controller dismissViewControllerAnimated:YES completion:nil];
}
代理返回的 url 是剛選擇的文件在共享容器的位置,我們可以利用這地址對該文件進行操作了。
3.2 讀取打開的文件
- (void)openFile:(NSURL *)url
{
    //1.獲取文件安全訪問權限
    BOOL accessing = [url startAccessingSecurityScopedResource];

    if(accessing){
        [activityView startAnimating];

        //2.通過文件協調器讀取文件地址
        NSFileCoordinator *fileCoordinator = [[NSFileCoordinator alloc] initWithFilePresenter:nil];
        [fileCoordinator coordinateReadingItemAtURL:url
                                            options:NSFileCoordinatorReadingWithoutChanges
                                              error:nil
                                         byAccessor:^(NSURL * _Nonnull newURL) {

                                             [activityView stopAnimating];

                                             //3.讀取文件協調器提供的新地址裡的數據
                                             NSString *fileName = [newURL lastPathComponent];
                                             NSString *contStr = [NSString stringWithContentsOfURL:newURL encoding:NSUTF8StringEncoding error:nil];

                                             //4.把數據保存在本地緩存
                                             [self saveLocalCachesCont:contStr fileName:fileName];
                                         }];

    }

    //6.停止安全訪問權限
    [url stopAccessingSecurityScopedResource];
}
1. 文件協調器 —— NSFileCoordinator,它與 File Provider extension 關聯,當我們使用文件協調器讀取、寫入文件時都會觸發 File Provider extension 的方法。等下介紹。
2. 可以看看打開的地址為:
`file:///Users/AllenChow/Library/Developer/CoreSimulator/Devices/F7999205-1D00-4683-A2E1-EBB8B32D67BE/data/Library/Mobile%20Documents/com~apple~CloudDocs/newFile.txt`
地址是位於 iCloud 裡的。
3.3 保存打開的文件
當編輯過打開的文件後,進行保存時:
//1.通過文件協調器寫入文件
NSFileCoordinator *fileCoorDinator = [NSFileCoordinator new];
NSError *error = nil;
[fileCoorDinator coordinateWritingItemAtURL:lastURL
                                    options:NSFileCoordinatorWritingForReplacing
                                      error:&error
                                 byAccessor:^(NSURL * _Nonnull newURL) {

                                     //2.獲取安全訪問權限
                                     BOOL access = [newURL startAccessingSecurityScopedResource];

                                     //3.寫入數據
                                     if(access && [content writeToURL:newURL atomically:YES encoding:NSUTF8StringEncoding error:nil]){
                                         NSLog(@"保存原文件成功");
                                     }

                                     //4.停止安全訪問權限
                                     [newURL stopAccessingSecurityScopedResource];
                                 }];
lastURL 是之前打開文件時 `-(void)documentPicker:(UIDocumentPickerViewController *)controller didPickDocumentAtURL:(NSURL *)url` 返回的地址。我們把文件保存回這個地址。
至此,我們已經完成了`在 App 內打開 另一個 App 的文件 ——> 讀取 ——> 編輯 ——> 保存`的過程了。
3.4 導入文件
跟打開文件一樣,但是 `documentPickerMode` 為 `UIDocumentPickerModeOpen`。
回調方法為:
- (void)importFile:(NSURL *)url
{
    [activityView startAnimating];

    //1.通過文件協調工具來得到新的文件地址,以此得到文件保護功能
    NSFileCoordinator *fileCoordinator = [[NSFileCoordinator alloc] initWithFilePresenter:nil];
    [fileCoordinator coordinateReadingItemAtURL:url options:NSFileCoordinatorReadingWithoutChanges error:nil byAccessor:^(NSURL * _Nonnull newURL) {
        [activityView stopAnimating];

        //2.直接讀取文件
        NSString *fileName = [newURL lastPathComponent];
        NSString *contStr = [NSString stringWithContentsOfURL:newURL encoding:NSUTF8StringEncoding error:nil];

        //3.把數據保存在本地緩存
        [self saveLocalCachesCont:contStr fileName:fileName];
    }];
}
我們看看導入的模式下打開文件的地址為:
`file:///Users/AllenChow/Library/Developer/CoreSimulator/Devices/F7999205-1D00-4683-A2E1-EBB8B32D67BE/data/Containers/Data/Application/82EE4511-930E-46FB-83B9-C6099C6A91A4/tmp/com.donlinks.MKTextEdit-Inbox/newFile.txt`
地址是位置 MKTextEdit App 裡的臨時文件夾,說明了導入模式下文件是拷貝進來 App 的,所以我們可以直接讀取文件數據。
3.5 移動和導出文件
移動和導出的處理方式一樣的,只有帶給 Document Provider extension 的 documentPickerMode 不一樣,我們可以根據這個參數,如果是移動模式則刪除 MKTextEdit App 裡的文件,如果是導出模式就拷貝文件到共享容器。
- (IBAction)export:(id)sender {
    //1. 保存緩存文件
    [self modify:nil];
    documentPickerMode = UIDocumentPickerModeExportToService;
    NSURL *fileURL = [NSURL fileURLWithPath: [CachesFilePath stringByAppendingPathComponent: currentFileName]];

    //2.打開文件選擇器
    [self displayDocumentPickerWithURL:fileURL];
}
- (void)displayDocumentPickerWithURL:(NSURL *)url {
    UIDocumentMenuViewController *importMenu = [[UIDocumentMenuViewController alloc] initWithURL:url inMode:documentPickerMode];
    importMenu.delegate = self;
    [self presentViewController:importMenu animated:YES completion:nil];
}
這次打開文件選擇器提供的參數是 URL 並不是 UTI 了。
4. 共享容器提供方 MKDocumentProvider
當你想讓自己 App 裡的文件能夠提供給其他 App 讀取和編輯,需要做兩件事:
1. 創建 Document Provider extension 和 File Provider extension
2. 提供共享容器,把共享的文件放到容器裡。
4.1 創建擴展
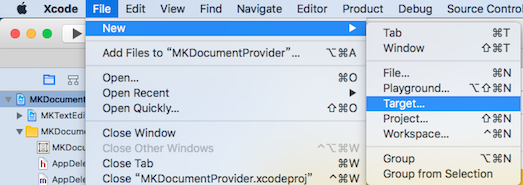
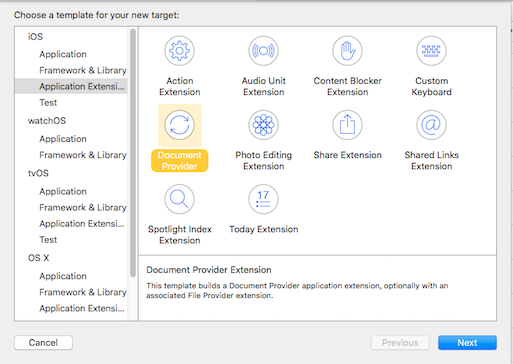
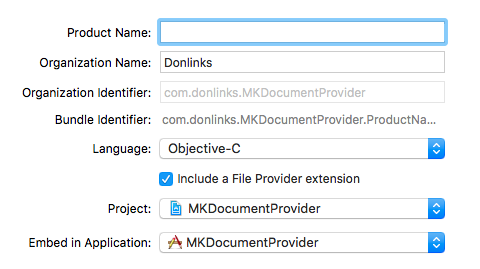
記得勾選 Include a File Provider extension  , 命名,完成。會彈出這樣一個詢問你時候激活 Scheme 的框,選擇激活(Activate)。
創建 Document Provider extension 之後會附帶一個 File Provider extension。
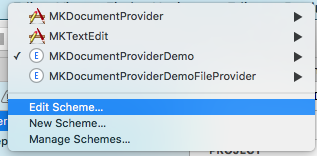
修改運行擴展時執行的主應用:

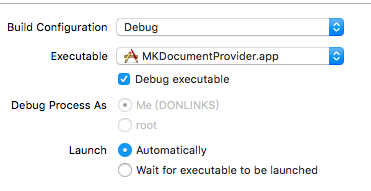
4.2 創建 App Groups
到項目的 Capabilities 裡找到 App Groups,點擊開啟:

Document Provider extension 和 File Provider extension 也要開啟 App Groups 並且都要用同一個 group。
創建完 Document Provider 擴展需要的東西後,我們來運行看看效果:

4.3 MKDocumentProvider 展示共享容器的文件
#pragma mark - 獲取共享容器文件夾路徑
- (NSString *)storagePath {
    NSURL *groupURL = [[NSFileManager defaultManager] containerURLForSecurityApplicationGroupIdentifier:APP_GROUP_ID];
    NSString *groupPath = [groupURL path];
    NSString *_storagePath = [groupPath stringByAppendingPathComponent:APP_FILE_NAME];
    NSFileManager *fileManager = [NSFileManager defaultManager];
    if (![fileManager fileExistsAtPath:_storagePath]) {
        [fileManager createDirectoryAtPath:_storagePath withIntermediateDirectories:NO attributes:nil error:nil];
    }
    return _storagePath;
}
4.4 Document Provider extension
擴展的入口是一個 UIDocumentPickerExtensionViewController 類。在3.2 打開文件的使用 UIDocumentPickerViewController 展示的就是這個界面了,我們可以自定義這個界面。
- (void)dismissGrantingAccessToURL:(nullable NSURL *)url;
調用此方法來關閉該文檔選擇器的視圖控制器以及所提供的授權訪問的網址。每種模式都有自己所要求的URL。有關其完整的詳細信息,請參閱:Dismissing the User Interface。
-(void)prepareForPresentationInMode:(UIDocumentPickerMode)mode;
當開始展示界面時自動調用,可以根據 mode 來做界面定制。
NSArray
*validTypes
當在打開和導入模式下才有值,值為 UTI
NSURL *documentStorageURL
共享容器地址
NSURL *originalURL
源文件地址,只有在移動和導入模式下才有值,訪問該地址需要申請安全訪問權限。
4.4.1 打開和導入
在打開和導入模式下,我們需要用戶點擊了文件就關閉文檔選擇器和返回文件地址 URL
4.4.2 移動和導出
在移動和導出模式下,我們提供個按鈕讓用戶確定保存的路徑,當點擊按鈕的時候保存文件到共享容器:
- (void)exportFile
{
    NSURL *originalURL = self.originalURL;
    NSString *fileName = [originalURL lastPathComponent];
    NSString *exportFilePath = [storagePath stringByAppendingPathComponent: fileName];

    //1. 獲取安全訪問權限
    BOOL access = [originalURL startAccessingSecurityScopedResource];

    if(access){
        //2. 通過文件協調器訪問讀取該文件
        NSFileCoordinator *fileCoordinator = [NSFileCoordinator new];
        NSError *error = nil;
        [fileCoordinator coordinateReadingItemAtURL:originalURL options:NSFileCoordinatorReadingWithoutChanges error:&error byAccessor:^(NSURL * _Nonnull newURL) {

            //3.保存文件到共享容器
            [self saveFileFromURL:newURL toFileURL: [NSURL fileURLWithPath:exportFilePath]];
        }];

    }

    //4. 停止安全訪問權限
    [originalURL stopAccessingSecurityScopedResource];
}
4.4 文件提供程序 File Provider extension
文件提供程序應用擴展允許在主應用程序的沙箱外使用打開和移動操作來訪問文件。當 MKTextEdit 使用文件協調器 `NSFileCoordinator ` 打開不存在 MKDocumentProvider 的文件時,我們可以使用 `- (void)startProvidingItemAtURL:(NSURL *)url completionHandler:(void (^)(NSError *))completionHandler` 方法來為 MKTextEdit 創建新文件:
//文件保護,文件不存在則創建新文件
- (void)startProvidingItemAtURL:(NSURL *)url completionHandler:(void (^)(NSError *))completionHandler {
    NSError* error = nil;
    __block NSError* fileError = nil;

    NSFileManager *fileMgr = [NSFileManager defaultManager];
    NSString *filePath = [url path];
    if([fileMgr fileExistsAtPath:filePath]){ //1
        //文件已存在,返回
        completionHandler(error);
        return;
    }

    //文件不存在,創建新文件,並寫入url
    NSData *fileData = [@"新建文件:" dataUsingEncoding:NSUTF8StringEncoding]; //2

    [self.fileCoordinator coordinateWritingItemAtURL:url options:NSFileCoordinatorWritingForReplacing error:&error byAccessor:^(NSURL *newURL) {
        [fileData writeToURL:newURL options:0 error:&fileError]; //3
    }];
    if (error!=nil) {
        completionHandler(error);
    } else {
        completionHandler(fileError);
    }
}
5. 搞掂
Demo: MKDocumentProvider


