支持自動布局,自動高度變化和palceholder的輸入框
本文是投稿文章,作者:KevinTing
不羅嗦,這是效果,輸入框自動彈起彈下。輸入框自動伸縮大小,同時上面的tableView也能自動伸縮。
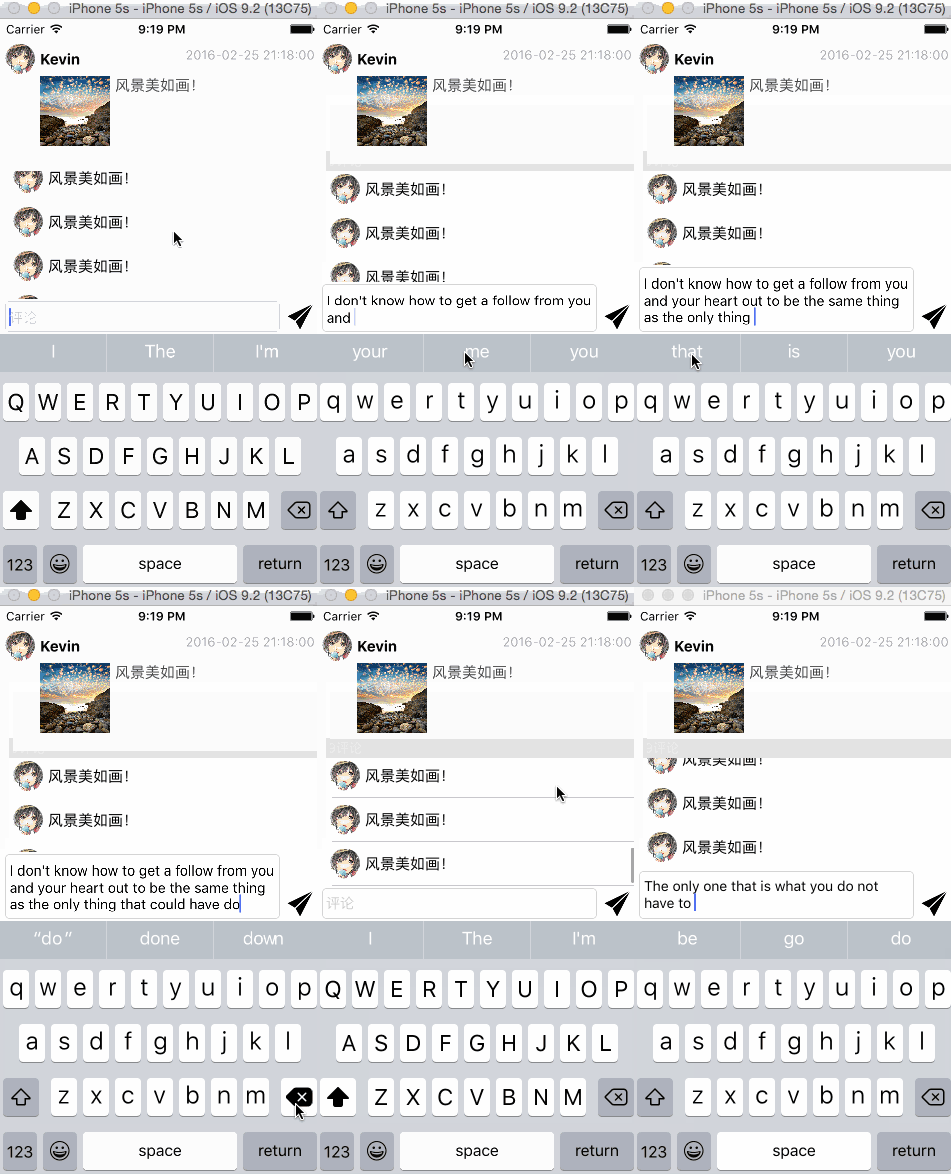
輸入框.gif
關於輸入框自動彈起彈下我另開一篇描述下,這裡就不說了,這裡重點關注輸入框的自動伸縮和palceholder的實現。
1、繼承UITextView
這個是用Auto Layout實現的!當然和網上很多教程一樣,這個輸入框是用UITextView實現的,不然怎麼放大縮小?
#import [UIKit/UIKit.h](因識別問題,此處將尖括號改為方括號)

IB_DESIGNABLE

@interface KTAutoHeightTextView : UITextView

// 是否顯示圓角邊界
@property (nonatomic, assign) IBInspectable BOOL showsRoundCorner;
// placeholder
@property (nonatomic, copy) IBInspectable NSString *placeholder;

@end
這裡IB_DESIGNABLE宏和IBInspectable配合使用是為了在xib和storyboard裡面可以直接設置屬性並實時顯示變化效果。showsRoundCorner屬性是為了能模仿UITextField的效果。
- (void)setShowsRoundCorner:(BOOL)showsRoundCorner
{
    _showsRoundCorner = showsRoundCorner;
    if (showsRoundCorner)
    {
        self.layer.masksToBounds = YES;
        self.layer.cornerRadius = 5.0;
        self.layer.borderColor = [[UIColor lightGrayColor] CGColor];
        self.layer.borderWidth = 0.5;
    }
    else
    {
        self.layer.masksToBounds = NO;
        self.layer.cornerRadius = 0.0;
        self.layer.borderColor = [[UIColor clearColor] CGColor];
        self.layer.borderWidth = 0.0;
    }
}
然後在你在storyboard裡面拖一個UITextView,然後設置class為KTAutoHeightTextView,接著你會發現可以設置屬性,這是IB_DESIGNABLE宏和IBInspectable的功勞,設置showsRoundCorner為ON,然後storyboard中就會顯示有圓角了!
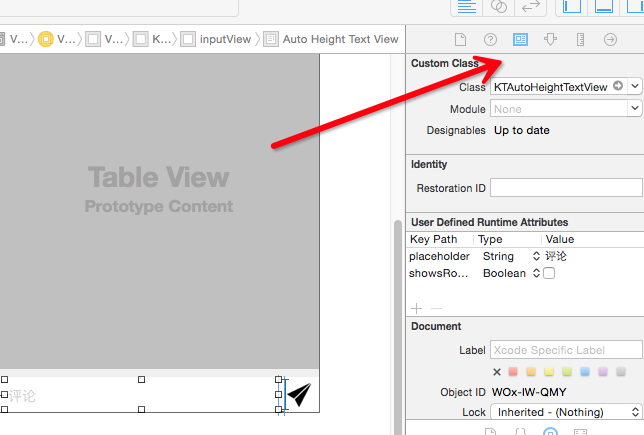
760FD1EC-8B46-42BA-8F50-DD8712D9F6BE.png
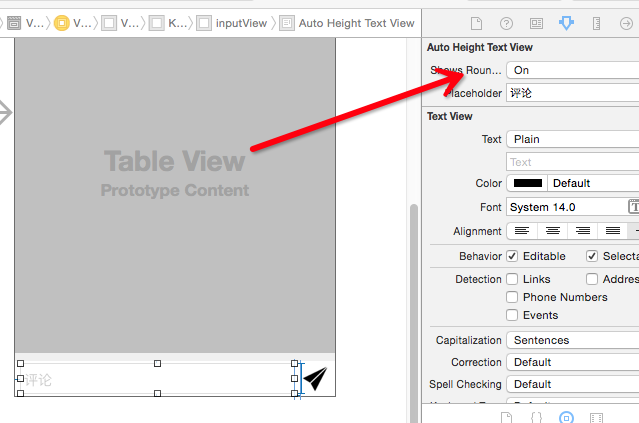
31C1E98A-3C82-4801-AAF4-7EF2AA519F7F.png
2、placeholder實現
同樣實現placeholder的setter,代碼很簡單。
- (void)setPlaceholder:(NSString *)placeholder
{
    _placeholder = placeholder;
    if (placeholder)
    {
        if (!_placeholderLabel)
        {
            _placeholderLabel = [[UILabel alloc] init];
            _placeholderLabel.font = self.font;
            _placeholderLabel.textAlignment = NSTextAlignmentLeft;
            UIEdgeInsets inset = self.textContainerInset;
            CGRect bounds = self.bounds;
            _placeholderLabel.frame = CGRectMake(4.0, inset.top, bounds.size.width - inset.left - inset.right, self.font.lineHeight);
            _placeholderLabel.textColor = [UIColor colorWithWhite:0.801 alpha:1.000];
            [self addSubview:_placeholderLabel];
            _placeholderLabel.text = placeholder;
        }
        _placeholderLabel.hidden = self.text.length > 0;
    }
    else
    {
        if (_placeholderLabel)
        {
            [_placeholderLabel removeFromSuperview];
            _placeholderLabel = nil;
        }
    }
}
placeholder還需要在編輯的時候顯示或者隱藏,那麼這裡監聽text的長度變化就可以了。
- (instancetype)initWithFrame:(CGRect)frame
{
    if (self = [super initWithFrame:frame])
    {
        [self setup];
    }

    return self;
}

- (void)awakeFromNib
{
    [self setup];
}

- (void)dealloc
{
    [[NSNotificationCenter defaultCenter] removeObserver:self];
}

- (void)setup
{
    [[NSNotificationCenter defaultCenter] addObserver:self selector:@selector(handleTextDidChange:) name:UITextViewTextDidChangeNotification object:self];
}

- (void)handleTextDidChange:(NSNotification *)notif
{
    if (!self.placeholder)
    {
        return;
    }

    UITextView *textView = notif.object;
    self.placeholderLabel.hidden = textView.text.length > 0;
}
也很簡單,值得注意的是awakeFromNib是考慮到從xib或者storyboard中加載的時候並不會調用initWithFrame而加上的。為了placeholder的font能跟隨UITextView本身的font變化,這裡有個小細節,重寫font的setter
- (void)setFont:(UIFont *)font
{
    [super setFont:font];

    if (_placeholderLabel)
    {
        UIEdgeInsets insets = self.textContainerInset;
        CGRect bounds = self.bounds;
        _placeholderLabel.frame = CGRectMake(4.0, insets.top, bounds.size.width - insets.left - insets.right, font.lineHeight);
    }
}
3、自動高度變化的實現
在對textView進行輸入的時候,如果換行了,那麼你會發現屬性contentSize會改變。這裡就是利用contentSize的變化進行縮放高度。這裡並沒有去計算一堆的boundingRectWithSize: options: attributes: context:因為發現這個有時候並不准!
- (void)layoutSubviews
{
    [super layoutSubviews];

    self.layoutFinished = YES;
}

- (void)setContentSize:(CGSize)contentSize
{
    [super setContentSize:contentSize];
    // 監聽size變化
    if (self.font)
    {
        if (self.layoutFinished) // 更新約束或者大小
        {
            CGFloat fitHeight = [self sizeThatFits:CGSizeMake(self.bounds.size.width, CGFLOAT_MAX)].height;
            if (fabs(fitHeight - self.bounds.size.height) < self.font.lineHeight * 0.5) // 變化量小於一個行距的0.5倍
            {
                [self findHeightConstraint];
                return;
            }
            if (self.heightConstraint)
            {
                self.heightConstraint.constant = fitHeight;
                [self layoutIfNeeded];
            }
            else
            {
                CGRect bounds = self.bounds;
                bounds.size.height = fitHeight;
                self.bounds = bounds;
            }
        }
        else // 查找height約束,記錄初值
        {
            [self findHeightConstraint];
        }
    }
}

- (void)findHeightConstraint
{
    if (self.heightConstraint)
    {
        return;
    }
    for (NSLayoutConstraint *constraint in self.constraints)
    {
        if (constraint.secondItem == nil && constraint.firstAttribute == NSLayoutAttributeHeight)
        {
            self.heightConstraint = constraint;
            break;
        }
    }
}
代碼是在利用sizeThatFits在contentSize變化的時候去計算合適的大小fitHeight,同時利用一定的規則在合適的時候尋找高度約束heightConstraint。當存在heightConstraint的時候修改約束值,不存在的時候直接修改bounds,從而實現在自動布局或者非自動布局情況下都能自動匹配高度。
4、如何設置約束
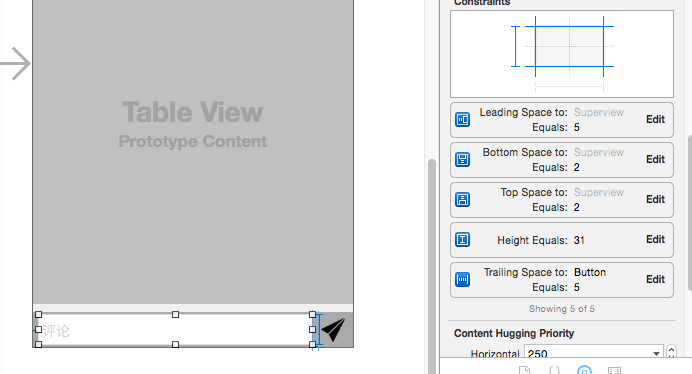
如果在自動布局情況下使用KTAutoHeightTextView,應注意:1、顯然你應該有Height這個約束;2、在高度方向上你應該用KTAutoHeightTextView的height去驅動其他view的height而不是反過來。第一句easy不解釋,第二句見下圖,KTAutoHeightTextView設置了5個約束(一個height,還有上下左右),它的superView(明顯起見,我把它設成了灰色)並沒有設置height約束。那麼它的height就會根據KTAutoHeightTextView的height和上,下三個約束來確定。從而達到這樣的效果:KTAutoHeightTextView伸縮,superView也伸縮,上面的tableView也伸縮。恩,這是我們想要的效果!
完整的項目https://github.com/tujinqiu/KTAutoHeightTextView
- 上一頁:iOS經典面試題總結
- 下一頁:iOS實現自定義的彈出視圖(popView)
- IOS 完成微信自動搶紅包(非越獄IPhone)
- Xcode8+和iOS10+運用Masonry自動計算行高
- ios label 自動計算行高詳解
- iOS代碼重構(二)CoreData多線程(支持線程平安)
- iOS UIImageView圖片自動拉伸功用
- iOS------自動查找項目中不用的圖片資源
- iOS之Xcode自動管理證書、打包adhoc和testFlight測試安裝
- ios9.3beta5自動鎖屏怎麼辦
- 新手指南 怎麼關閉AppStore自動更新功能
- iOS 10自動鎖定在哪 怎麼更改自動鎖定時間
- iOS 9.3.3支持哪些設備 可以在哪些設備上使用
- iOS 10怎麼關閉App Store自動更新功能
- 蘋果IOS8技巧之拍照自動識別信用卡號碼[多圖]
- 不想升級蘋果iOS8怎麼辦?防止iphone/ipad自動下載安裝包方案![圖]
- 蘋果iOS8降低iphone5s的ISO問題實測+網絡支持流暢度小測[多圖]

