動效解析工廠:Mask 動畫
前言:很多動效都是多種動畫的組合,有時候你可能只是需要其中某個動畫,但面對龐雜的代碼庫或是教程,你可能比較困惑,本系列將復雜動效中不常見的動畫效果拆解出來便於學習,授人以魚不如授人以漁。
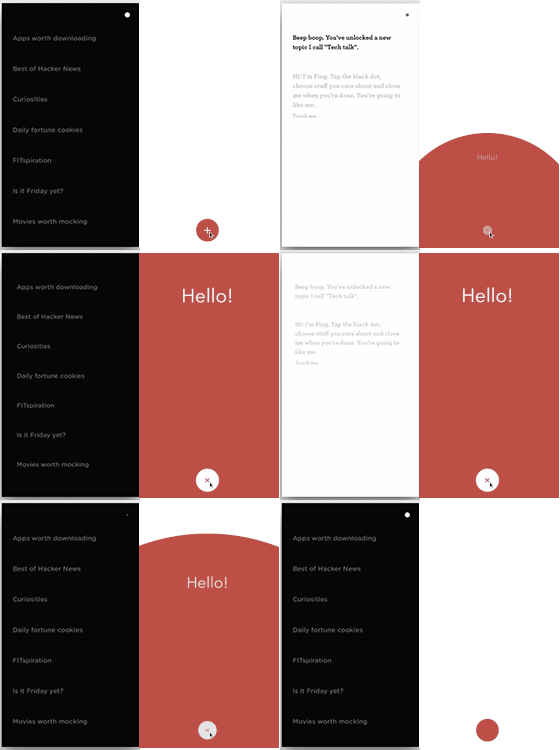
第一講是來自 BubbleTransition 中最奪人眼球的形變動畫。這個效果在 StarWars.iOS轉場動效有兩次應用,非常地炫酷;Raywenderlich.com 也出過一個教程來實現這種效果。
BubbleTransition
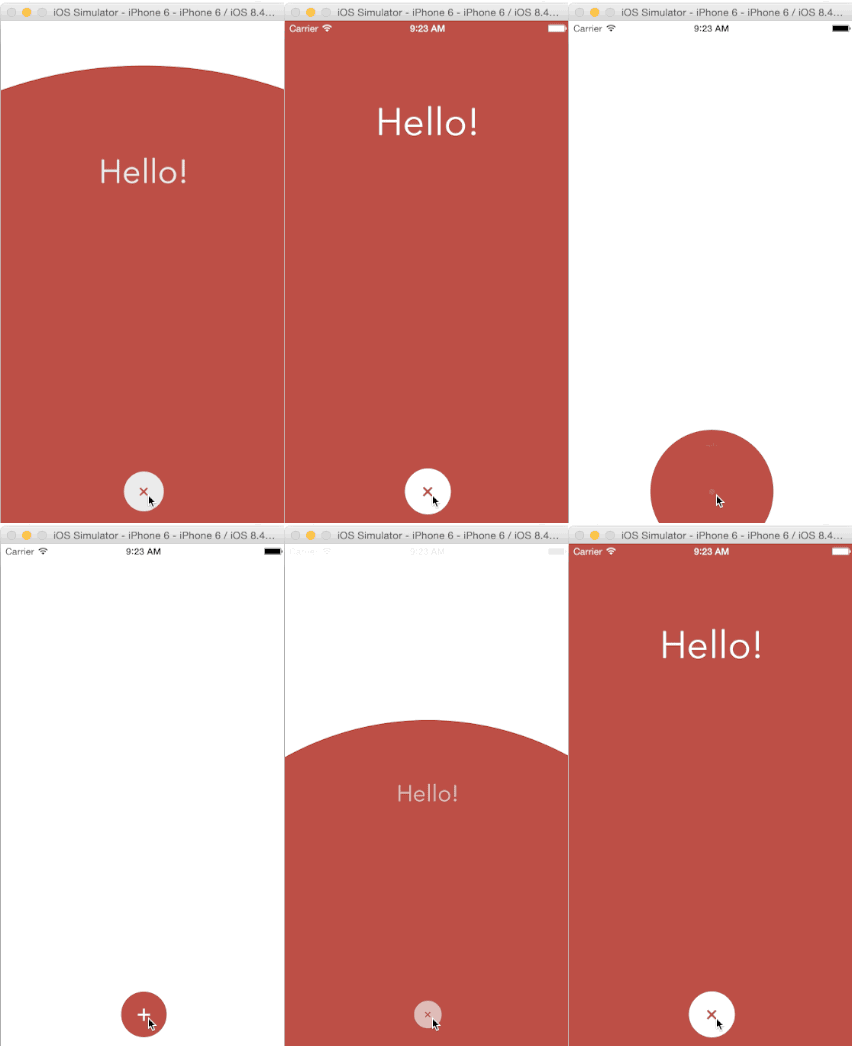
一般而言,這種效果會使用 UIBezierPath + CAShapeLayer + maskLayer 搞定,但是我去看了看代碼,上面的效果其實是下面這樣實現的。
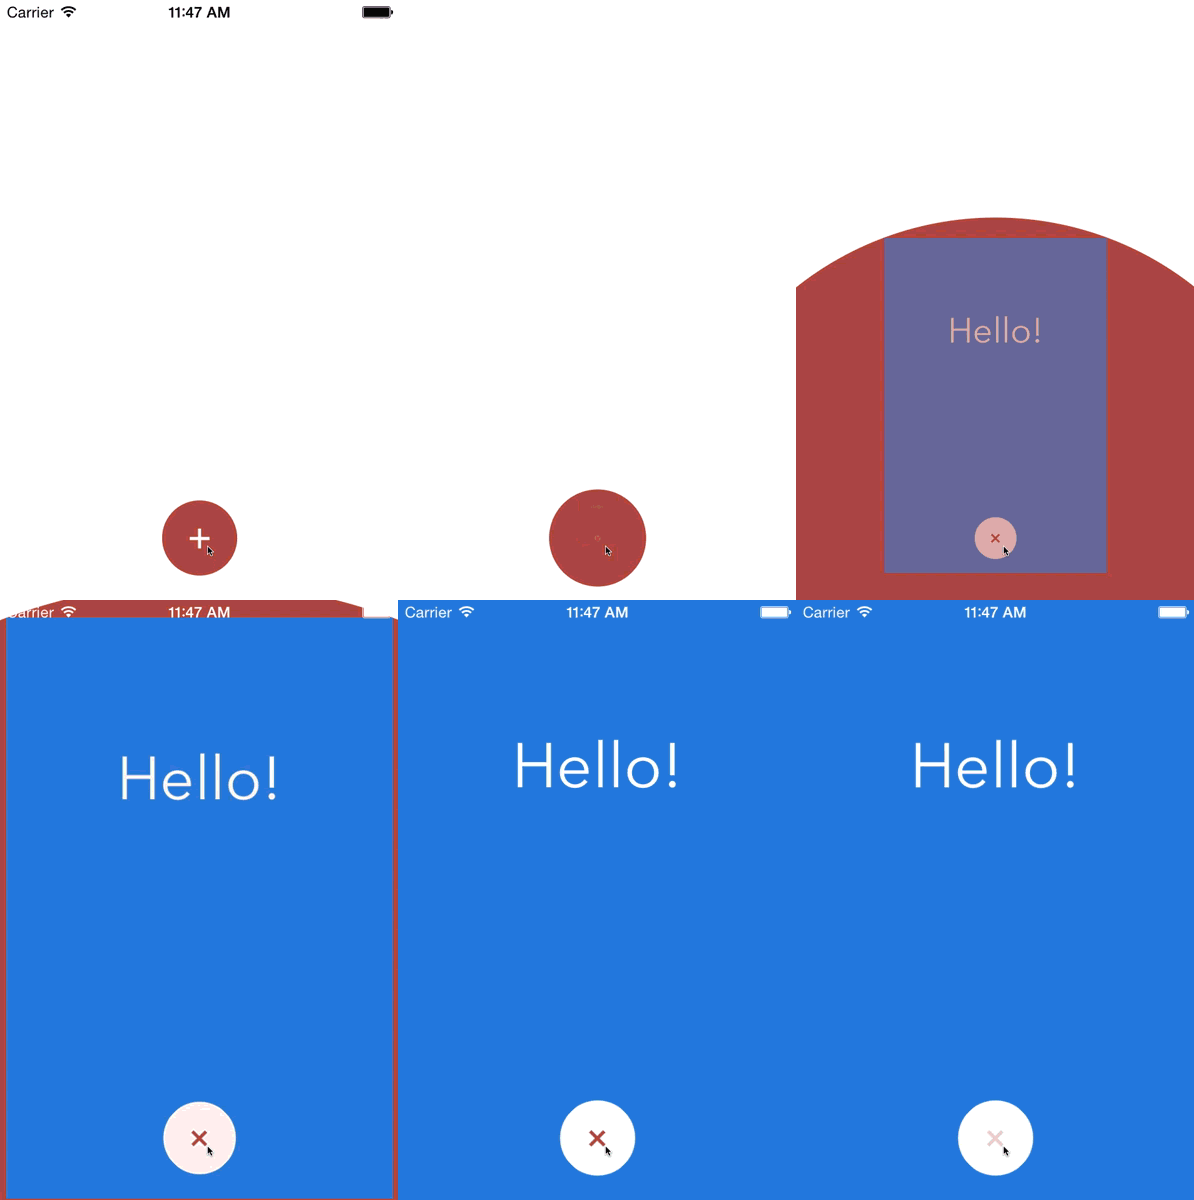
BubbleTransition 慢放
Are you kidding me? Are you kidding me? 不知道我為何說兩遍的請去欣賞《拯救呆萌》三部曲最終篇《火星救援》。這個效果的開發者真是太有才了,僅僅通過組合視圖+縮放這麼簡單的方法就實現了這個效果,天才。
在上面提到的另外兩種效果則是使用提到的 UIBezierPath + CAShapeLayer + maskLayer 套路,關於 UIBezierPath + CAShapeLayer,簡書上有一篇寫得還不錯,就是標題太炫酷,這篇文章示范了使用 UIBezierPath + CAShapeLayer 實現不規則視圖,也可以使用上面的簡單組合手法輕松實現,但如果面對更加復雜的圖形,還是得靠 UIBezierPath + CAShapeLayer。
也許你聽說過貝塞爾曲線,但在 iOS 裡,UIBezierPath 不僅僅用於生成一條曲線,常規的矩形、圓形、圓角矩形以及橢圓都不在話下,是個普適性的圖形對象。而 CAShapeLayer 則是 CALayer 的子類,正如類名描述一樣,通過其path屬性搭配 UIBezierPath 可以實現多種用普通手段難以實現的外形,以及一些線條動畫(可以去看看上面提到的標題很炫酷的文章)。
而 maskLayer,你可能聽說過遮罩之類的概念,很像你玩游戲探索地圖時的效果,這裡實際上指的是CALayer類的mask屬性,也是個CALayer對象,UIView類有個maskView的屬性,作用相似。其實 BubbleTransition 裡作者的實現手法本身就是對 mask 這一概念的應用,真的是太天才了。
使用 UIBezierPath + CAShapeLayer + maskLayer 套路實現上面的效果慢放後是下面這樣的,不知道原作者有沒有對這兩種效果進行過對比,老實說,我覺得原作者的手法實現的效果更好:
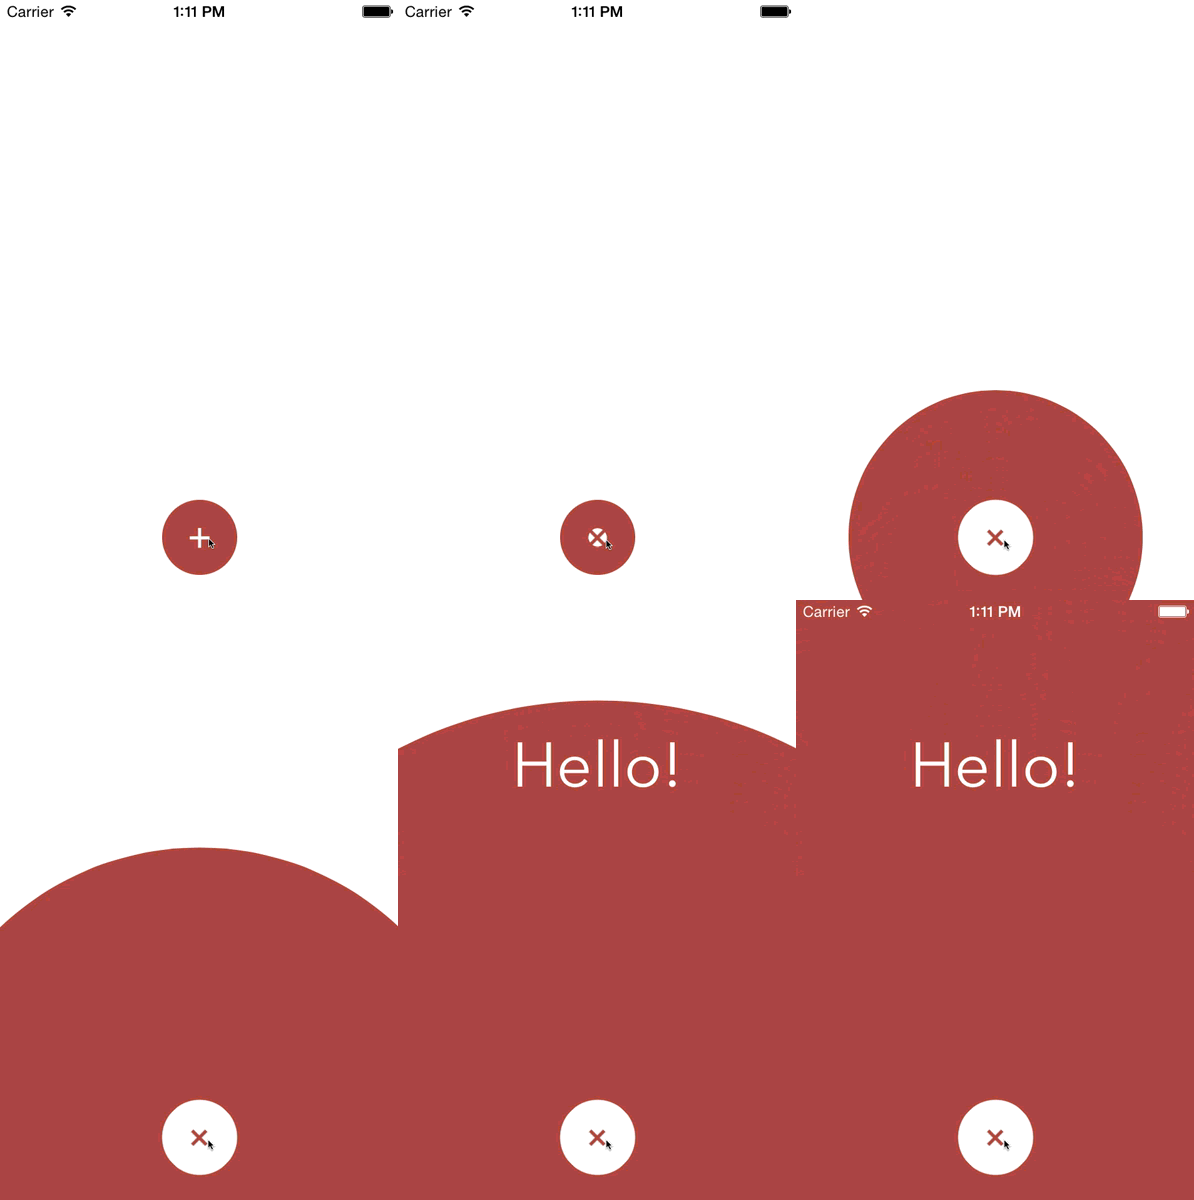
NewBubbleTransition
上面方法的核心代碼:
//利用 UIBezierPath 生成一大一小兩條橢形路徑,ovalInRect 意思是生成緊貼矩形內部的橢圓,bubble 是 BubbleTransition 中的添加的背景視圖,
let circleMaskPathInitial = UIBezierPath(ovalInRect: bubble.frame)
let finalRect = CGRectInset(bubble.frame, -1000, -1000)
let circleMaskPathFinal = UIBezierPath(ovalInRect: finalRect)
//用 CAShapeLayer 作為 mask
let maskLayer = CAShapeLayer()
maskLayer.path = circleMaskPathFinal.CGPath
presentedControllerView.layer.mask = maskLayer
//對 CAShapeLayer 的 path 屬性進行動畫
let maskLayerAnimation = CABasicAnimation(keyPath: "path")
maskLayerAnimation.fromValue = circleMaskPathInitial.CGPath
maskLayerAnimation.toValue = circleMaskPathFinal.CGPath
maskLayerAnimation.duration = self.transitionDuration(transitionContext)
maskLayer.addAnimation(maskLayerAnimation, forKey: "path")
來點不一樣的形狀,當然從效果上來講這個形狀放在這裡不好看。該例子僅作示范。
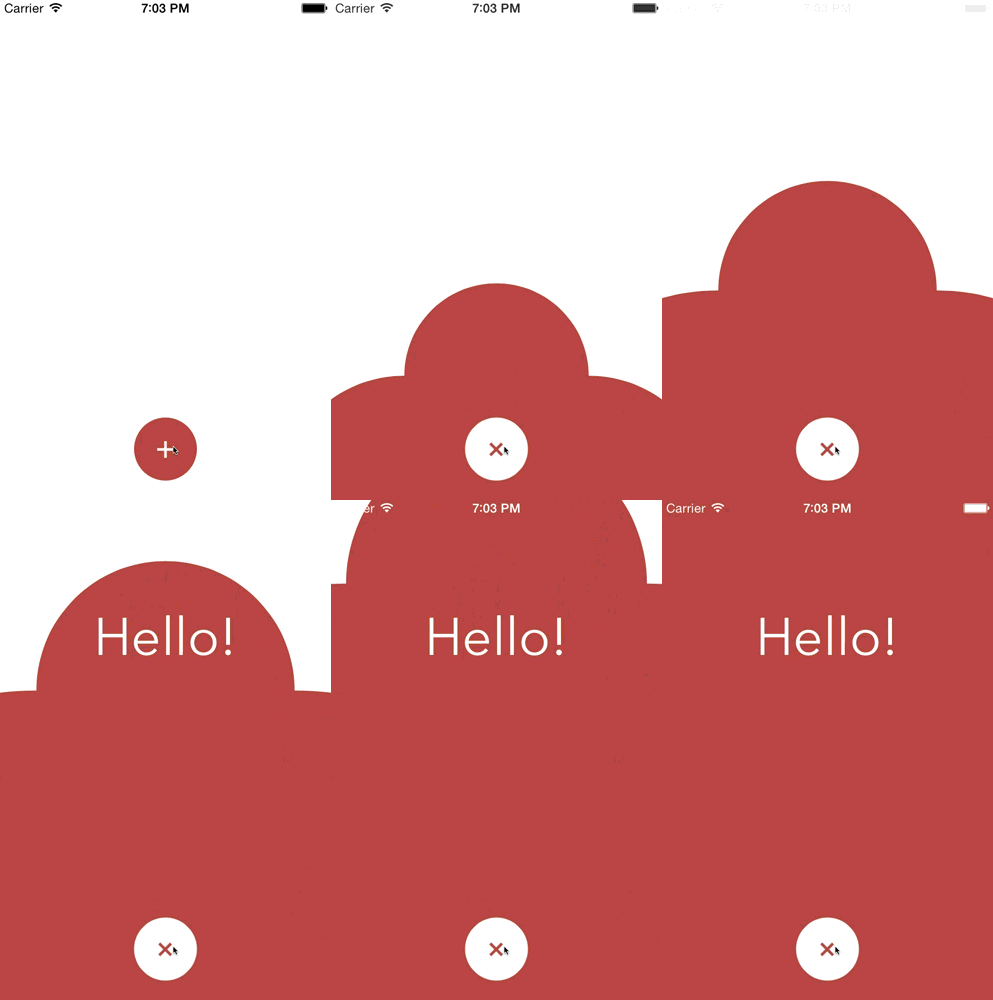
quincunx.gif
生成梅花形狀曲線的代碼:
let width = presentedControllerView.frame.width
let height = presentedControllerView.frame.height

let circleMaskPathInitial = UIBezierPath()
circleMaskPathInitial.moveToPoint(CGPoint(x: 0, y: height))
circleMaskPathInitial.addArcWithCenter(CGPoint(x: width / 4, y: height), radius: width / 4, startAngle: CGFloat(M_PI), endAngle: CGFloat(M_PI * 3 / 2), clockwise: true)
circleMaskPathInitial.addArcWithCenter(CGPoint(x: width / 2, y: height - width / 4), radius: width / 4, startAngle: CGFloat(M_PI), endAngle: CGFloat(M_PI * 2), clockwise: true)
circleMaskPathInitial.addArcWithCenter(CGPoint(x: width * 3 / 4, y: height), radius: width / 4, startAngle: CGFloat(M_PI * 3 / 2), endAngle:CGFloat(M_PI * 2), clockwise: true)
circleMaskPathInitial.moveToPoint(CGPoint(x: 0, y: height))
circleMaskPathInitial.closePath()

let circleMaskPathFinal = UIBezierPath()
circleMaskPathFinal.moveToPoint(CGPoint(x: -width, y: height))
circleMaskPathFinal.addArcWithCenter(CGPoint(x: 0, y: height), radius: height, startAngle: CGFloat(M_PI), endAngle: CGFloat(M_PI * 3 / 2), clockwise: true)
circleMaskPathFinal.addArcWithCenter(CGPoint(x: width / 2, y: 0), radius: width / 2, startAngle: CGFloat(M_PI), endAngle: CGFloat(M_PI * 2), clockwise: true)
circleMaskPathFinal.addArcWithCenter(CGPoint(x: width, y: height), radius: height, startAngle: CGFloat(M_PI * 3 / 2), endAngle: CGFloat(M_PI * 2), clockwise: true)
circleMaskPathFinal.moveToPoint(CGPoint(x: -width, y: height))
circleMaskPathFinal.closePath()
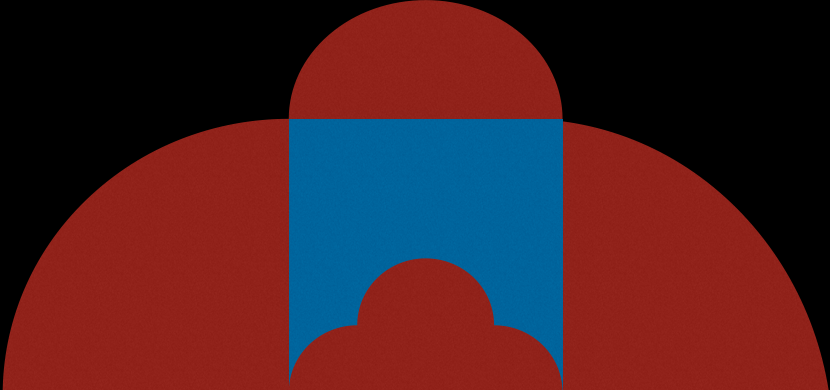
示意圖
類方法bezierPathWithArcCenter:radius:startAngle:endAngle:clockwise:用於添加圓弧,clockwise參數指示繪制的方向,true時沿順時針方向繪制,false時沿逆時針方向繪制。下圖是該方法文檔中的坐標示意圖:
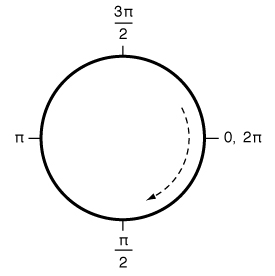
Angles in the default coordinate system
在繪制上面的梅花形狀的曲線時,注意起始和終點的曲線保持整體的繪制方向一致,不然動畫會很奇怪。
總結
差點搞了個大烏龍,不過見識到 BubbleTransition 的實現手段,現在就有兩種手段來實現這類效果:
尺寸更大的圓角矩形視圖充當背景
UIBezierPath + CAShapeLayer + maskLayer
我對 BubbleTransition 的手法真是佩服得五體投地,就這麼簡單地搞定了,UIBezierPath + CAShapeLayer + maskLayer 的很多場景都可以使用這個手法替代,代價也不高。當然面對更復雜的曲線視圖,還是用後者比較省心。
UIBezierPath + CAShapeLayer + maskLayer 的組合拳非常適合實現一些不規則的視圖,像曲線菜單或任務欄,波紋視圖,灌水視圖等等,發揮下你的想象力吧。
- 解析iOS10中的極光推送新聞的適配
- 周全解析iOS中同步要求、異步要求、GET要求、POST要求
- 周全解析iOS運用中自界說UITableViewCell的辦法
- 解析iOS運用開辟中對設計形式中的籠統工場形式的完成
- 深刻解析設計形式中的裝潢器形式在iOS運用開辟中的完成
- 實例解析設計形式中的外不雅形式在iOS App開辟中的應用
- 深刻解析iOS運用開辟中對設計形式中的橋接形式的應用
- 深刻解析iOS運用開辟中九宮格視圖結構的相干盤算辦法
- 實例解析iOS運用多線程開辟中NSthread類的用法
- iOS開辟應用GDataXML框架解析收集數據
- iOS開辟應用XML解析收集數據
- iOS開辟應用JSON解析收集數據
- 實例解析iOS app開辟中音頻文件播下班具類的封裝
- iOS中json解析湧現的null,nil,NSNumber的處理方法
- 簡介Objective-C解析XML與JSON數據格局的辦法


