WatchConnectivity:通過Application Context同步最新數據

譯者:鋼鐵俠般的卿哥(微博)
原文:WatchConnectivity: Sharing The Latest Data via Application Context
關於WatchOS 2還沒有掌握的同學可以參考之前已經發布的文章:
WatchOS 2: Hello, World
WatchConnectivity Introduction: Say Goodbye To The Spinner
WatchConnectivity: Say Hello to WCSession
當你的Watch App 只需要展示最新可用的信息時,可通過Application Context傳輸後台數據。例如,如果你的Glance展示比賽的分數,用戶不關心兩分鐘前4-2的分數,他們只關心當前的分數是4-4。關於交通的APP的例子,用戶不關心上上一個五分鐘之前開走的巴士,他們只會關心下一輛巴士何時到來。
所以Application Context工作的方式是把分片的數據插入隊列,如果在數據被傳送前有了一個全新的數據,那麼原來的舊數據就會被新數據取代。按照這樣的規律直到有新的數據取代。
受到Kristina Thai’s Application Context教程的啟發。我將創建一個類似基於emoji的app。在我的app中,用戶選擇iphone菜單中的食物emoji,然後最新的食物選項會展示在Apple Watch app中:視頻
免責聲明
注意到在我的app中我將要寫比Kristina教程中更多的抽象數據更新模型。所以我演示的demo app會被過度的設計。
假設我即將操作的是你真實的app將會變得比這個大很多。而且它需要更新許多視圖或者數據源通過iOSapp(或者Watch app)接收。所以如果你的app正如我演示的那麼簡單,只有一個視圖更新,保持它的簡單,然後研究Kristina的教程。
我也正在嘗試不同的方式編寫抽象層發送更新的數據到app所需的不同部分。所以我相信會有更好的實現方式。如果你有任何想法,請在評論中讓我知道你的想法。
步驟
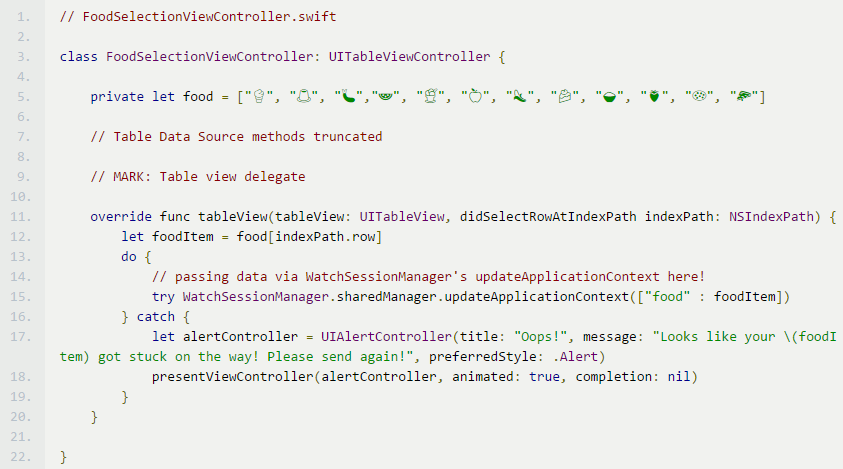
關於這個教程,我假設你已經知道如何在Xcode中創建一個單一視圖應用,以及創建一個簡單的食物emoji列表視圖。如果你對這有疑問,請參考我的 FoodSelectionViewController。
我也假設你了解如何創建一個Watch App同時在Interface.Storyboard中設置基礎樣式。如果你需要如何設置的幫助,閱讀我的WatchOS 2: Hello, World 教程。
最後你應該能夠設置基礎的單例來封裝WCSession,以及在AppDelegate中的application:didFinishLaunchingWithOptions方法和Watch Extension的 ExtensionDelegate 中的applicationDidFinishLaunching方法中激活它。如有疑問請看我的 WatchConnectivity: Say Hello to WCSession教程。
在你的iOS app中有如下代碼:
  // in your iOS app

import WatchConnectivity
class WatchSessionManager: NSObject, WCSessionDelegate {
    static let sharedManager = WatchSessionManager()
    private override init() {
        super.init()
    }

    private let session: WCSession? = WCSession.isSupported() ? WCSession.defaultSession() : nil

    private var validSession: WCSession? {

        // paired - the user has to have their device paired to the watch
        // watchAppInstalled - the user must have your watch app installed

        // Note: if the device is paired, but your watch app is not installed
        // consider prompting the user to install it for a better experience

        if let session = session where session.paired && session.watchAppInstalled {
            return session
        }
        return nil

    }
    func startSession() {
        session?.delegate = self
        session?.activateSession()
    }
}
在你的Watch App中有如下代碼:
// in your WatchKit Extension
import WatchConnectivity
class WatchSessionManager: NSObject, WCSessionDelegate {
    static let sharedManager = WatchSessionManager()
    private override init() {
        super.init()
    }
    private let session: WCSession = WCSession.defaultSession()
    func startSession() {
        session.delegate = self
        session.activateSession()
    }
}
當然如果你需要更多的說明,可以參考本教程的源代碼。
發送數據
在我的應用中,當用戶選擇一項食物選項時,它就會被在後台傳輸到我的Watch App中。這裡的iOS應用是發送者,而且這是非常容易實現的。
只需要在你的iOS app中擴展WatchSessionManager單例來更新application context:。
// in your iOS app

// MARK: Application Context
// use when your app needs only the latest information
// if the data was not sent, it will be replaced

extension WatchSessionManager {
    // This is where the magic happens!
    // Yes, that's it!
    // Just updateApplicationContext on the session!
    func updateApplicationContext(applicationContext: [String : AnyObject]) throws {
        if let session = validSession {
            do {
                try session.updateApplicationContext(applicationContext)
            } catch let error {
                throw error
            }
        }
    }
}
現在當用戶選擇一項食物欄時,你需要調用以下方法:
就是這樣!食物項已經在隊列中,將會被發送到你的Watch App。除非有一個新的食物選項在發送前被選中。
接收數據
你的Watch App 現在需要接收數據。這也是很容的,只需要實現WCSessionDelegate 中的session:didReceiveApplicationContext: 方法。
// in your Watch App

// MARK: Application Context
// use when your app needs only the latest information
// if the data was not sent, it will be replaced
extension WatchSessionManager {

    // Receiving data
    func session(session: WCSession, didReceiveApplicationContext applicationContext: [String : AnyObject]) {

     // update data here
     // this will be filled in in the Updating Data Section below!
    }
}
更新數據
現在你接收到了數據,然而這是很麻煩的部分。嘗試讓你的Watch Extension的InterfaceController和其他的視圖或者數據源知道你的數據已經被更新了。一種方法是通過NSNotificationCenter,但是我將要嘗試一個不同的方式。這個部分可以通過多種方法實現。同時對於這個app來說有些過度設計。所以記住這些。
自從使用Swift,我的目標是改變模型的類型。不幸的是,在我的博客中關於WCSession的文章提及到,WCSessionDelegate只能以NSOject的子類被實現。所以為了兼容上述條件,我創建了一個可以攜帶applicationContext數據同時又能轉換不可變類型,以及可被多個試圖控制器使用的數據源。
// in your WatchKit Extension

struct DataSource {

    let item: Item

    enum Item {
        case Food(String)
        case Unknown
    }

    init(data: [String : AnyObject]) {
        if let foodItem = data["food"] as? String {
            item = Item.Food(foodItem)
        } else {
            item = Item.Unknown
        }
    }
}
現在我設置一個需要更新所有部分並且這些部分需要知道最新更新的數據的協議。
// in your WatchKit Extension
//  WatchSessionManager.swift

protocol DataSourceChangedDelegate {
    func dataSourceDidUpdate(dataSource: DataSource)
}
到了有趣的部分!你的WatchSessionManager需要追蹤所有的dataSourceChangedDelegate。這需要通過一個數組實現。addDataSourceChangedDelegate方法會從數組中添加代理,方法removeDataSourceChangedDelegate會從數組中刪除代理。
// in your WatchKit Extension
//  WatchSessionManager.swift

class WatchSessionManager: NSObject, WCSessionDelegate {

    static let sharedManager = WatchSessionManager()
    private override init() {
        super.init()
    }

    private let session: WCSession = WCSession.defaultSession()

    // keeps track of all the dataSourceChangedDelegates
    private var dataSourceChangedDelegates = [DataSourceChangedDelegate]()

    func startSession() {
        session.delegate = self
        session.activateSession()
    }

    // adds / removes dataSourceChangedDelegates from the array
    func addDataSourceChangedDelegate(delegate: T) {
        dataSourceChangedDelegates.append(delegate)
    }

        func removeDataSourceChangedDelegate(delegate: T) {
        for (index, dataSourceDelegate) in dataSourceChangedDelegates.enumerate() {
            if let dataSourceDelegate = dataSourceDelegate as? T where dataSourceDelegate == delegate {
                dataSourceChangedDelegates.removeAtIndex(index)
                break
            }
        }
    }
}
我們現在可以加入接收application context的實現:
// in your WatchKit Extension
//  WatchSessionManager.swift

// MARK: Application Context
// use when your app needs only the latest information
// if the data was not sent, it will be replaced
extension WatchSessionManager {

    // Receiver
    func session(session: WCSession, didReceiveApplicationContext applicationContext: [String : AnyObject]) {
        dispatch_async(dispatch_get_main_queue()) { [weak self] in
            self?.dataSourceChangedDelegates.forEach { $0.dataSourceDidUpdate(DataSource(data: applicationContext))}
        }
    }
}
現在我們只需要確保我們的InterfaceController是DataSourceChangedDelegate,然後它被WatchSessionManager追蹤。
//  in your WatchKit Extension
//  InterfaceController.swift

import WatchKit

class InterfaceController: WKInterfaceController, DataSourceChangedDelegate {

    @IBOutlet var foodLabel: WKInterfaceLabel!
    override func awakeWithContext(context: AnyObject?) {

        super.awakeWithContext(context)
        // add InterfaceController as a dataSourceChangedDelegate
        WatchSessionManager.sharedManager.addDataSourceChangedDelegate(self)
    }

    override func didDeactivate() {

        // remove InterfaceController as a dataSourceChangedDelegate
        // to prevent memory leaks
        WatchSessionManager.sharedManager.removeDataSourceChangedDelegate(self)

        super.didDeactivate()
    }
    // MARK: DataSourceUpdatedDelegate
    // update the food label once the data is changed!
    func dataSourceDidUpdate(dataSource: DataSource) {
        switch dataSource.item {
        case .Food(let foodItem):
            foodLabel.setText(foodItem)
        case .Unknown:
            foodLabel.setText("ˉ\\_(ツ)_/ˉ")
        }
    }
}
大功告成!
你可以查看Github上的全部源代碼。
特別感謝@allonsykraken對代碼進行審核,以及提供建議。
- 進修iOS自界說導航掌握器UINavigationController
- iOS10告訴框架UserNotification懂得與運用
- iOS 開辟中 NavigationController常常湧現的成績緣由剖析
- iOS10 App適配權限 Push Notifications 字體Frame 碰到的成績
- iPhone/iPad開辟經由過程LocalNotification完成iOS准時當地推送功效
- iOS推送之當地告訴UILocalNotification
- ios開辟navigationController pushViewController 方法屢次跳轉前往到最下層前往到指定的某一層的完成辦法
- iOS10添加當地推送(Local Notification)實例
- iOS Remote Notification長途新聞推送處置
- IOS 波紋進度(waveProgress)動畫完成
- React Native搭建iOS開辟情況
- iOS中navigationController 去失落配景圖片、去失落底部線條的焦點代碼
- iOS的CoreAnimation開辟框架中的Layer層動畫制造解析
- iOS中的導航欄UINavigationBar與對象欄UIToolBar要點解析
- iOS中應用JSPatch框架使Objective-C與JavaScript代碼交互


