新手向:五分鐘搭建App設置頁面_純代碼 + 模型思想(OC)

作者:iOS_CYX 授權本站轉載。
本節主題(Storyboard/模型思想搭建設置頁面)
源碼地址
設置(Setting)頁面的搭建(實現效果)
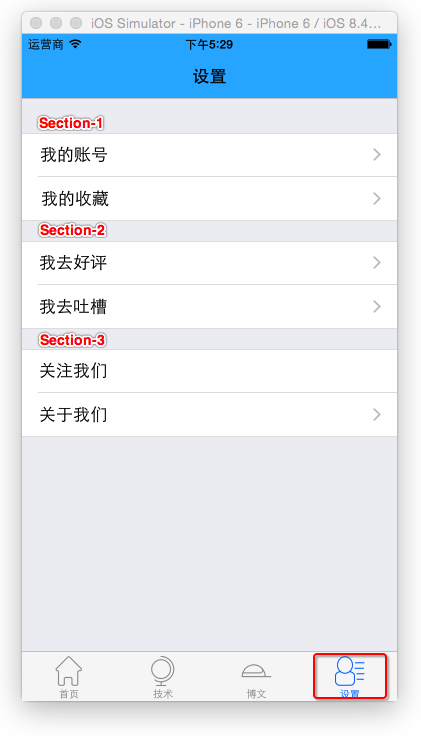
注:本文部分圖標及效果圖來自[IT江湖] https://github.com/itjhDev/itjh
開發方式(這裡提供兩種,個人感覺第二種重用性較高,推薦使用。但第一種較為簡單,視開發需求選擇)
(1)純代碼 + StoryBoard混合 開發
(2)純代碼 + 模型 思想
設置頁面的搭建
假設你已經搭建出了這個基本框架
《十分鐘搭建App主流框架》
但這畢竟是個空殼,下面讓我們把設置頁面簡單的搭建一下吧
注:本文僅僅提供簡略的搭建方式與實現思路,更加詳細的功能需要讀者深入探究。
方式一(純代碼 + StoryBoard混合 開發)
第一步
新建StoryBoard文件,注意:命名與控制器相同
第二步
往StoryBoard一頓狂拖,你懂的
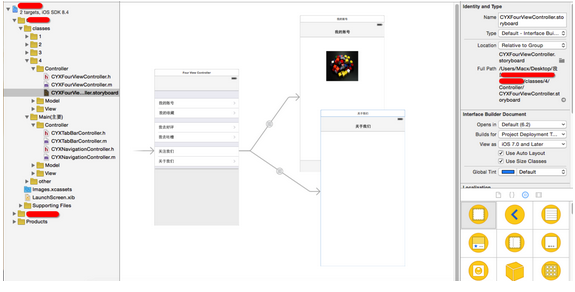
注意點:記得勾選第一個頁面 is Initial View Controller
Snip20150911_13.png
設置TableViewCell的樣式
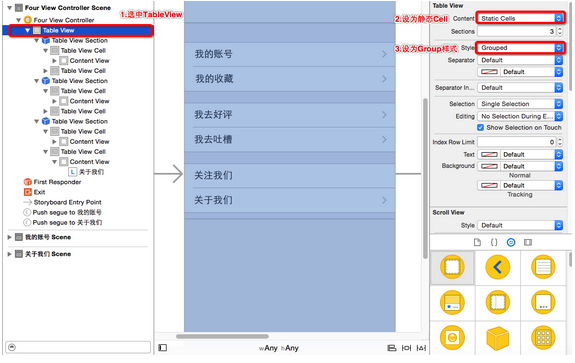
第三步(回到CYXTabBarController.m文件)
這裡只需要改第四個控制器的代碼,由於是從Storyboard中加載的控制器,與前三個不同。

/**
 *  添加所有子控制器
 */
- (void)setUpAllChildViewController{
    // 1.添加第一個控制器
    CYXOneViewController *oneVC = [[CYXOneViewController alloc]init];
    [self setUpOneChildViewController:oneVC image:[UIImage imageNamed:@"tab_home_icon"] title:@"首頁"];
    // 2.添加第2個控制器
    CYXTwoViewController *twoVC = [[CYXTwoViewController alloc]init];
    [self setUpOneChildViewController:twoVC image:[UIImage imageNamed:@"js"] title:@"技術"];
    // 3.添加第3個控制器
    CYXThreeViewController *threeVC = [[CYXThreeViewController alloc]init];
    [self setUpOneChildViewController:threeVC image:[UIImage imageNamed:@"qw"] title:@"博文"];
    // 4.添加第4個控制器
    // 4.1 初始化並從Storyboard中加載控制器
    UIStoryboard *storyBoard = [UIStoryboard storyboardWithName:@"CYXFourViewController" bundle:nil];
    // 4.2 關聯storyBoard與CYXFourViewController
    CYXFourViewController *fourVC = [storyBoard instantiateInitialViewController];
    [self setUpOneChildViewController:fourVC image:[UIImage imageNamed:@"user"] title:@"設置"];
}
設置頁面已經出來了
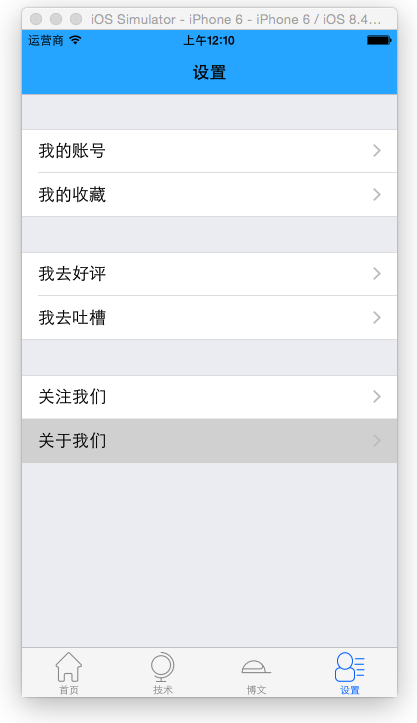
方式二(純代碼 + 模型 開發)
第一步 (新建模型文件)
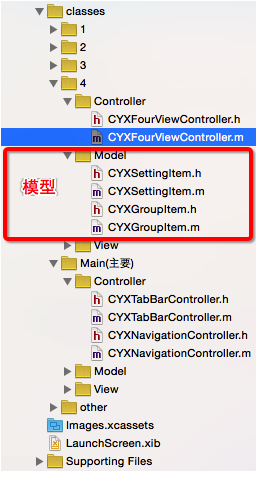
第二步 (模型的設計)
組模型設計(CYXGroupitem.h),分析每一組的所有元素:比如有頭部標題,尾部標題,還有若干行Cell
@interface CYXGroupItem : NSObject
/** 頭部標題 */
@property (strong, nonatomic) NSString * headerTitle;
/** 尾部標題 */
@property (strong, nonatomic) NSString * footerTitle;
/** 組中的行數組 */
@property (strong, nonatomic) NSArray * items;
@end
行模型的設計(CYXSettingItem.h),分析每一行的所有元素:比如只有標題
  @interface CYXSettingItem : NSObject
  @property (strong, nonatomic) NSString * title;/**< 標題 */
  + (instancetype)itemWithtitle:(NSString *)title;/**< 設置標題值 類方法 */
  @end
類方法的實現(CYXSettingItem.m)
  + (instancetype)itemWithtitle:(NSString *)title{
  CYXSettingItem *item = [[CYXSettingItem alloc]init];
  item.title = title;
  return item;
  }
第三步 回到設置頁面的控制器(CYXFourViewController.m)
(1) 實現< UITableViewDataSource >協議的3個方法
(2) 給對應的模型設置值
#import "CYXFourViewController.h"
#import "CYXSettingItem.h"
#import "CYXGroupItem.h"
@interface CYXFourViewController ()
@property (strong, nonatomic) NSMutableArray * groups;/**< 組數組 描述TableView有多少組 */
@end
@implementation CYXFourViewController
/** groups 數據懶加載*/
- (NSMutableArray *)groups
{
    if (!_groups) {
        _groups = [NSMutableArray array];
    }
    return _groups;
}
- (instancetype)init{
    // 設置tableView的分組樣式為Group樣式
    return [self initWithStyle:UITableViewStyleGrouped];
}
- (void)viewDidLoad {
    [super viewDidLoad];
    //添加第1組模型
    [self setGroup1];
    //添加第2組模型
    [self setGroup2];
    //添加第3組模型
    [self setGroup3];
}
- (void)setGroup1{
    // 創建組模型
    CYXGroupItem *group = [[CYXGroupItem alloc]init];
    // 創建行模型
    CYXSettingItem *item = [CYXSettingItem itemWithtitle:@"我的賬號"];
    CYXSettingItem *item1 = [CYXSettingItem itemWithtitle:@"我的收藏"];
    // 保存行模型數組
    group.items = @[item,item1];
    // 把組模型保存到groups數組
    [self.groups addObject:group];
}
- (void)setGroup2{
    CYXGroupItem *group = [[CYXGroupItem alloc]init];
    CYXSettingItem *item = [CYXSettingItem itemWithtitle:@"我去好評"];
    CYXSettingItem *item1 = [CYXSettingItem itemWithtitle:@"我去吐槽"];
    group.items = @[item,item1];
    [self.groups addObject:group];
}
- (void)setGroup3{
    CYXGroupItem *group = [[CYXGroupItem alloc]init];
    CYXSettingItem *item = [CYXSettingItem itemWithtitle:@"關注我們"];
    CYXSettingItem *item1 = [CYXSettingItem itemWithtitle:@"關於我們"];
    group.items = @[item,item1];
    [self.groups addObject:group];
}
#pragma mark - TableView的數據源代理方法實現
/**
 *  返回有多少組的代理方法
 */
- (NSInteger)numberOfSectionsInTableView:(UITableView *)tableView {
    return self.groups.count;
}
/**
 *  返回每組有多少行的代理方法
 */
- (NSInteger)tableView:(UITableView *)tableView numberOfRowsInSection:(NSInteger)section {
    CYXGroupItem *group = self.groups[section];
    return group.items.count;
}
/**
 *  返回每一行Cell的代理方法
 */
- (UITableViewCell *)tableView:(UITableView *)tableView cellForRowAtIndexPath:(NSIndexPath *)indexPath {
    // 1 初始化Cell
    // 1.1 設置Cell的重用標識
    static NSString *ID = @"cell";
    // 1.2 去緩存池中取Cell
    UITableViewCell *cell = [tableView dequeueReusableCellWithIdentifier:ID];
    // 1.3 若取不到便創建一個帶重用標識的Cell
    if (cell == nil) {
        cell  = [[UITableViewCell alloc]initWithStyle:UITableViewCellStyleDefault reuseIdentifier:ID];
    }
    // 設置Cell右邊的小箭頭
    cell.accessoryType = UITableViewCellAccessoryDisclosureIndicator;
    // 2 設置數據
    // 2.1 取出組模型
    CYXGroupItem *group = self.groups[indexPath.section];
    // 2.2 根據組模型取出行(Cell)模型
    CYXSettingItem *item = group.items[indexPath.row];
    // 2.3 根據行模型的數據賦值
    cell.textLabel.text = item.title;
    return cell;
}
@end
實現效果
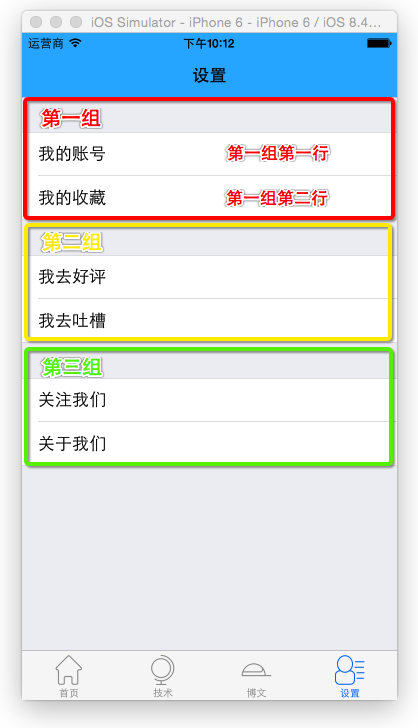
如果你希望使用方式二實現點擊Cell的跳轉,需要實現下面的方法,並在裡面調用navigationController的pushViewController方法跳轉到你自定義的控制器。
- (void)tableView:(UITableView *)tableView didSelectRowAtIndexPath:(NSIndexPath *)indexPath;
看到這裡,如果你是個iOS初學者,應該覺得方式2的實現過於繁瑣,但方式2卻是個一勞永逸的方式。換句話說,如果你用方式2封裝了一個完整的設置頁面的框架,在下一個項目中,再有類似的設置頁面,你便可以直接把這個框架拷貝過去,改少量的代碼便可以完美兼容,肯定比你再重新拖Storyboard要便捷,因此本人是比較推崇這種方式的。
附:源碼github地址
- 新手指南 怎麼關閉AppStore自動更新功能
- 新手指南 怎麼查看iCloud照片流中的照片
- 新手教程:如何在iPad上使用iOS10的Safari分屏功能?
- 新手教程:升級開發者預覽版/公測版後如何改回蘋果iOS10.2正式版?
- 新手福音:蘋果發布iOS9正式版用戶指南
- iTunes新手入門 同步使用教程
- 新手iPhone 4越獄解鎖基礎知識
- iTunes使用教程精華大全 新手終極寶典
- iphone《仙劍奇俠傳5:劍傲丹楓》新手入門
- iphone版Pocket Planes《口袋飛機》新手入門手冊
- iPhone新手購機電池保養及充電技巧
- 蘋果iTunes新手使用圖文教程
- iphone新手教程什麼導入音樂
- 蘋果手機新手入門 91助手全程呵護
- 蘋果手機新手教程:怎樣打電話?

