[XTPaster] iOS 貼紙功能實現
作者:@TEASON
先把代碼貼上來,https://github.com/Akateason/XTPaster

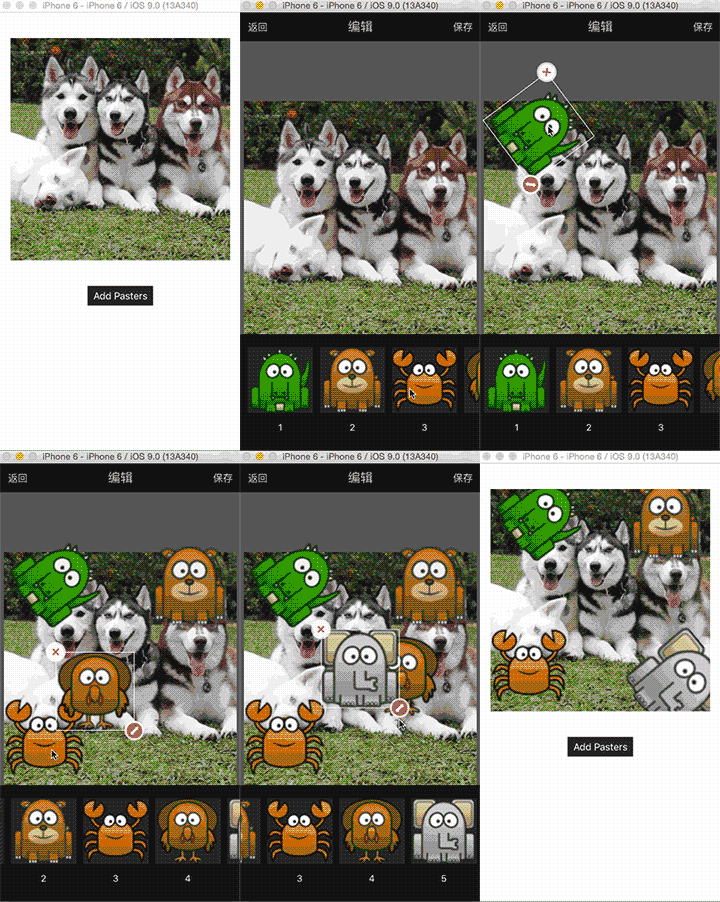
貼紙功能出現在很多圖片社交中, 就是圖片上面貼圖片, 對貼紙而言就是需要控制貼紙的位置,旋轉,大小, 說到底是處理gesture,transform,frame, 如果需要多張貼紙, 需要考慮增加刪除和正在操作的對象 , 你的腦海中需要對這些東西有個了解.
鋪墊做到這裡, github下載代碼, 集成方式如下
1.把Paster文件夾放到你的項目中
2.把UIImage+AddFunction類目放到你的項目中
主要邏輯在這兩個類
XTPasterStageView和XTPasterView
1.XTPasterStageView是畫布View,用來放需要被加工的圖片,是主舞台,用來管理貼紙list,貼紙的新增和刪除, 保存退出等
2.XTPasterView是貼紙類. 手勢或點擊控制旋轉,位置,大小等
調用方式
1.new
    _stageView = [[XTPasterStageView alloc] initWithFrame:rectImage] ;
    _stageView.originImage = self.imageWillHandle ; // 需要被貼紙加工的圖片
    _stageView.backgroundColor = [UIColor whiteColor] ;
    [self.view addSubview:_stageView] ;
2.add paster
[_stageView addPasterWithImg:image] ;
如果你只想使用的話, 看到上面足矣 .
下面的部分從宏觀和細節兩個角度大概講一下我個人實現的思路 .
大方向思路
pasterID , 用一個自增的id來控制內存裡的貼紙唯一
XTPasterStageView管理多張貼紙 , XTPasterView中設置delegate在XTPasterStageView中回調控制新增和刪除
多張貼紙需要判斷哪一張在操作中, 所以貼紙類需要一個bool狀態isOnFirst來控制是否正在操作.
@interface XTPasterStageView : UIView
@property (nonatomic,strong) UIImage *originImage ;//原圖
- (instancetype)initWithFrame:(CGRect)frame ;
- (void)addPasterWithImg:(UIImage *)imgP ;//加貼紙
- (UIImage *)doneEdit ;//完成保存
@end
#import #import "XTPasterStageView.h"
@class XTPasterView ;
@protocol XTPasterViewDelegate - (void)makePasterBecomeFirstRespond:(int)pasterID ; //切換控制正在操作哪一張貼紙
- (void)removePaster:(int)pasterID ; //刪除某張
@end
@interface XTPasterView : UIView
@property (nonatomic,strong)    UIImage *imagePaster ; //img resource
@property (nonatomic)           int     pasterID ;
@property (nonatomic)           BOOL    isOnFirst ; //是否正在操作
@property (nonatomic,weak)    id  delegate ;
- (instancetype)initWithBgView:(XTPasterStageView *)bgView
                      pasterID:(int)pasterID
                           img:(UIImage *)img ;
- (void)remove ;
@end
細節思路
上面給出.h的外部Api只和需求有關, 並把只和自己有關的細節放在.m裡面
比如說變形按鈕, 刪除按鈕, 拖動等等, 這些都是控制單張貼紙操作的細節 .
有以下幾點需要注意:
變形按鈕: 實現縮放和旋轉
拖動: 手勢 ,控制相對位移
刪除按鈕: 刪除在舞台上正在操作的貼紙
#define PASTER_SLIDE        150.0
#define FLEX_SLIDE          15.0
#define BT_SLIDE            30.0
#define BORDER_LINE_WIDTH   1.0
#define SECURITY_LENGTH     75.0
@interface XTPasterView ()
{
    CGFloat minWidth;
    CGFloat minHeight;
    CGFloat deltaAngle;
    CGPoint prevPoint;
    CGPoint touchStart;
    CGRect  bgRect ;
}
@property (nonatomic,strong) UIImageView    *imgContentView ;
@property (nonatomic,strong) UIImageView    *btDelete ;
@property (nonatomic,strong) UIImageView    *btSizeCtrl ;
@end
細節的實現見源碼吧, 貼過來實在是有點冗長, github源碼點這裡過去
如果你喜歡它覺得好用, 就在github加個star .嘻嘻.
一起來討論有趣的東西
- iOS9與XCode7中不克不及應用http銜接的疾速處理方法
- iOS中修正UITextField占位符字體色彩的辦法總結
- 應用UITextField限制只可輸出中,英文,數字的辦法
- iOS讀取txt文件湧現中文亂碼的處理辦法
- 僅幾行iOS代碼限制TextField輸出長度
- TextField和TextView限制輸出字數長度
- iOS應用runtime修正文本框(TextField)的占位文字色彩
- iOS中應用NSURLConnection處置HTTP同步與異步要求
- iOS的HTTP要求和要求回執類用法小結
- iOS運用開辟中AFNetworking庫的經常使用HTTP操作辦法小結
- iOS中的UITextView文字輸出光標應用技能小結
- iOS開辟之自界說UITextField的辦法
- iOS App開辟中UITextField組件的經常使用屬性小結
- iOS運用開辟中使UITextField完成placeholder屬性的辦法
- HTTP/2 協定用於 iOS 推送提示辦事 (APNS)


