新手教程:使用Masonry創建一個下拉式菜單

之前看到一個swift開源項目
https://github.com/PhamBaTho/BTNavigationDropdownMenu
就是一個類似新浪微博的下拉式導航菜單,看看下面的效果。

之前看這個項目的時候(大概一個月之前??今天上去看的時候作者已經更新到適配橫豎屏切換了!用的UIViewAutoResizingMask),不能支持橫豎屏切換,這明顯是沒有做布局適配啊,而且沒有Objective-C版本,於是自己用Objective-C重新寫了一個,並且加上Masonry做自動布局適配屏幕切換。當然這裡完全可以用UIViewAutoResizingMask做橫豎屏切換,但是Masonry用起來也很簡單。做一遍下來加深自己對View和自動布局的理解。。。寫下來適合新手看看,高手就繞道吧。不啰嗦了,開始吧。
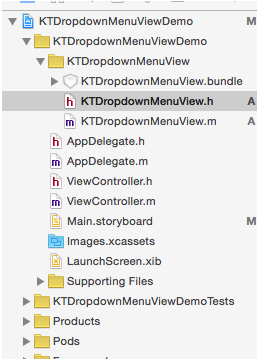
首先盜用BTNavigationDropdownMenu的圖標元素bundle到我的新建的項目https://github.com/tujinqiu/KTDropdownMenuView下面。。。
1、新建項目,集成UIView創建KTDropdownMenuView。配置CocoaPods。
BTNavigationDropdownMenu
2、添加一些基本的設置屬性和初始化方法,不夠的可以以後再添加
#import @interface KTDropdownMenuView : UIView
// cell color default greenColor
@property (nonatomic, strong) UIColor *cellColor;
// cell seprator color default whiteColor
@property (nonatomic, strong) UIColor *cellSeparatorColor;
// cell height default 44
@property (nonatomic, assign) CGFloat cellHeight;
// animation duration default 0.4
@property (nonatomic, assign) CGFloat animationDuration;
// text color default whiteColor
@property (nonatomic, strong) UIColor *textColor;
// text font default system 17
@property (nonatomic, strong) UIFont *textFont;
// background opacity default 0.3
@property (nonatomic, assign) CGFloat backgroundAlpha;
- (instancetype)initWithFrame:(CGRect)frame titles:(NSArray*)titles;
@end
3、在m文件中定義私有屬性titles,顧名思義這個存放菜單名稱的數組,初始化前面的默認值。個人喜歡用getter來實現懶加載,代碼風格而已,看個人喜好。下面是代碼。。。
#import "KTDropdownMenuView.h"
#import
@interface KTDropdownMenuView()
@property (nonatomic, copy) NSArray *titles;
@end
@implementation KTDropdownMenuView
#pragma mark -- life cycle --
- (instancetype)initWithFrame:(CGRect)frame titles:(NSArray *)titles
{
    if (self = [super initWithFrame:frame])
    {
        _animationDuration=0.4;
        _backgroundAlpha=0.3;
        _cellHeight=44;
        _selectedIndex = 0;
        _titles= titles;
    }
    return self;
}
#pragma mark -- getter and setter --
- (UIColor *)cellColor
{
    if (!_cellColor)
    {
        _cellColor = [UIColor greenColor];
    }
    return _cellColor;
}
- (UIColor *)cellSeparatorColor
{
    if (!_cellSeparatorColor)
    {
        _cellSeparatorColor = [UIColor whiteColor];
    }
    return _cellSeparatorColor;
}
- (UIColor *)textColor
{
    if (!_textColor)
    {
        _textColor = [UIColor whiteColor];
    }
    return _textColor;
}
- (UIFont *)textFont
{
    if(!_textFont)
    {
        _textFont = [UIFont systemFontOfSize:17];
    }
    return _textFont;
}
4、在ViewController中加上如下代碼
[self.navigationController.navigationBar setBarTintColor:[UIColor greenColor]];
KTDropdownMenuView*menuView = [[KTDropdownMenuView alloc] initWithFrame:CGRectMake(0,0,100,44) titles:@[@"首頁",@"朋友圈",@"我的關注",@"明星",@"家人朋友"]];
self.navigationItem.titleView = menuView;
self.navigationItem.titleView = menuView的作用是替換當前的titleView為我們自定義的view。運行一下,除了導航欄變綠之外,並沒有什麼卵用。。。但是,運用Xcode的視圖調試功能,你會發現還是有點卵用的。
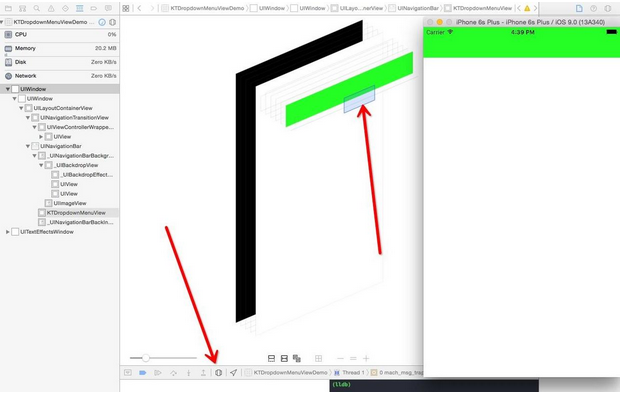
轉動一下,導航欄上有個View出現了有木有。
好,下面開始在我們的View上添加控件了,首先導航欄上面有一個可以點的button,同時右邊有一個箭頭是吧。在m文件中加上如下控件
@property (nonatomic, strong) UIButton *titleButton;
@property (nonatomic, strong) UIImageView *arrowImageView;
同時寫下getter
- (UIButton *)titleButton
{
    if (!_titleButton)
    {
        _titleButton = [[UIButton alloc] init];
        [_titleButton setTitle:[self.titles objectAtIndex:0] forState:UIControlStateNormal];
        [_titleButton addTarget:self action:@selector(handleTapOnTitleButton:) forControlEvents:UIControlEventTouchUpInside];
        [_titleButton.titleLabel setFont:self.textFont];
        [_titleButton setTitleColor:self.textColor forState:UIControlStateNormal];
    }
    return _titleButton;
}
- (UIImageView *)arrowImageView
{
    if (!_arrowImageView)
    {
        NSString * bundlePath = [[ NSBundle mainBundle] pathForResource:@"KTDropdownMenuView" ofType:@ "bundle"];
        NSString *imgPath= [bundlePath stringByAppendingPathComponent:@"arrow_down_icon.png"];
        UIImage *image=[UIImage imageWithContentsOfFile:imgPath];
        _arrowImageView = [[UIImageView alloc] initWithImage:image];
    }
    return _arrowImageView;
}
接下來當然是addSubView是吧
(instancetype)initWithFrame:(CGRect)frame titles:(NSArray *)titles中寫下
 [self addSubview:self.titleButton];
 [self addSubview:self.arrowImageView];
運行你會發現button和imageView的大小和位置顯然不是你想的那樣,因為我們並沒有設置控件的frame。好,下面用Masonry了。上代碼。
        [self.titleButton mas_makeConstraints:^(MASConstraintMaker *make) {
            make.center.equalTo(self);
        }];
        [self.arrowImageView mas_makeConstraints:^(MASConstraintMaker *make) {
            make.left.equalTo(self.titleButton.mas_right).offset(5);
            make.centerY.equalTo(self.titleButton.mas_centerY);
        }];
Masonry使用非常簡單,就簡單的三個方法,mas_makeConstraints, mas_remakeConstraints, mas_updateConstraints, 比起蘋果自己寫一堆的布局代碼簡單太多。推薦用代碼寫View的童鞋使用Masonry。關於Masonry的詳細說明可以去https://github.com/SnapKit/Masonry 上查看。
上面的代碼很容易理解,第一個約束語句是讓titleButton處於視圖的中間位置。第二個約束語句是讓arrowImageView保持與titleButton水平中心對齊,同時arrowImageView的左邊與titleButton的右邊水平距離為5。
Masonry使用鏈式語法讓添加約束變得非常簡單,要是你自己用蘋果的API活著可視化語言,你得寫一堆的代碼來實現布局。比如下面這樣又臭又長,還容易出錯。
[superview addConstraints:@[
 //view1 constraints
 [NSLayoutConstraint constraintWithItem:view1 attribute:NSLayoutAttributeTop
relatedBy:NSLayoutRelationEqual
 toItem:superview
 attribute:NSLayoutAttributeTop
 multiplier:1.0
 constant:padding.top],
 [NSLayoutConstraint constraintWithItem:view1 attribute:NSLayoutAttributeLeft
 relatedBy:NSLayoutRelationEqual
 toItem:superview
 attribute:NSLayoutAttributeLeft
 multiplier:1.0
 constant:padding.left],
 [NSLayoutConstraint constraintWithItem:view1 attribute:NSLayoutAttributeBottom
 relatedBy:NSLayoutRelationEqual
 toItem:superview
attribute:NSLayoutAttributeBottom
 multiplier:1.0
 constant:-padding.bottom],
[NSLayoutConstraint constraintWithItem:view1 attribute:NSLayoutAttributeRight
 relatedBy:NSLayoutRelationEqual
 toItem:superview attribute:NSLayoutAttributeRight
 multiplier:1
constant:-padding.right]]
];
運行之後,果然,使我們預料的效果哈

細心的會發現我用Masonry的時候並沒有設置arrowImageView與titleButton的size,但是照樣運行很好哈。這是因為自動布局系統中,如果你沒有設置控件的size,那麼就會默認使用固有內容大小(Intrinsic Content Size),固有內容會驅動設置控件的size。實際上Xcode裡面大部分的控件都有Intrinsic Content Size。也就是說如果你內容多的時候,size會自動變大。自動布局的這個好處在本地化不同語言(內容長度不一致)的時候非常有用。如果中文的label就兩個字,但是英文一大串的時候,建議你使用自動布局,不要手動去設置label的size。
5、下面添加tableView,加上如下屬性。tableView干嘛?顯然是裝載文字菜單列表啊。
@property (nonatomic, strong) UITableView *tableView;
@property (nonatomic, strong) UIView *backgroundView;
@property (nonatomic, strong) UIView *wrapperView;
backgroundView是後面的一層半透明的黑色背景,當tableView出現的時候,backgroundView也出現,菜單收起的時候一起消失。wrapperView則是tableView和backgroundView的父View。
那麼問題來了,wrapperView附著到哪裡?顯然不能加在KTDropdownMenuView上哈,答案是附著到當前的keyWindow上面。因為初始化的過程中並沒有傳入其他的View,而且也不應該讓KTDropdownMenuView與其他的view產生關聯。直接添加到keyWindow上面,即可以顯示在最上層。
另外一個問題是wrapperView的大小位置如何設置?如何保證旋轉屏幕也能適配大小?利用自動布局可以適配旋轉屏幕,同時wrapperView要在導航欄下面顯示。那麼很容易想到wrapperView的top要依靠在導航欄的bottom,同時左,右,下需要與當前keyWindow分別對齊。
那麼問題又來了,如何找到navigationBar?初始化方法並沒有傳進來啊。。。當然簡單的辦法是傳一個進來一個哈,這裡用BTNavigationDropdownMenu的思路,遞歸搜索最前面的UINavigationController就行,代碼貼上來,自己理解。。。
@implementation UIViewController (topestViewController)
- (UIViewController *)topestViewController
{
    if (self.presentedViewController)
    {
        return [self.presentedViewController topestViewController];
    }
    if ([self isKindOfClass:[UITabBarController class]])
    {
        UITabBarController *tab = (UITabBarController *)self;
        return [[tab selectedViewController] topestViewController];
    }
    if ([self isKindOfClass:[UINavigationController class]])
    {
        UINavigationController *nav = (UINavigationController *)self;
        return [[nav visibleViewController] topestViewController];
    }
    return self;
}
@end
下面在初始化方法中加上如下代碼
        UIWindow *keyWindow = [UIApplication sharedApplication].keyWindow;
        UINavigationBar *navBar = [keyWindow.rootViewController topestViewController].navigationController.navigationBar;
        [keyWindow addSubview:self.wrapperView];
        [self.wrapperView mas_makeConstraints:^(MASConstraintMaker *make) {
            make.left.right.bottom.equalTo(keyWindow);
            make.top.equalTo(navBar.mas_bottom);
        }];
        [self.wrapperView addSubview:self.backgroundView];
        [self.backgroundView mas_makeConstraints:^(MASConstraintMaker *make) {
            make.edges.equalTo(self.wrapperView);
        }];
        [self.wrapperView addSubview:self.tableView];
        [self.tableView mas_makeConstraints:^(MASConstraintMaker *make) {
            make.edges.equalTo(self.wrapperView);
        }];
以上略掉tableViewDataSource的相關代碼和getter。
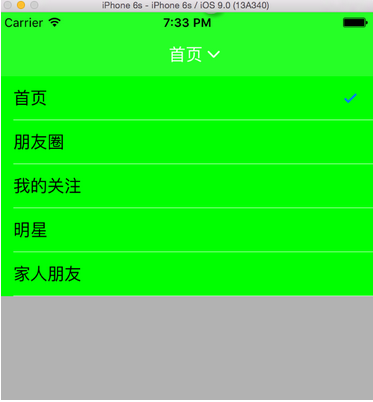
旋轉一下,很好,沒有問題,自動布局工作的很好
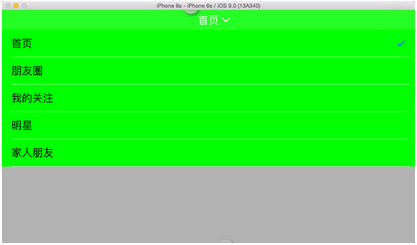
6、下面加上按鈕響應和動畫
添加下面兩個屬性
@property (nonatomic, assign) BOOL isMenuShow;
@property (nonatomic, assign) NSUInteger selectedIndex;
然後實現按鈕的點擊事件方法,實現tableView的delegate方法
#pragma mark -- UITableViewDataDelegate --
- (void)tableView:(UITableView *)tableView didSelectRowAtIndexPath:(NSIndexPath *)indexPath
{
    self.selectedIndex = indexPath.row;
    [tableView deselectRowAtIndexPath:indexPath animated:YES];
}
#pragma mark -- handle actions --
- (void)handleTapOnTitleButton:(UIButton *)button
{
    self.isMenuShow = !self.isMenuShow;
}
相應的屬性setter
- (void)setIsMenuShow:(BOOL)isMenuShow
{
    if (_isMenuShow != isMenuShow)
    {
        _isMenuShow = isMenuShow;
        if (isMenuShow)
        {
            [self showMenu];
        }
        else
        {
            [self hideMenu];
        }
    }
}
- (void)setSelectedIndex:(NSUInteger)selectedIndex
{
    if (_selectedIndex != selectedIndex)
    {
        _selectedIndex = selectedIndex;
        [_titleButton setTitle:[_titles objectAtIndex:selectedIndex] forState:UIControlStateNormal];
        [self.tableView reloadData];
    }
    self.isMenuShow = NO;
}
在實現動畫方法showMenu和hideMenu之前,先考慮:這個tableView在出現的時候是從上往下出現的,也就是這個tableView的出現的這幾行的下端應該在wrapperView的頂端,於是先修改init方法中設置tableView起始位置的代碼。
        CGFloat tableCellsHeight = _cellHeight * _titles.count;
        [self.tableView mas_makeConstraints:^(MASConstraintMaker *make) {
            make.left.right.equalTo(self.wrapperView);
            make.top.equalTo(self.wrapperView.mas_top).offset(-tableCellsHeight);
            make.bottom.equalTo(self.wrapperView.mas_bottom).offset(tableCellsHeight);
        }];
        [self.tableView layoutIfNeeded];
        self.wrapperView.hidden = YES;
注意到最後加了一句 [self.tableView layoutIfNeeded],這是因為自動布局動畫都是驅動layoutIfNeeded來實現的,與以往的設置frame不一樣。給View添加或者更新約束後,並不能馬上看到效果,而是要等到viewlayout的時候觸發。layoutIfNeeded就是手動觸發這一過程。這裡為了與後面的動畫不沖突,首先調用一次,設置初始狀態。下面是動畫代碼。
- (void)showMenu
{
    [self.tableView mas_updateConstraints:^(MASConstraintMaker *make) {
        make.edges.equalTo(self.wrapperView);
    }];
    self.wrapperView.hidden = NO;
    self.backgroundView.alpha = 0.0;
    [UIView animateWithDuration:self.animationDuration
                     animations:^{
                         self.arrowImageView.transform = CGAffineTransformRotate(self.arrowImageView.transform, M_PI);
                     }];
    [UIView animateWithDuration:self.animationDuration * 1.5
                          delay:0
         usingSpringWithDamping:0.7
          initialSpringVelocity:0.5
                        options:UIViewAnimationOptionCurveLinear
                     animations:^{
                         [self.tableView layoutIfNeeded];
                         self.backgroundView.alpha = self.backgroundAlpha;
                     } completion:nil];
}
- (void)hideMenu
{
    CGFloat tableCellsHeight = _cellHeight * _titles.count;
    [self.tableView mas_updateConstraints:^(MASConstraintMaker *make) {
        make.left.right.equalTo(self.wrapperView);
        make.top.equalTo(self.wrapperView.mas_top).offset(-tableCellsHeight);
        make.bottom.equalTo(self.wrapperView.mas_bottom).offset(tableCellsHeight);
    }];
    [UIView animateWithDuration:self.animationDuration
                     animations:^{
                         self.arrowImageView.transform = CGAffineTransformRotate(self.arrowImageView.transform, M_PI);
                     }];
    [UIView animateWithDuration:self.animationDuration * 1.5
                          delay:0
         usingSpringWithDamping:0.7
          initialSpringVelocity:0.5
                        options:UIViewAnimationOptionCurveLinear
                     animations:^{
                         [self.tableView layoutIfNeeded];
                         self.backgroundView.alpha = 0.0;
                     } completion:^(BOOL finished) {
                         self.wrapperView.hidden = YES;
                     }];
}
代碼很簡單,主要是設置動畫之後的tableView約束位置,旋轉arrowImageView同時改變backgroundView的透明度,注意這裡是調用的mas_updateConstraints是更新約束,一搬做動畫都是用這個。但是細心的話會發現有一個bug,動畫過程中,還有把tableView往下面拽的時候,上面和導航欄之間會出現灰色背景啊。
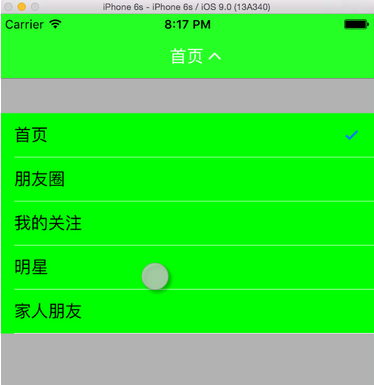
不能忍。添加一個與tableCell一樣顏色的tableHeaderView到tableView上面吧。在showMenu方法的開頭加上下面代碼。
    UIView *headerView = [[UIView alloc] initWithFrame:CGRectMake(0, 0, 0, kKTDropdownMenuViewHeaderHeight)];
    headerView.backgroundColor = self.cellColor;
    self.tableView.tableHeaderView = headerView;
其中kKTDropdownMenuViewHeaderHeight設置為300。值得注意的是,這裡並不需要設置tableHeaderView的寬度,它會自適應到tableView的寬度。還有加了tableHeaderView之後,相應的mas_updateConstraints和mas_makeConstraints方法中需要將位置上移kKTDropdownMenuViewHeaderHeight的距離。同時把init方法中的[self.tableView layoutIfNeeded]移動到添加tableHeaderView之後。現在動畫還有拖拽不會看到背景了。
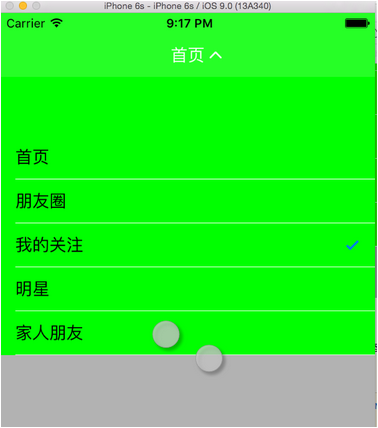
完整的項目在這裡,https://github.com/tujinqiu/KTDropdownMenuView
歡迎討論交流,批評指正!!!
- 史上最具體的CocoaPods裝置教程(圖文)
- iOS10最新完成長途告訴的開辟教程詳解
- 手把手教你完成微信藐視頻iOS代碼完成
- IOS UI進修教程之辨別NSBundle和NSURL(讀取文件、寫入文件)
- IOS UI進修教程之設置UITextField各類屬性
- IOS UI進修教程之應用UIImageView控件制造動畫
- IOS UI進修教程之應用代碼創立button
- 付出寶付出開辟IOS圖文教程案例
- iOS開發之獲取零碎相冊中的圖片與視頻教程(內帶url轉換)
- iOS指紋驗證TouchID使用學習教程2
- iOS初級教程(一)
- Xamarin開發IOS系列教程一:裝置黑蘋果
- iOS9.3正式版升級教程詳解
- iOS美化教程:設置界面添加自定義文字
- 新手指南 怎麼關閉AppStore自動更新功能

