葉孤城:UICollectionView自定義布局教程——Pinterest
開始之前先說個題外話,前段時間在流利說,老板在清華的大學同學剛好是Pinterest裡的第二個華人員工和第一個安卓工程師(好像是前十五號員工),被老板請來做了一次分享,經歷頗為傳奇.
他之前在美國谷歌本部的Android部門(當時的薪資已經碾壓大部分程序猿了),後來看到Pinterest這個app在iOS上非常火,但是還沒有安卓版本,於是用了一個周六周日做了一個安卓版本,發到了Pinterest的HR那裡,於是乎,人就成功跳槽了.現在已經財務自由.
(Pinterest的AB Test已經玩出花了.有機會肉身翻牆的同學一定要翻去硅谷干兩年.)
所以現在有很多朋友問,剛學iOS出來沒有工作經驗怎麼找工作啊之類的,舉個簡單的例子,你想去滴滴打車啊, 下廚房啊, 英語流利說啊之類的,你直接把app down下來,unzip一下,把圖片什麼亂七八糟的拿出來,仿個7,8成的UI和功能,我就問,這個公司要不要你?
UICollection這個東西是在iOS6被推出來的,所以如果你的app還在支持iOS5還是老實用TableView吧,要麼牛逼的就用ScrollView手撸一個出來.
它最牛逼的地方就在於,Custom的Layout可以玩出無限可能.舉個簡單例子,早年有個非常出名的CoverFlow第三方庫iCarousel(大約在13年的時候我非常頻繁的使用過它),效果非常炫,但問題是它是用scrollview撸出來的,雖然裡面也會cache 一些view來復用,保持流暢性,但是始終沒有collectionView + layout來的流暢.而且如果是會玩的程序猿,真的能寫出非常炫酷效果的layout.
首先在 這個地址.把Raywenderlich的start Project下載下來.
跑一下.效果是這樣的.

效果沒啥稀奇的,就是最簡單的UICollectionFlowLayout效果,把一個個的Cell從左到右排,如果右邊到屏幕頭了,放不下了就跑到下一行繼續從左到右排列一個個Cell.collectionview會根據你有沒有設置minimumInteritemSpacing來設置你的每個cell的最小間距,和minimumLineSpacing來設置一行和一行的最小間距.
其實,tableView說白了,完全可以自定義一種Layout,通過CollectionView來實現.
我們浏覽一下文件結構.
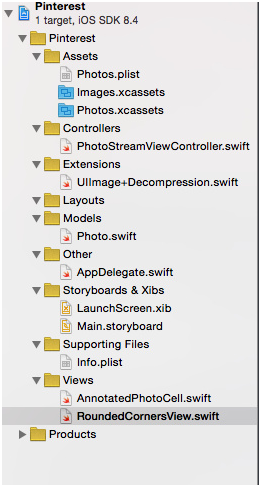
Controllers 裡沒啥好說的,就是一個ViewController.
Extensions 裡寫了一個UIImage的分類,用來Decompression,我看了一下,其實是用UIGraphicsGetImageFromCurrentImageContext重新生成了一個UIImage.
Models裡就是一個Photo的model,包括一個圖片,一個圖片的標題和留言.這個model構成了我們UICollectionViewCell的內容.
還有一個heightForComment方法,是通過boundingRectWithSize方法來計算文字內容在label裡的高度.
Assets 就是我們的圖片資源和文字資源.
好了,現在我們新建一個類,繼承自UICollectionViewLayout(注意,不是UICollectionViewFlowLayout).起名叫PinterestLayout,放在我們的Layout的Group裡.
然後在storyboard裡選中我們的CollectionView.如圖.
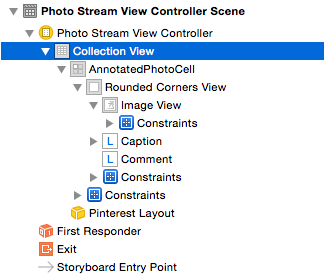
打開Attributes Inspector,進行如圖所示的操作.
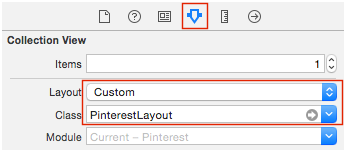
OK,直接跑起來.

啥都沒有!

啥都沒有就對了,你新建了一個Layout,裡面啥都沒寫,肯定沒有任何效果.
Core Layout Process(核心布局的處理過程)
先看看UICollectionView和UICollectionViewLayout是怎麼配合工作的.
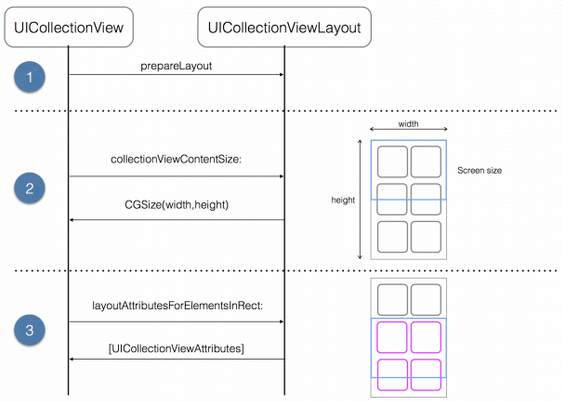
當你繼承了一個Layout之後,有三個方法是必須Override得.
prepareLayout():這個方法是干嘛的?這個方法就是當你的布局快要生效的時候,你會在這個方法裡計算好每個Item的position和CollectionView的size.展開一下,最簡便的提升TableView的流暢度的方法是什麼?很簡單,別在HeightForRow的代理方法裡直接計算高度.而是在網絡拉取所有數據之後計算好高度,放在Array裡,直接在代理方法裡return heightArray[indexPath.row].那麼為什麼要在prepareLayout裡計算每個item的Position,意圖也很明顯了.就是別讓系統每次滾動的時候再去計算每個Cell的frame.(如何提升tableView的performance去看VVbo的Demo.)
collectionViewContentSize(): 這個方法的意思也很簡單,就是返回CollectionView的ContentSize.是ContentSize而不是Size.
layoutAttributesForElementsInRect(_:):在這個方法裡返回某個特定區域的布局的屬性.有點繞是吧,那我簡單點說.eg.有一個CollectionView,ContentSize是(320, 1000), size是(320, 400),這時候我滑滑滑,滑到了(0, 544, 320, 400).好,那麼在這個區域,有幾個Cell,每個Cell的位置都是怎麼樣的?就是通過這個方法獲知的.你不告訴CollectionView,他怎麼知道怎麼放cell,對吧.
好的,我們現在理一下思路.
看上面那張圖,A代表CollectionView,B代表Layout.
A先問B,我cup(size)是多少,C還是D? - -!.
B告訴他.
A又問:我的ContentSize是多少.
B告訴他.
A這時候的offSet發生了變化,每滑動一下,A都會問,我現在這個位置,有幾個Cell,每個Cell的位置,Transform,是怎樣的?
B告訴他.
就是這樣.
Calculating Layout Attributes (計算布局的屬性)
好的,正式開始我們的編寫Pinterest之旅.
那麼問題來了,現在面臨的最棘手的問題是什麼?
注意這張圖.

每個Cell的寬度固定,長度不定.
這就是整個Layout的核心問題.
所有的難度都在於,如何獲知每個Item的height.
剛才介紹Photo這個Model,我說了決定Cell高度的只有三個,1.圖片高度2title的高度3.內容的高度.
怎麼獲取圖片的高度和文字的高度?
代理呗.
在layout裡聲明一個PinterestLayoutDelegate
protocol PinterestLayoutDelegate {
  // 1
  func collectionView(collectionView:UICollectionView, heightForPhotoAtIndexPath indexPath:NSIndexPath,
      withWidth:CGFloat) -> CGFloat
  // 2
  func collectionView(collectionView: UICollectionView,
      heightForAnnotationAtIndexPath indexPath: NSIndexPath, withWidth width: CGFloat) -> CGFloat
}
第一個就是通過代理拿到圖片的高度,第二個是通過代理拿到文字的高度.
通過代理拿到了我們想要的數據,接下來,就是要在prepareLayout裡計算item的Frame了.
直接看代碼.
override func prepareLayout() {
    // 1. Only calculate once
    if cache.isEmpty {
      // 2. Pre-Calculates the X Offset for every column and adds an array to increment the currently max Y Offset for each column
      // 每列寬度
      let columnWidth = contentWidth / CGFloat(numberOfColumns)
      var xOffset = [CGFloat]()
      // 其實就是xOffset就是兩個,都是固定的.
      for column in 0 ..< numberOfColumns {
        xOffset.append(CGFloat(column) * columnWidth )
      }
      var column = 0
      var yOffset = [CGFloat](count: numberOfColumns, repeatedValue: 0)
      // 3. Iterates through the list of items in the first section
      for item in 0 ..< collectionView!.numberOfItemsInSection(0) {
        let indexPath = NSIndexPath(forItem: item, inSection: 0)
        // 4. Asks the delegate for the height of the picture and the annotation and calculates the cell frame.
        // 這個width是為了計算comment的長度的.
        let width = columnWidth - cellPadding*2
        let photoHeight = delegate.collectionView(collectionView!, heightForPhotoAtIndexPath: indexPath , withWidth:width)
        let annotationHeight = delegate.collectionView(collectionView!, heightForAnnotationAtIndexPath: indexPath, withWidth: width)
        let height = cellPadding +  photoHeight + annotationHeight + cellPadding
        let frame = CGRect(x: xOffset[column], y: yOffset[column], width: columnWidth, height: height)
        let insetFrame = CGRectInset(frame, cellPadding, cellPadding)
        // 5. Creates an UICollectionViewLayoutItem with the frame and add it to the cache
        let attributes = PinterestLayoutAttributes(forCellWithIndexPath: indexPath)
        attributes.photoHeight = photoHeight
        attributes.frame = insetFrame
        cache.append(attributes)
        // 6. Updates the collection view content height
        contentHeight = max(contentHeight, CGRectGetMaxY(frame))
        yOffset[column] = yOffset[column] + height
        column = column >= (numberOfColumns - 1) ? 0 : ++column
      }
    }
  }
我寫了一點注釋,方便大家觀看.
第一句if cache.isEmpty:判斷緩存Item高度的Array是否為空,是空則需要計算.
let columnWidth = contentWidth / CGFloat(numberOfColumns):計算每列寬度,每列寬度是固定的,就是collectionView的contentWidth除以2,三列就除以3. contentWidth就是用CollectionView的Bounds.width - ContentInset裡的左和右Inset.
var xOffset = [CGFloat]():用來存每個Item的X坐標,其實所有Item的X坐標就只有兩個.
var yOffset = [CGFloat](count: numberOfColumns, repeatedValue: 0):初始化每列的Item的Y坐標,是一個數組,裡面有兩個元素.
Y坐標這個東西有點繞,先看一張圖.
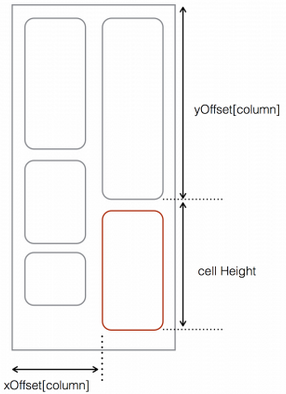
這個CollectionView分為兩列,實際上呢?CollectionView裡壓根就沒有列的概念.因為排列的時候始終是從左到右排列.如圖.
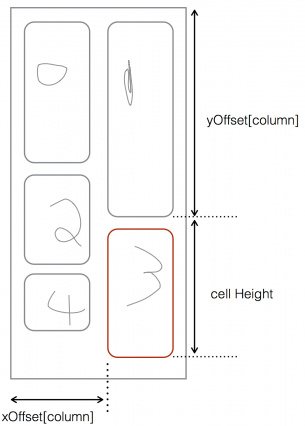
但是,現在呢,第二個Cell的Y軸實際上是和第零個Cell的height相關的,而第三個是和第一個相關的.
所以yOffset這個數組裡存了兩個值,當第一列的Cell計算高度的時候,他會去yOffset[0]裡拿數據,因為yOffset[0]只存第一列的上一個cell的height,那麼同理,當走到第二列的時候,又會去yOffset[1]裡拿第二列的上一個cell的height.
整個流程他用了這麼一句話判斷.
column = column >= (numberOfColumns - 1) ? 0 : ++column.
仔細研讀for循環裡的邏輯判斷.
override func prepareLayout() {  // 1
  if cache.isEmpty {    // 2
    let columnWidth = contentWidth / CGFloat(numberOfColumns)    var xOffset = [CGFloat]()    for column in 0 ..< numberOfColumns {
      xOffset.append(CGFloat(column) * columnWidth )
    }    var column = 0
    var yOffset = [CGFloat](count: numberOfColumns, repeatedValue: 0)    // 3
    for item in 0 ..< collectionView!.numberOfItemsInSection(0) {      let indexPath = NSIndexPath(forItem: item, inSection: 0)      // 4
      let width = columnWidth - cellPadding * 2
      let photoHeight = delegate.collectionView(collectionView!, heightForPhotoAtIndexPath: indexPath,
          withWidth:width)      let annotationHeight = delegate.collectionView(collectionView!,
          heightForAnnotationAtIndexPath: indexPath, withWidth: width)      let height = cellPadding +  photoHeight + annotationHeight + cellPadding      let frame = CGRect(x: xOffset[column], y: yOffset[column], width: columnWidth, height: height)      let insetFrame = CGRectInset(frame, cellPadding, cellPadding)      // 5
      let attributes = UICollectionViewLayoutAttributes(forCellWithIndexPath: indexPath)
      attributes.frame = insetFrame
      cache.append(attributes)      // 6
      contentHeight = max(contentHeight, CGRectGetMaxY(frame))
      yOffset[column] = yOffset[column] + height

      column = column >= (numberOfColumns - 1) ? 0 : ++column
    }
  }
}
繼續承接上一篇,在prepareLayout()裡的這個計算Item的frame是整個Layout的核心,所以必須要每一段話都讀懂才能領會UICollectionViewLayout的核心.
var column = 0:這個變量是干嗎的呢?我們上文貼過這麼一張圖.
我解釋過,在這個布局中,所謂列這個概念是人工加上去的.在CollectionView中,沒有所謂的豎排的這種列,只有Section和Item(也就是Row).而排列方式總是從左到右,一行排滿了到下一行這種方式.
而我們的第二個Item的Y軸依賴於第0個Item的高度,所以,你也可以看做是第偶數個Item的Y軸總是和上一個偶數Item的高度相關.奇數的Item也類似.
那麼,作者又是怎麼計算的呢?
他采取了另外一種方式,聲明了一個yOffset數組,只有兩個數值.yOffset[0]記錄第一列的上一個Item的height,yOffset[1]記錄第二列的上一個Item的height.
當for循環走到第一列的Item(也就是index為偶數的Item)的時候他就去yOffset[0]裡去取,走到第二列的Item(也就是index為奇數的Item)的時候就去yOffset[1]裡去拿.
column就是作者用來判別到底當前循環走到的Item是第一列還是第二列的.
不信?看這句
column = column >= (numberOfColumns - 1) ? 0 : ++column
我們來走一下,column聲明時賦值為0.第一個for循環走完之後,這個判斷是
column(現在是0) >= (numberOfColumns(始終為2,因為是定死的只有兩列) - 1) ? 0: ++column
所以第一遍循環完了之後column變成1了,說明第二次要從yOffset[1]裡取值了.看懂了麼?然後每次循環的時候,column就在0和1之間變啊變.
其實看懂了這一句,其他的就沒什麼難度了,無非是從Delegate裡拿到圖片高度,文字標題高度,文字內容高度,加起來,就是每一個Item的height,然後依據這個Item所在的是第一列,給放到yOffset數組裡就行了.
最後把每一個LayoutAttributes存到數組裡,用來以後判斷和讀取用.以後就不需要再計算了.
返回布局的ContentSize
在for循環裡,我們每執行一次之後都要做一次這個判斷.
contentHeight = max(contentHeight, CGRectGetMaxY(frame))
其實cotnentSize的height不就是最後的那個Cell的CGRectGetMaxY(frame).所以可以這麼計算.
override func collectionViewContentSize() -> CGSize {
  return CGSize(width: contentWidth, height: contentHeight)
}
重寫layoutAttributesForElementsInRect(_:)
override func layoutAttributesForElementsInRect(rect: CGRect) -> [AnyObject]? {
  var layoutAttributes = [UICollectionViewLayoutAttributes]()
  for attributes  in cache {
    if CGRectIntersectsRect(attributes.frame, rect) {
      layoutAttributes.append(attributes)
    }
  }
  return layoutAttributes
}
這個方法的含義我上一篇已經講過了,就是每次CollectionView滾動到某個區域的時候,CollectionView需要知道這個區域裡的每個Cell的layoutAttributes.
那我們就用CGRectIntersectsRect這個方法遍歷判斷有哪些attributes的frame在這個區域裡,然後返回給collectionView就行了.
一個獲取Photo的height的代理方法
func collectionView(collectionView:UICollectionView, heightForPhotoAtIndexPath indexPath:NSIndexPath,
      withWidth width:CGFloat) -> CGFloat {
    let photo = photos[indexPath.item]
    let boundingRect =  CGRect(x: 0, y: 0, width: width, height: CGFloat(MAXFLOAT))
    let rect  = AVMakeRectWithAspectRatioInsideRect(photo.image.size, boundingRect)
    return rect.size.height
  }
這個代理方法是計算Image在contentMode為aspectFit的UIImageView裡壓縮過之後,如何計算高度的.如果看不懂的可以看武蘊牛X(這個ID真的狂拽炫酷叼霸天)的這篇blog.
最後一步,修改我們的UICollectionViewCell中的UIImageView的height這個constraint
override func applyLayoutAttributes(layoutAttributes: UICollectionViewLayoutAttributes!) {
  super.applyLayoutAttributes(layoutAttributes)
  if let attributes = layoutAttributes as? PinterestLayoutAttributes {
    imageViewHeightLayoutConstraint.constant = attributes.photoHeight
  }
}
就是重寫CollectionViewCell的這個方法,在每次給我們的Cell賦layoutAttributes之後,拿到我們的Photo高度,然後把cell的imageViewHeightLayoutConstraint拉一條線,更改Constant屬性為layoutAttributes中的photoHeight就行了.
完結的項目在這裡
下一期,帶領大家做一個英語流利說的這種布局效果的Layout.


