經驗介紹:Glow App 開發 Apple Watch 應用
之前跟兩個同事一起用業余時間給我們的 Glow App 做了 Apple Watch 的應用。寫這篇文章來對 Apple Watch 的開發做個介紹,也列出開發過程中遇到的一些坑。雖然 Watch OS 2 已經出來,而我們是用 WatchKit 進行的開發,但很多內容也適用於 Watch OS 2。希望這篇文章對大家有幫助。
Introduction
Design
WatchKit App Architecture
Data Communication
Provisioning Profiles and Entitlements
Tips
Design
本質上,你可以把 Apple Watch 當作 iPhone 的一個擴展屏幕。你不需要掏出手機。只需要稍稍抬一下手腕,就可以獲取信息,或做一些簡單的操作。實際上,在你開發 Watch App 的時候,你就會發現 Watch 的模擬器就是當作 iPhone 模擬器的一個 external display 實現的。
不過 Apple Watch 展現了全新的人機交互方式,iOS App 的設計交互准則在 Watch 上並不適用。因此在設計開發 Watch App 之前,有必要先理解它的交互和基本的 UI 元素。
首先說交互。除了熟悉的手勢交互,Apple Watch 提供了 3 種新的交互方式:
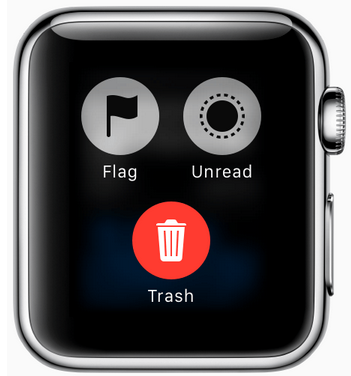
Force Touch
Apple Watch 的顯示屏在感知用戶點擊的同時,也能感知壓力。通過「重按」可以顯示最多有 4 個操作的上下文菜單。
The Digital Crown(數碼表冠)
跟傳統手表一樣,表冠是最常用的交互。但在 Apple Watch 上,表冠不是用來調校時間日期,或上弦。通過轉動 Digital Crown,可以在不會遮擋視線的情況下,精確地放大縮放、滾動、或選擇數據。它作為按鈕還有返回的功能,按下返回主屏幕,按兩下回到時鐘界面。
聽起來很美,但目前表冠的 API 還沒有開放,滾動都是系統自動幫你做的 :[
Side Button
表冠下面的一個長長的按鈕。按它會把你帶到 Friends 界面。在這裡,你可以給你選擇好的 12 個聯系人打電話,發短信,或者 Watch 提供的新的交流方式,例如輕點他們一下,畫個塗鴉,或是發送心跳。
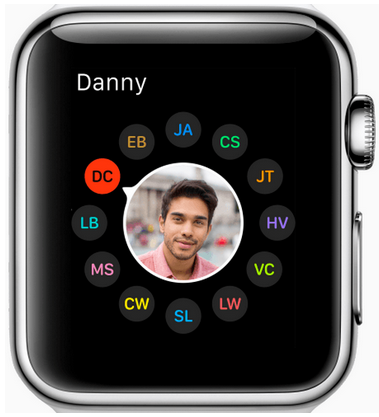
恩,這也沒有開放相關的 API,考慮到它聯系人的功能,估計之後也不會開放。
Apple Watch 人機交互指北
Watchkit App Architecture
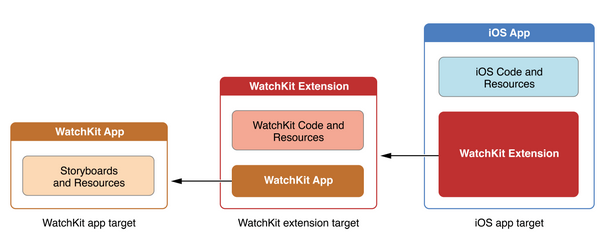
當你新增一個 Watchkit App target 的時候,你會發現 Xcode 實際上給添加了 2 個新的 executables,並同你的 iOS App 打包在一起編譯。
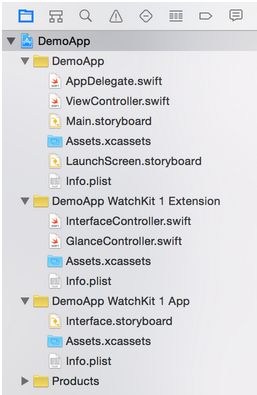
他們之間的依賴關系如下圖所示,Watch App 依賴於 Watchkit Extension,而 Watchkit Extension 依賴於 iOS App. 從上面下面兩張圖都可以看到,Watch App 裡只有 Storyboard 和 ImageAssets。沒錯,Watch OS 1 裡,Watch App 只包含一些靜態的東西,Extension 是真正執行代碼的地方。Extension 負責從 iOS App 那裡獲得數據,並控制 Watch App 界面上要顯示什麼。而 Watch App 的操作也是由 Extension 向 iOS App 發起請求。Watch App 不直接與 iOS App 交流。
Watch App 的每一個頁面,都需要有一個對應的 WKInterfaceController 的子類。如上圖 Extension 的文件夾的 InterfaceController 和 GlanceInterfaceController。WKInterfaceController 除了 init 之外,還有 3 個與生命周期有關的方法:
// 在 init 之後被調用,可以在這個方法裡配置界面上的元素
- (void)awakeWithContext:(id)context;
// 當這個頁面將要顯示給用戶的時候被調用
- (void)willActivate;
// 當這個頁面不再顯示的時候被調用
- (void)didDeactivate;
Data Communication
前面說到 Watch App 本身只包含一些靜態內容,它自己不保存數據,也無法發送網絡請求。它只能借由 Extension 與 iOS App 交互。所以 Watch App 與 iOS App 的數據傳遞是關鍵,也是大部分 Watch App 的主要開發工作。數據傳遞的方法主要有下面 5 種。第一種是使用 WKInterfaceController 提供的 openParentApplication:reply,然後在 iOS 端 實現 application:handleWatchKitExtensionRequest:reply 來處理 Watch Extension 發來的請求。最後一種 Wormhole 是第三方的一個庫,通過 Dawrin notification center 發送消息並捎帶上數據。而中間三種都是通過 App Group,在獨立的共享沙盒裡傳遞數據。
WKInterfaceController openParentApplication:reply
NSUserDefaults
Core Data
NSFileManager
Dawrin notification center - MMWormhole
WKInterfaceController openParentApplication:reply
這種方法很直觀,也是幾種數據傳遞方式中最實時可靠的。你可以用 Enum 定義幾種請求的類型,然後在發送請求的時候把請求類型一並傳過去,這樣 iOS App 收到請求時,就能知道要做什麼。iOS App 用 reply 回調把請求結果傳回去。
用這種方法,iOS App 即使在後台也能被喚起。但 iOS App 不能主動去喚起 Watch Extension。
NSDictionary *request = @{kRequestType: @(requestType)};
[InterfaceController openParentApplication:request
                    reply:^(NSDictionary *replyInfo, NSError *error) {
}];
- (void)application:(UIApplication *)application
handleWatchKitExtensionRequest:(NSDictionary *)userInfo
reply:(void (^)(NSDictionary *))reply
{
RequestType requestType = userInfo[kRequestType];
if (requestType == RequestTypeRefreshWatchData) {
//
}
}中間三種方式很類似,都是把數據存在一個獨立的共享沙盒中,不同是他們的存放方式。iOS App 或者 Watch App 需要數據了,就去找沙盒裡面找。就像一個秘密的信箱,只有他們倆知道這在哪兒。所以這也是異步的傳遞方式,雙方不直接打交道。具體怎麼用看下面代碼吧。
NSUserDefaults
用 NSUserDefaults 最簡單,但有數據大小的限制。
NSString *appGroupName = @"group.com.yourcompnay.shared";
NSUserDefaults *defaults = [[NSUserDefaults alloc] initWithSuiteName:appGroupName];
[defaults setObject:user.name forKey:@"userName"];
Core Data
如果你的 iOS App 已經把 Core Data 放到共享沙盒裡了,那可以考慮這種方法。
NSString *appGroupName = @"group.com.yourcompnay.shared";
NSURL *storeURL = [[NSFileManager defaultManager]
    containerURLForSecurityApplicationGroupIdentifier:appGroupName];
storeURL = [storeURL URLByAppendingPathComponent:@"glow.sqlite"];
[self.persistentStoreCoordinator addPersistentStoreWithType:NSSQLiteStoreType
                                              configuration:nil
                                                        URL:storeURL
                                                        options:nil
                                                        error:&error]
NSFileManager && NSFileCoordinator
文件讀寫必然要涉及到多線程問題,不過不用擔心,用 NSFileCoordinator 就可以了。
- coordinateReadingItemAtURL:options:error:byAccessor:
- coordinateWritingItemAtURL:options:error:byAccessor:
[coordinator coordinateWritingItemAtURL:fileURL
                                options:nil
                                  error:nil
                             byAccessor:^(NSURL* writingURL) {
   [dataToSave writeToURL:newURL atomically:true];
}];
NSFilePresenter
你還可以通過實現 NSFilePresenter 協議來監聽文件的更改,不需要自己實現刷新機制就能免費獲得實時更新。
- presentedItemDidChange
Dawrin notification - MMWormhole
最後一種用起來也很方便,Watch Extension 和 iOS App 一方發送消息,一方監聽消息。而且還有一大優勢是,Wormhole 會保存上次傳遞的數據,這樣在 Watch App 喚醒的時候,可以先使用 Wormhole 裡的數據,等 iOS App 傳來最新的數據時,再更新界面。
// init
self.wormhole = [[MMWormhole alloc] initWithApplicationGroupIdentifier:kApplicationGroupIdentifier
                                               optionalDirectory:kWormholeDirectory];
// iOS app
NSDictionary *message = [self makeWatchData];
[self.wormhole passMessageObject:message identifier:kWormholeWatchData];
// WatchKit Extension
NSDictionary *message = [self.wormhole messageWithIdentifier:kWormholeWatchData];
// do something with message
[self.wormhole listenForMessageWithIdentifier:kWormholeWatchData
                               listener:^(id messageObject) {
    NSLog(@"Received data from wormhole.");
}];
也是我開發最初使用的方式。但在我使用的過程中,發現如果 iOS App 是在後台模式,就並不能實時接收到 WatchKit Extension 發來的消息。所以最後,我們選擇openParentApplication:reply 和 Wormhole 的混用。在 Watch App 喚醒時,使用 Wormhole 裡的數據,保證 Watch App 響應的速度,同時用 openParentApplication:reply 向 iOS 請求最新的更新。
Provisioning Profiles and Entitlements
開發之初,最讓人頭疼的可能就是 Code Signing, Provisioning 和 entitlements 這些東西了。
每一個 target 都要有自己的 App ID。所以我們一共需要有三個:
yourAppID
yourAppID.watchkitextension
yourAppID.watchkitapp
你還需要給每個 App ID 創建一個相關聯的 Provisioning Profile。如果你用 Xcode 自動創建 Provisioning Profile,它只會給你創建前面兩個,你需要自己去 developer center 裡手動創建。
另外,你還需要確保你的三個 Entitlements 都是對的。Version Number、Build Number、以及 App Groups (如果使用的話) 都必須是一樣的,不然編譯就不能通過。
Tips
Debug
有時候,你會需要同時 debug iOS App 和 Watch App。但 Xcode 只允許你指定一個 target 運行,你要麼 debug iOS App 的代碼,要麼 Watch App 的代碼。但通過 Xcode 的 Attach to Process 就能同時 debug。具體步驟如下:
運行 WatchKit App
在 Simulator 中打開你的 iOS App
在 Xcode 的菜單欄上 Debug -> Attach to Process,選擇你的 iOS App 就能同時 debug iOS 跟 WatchKit app 了。
App Icons and iTunes Connect
如果在上傳你的應用到 iTunes Connect 的時候,遇到 Invalid Binary 的錯誤。很大可能是因為你的 Watch App 的 icon 裡有透明層或者 alpha 通道。一個比較方便的解決辦法是,用 Preview 打開圖片,選擇導出(export),然後不要勾選底部的 Alpha 選項,確定。
End
之後會針對 Watch OS 2 進行更新。有任何問題,可以郵件我 [email protected] 或者私信我的微博 @no_computer。
謝謝觀賞。
- NSTimer定時器進階 詳細介紹,循環引用分析與解決
- IOS property屬性詳細介紹使用注意事項
- iphone6美版和港版有什麼不同?蘋果6美版和港版特點介紹[圖]
- ios8有哪些新功能? ios8正式版新功能介紹[圖]
- ios8如何恢復被刪照片? ios8恢復最近被刪照片及隱照片功能介紹[多圖]
- ios8獨立運行計步器功能介紹[多圖]
- iOS8.1.2有哪些新功能? iOS8.1.2新特性介紹[多圖]
- UC免費WIFI電腦版怎麼用?UC免費WIFI電腦版使用方法介紹[多圖]
- 啪啪模擬器怎麼玩?啪啪模擬器使用圖文教程介紹[多圖]
- 馬上賺錢怎麼注冊?馬上賺錢注冊流程介紹[多圖]
- iPhone6S升級iOS9.0.1詳細介紹[多圖]
- 石榴直播下載地址什麼?石榴直播app下載地址介紹[多圖]
- iOS10.1正式版什麼時候出?蘋果iOS10.1正式版推送時間介紹[圖]
- 知商金融怎麼注冊?知商金融注冊方法介紹[多圖]
- 上文引立客戶端怎麼注冊?上文引立官網注冊登錄方法介紹[多圖]

