詳解 UIView 的 Tint Color 屬性
在iOS 7後,UIView新增加了一個tintColor屬性,這個屬性定義了一個非默認的著色顏色值,其值的設置會影響到以視圖為根視圖的整個視圖層次結構。它主要是應用到諸如app圖標、導航欄、按鈕等一些控件上,以獲取一些有意思的視覺效果。
tintColor屬性的聲明如下:
var tintColor: UIColor!
默認情況下,一個視圖的tintColor是為nil的,這意味著視圖將使用父視圖的tint color值。當我們指定了一個視圖的tintColor後,這個色值會自動傳播到視圖層次結構(以當前視圖為根視圖)中所有的子視圖上。如果系統在視圖層次結構中沒有找到一個非默認的tintColor值,則會使用系統定義的顏色值(藍色,RGB值為[0,0.478431,1],我們可以在IB中看到這個顏色)。因此,這個值總是會返回一個顏色值,即我們沒有指定它。
與tintColor屬性相關的還有個tintAdjustmentMode屬性,它是一個枚舉值,定義了tint color的調整模式。其聲明如下:
var tintAdjustmentMode: UIViewTintAdjustmentMode
枚舉UIViewTintAdjustmentMode的定義如下:
enum UIViewTintAdjustmentMode : Int {
    case Automatic          // 視圖的著色調整模式與父視圖一致
    case Normal             // 視圖的tintColor屬性返回完全未修改的視圖著色顏色
    case Dimmed             // 視圖的tintColor屬性返回一個去飽和度的、變暗的視圖著色顏色
}
因此,當tintAdjustmentMode屬性設置為Dimmed時,tintColor的顏色值會自動變暗。而如果我們在視圖層次結構中沒有找到默認值,則該值默認是Normal。
與tintColor相關的還有一個tintColorDidChange方法,其聲明如下:
func tintColorDidChange()
這個方法會在視圖的tintColor或tintAdjustmentMode屬性改變時自動調用。另外,如果當前視圖的父視圖的tintColor或tintAdjustmentMode屬性改變時,也會調用這個方法。我們可以在這個方法中根據需要去刷新我們的視圖。
示例
接下來我們通過示例來看看tintColor的強大功能(示例盜用了Sam Davies寫的一個例子,具體可以查看iOS7 Day-by-Day :: Day 6 :: Tint Color,我就負責搬磚,用swift實現了一下,代碼可以在這裡下載)。
先來看看最終效果吧(以下都是盜圖,請見諒,太懶了):
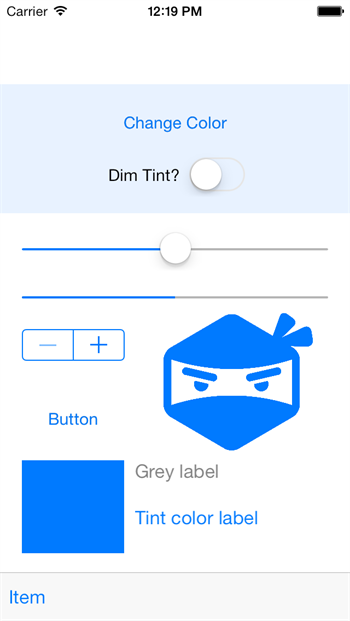
這個界面包含的元素主要有UIButton, UISlider, UIProgressView, UIStepper, UIImageView, ToolBar和一個自定義的子視圖CustomView。接下來我們便來看看修改視圖的tintColor會對這些控件產生什麼樣的影響。
在ViewController的viewDidLoad方法中,我們做了如下設置:
override func viewDidLoad() {
    super.viewDidLoad()

    println("\(self.view.tintAdjustmentMode.rawValue)")         // 輸出:1
    println("\(self.view.tintColor)")                           // 輸出:UIDeviceRGBColorSpace 0 0.478431 1 1

    self.view.tintAdjustmentMode = .Normal
    self.dimTintSwitch?.on = false

    // 加載圖片
    var shinobiHead = UIImage(named: "shinobihead")
    // 設置渲染模式
    shinobiHead = shinobiHead?.imageWithRenderingMode(.AlwaysTemplate)

    self.tintedImageView?.image = shinobiHead
    self.tintedImageView?.contentMode = .ScaleAspectFit
}
首先,我們嘗試打印默認的tintColor和tintAdjustmentMode,分別輸出了[UIDeviceRGBColorSpace 0 0.478431 1 1]和1,這是在我們沒有對整個視圖層次結構設置任何tint color相關的值的情況下的輸出。可以看到,雖然我們沒有設置tintColor,但它仍然返回了系統的默認值;而tintAdjustmentMode則默認返回Normal的原始值。
接下來,我們顯式設置tintAdjustmentMode的值為Normal,同時設置UIImageView的圖片及渲染模式。
當我們點擊”Change Color”按鈕時,會執行以下的事件處理方法:
@IBAction func changeColorHandler(sender: AnyObject) {

    let hue = CGFloat(arc4random() % 256) / 256.0
    let saturation = CGFloat(arc4random() % 128) / 256.0 + 0.5
    let brightness = CGFloat(arc4random() % 128) / 256.0 + 0.5

    let color = UIColor(hue: hue, saturation: saturation, brightness: brightness, alpha: 1.0)
    self.view.tintColor = color
    updateViewConstraints()
}

private func updateProgressViewTint() {
    self.progressView?.progressTintColor = self.view.tintColor
}
這段代碼主要是隨機生成一個顏色值,並賦值給self.view的tintColor屬性,同時去更新進度條的tintColor值。
注:有些控件的特定組成部件的tint color由特定的屬性控制,例如進度就有2個tint color:一個用於進度條本身,另一個用於背景。
點擊”Change Color”按鈕,可得到以下效果:
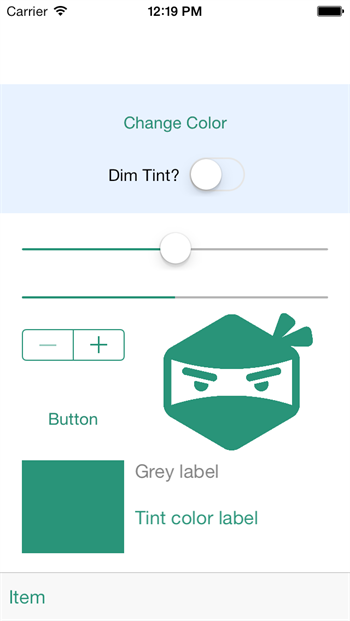
可以看到,我們在示例中並有沒手動去設置UIButton, UISlider, UIStepper, UIImageView, ToolBar等子視圖的顏色值,但隨著self.view的tintColor屬性顏色值的變化,這些控件的外觀也同時跟著改變。也就是說self.view的tintColor屬性顏色值的變化,影響到了以self.view為根視圖的整個視圖層次結果中所有子視圖的外觀。
看來tintColor還是很強大的嘛。
在界面中還有個UISwitch,這個是用來開啟關閉dim tint的功能,其對應處理方法如下:
@IBAction func dimTimtHandler(sender: AnyObject) {
    if let isOn = self.dimTintSwitch?.on {

        self.view.tintAdjustmentMode = isOn ? .Dimmed : .Normal
    }

    updateViewConstraints()
}
當tintAdjustmentMode設置Dimmed時,其實際的效果是整個色值都變暗(此處無圖可盜)。
另外,我們在子視圖CustomView中重寫了tintColorDidChange方法,以監聽tintColor的變化,以更新我們的自定義視圖,其實現如下:
override func tintColorDidChange() {
    tintColorLabel.textColor = self.tintColor
    tintColorBlock.backgroundColor = self.tintColor
}
所以方框和”Tint color label”顏色是跟著子視圖的tintColor來變化的,而子視圖的tintColor又是繼承自父視圖的。
在這個示例中,比較有意思的是還是對圖片的處理。對圖像的處理比較簡單粗暴,對一個像素而言,如果它的alpha值為1的話,就將它的顏色設置為tint color;如果不為1的話,則設置為透明的。示例中的忍者頭像就是這麼處理的。不過我們需要設置圖片的imageWithRenderingMode屬性為AlwaysTemplate,這樣渲染圖片時會將其渲染為一個模板而忽略它的顏色信息,如代碼所示:
var shinobiHead = UIImage(named: "shinobihead")
// 設置渲染模式
shinobiHead = shinobiHead?.imageWithRenderingMode(.AlwaysTemplate)
題外話
插個題外話,跟主題關系不大。
在色彩理論(color theory)中,一個tint color是一種顏色與白色的混合。與之類似的是shade color和tone color。shade color是將顏色與黑色混合,tone color是將顏色與灰色混合。它們都是基於Hues色調的。這幾個色值的效果如下圖所示:
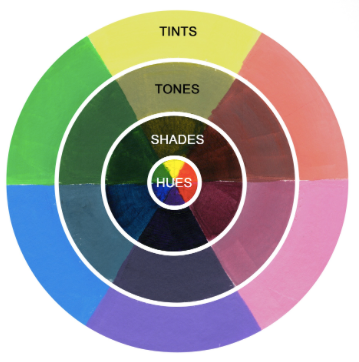
一些基礎的理論知識可以參考Hues, Tints, Tones and Shades: What’s the Difference?或更專業的一些文章。
小結
如果我們想指定整個App的tint color,則可以通過設置window的tint color。這樣同一個window下的所有子視圖都會繼承此tint color。
當彈出一個alert或者action sheet時,iOS7會自動將後面視圖的tint color變暗。此時,我們可以在自定義視圖中重寫tintColorDidChange方法來執行我們想要的操作。
有些復雜控件,可以有多個tint color,不同的tint color控件不同的部分。如上面提到的UIProgressView,又如navigation bars, tab bars, toolbars, search bars, scope bars等,這些控件的背景著色顏色可以使用barTintColor屬性來處理。
參考
UIView Class Reference
iOS7 Day-by-Day :: Day 6 :: Tint Color
Appearance and Behavior
Tints and shades
Hues, Tints, Tones and Shades: What’s the Difference?
- 詳解iOS獲得通信錄的4種方法
- iOS開源一個簡略的訂餐app UI框架
- 在uiview 的tableView中點擊cell進入跳轉到另外一個界面的完成辦法
- iOS開辟之UIScrollView控件詳解
- 進修iOS自界說導航掌握器UINavigationController
- IOS中UITableView轉動到指定地位
- iOS為UIView設置暗影後果
- iOS設置UIButton文字顯示地位和字體年夜小、色彩的辦法
- iOS開辟之UIPickerView完成城市選擇器的步調詳解
- iOS長按UIlabel完成可復制功效
- iOS開辟中UIWebView的加載當地數據的三種方法
- iOS中修正UITextField占位符字體色彩的辦法總結
- IOS 仿時間網選票UI實例代碼
- iOS推送之當地告訴UILocalNotification
- 應用UITextField限制只可輸出中,英文,數字的辦法


