iOS動畫——Layer Animations
Layer Animations與我們前面第一篇講過的View Animation有點類似,但是Layer Animation比之多了很多效果,更加強大。
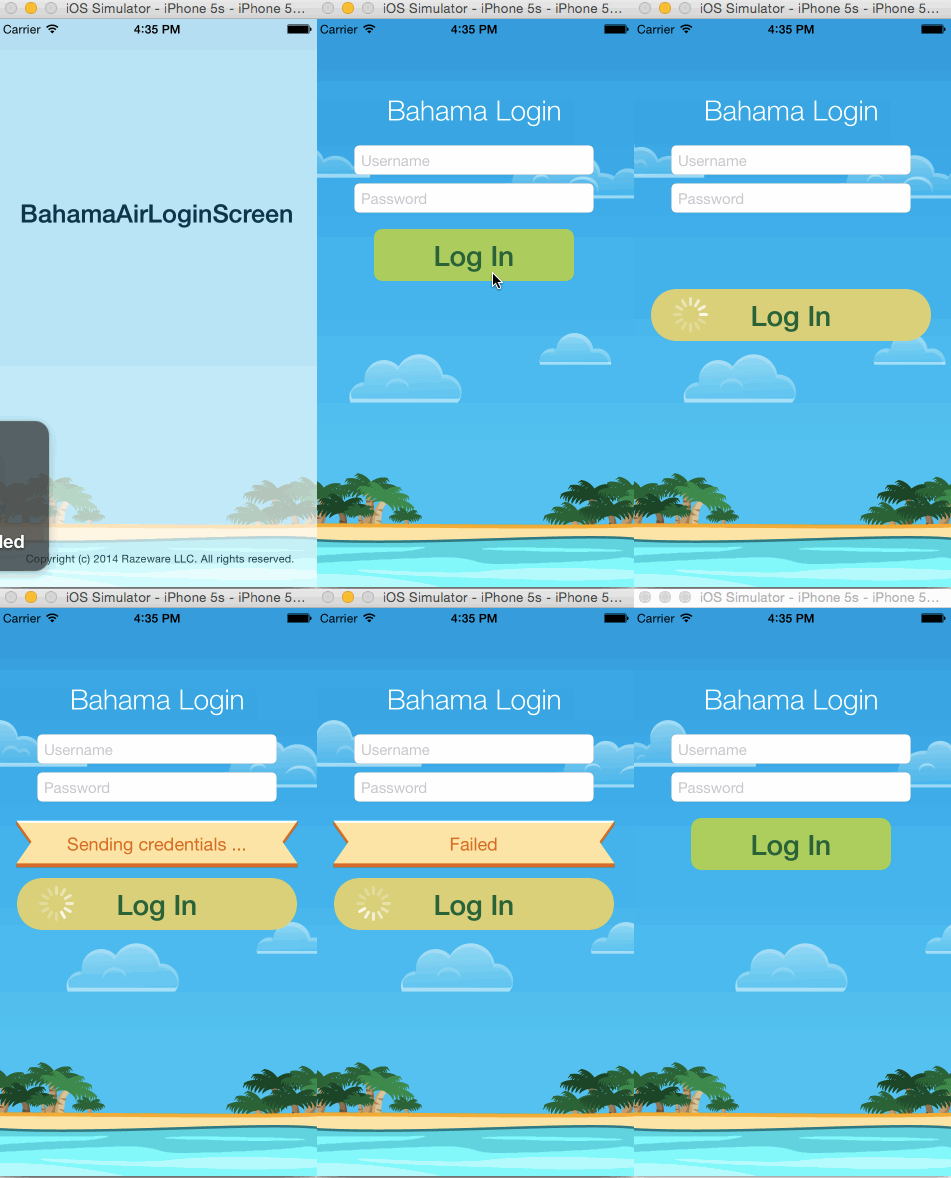
我們先來看一下今天我們要實現的效果,今天實現的效果用第一篇View Animations能實現相同效果。
本文所講為實現此動畫的相關知識。

動畫由書籍《iOS Animations by tutorials》提供,我只是一個復述者
哦~先來看一下Layer是什麼吧:
比較通俗的來說,CALayer就是UIView的視圖層,你所看到的UIView,其實是UIView的layer。這麼說吧,CALayer就是樹葉的葉綠素,和葉綠素不同的就是,CALayer更加的“單純”,我們知道葉綠素是包括很多基質的,而CALayer僅僅是代表了你能看到的一切。
我們今天把所有的重點都放在動畫的編寫上,默認有swift基礎
如果你觀察都仔細的話,你會發現,背景上的雲是漸入的,也就是透明度由0到1,當然這個用我們前面學的UIViewAnimation是很容易實現的,那麼用CALayer如何實現呢,看下面的代碼:
    //1
    let fadeIn = CABasicAnimation(keyPath: "opacity")
    //2
    fadeIn.fromValue = 0.0
    //3
    fadeIn.toValue = 1.0
    //4
    fadeIn.duration = 0.5
    //5
    fadeIn.fillMode = kCAFillModeBackwards
    //6
    fadeIn.beginTime = CACurrentMediaTime() + 0.5
    cloud1.layer.addAnimation(fadeIn, forKey: nil)
    fadeIn.beginTime = CACurrentMediaTime() + 0.7
    cloud2.layer.addAnimation(fadeIn, forKey: nil)
    fadeIn.beginTime = CACurrentMediaTime() + 0.9
    cloud3.layer.addAnimation(fadeIn, forKey: nil)
    fadeIn.beginTime = CACurrentMediaTime() + 1.1
    cloud4.layer.addAnimation(fadeIn, forKey: nil)
很明顯我們是給四朵雲的layer添加了動畫,然後實現了漸入的效果。
1、這句話聲明了一個 CABasicAnimation,注意到裡面填寫的參數沒,填的是 opacity,就是透明度的意思,這裡頭還能填寫很多其他值,比如position,當然這些我們後面都會講的。
2、我們對動畫的初始值進行設定,也就是透明度最開始為0.
3、我們對動畫的最終值進行設定,也就是透明度為1。
4、動畫持續時間,我們設定為0.5秒。和前面三句合起來,就表達了這麼一個意思:這個動畫是對對象的透明度進行改變,在0.5秒內,透明度從0變化為1.
5、我們給fillMode屬性填的值是kCAFillModeBackwards,那麼kCAFillModeBackwards這個值有什麼用呢,這個屬性可以顯示對象的frame,我們可以把這一句注釋以後運行程序來看一下效果,我們會發現,在進行動畫之前,雲朵任然可見,而這顯然是一個BUG,如何解決這個BUG呢,其實方法很多,比如我們可以講雲朵的透明度都設置為0,然後計算好動畫時間,當動畫結束以後將雲朵的透明度設置為1,這樣做當然可以實現相同的效果,但是這樣做實在是~~~~太不優雅了,還有一種做法就是添加fillMode屬性,kCAFillModeBackwards的意思是顯示動畫的初始狀態,同時還有其他兩個值kCAFillModeForwards可以顯示對象動畫之後的效果,kCAFillModeBoth則是兼顧以上兩個效果。
6、這個屬性很好解釋,每一朵雲朵的動畫並不是同時進行的,那麼我們就給雲朵設定開始的時間,這個屬性和我們前面說過的UIViewAnimation的delay這個參數比較類似。
以上內容實現了雲朵的漸入動畫。
如果對我已經說過好幾遍的UIViewAniamtion有疑問的話,請自行閱讀本人前面的文章,覺得不錯的話請關注本人,再點一個喜歡吧,親~~
接下來實現的是標題、Username、PassWord有screen外由左向右移動到屏幕中心的動畫,直接上代碼:
   //1
    let flyRight = CABasicAnimation(keyPath: "position.x")
    flyRight.toValue = view.bounds.size.width/2
    flyRight.fromValue = -view.bounds.size.width/2
    flyRight.duration = 0.5
    heading.layer.addAnimation(flyRight, forKey: nil)
    //2
    flyRight.beginTime = CACurrentMediaTime() + 0.3
    flyRight.fillMode = kCAFillModeBackwards
    username.layer.addAnimation(flyRight, forKey: nil)
   flyRight.beginTime = CACurrentMediaTime() + 0.4
   password.layer.addAnimation(flyRight, forKey: nil)
//1 通過對雲朵動畫的講解,相信其實我們已經能夠大致看懂這一段代碼了,和上面唯一不同的就是,我們這裡創建的CABasicAnimation的動畫對象為"position.x",fromvalue和toVaule相信也不用進行太多講解,值得一題的是我們的值指的是對象的center.x,而不是左上角。
//2 對username延遲0.3秒進行。同時同樣設定
flyRight.fillMode = kCAFillModeBackwards
是不是很簡單呢,是的~
Log in 按鈕的動畫,上代碼:
UIView.animateWithDuration(0.5, delay: 0.5, usingSpringWithDamping: 0.5, initialSpringVelocity: 0.0, options: nil, animations: {
        self.loginButton.center.y -= 30.0
        self.loginButton.alpha = 1.0
    }, completion: nil)
對於這一段代碼的解釋在這裡,說的十分詳細,作者也長得很帥,看頭像就看得出來:http://www.jianshu.com/p/bd7bf438b288 喜歡的話請關注他。
我們還發現雲朵是不斷的移動的,繼續上代碼:
 func animateCloud(cloud: UIImageView) {
    let cloudSpeed = 60.0 / view.frame.size.width
    let duration = (view.frame.size.width - cloud.frame.origin.x) * cloudSpeed
    UIView.animateWithDuration(NSTimeInterval(duration), delay: 0.0, options: .CurveLinear, animations: {
      cloud.frame.origin.x = self.view.frame.size.width
    }, completion: {_ in
      cloud.frame.origin.x = -cloud.frame.size.width
      self.animateCloud(cloud)
    })
  }
> 解釋請參考Log in按鈕的解釋。 ------------- 先就只剩下點擊**Log in**按鈕以後的動畫了,我們先來看一下發生什麼了,當我們點擊按鈕以後,按鈕duang~的一下蹦到下面了,同時顏色變了,圓角變大了,然後添加了一個活動指示器。 上代碼:
@IBAction func login() {
    //1
    UIView.animateWithDuration(1.5, delay: 0.0, usingSpringWithDamping: 0.2, initialSpringVelocity: 0.0, options: nil, animations: {
      self.loginButton.bounds.size.width += 80.0
    }, completion: nil)
    //2
    UIView.animateWithDuration(0.33, delay: 0.0, usingSpringWithDamping: 0.7, initialSpringVelocity: 0.0, options: nil, animations: {
      self.loginButton.center.y += 60.0
    //3
      self.spinner.center = CGPoint(x: 40.0, y: self.loginButton.frame.size.height/2)
      self.spinner.alpha = 1.0
    }, completion: {_ in
    //4
      self.showMessage(index: 0)
    })
    //5
    let tintColor = UIColor(red: 0.85, green: 0.83, blue: 0.45, alpha: 1.0)
    tintBackgroundColor(layer: loginButton.layer, toColor: tintColor)
    //6
    roundCorners(layer: loginButton.layer, toRadius: 25.0)
  }
這一段就厲害了,因為這一段特別的長。
1、duang~的一下按鈕變長了。
2、duang~的一下按鈕下移了。
3、添加活動指示器。
4、添加message這個後面再說。
5、調用tintBackgroundColor方法,改變顏色,這是tintBackgroundColor方法的代碼:
func tintBackgroundColor(#layer: CALayer, #toColor: UIColor) {
let tint = CABasicAnimation(keyPath: "backgroundColor")
tint.fromValue = layer.backgroundColor
layer.backgroundColor = toColor.CGColor
tint.toValue = toColor.CGColor
tint.duration = 1.0
tint.fillMode = kCAFillModeBoth
layer.addAnimation(tint, forKey: nil)
}
其實這個方法和前面的CABasicgroundColor大體是相同的,我們先把顏色改變成我們需要變成的顏色,然後執行動畫。
6、增大圓角的動畫
func roundCorners(#layer: CALayer, #toRadius: CGFloat) {
let round = CABasicAnimation(keyPath: "cornerRadius")
round.fromValue = layer.cornerRadius
layer.cornerRadius = toRadius
round.toValue = toRadius
round.duration = 0.33
layer.addAnimation(round, forKey: nil)
}
這個實現的方法大體是上面改變顏色的思想是一模一樣的。也是先改變圓角,然後執行動畫,最後顯示的會是你一開始設定的圓角。
現在整個動畫就只剩下了那個message的動畫,和message的動畫結束以後,Log in按鈕彈回的動畫,而Log in按鈕彈回的動畫和前面剛說過的按鈕彈下是一模一樣的,只是相反而已。我們來看一下message的動畫:
func removeMessage(#index: Int) {
    UIView.animateWithDuration(0.33, delay: 0.0, options: nil, animations: {
      self.status.center.x += self.view.frame.size.width
    }, completion: {_ in
      self.status.hidden = true
      self.status.center = self.statusPosition
      self.showMessage(index: index+1)
    })
  }
  func resetForm() {
    UIView.transitionWithView(status, duration: 0.2, options: .TransitionFlipFromTop, animations: {
      self.status.hidden = true
      self.status.center = self.statusPosition
    }, completion: nil)
    UIView.animateWithDuration(0.2, delay: 0.0, options: nil, animations: {
      self.spinner.center = CGPoint(x: -20.0, y: 16.0)
      self.spinner.alpha = 0.0
      self.loginButton.bounds.size.width -= 80.0
      self.loginButton.center.y -= 60.0
    }, completion: {_ in
      let tintColor = UIColor(red: 0.63, green: 0.84, blue: 0.35, alpha: 1.0)
      tintBackgroundColor(layer: self.loginButton.layer, toColor: tintColor)
      roundCorners(layer: self.loginButton.layer, toRadius: 10.0)
    })
  }
這一段代碼用的全部都是UIViewAnimation,就不做多解釋,還是比較好理解的,若是不理解,請看我前面的寫過的文章。
Core Animation相對於UIView Animation的優勢在哪呢,其一就是你能夠操作動畫的過程,對動畫的操作更加詳細。
既然我們需要監控整個動畫過程,很顯然我們需要繼承一個協議。然而,我們並不需要去寫代碼去繼承一個協議,每一個NSObject都早已經繼承了這麼兩個方法:
override func animationDidStop(anim: CAAnimation!, finished flag: Bool) {}
override func animationDidStart(anim: CAAnimation!) {}
當很多個CABasicAnimation都設置了.delegate = self的時候,我們如何再上述兩個函數中區分呢?我們可以給 CABasicAnimation設置value,像這樣:
caBasic.setValue("Value", forKey: "key")然後你就能這麼識別:
if let name = anim.valueForKey("name") as? String {
    if name == "Vaule" {
        println("This is caBasic")
    }
}
那麼有什麼用呢,這個就要考想象力了~~
前面我們創建了一些CABasicAnimation,在這裡我們再介紹一個CAAnimation類——CAAnimationGroup,這個類的作用就是將許多動畫放在一起,統一管理。像下面這樣:
let groupAnimation = CAAnimationGroup()
    groupAnimation.beginTime = CACurrentMediaTime() + 0.5
    groupAnimation.duration = 0.5
    groupAnimation.fillMode = kCAFillModeBackwards
    groupAnimation.timingFunction = CAMediaTimingFunction(
      name: kCAMediaTimingFunctionEaseIn)
    let scaleDown = CABasicAnimation(keyPath: "transform.scale")
    scaleDown.fromValue = 3.5
    scaleDown.toValue = 1.0
    let rotate = CABasicAnimation(keyPath: "transform.rotation")
    rotate.fromValue = CGFloat(M_PI_4)
    rotate.toValue = 0.0
    let fade = CABasicAnimation(keyPath: "opacity")
    fade.fromValue = 0.0
    fade.toValue = 1.0
    groupAnimation.animations = [scaleDown, rotate, fade]
    loginButton.layer.addAnimation(groupAnimation, forKey: nil)
像上述那樣,我們就給一個對象添加了一組動畫,注意動畫時間並不是一個結束後執行另一個!
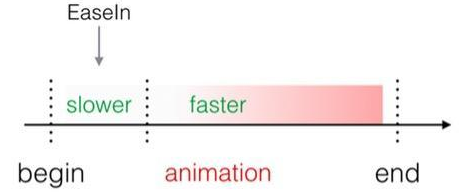
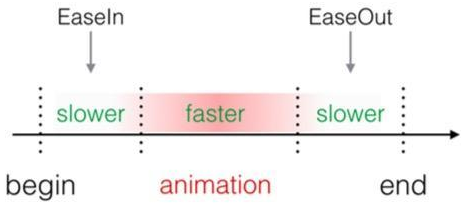
CAAnimationGroup還有一個屬性:timingFunction,他控制這一組動畫的運行狀態,他有一下幾個值:
kCAMediaTimingFunctionEaseIn:

運行速度開始慢,然後加速
kCAMediaTimingFunctionEaseOut:

kCAMediaTimingFunctionEaseInEaseOut:

kCAMediaTimingFunctionLinear:
默認的就是這個值,這個值就是速度保持一定。
這裡還有幾個CABasicAnimation的屬性:
.repeatCount:重復次數
.speed:動畫運行速度(.speed = 2,意為以原本兩倍速度運行,時間減半,運行次數不變。)
view.layer.speed = 2.0:如此操作,將給view上的所有動畫加速一倍。
繼續介紹一個新的類CAKeyframeAnimation,這個類和前面大不相同,前面的 CABasicAnimation動畫是從.fromValue到.toValue。而CAKeyframeAnimation類則是更加精確的控制動畫,我們可以這樣定義一個CAKeyframeAnimation類:
let wobble = CAKeyframeAnimation(keyPath: "transform.rotation") wobble.duration = 0.25
wobble.repeatCount = 4
wobble.values = [0.0, -M_PI_4/4, 0.0, M_PI_4/4, 0.0]
wobble.keyTimes = [0.0, 0.25, 0.5, 0.75, 1.0]
heading.layer.addAnimation(wobble, forKey: nil)
我們看到了什麼?在這個類當中將value分割成了很多部分,然後對每一個部分都有一個對應的完成時間,和前面的 CABasicAnimation比較,我們可以將它理解為,將froemValue,*toValue,duration分割成n個部分,那麼這樣做的好處就是對動畫的控制更加精確。
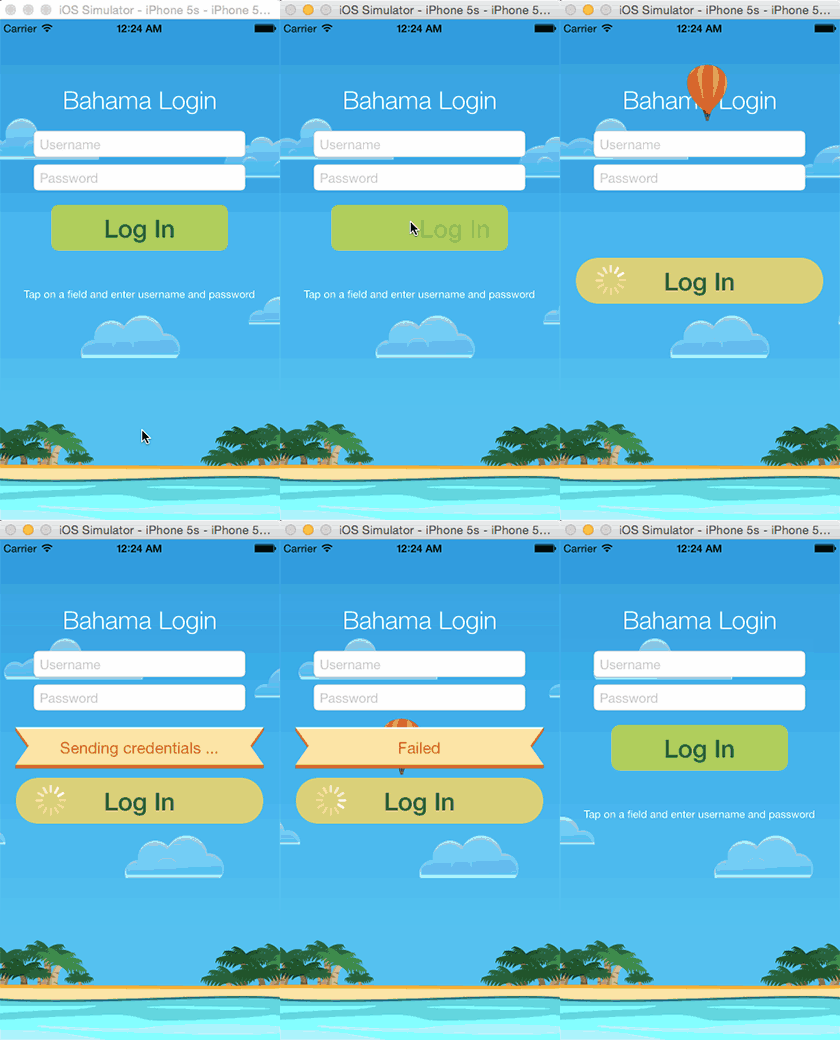
我們來看這樣一個動畫:

當我們點擊Log In按鈕以後,從左上角出現了一個熱氣球,熱氣球從左上角先是右下方移動,移動到頭以後繼續向左下角移動,那麼這個動畫很明顯分為三個點,那麼先後到達這三個點就可以實現動畫。
來看一下代碼:
    let balloon = CALayer()
    balloon.contents = UIImage(named: "balloon")!.CGImage
    balloon.frame = CGRect(x: -50.0, y: 0.0,width: 50.0, height: 65.0)
    view.layer.insertSublayer(balloon, below: username.layer)
    let flight = CAKeyframeAnimation(keyPath: "position")
    flight.duration = 12.0
    flight.values = [
      CGPoint(x: -50.0, y: 0.0),
      CGPoint(x: view.frame.width + 50.0, y: 160.0),
      CGPoint(x: -50.0, y: loginButton.center.y)
      ].map { NSValue(CGPoint: $0) }
     flight.keyTimes = [0.0, 0.5, 1.0]
    balloon.addAnimation(flight, forKey: nil)
代碼較為容易理解,我們將 flight.values分為了三段,並且給每一段都設定了完成時間,最後一步就是給視圖添加動畫。
這一篇的東西比較零散,不過我們還是有一個Demo的。
這是Github地址:https://github.com/superxlx/iOS_Animation_Test4


