Xcode插件AllTargets開發教程
我最近一年來都在開發ios應用,不過感覺公司的app維護起來非常麻煩。
因為公司要為很多個企業訂做app,每個app的功能基本相同,只是界面上的一些圖片和文字要換掉,功能也有一些小改動。考慮到代碼維護的問題,比較好的做法就是只維護一份代碼,然後用不同的配置文件來管理各個target的內容。
當工程裡達到上百個target的時候,為工程新增文件就成了一件非常痛苦的事情。
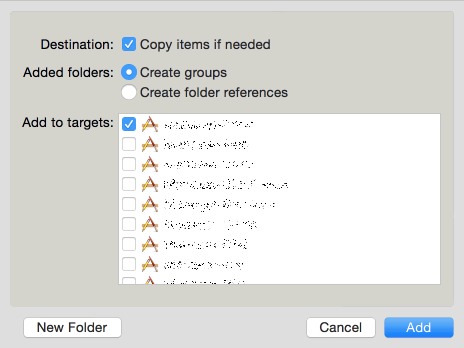
我必須一個一個地去勾選所有的targets,往往要花上幾分鐘的時間來重復無聊的操作,既浪費時間又影響心情,而Xcode居然沒有自帶全選targets的功能。因此我萌生了一個想法:寫一個能自動勾選所有targets的插件。
google一下Xcode的制作教程,找到了VVDocumenter插件作者寫的一篇教程:《Xcode 4 插件制作入門》。
這篇教程很適合入門,不過裡面有些東西由於年代久遠,已經不兼容最新的Xcode 6.1了。但是教程裡很多細節都寫得很詳細,建議先看完這篇教程。我看了教程後加上自己的摸索,終於完成了插件的開發,因此在這裡把插件的開發過程分享出來。
本插件的源碼下載地址:https://github.com/poboke/AllTargets
一、安裝插件模板
Alcatraz是一款開源的Xcode包管理器,源碼下載地址為:https://github.com/supermarin/Alcatraz
編譯完成之後,重啟Xcode,然後點擊Xcode頂部菜單”Windows”中的”Package Manager”就可以打開Alcatraz包管理器面板。
搜索關鍵字”Xcode Plugin”,可以找到一個”Xcode Plugin”模板,該模板可以用來創建Xcode 6+的插件。

點擊左邊的圖標按鈕就可以把模板安裝到Xcode裡。
新建一個Xcode工程,選擇”Xcode Plugin”模板,本例子的工程名為AllTargets。
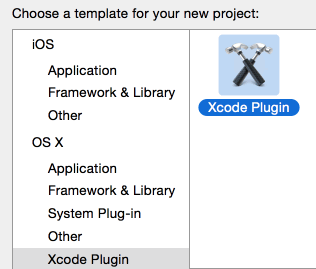
該模板的部分初始代碼為:
- (id)initWithBundle:(NSBundle *)plugin
{
    if (self = [super init]) {
        // reference to plugin's bundle, for resource access
        self.bundle = plugin;

        // Create menu items, initialize UI, etc.

        // Sample Menu Item:
        NSMenuItem *menuItem = [[NSApp mainMenu] itemWithTitle:@"Edit"];
        if (menuItem) {
            [[menuItem submenu] addItem:[NSMenuItem separatorItem]];
            NSMenuItem *actionMenuItem = [[NSMenuItem alloc] initWithTitle:@"Do Action" action:@selector(doMenuAction) keyEquivalent:@""];
            [actionMenuItem setTarget:self];
            [[menuItem submenu] addItem:actionMenuItem];
        }
    }
    return self;
}

// Sample Action, for menu item:
- (void)doMenuAction
{
    NSAlert *alert = [[NSAlert alloc] init];
    [alert setMessageText:@"Hello, World"];
    [alert runModal];
}
初始代碼會在Xcode的”Edit”菜單裡加入一個名字為”Do Action”的子菜單,當你點擊這個子菜單的時候,會調用doMenuAction函數彈出一個提示框,提示內容為”Hello, World”。
二、需求分析
在Xcode裡按command+alt+A打開添加文件窗口:
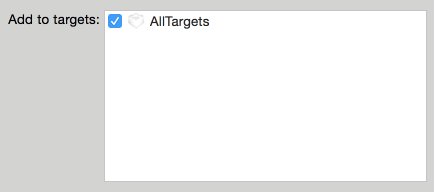
所有的targets都位於白色矩形視圖裡,可以猜測該矩形視圖是一個NSTableView(大小差不多為320*170),勾選的按鈕是一個NSCell。
首先要獲得NSTableView對象,《Xcode 4 插件制作入門》裡提到可以使用遞歸打印subviews的方法來得到某個NSView對象。
不過我發現一種更簡便的方法,在本例子中比較適用。在沒打開添加文件窗口之前,NSTableView是不會創建的,而視圖創建設置尺寸時都會調用NSViewDidUpdateTrackingAreasNotification通知。所以我們可以先監聽該通知,再打開添加文件窗口,這樣就能得到添加文件窗口裡所有視圖對象了,修改代碼為:
- (void)doMenuAction
{
    //監聽視圖更新區域大小的通知
    [[NSNotificationCenter defaultCenter] addObserver:self selector:@selector(notificationListener:) name:NSViewDidUpdateTrackingAreasNotification object:nil];
}

- (void)notificationListener:(NSNotification *)notification
{
    //打印出視圖對象以及視圖的大小
    NSView *view = notification.object;
    if ([view respondsToSelector:@selector(frame)]) {
        NSLog(@"view : %@, frame : %@", view, [NSValue valueWithRect:view.frame]);
    }
}
編譯代碼後重啟Xcode,打開控制台(Control+空格,輸入console),並清空控制台裡的log。
點擊Xcode的”Do Action”子菜單開始監聽消息,這時打開添加文件的窗口會看到控制台輸出一堆log。
把log復制到MacVim裡,搜索”NSTableView”,可以找到一條結果:
view : < NSTableView: 0x7fb206c65f40>, frame : NSRect: {{0, 0}, {321, 170}}可以發現,此TableView的大小為321*170,看來正是我們正在尋找的對象。
三、hook私有類
由於NSCell的值是由NSTableView的數據源所控制的,所以我們必須找到NSTableView的數據源,修改一下代碼打印出數據源:
- (void)notificationListener:(NSNotification *)notification
{
    NSView *view = notification.object;
    if ([view.className isEqualToString:@"NSTableView"]) {
        NSTableView *tableView = (NSTableView *)view;
        NSLog(@"dataSource : %@", tableView.dataSource);
    }
}
可以看到控制台輸出了log:
dataSource : < Xcode3TargetMembershipDataSource: 0x7fadb7352830>
Xcode3TargetMembershipDataSource是Xcode的私有類,位於 /Applications/Xcode.app/Contents/PlugIns/Xcode3UI.ideplugin/Contents/MacOS/Xcode3UI 裡。由於這個私有類沒有frameworks可引用,所以只能通過NSClassFromString來Hook該私有類的函數。
在這裡可以下載從Xcode 6.1 dump出來的私有類頭文件:https://github.com/luisobo/Xcode-RuntimeHeaders/tree/xcode6-beta1。
打開Xcode3TargetMembershipDataSource.h,部分代碼如下:
@interface Xcode3TargetMembershipDataSource : NSObject {
    NSMutableArray *_wrappedTargets;
    //......
}

- (void)updateTargets;
//......
_wrappedTargets數組很有可能保存著targets的信息,updateTargets函數的作用應該是用來更新targets的值,所以可以試試hook updateTargets函數,代碼如下:
//originalImp用來保存原私有類的方法
static IMP originalImp = NULL;

@implementation AllTargets

//......

- (void)doMenuAction
{
    [self hookClass];
}

- (void)hookMethod
{
    SEL method = @selector(updateTargets);

    //獲取私有類的函數
    Class originalClass = NSClassFromString(@"Xcode3TargetMembershipDataSource");
    Method originalMethod = class_getInstanceMethod(originalClass, method);
    originalImp = method_getImplementation(originalMethod);

    //獲取當前類的函數
    Class replacedClass = self.class;
    Method replacedMethod = class_getInstanceMethod(replacedClass, method);

    //交換兩個函數
    method_exchangeImplementations(originalMethod, replacedMethod);
}

- (void)updateTargets
{
    //先調用原私有類的函數
    originalImp();

    //查看_wrappedTargets數組裡保存了什麼類型的對象
    NSMutableArray *wrappedTargets = [self valueForKey:@"wrappedTargets"];
    for (id wrappedTarget in wrappedTargets) {
        NSLog(@"target : %@", wrappedTarget);
    }
}
可以看到控制台輸出了log,由於工程只有一個target,所以只有一個對象:
target : < Xcode3TargetWrapper: 0x7f8b59264ab0>
在Xcode的私有類裡找到Xcode3TargetWrapper.h,內容如下:
@interface Xcode3TargetWrapper : NSObject
{
    PBXTarget *_pbxTarget;
    Xcode3Project *_project;
    NSString *_name;
    NSImage *_image;
    BOOL _selected;
}

@property(readonly) NSImage *image; // @synthesize image=_image;
@property(readonly) NSString *name; // @synthesize name=_name;
@property BOOL selected; // @synthesize selected=_selected;
//......
可以看到,該類有三個屬性:圖片、名字和是否選中,我們只要把selected屬性改為YES就行了。
我們把updateTargets函數修改為:
- (void)updateTargets
{
    //先調用原私有類的函數
    originalImp();

    //修改wrappedTarget的屬性
    NSMutableArray *wrappedTargets = [self valueForKey:@"wrappedTargets"];
    for (id wrappedTarget in wrappedTargets) {
        [wrappedTarget setValue:@YES forKey:@"selected"];
    }
}
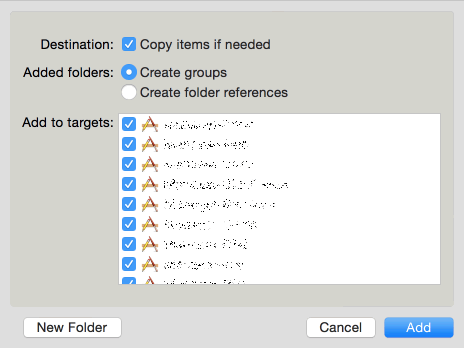
再次編譯重啟Xcode,打開添加文件窗口,可以發現所有targets都自動選中了。
四、添加菜單
考慮到有時可能要關閉這個功能,所以可以給菜單加上是否選中的狀態,此外還可以給Xcode加上一個獨立的Plugins菜單,大部分插件就可以放在這個菜單裡,以方便管理。

創建菜單的代碼如下:
- (void)addPluginsMenu
{
    //增加一個"Plugins"菜單到"Window"菜單前面
    NSMenu *mainMenu = [NSApp mainMenu];
    NSMenuItem *pluginsMenuItem = [mainMenu itemWithTitle:@"Plugins"];
    if (!pluginsMenuItem) {
        pluginsMenuItem = [[NSMenuItem alloc] init];
        pluginsMenuItem.title = @"Plugins";
        pluginsMenuItem.submenu = [[NSMenu alloc] initWithTitle:pluginsMenuItem.title];
        NSInteger windowIndex = [mainMenu indexOfItemWithTitle:@"Window"];
        [mainMenu insertItem:pluginsMenuItem atIndex:windowIndex];
    }

    //添加"Auto Select All Targets"子菜單
    NSMenuItem *subItem = [[NSMenuItem alloc] init];
    subItem.title = @"Auto Select All Targets";
    subItem.target = self;
    subItem.action = @selector(toggleMenu:);
    subItem.state = NSOnState;
    [pluginsMenuItem.submenu addItem:subItem];
}

- (void)toggleMenu:(NSMenuItem *)menuItem
{
    //改變菜單選中狀態
    menuItem.state = !menuItem.state;

    //重新交換函數,hook與unhook
    [self hookMethod];
}
本插件的源碼下載地址:https://github.com/poboke/AllTargets
- iOS9與XCode7中不克不及應用http銜接的疾速處理方法
- xcode8 封閉掌握台不打印不信息的處理辦法(圖文詳解)
- 史上最具體的CocoaPods裝置教程(圖文)
- IOS Xcode中快捷鍵年夜全
- iOS中處理Xcode 8掌握台亂碼的方法
- IOS開辟之適配iOS10及Xcode8的留意點
- xcode8提交ipa掉敗沒法構建版本成績的處理計劃
- XCode 加速編譯鏈接速度的辦法
- 2016 cocoapods的裝置和應用辦法和版本進級碰到的成績
- IOS 陀螺儀開辟(CoreMotion框架)實例詳解
- 進修iOS自界說導航掌握器UINavigationController
- Xcode 8打印log日記的成績小結及處理辦法
- iOS10 適配和Xcode8設置裝備擺設總結
- iOS Xcode8更新後輸入log日記封閉的辦法
- Xcode8、iOS10進級成績記載

