Apple Pay 開發教程:創造更好的支付體驗
(原文:Apple Pay 作者:Jack Flintermann 譯者:Alili)
當你決定在線買一些東西的時候,可能會有一種現代特有的焦慮感湧上心頭。雖然沒有精確的單詞來表達這種焦慮,但如果只想簡單的描述的話,可以是:“我的信用卡在哪裡?它的號碼是多少?我真的需要買這個東西嗎?”
當你在一個iOS設備上購物時,這種令人抓狂的感覺會放大:你很有可能沒有隨身攜帶你的信用卡,而且手裡拿著信用卡還要在手機上輸入信息這種操作相當有難度,我覺得應該留給體操選手和宇航員用來展示他們高超的技藝(當然,我是在開玩笑,但是我也願意打賭蘋果公司已經在某個實驗室做過這個測試)。
如果你是一位開發者,並且你的App裡接受信用卡付款,這個不利的因素將直接影響你的收入。
Apple Pay改變了這一切。盡管很多線下商店把它們的大部分注意力集中在實體付款(如客戶可以使用他們的iPhone在支持NFC的終端付款),但除此之外,iOS開發者同樣獲得了一個極好的機會去提高他們App裡的支付體驗。
提醒:如果你在你的APP中銷售的是電子產品或者虛擬貨幣,你應該使用內購方式而不是App Pay去銷售你的東西(見的App Store Review Guidelines 11.2節)。你可以使用Apple Pay銷售你的實體商品和服務。
獲取蘋果商戶ID(Merchant ID)
在做任何測試之前,你必須先注冊一個蘋果商戶ID。而在你做這件事之前,你還需要選擇一個支付提供商用來處理你的信用卡流程。蘋果公司在他們的Apple Pay開發者頁面提供了一份推薦的公司名單(注:我在Stripe公司工作,這個公司是推薦名單中的一個,但本文中的代碼不依賴於你選擇的任何特定供應商)。你的供應商應該有一個詳細的指導,用來告訴你在他們的平台如何設置和使用Apple Pay,整個流程將是這樣的:
前往蘋果開發者中心的Certificates, Identifiers, and Profiles部分並且創建一個新的商家ID。
接下來,前往選擇證書菜單,並創建一個新的蘋果支付證書。這需要向蘋果公司上傳證書簽名請求(CSR)。當你注冊一個支付處理,他們通常會為你提供一個CSR使用。你可以使用CSR通過這個指導生成自己私有的證書,但你的付款處理程序將無法解密它,你需要在以後重新生成。
在Xcode中,打開你的項目設置中的“Capabilities”部分,然後將“Apple Pay”選項打開。你可能需要從提供的列表中選擇之前創建的商家ID。
創建第一次交易
Apple Pay只支持可以使用Apple Pay的iOS設備(如iPhone6/6+,iPad Mini 3,iPad Air 2)。此外,你需要先添加蘋果支付授權,才能在你的應用程序中進行測試(在“獲取蘋果商家ID”中所述)。如果你想在模擬器上模擬它的行為,你可以在Github上找到一個模仿它的功能(測試信用卡的詳細消息)的測試庫。
一旦你准備好了商家帳戶,那麼開始使用Apple Pay將會非常簡單。當你的驗證超時時,你首先需要先看你正在運行的設備是否支持Apple Pay,接著看你的客戶是否已經將信用卡添加在Passbook:
let paymentNetworks = [PKPaymentNetworkAmex, PKPaymentNetworkMasterCard, PKPaymentNetworkVisa]
if PKPaymentAuthorizationViewController.canMakePaymentsUsingNetworks(paymentNetworks) {
    // ?Pay is available!
} else {
    // Show your own credit card form.
}
假設Apple Pay是可用的,下一個步驟將是調用PKPaymentRequest。它是描述你從客戶那裡要求收取的費用。如果你的付款請求發生在美國,這裡你需要設置一些默認選項,以後也無需改變:
let request = PKPaymentRequest()
request.supportedNetworks = [PKPaymentNetworkAmex, PKPaymentNetworkMasterCard, PKPaymentNetworkVisa]
request.countryCode = "US"
request.currencyCode = "USD"
request.merchantIdentifier = "#Replace me with your Apple Merchant ID#"
request.merchantCapabilities = .Capability3DS
接下來,使用paymentSummaryItem屬性來描述用戶真正買的商品。這需要包含一系列的PKPaymentSummaryItem所組成的數組,這個數組包括標簽和數量。他們類似於收據上的行項目(這個是我們立刻就可以看到)。

let wax = PKPaymentSummaryItem(label: "Mustache Wax", amount: NSDecimalNumber(string: "10.00"))
let discount = PKPaymentSummaryItem(label: "Discount", amount: NSDecimalNumber(string: "-1.00"))

let totalAmount = wax.amount.decimalNumberByAdding(discount.amount)
                            .decimalNumberByAdding(shipping.amount)
let total = PKPaymentSummaryItem(label: "NSHipster", amount: totalAmount)

request.paymentSummaryItems = [wax, discount, shipping, total]
請注意,這裡您可以指定零或負數價格,用做優惠券的使用或其它信息。然而,總量的要求是必須大於零的。你將會注意到,我們使用PKShippingMethod這個方法(從PKPaymentSummaryItem繼承)來描述我們的送貨方式。下面我們會更詳細的講解。
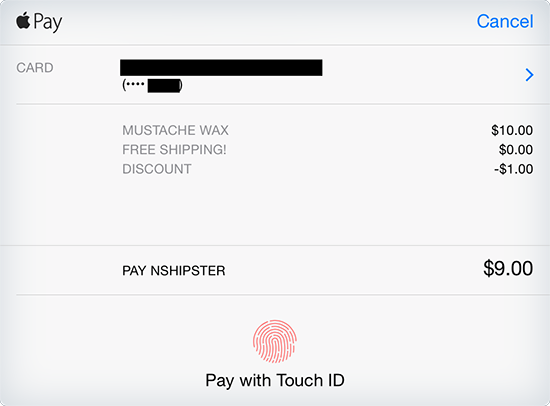
接下來,我們結合 PKPaymentRequest創建PKPaymentAuthorizationViewController的示例來向客戶展示支付清單 (在這個例子中,所有這些代碼都位於隱藏在支付背後的UIViewController裡面)。
let viewController = PKPaymentAuthorizationViewController(paymentRequest: request)
viewController.delegate = self
presentViewController(viewController, animated: true, completion: nil)
一些需要注意的地方:
視圖控制器不完全占據屏幕(在這種情況下,藍色的背景是我們應用程序的一部分)。你可以通過更新後台視圖控制器讓PKPaymentAuthorizationViewController可見。
所有的文本自動大寫。
把最後一行從剩余部分分離出來的目的是顯示你的總收入。標簽將自動在前面加上“PAY”,所以這裡通常使用公司名稱。
整個UI是通過Remote View Controller來展現的。這意味著,在你給的PKPaymentRequest之外,以其他的方式展現或修改這個視圖的內容是不可能的。
PKPaymentAuthorizationViewControllerDelegate
實際上為了處理由PKPaymentAuthorizationViewController返回的付款信息,您需要實現PKPaymentAuthorizationViewControllerDelegate這個協議。它有兩個必須實現的方法,分別如下:
-(void)paymentAuthorizationViewController:didAuthorizePayment:completion:
-(void)paymentAuthorizationViewControllerDidFinish:
要了解這些方法的工作原理,我們需要看看一個Apple Pay交易具體是如何工作的:
寫一個如上所述的PKPaymentAuthorizationViewController。
客戶同意使用Touch ID購買(或者在失敗了3次之後通過輸入自己的密碼購買)。
指紋圖標變成一個帶有“Processing”的旋轉標簽
你的代理將接收paymentAuthorizationViewController:didAuthorizePayment:completion: callback回調。
你的應用程序與付款進程進行異步通信,網站後台實際上是對這些付款細節的代辦。一旦付款結束,你根據返回的結果調用PKPaymentAuthorizationStatus.Success或PKPaymentAuthorizationStatus.Failure以完成處理。
把PKPaymentAuthorizationViewController旋轉動畫到成功或失敗圖標。如果成功的話,用戶將會收到一個從PassBook發出的表明從用戶信用卡消費的通知。
你的代理會接收paymentAuthorizationViewControllerDidFinish:方法的回調。它是負責調用用來切換支付頁面的dismissViewControllerAnimated:這個方法的。

代碼如下:
// MARK: - PKPaymentAuthorizationViewControllerDelegate

func paymentAuthorizationViewController(controller: PKPaymentAuthorizationViewController!, didAuthorizePayment payment: PKPayment!, completion: ((PKPaymentAuthorizationStatus) -> Void)!) {
    // Use your payment processor's SDK to finish charging your customer.
    // When this is done, call completion(PKPaymentAuthorizationStatus.Success)
}

func paymentAuthorizationViewControllerDidFinish(controller: PKPaymentAuthorizationViewController!) {
    dismissViewControllerAnimated(true, completion: nil)
}
在這裡, processPayment:payment completion: 這個方法是你自己的代碼,並會利用你的支付處理程序中的SDK來完成交易。
動態的送貨方式和價格
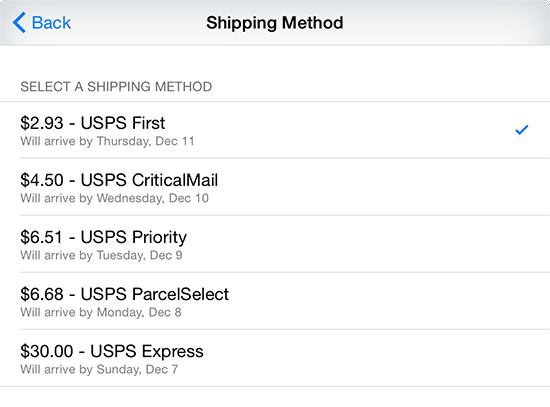
如果你的客戶使用Apple Pay購買實體商品,你可能要為他們提供不同送貨選項。你可以在PKPaymentRequest這個方法設置shippingMethods選項做到這一點。然後,你可以執行PKPaymentAuthorizationViewControllerDelegate代理中的可選方法paymentAuthorizationViewController:didSelectShippingMethod:completion:給用戶的選擇作出響應。這個方法遵循類似上述didAuthorizePayment方法描述的模式,在這裡你可以通過這個異步回調更新PKPaymentSummaryItem數組,這個數組中包含客戶所需的送貨方式。 (還記得繼承自PKPaymentSummaryItem的PKShippingMethod方法嗎?在這裡是非常有用的!)
下面是我們之前示例的修改版本,作為視圖控制器和輔助函數的計算屬性實現:
var paymentRequest: PKPaymentRequest {
    let request = ... // initialize as before

    let freeShipping = PKShippingMethod(label: "Free Shipping", amount: NSDecimalNumber(string: "0"))
    freeShipping.identifier = "freeshipping"
    freeShipping.detail = "Arrives in 6-8 weeks"

    let expressShipping = PKShippingMethod(label: "Express Shipping", amount: NSDecimalNumber(string: "10.00"))
    expressShipping.identifier = "expressshipping"
    expressShipping.detail = "Arrives in 2-3 days"

    request.shippingMethods = [freeShipping, expressShipping]
    request.paymentSummaryItems = paymentSummaryItemsForShippingMethod(freeShipping)

    return request
}

func paymentSummaryItemsForShippingMethod(shipping: PKShippingMethod) -> ([PKPaymentSummaryItem]) {
    let wax = PKPaymentSummaryItem(label: "Mustache Wax", amount: NSDecimalNumber(string: "10.00"))
    let discount = PKPaymentSummaryItem(label: "Discount", amount: NSDecimalNumber(string: "-1.00"))

    let totalAmount = wax.amount.decimalNumberByAdding(discount.amount)
                                .decimalNumberByAdding(shipping.amount)
    let total = PKPaymentSummaryItem(label: "NSHipster", amount: totalAmount)

    return [wax, discount, shipping, total]
}

// MARK: - PKPaymentAuthorizationViewControllerDelegate

func paymentAuthorizationViewController(controller: PKPaymentAuthorizationViewController!, didSelectShippingMethod shippingMethod: PKShippingMethod!, completion: ((PKPaymentAuthorizationStatus, [AnyObject]!) -> Void)!) {
    completion(PKPaymentAuthorizationStatus.Success, paymentSummaryItemsForShippingMethod(shippingMethod))
}
在這個例子中,客戶會選擇免費配送或快遞,隨著他們選擇的改變,價格也會相應的調整。
別急,後面還有更多!
與其提供一些固定費率的配送選項,你可以讓用戶自行選擇送貨地址,並在其基礎上動態的計算運費。為了達到目的,首先你需要在你的PKPaymentRequest方法中設定要求的requiredShippingAddressFields屬性。這可以是電子郵件,電話號碼和地址的任意組合。
另外,如果你不需要用戶的詳細通訊地址而是需要收集一些聯系方式(如發送收據的email地址),這樣做是一個很好的方法。
當設置了送貨地址這個字段,將在支付用戶界面出現一個新的“送貨地址”,以便允許客戶選擇之前保存的地址。每次用戶選擇時,paymentAuthorizationViewController:didSelectShippingAddress:completion:將消息發送到你的PKPaymentAuthorizationViewControllerDelegate代理。
在這裡,你應該為選擇的地址計算相應的費用,然後調用帶有3個參數的completion回調:
回調的結果
如果成功調用PKPaymentAuthorizationStatus.Success
如果出現連接錯誤調用PKPaymentAuthorizationStatus.Failure
如果API返回一個空的數組調用InvalidShippingPostalAddress (即該收貨地址是不可用的)
數組PKShippingMethods代表用戶可用的收貨地址。
新數組PKPaymentSummaryItems包含一個送貨方法。
我已經搭建了一個非常簡單的用來查詢給定地址運費的EasyPost API的Web後台。這個源碼可以在 https://github.com/jflinter/example-shipping-api 獲得。
這裡則是一個查詢此API的函數,用了Alamofire:
import AddressBook
import PassKit
import Alamofire

func addressesForRecord(record: ABRecord) -> [[String: String]] {
    var addresses: [[String: String]] = []
    let values: ABMultiValue = ABRecordCopyValue(record, kABPersonAddressProperty).takeRetainedValue()
    for index in 0.. Void) {
    let parameters = [
        "street": address[kABPersonAddressStreetKey] ?? "",
        "city": address[kABPersonAddressCityKey] ?? "",
        "state": address[kABPersonAddressStateKey] ?? "",
        "zip": address[kABPersonAddressZIPKey] ?? "",
        "country": address[kABPersonAddressCountryKey] ?? ""
    ]

    Alamofire.request(.GET, "http://example.com", parameters: parameters)
             .responseJSON { (_, _, JSON, _) in
                if let rates = JSON as? [[String: String]] {
                    let shippingMethods = map(rates) { (rate) -> PKShippingMethod in
                        let identifier = rate["id"]
                        let carrier = rate["carrier"] ?? "Unknown Carrier"
                        let service = rate["service"] ?? "Unknown Service"
                        let amount = NSDecimalNumber(string: rate["amount"])
                        let arrival = rate["formatted_arrival_date"] ?? "Unknown Arrival"

                        let shippingMethod = PKShippingMethod(label: "\(carrier) \(service)", amount: amount)
                        shippingMethod.identifier = identifier
                        shippingMethod.detail = arrival

                        return shippingMethod
                    }
                }
             }
}
有了這個,就可以簡單的實現PKPaymentAuthorizationViewControllerDelegate這個代理:
func paymentAuthorizationViewController(controller: PKPaymentAuthorizationViewController!, didSelectShippingAddress record: ABRecord!, completion: ((PKPaymentAuthorizationStatus, [AnyObject]!, [AnyObject]!) -> Void)!) {
    if let address = addressesForRecord(record).first {
        fetchShippingMethodsForAddress(address) { (shippingMethods) in
            switch shippingMethods?.count {
            case .None:
                completion(PKPaymentAuthorizationStatus.Failure, nil, nil)
            case .Some(0):
                completion(PKPaymentAuthorizationStatus.InvalidShippingPostalAddress, nil, nil)
            default:
                completion(PKPaymentAuthorizationStatus.Success, shippingMethods, self.paymentSummaryItemsForShippingMethod(shippingMethods!.first!))
            }
        }
    } else {
        completion(PKPaymentAuthorizationStatus.Failure, nil, nil)
    }
}
現在,用戶可以根據他們的居住地址來選擇收貨地址和方式。他們最終選擇的shippingAddress和shippingMethod將在paymentAuthorizationViewController:didAuthorizePayment:completion:方法中作為PKPayment的屬性。
這篇文章中的所有源碼公布在 https://github.com/jflinter/ApplePayExample 。
盡管Apple Pay只公開了少量的API,但是它的可用范圍十分廣泛,你可以在你的App中自定義適當的結賬流程。它甚至允許你建立新的流程,如讓用戶不需要創建賬號就能買東西。
隨著越來越多的應用開始使用Apple Pay(並且越來越多的用戶擁有了支持它的設備),我相信它將成為iOS應用中一種很普遍的支付方式。
(本文為CocoaChina組織翻譯,本譯文權利歸譯者所有,未經允許禁止轉載。)
- iOS開源一個簡略的訂餐app UI框架
- 史上最具體的CocoaPods裝置教程(圖文)
- iOS卒業設計之氣象預告App
- 2016 cocoapods的裝置和應用辦法和版本進級碰到的成績
- iOS10 App適配權限 Push Notifications 字體Frame 碰到的成績
- 針對iOS10新增Api的具體研討
- iOS開辟之(APNS)長途推送完成代碼 附證書與真機調試
- iOS突變圓環扭轉動畫CAShapeLayer CAGradientLayer
- iOS仿簡書、淘寶等App的View彈出後果
- iOS App通訊之local socket示例
- Mac下獲得AppStore裝置包文件途徑
- iOS App之間的通訊 local socket
- iOS逆向工程應用LLDB的USB銜接調試第三方App
- IOS CocoaPods詳解之制造篇
- IOS CocoaPods具體應用辦法


