兩行代碼搞定iOS自定義HUD風格動畫彈窗(支持選擇記錄)
原文地址----> MyBlog
HUD風格的選項彈窗是我們在日常開發中經常會碰到的一類需求,通常因為項目周期等因素,很少會專門抽出時間來對此類彈窗進行專門的定制開發和維護。常見的情況就是google類似的效果控件,如果恰好匹配需求,效果上說得過去,那麼便可以節省不少的時間和精力,但更多的情況是,我們花費了更多的時間去修改、去填坑,效果缺不見得如意,導致開發者最後不得不吐槽:還不如自己寫。對於注重追求效率的開發者,似乎什麼輪子都可以上路跑,只要它ok,但對於更注重用戶體驗和效果的開發者而言,就很難將就了,但人的精力總歸有限,抽不開身怎麼辦呢?這個時候就很需要一款效果很贊,使用方便、簡潔、可快速集成的組件了:SKChoosePopView便應運而生了。
簡述
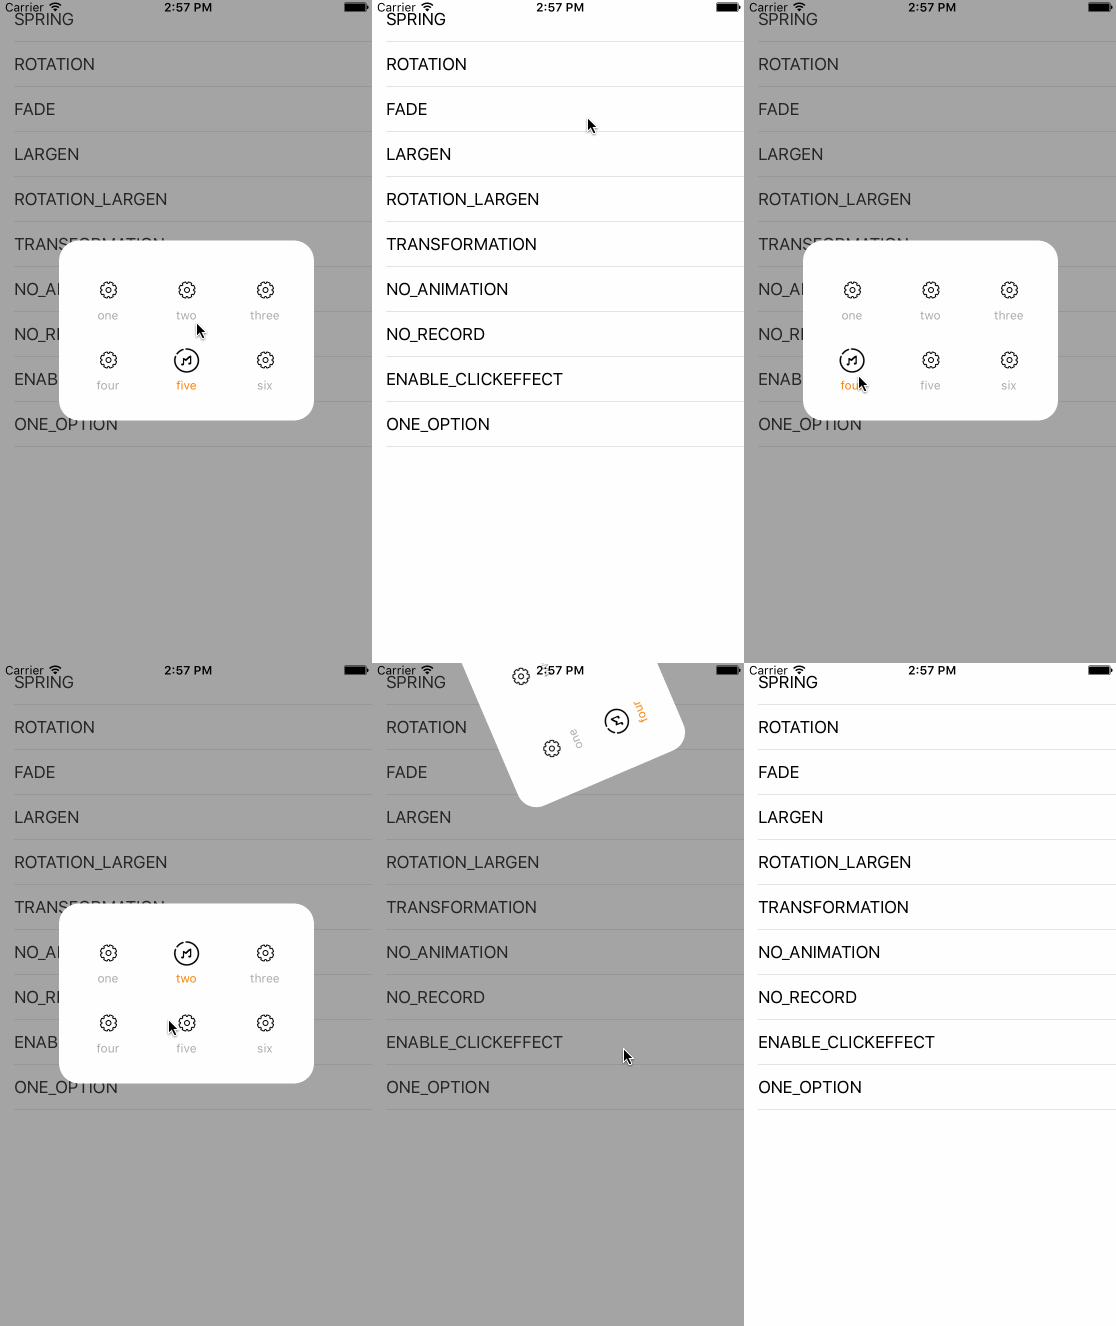
SKChoosePopView是一個HUD風格的可定制化選項彈窗的快速解決方案,集成了上、下、左、右、中5個進場方向的6種動畫效果,如果不能滿足你對酷炫效果的需要,SKChoosePopView同樣支持自定義動畫,以及選擇記錄、動畫的開閉、點擊特效、行列數量控制等。如果你覺得還不錯,star支持一下吧!
效果圖

一.如何使用
1.如何開始
1.從GitHub上Clone-->SKChoosePopView, 然後查看Demo (由於使用cocoaPods管理,請打開xcworkspace工程進行查看)
2.請仔細閱讀下方特別指出的部分和需要注意問題
3.在項目中使用SKChoosePopView,直接將目錄下的SKChoosePopView文件夾拷貝到工程中,或在podfile文件中添加pod 'SKChoosePopView'
4.SKChoosePopView基於Masonry布局,請確保你的工程裡已存在Masonry,下載地址
2.使用方法
頭文件導入
#import "SKPopView.h"
初始化
/** 初始化方法
* @param title 標題數組
* @param iconNormal 默認圖標數組
* @param iconSelected 選中圖標數組, 若不需要傳入nil即可
* @param titleColor 選中的選項標題字體顏色, 若不需要傳入nil即可
* @param delegate 代理協議
* @param completion 彈窗出現後的回調操作,若不需要傳入nil即可
*/
SKPopView * popView = [[SKPopView alloc] initWithOptionsTitle:kDate.title
                                        OptionsIconNormal:kDate.normalIcons
                                    OptionsIconSelected:kDate.selectedIcons
                                        selectedTitleColor:[UIColor orangeColor]
                                            delegate:self  completion:^{
        // TODO: 如果這裡不需要就nil
}];
顯示
[popView show];
消失
[popView dismiss];
設置動畫類型
popView.animationType = SK_TYPE_SPRING;
設置動畫方向
popView.animationDirection = SK_SUBTYPE_FROMBOTTOM;
動畫時間
popView.animationDuration = 0.5;
開啟/關閉選擇記錄
popView.enableRecord = YES;
開啟/關閉動畫效果
popView.enableAnimation = YES;
行數設置
popView.optionsLine = 2;
列數設置
popView.optionsRow = 3;
最小行間距
popView.minLineSpacing = 10;
最小列間距
popView.minRowSpacing = 10;
動畫設置
SK_TYPE_SPRING,// 彈簧效果
SK_TYPE_ROTATION,// 旋轉效果
SK_TYPE_FADE,// 漸變效果
SK_TYPE_LARGEN,// 變大效果
SK_TYPE_ROTATION_LARGEN,// 旋轉變大效果
SK_TYPE_TRANSFORMATION// 變形效果
動畫進場方向
SK_SUBTYPE_FROMRIGHT,// 從右側進入
SK_SUBTYPE_FROMLEFT,// 從左側進入
SK_SUBTYPE_FROMTOP,// 從頂部進入
SK_SUBTYPE_FROMBOTTOM,// 從底部進入
SK_SUBTYPE_FROMCENTER// 從屏幕中間進入
獲取已選擇的選項row(代理協議方法)
- (void)selectedWithRow:(NSUInteger)row;
注意事項
1.optionsLine和optionsRow屬性是必須設置的, 且遵循垂直布局原則,請確保optionsLine * optionsRow於選項數量相等
2.最小行、列間距如不需要可以不設置,默認為0
3.如果開啟動畫,請確保animationType、animationDirection和animationDuration屬性已經設置
4.使用代理協議方法前,請確保已遵循
5.對於沒有使用cocoaPods的同學,在將SKChoosePopView拷貝到工程目錄後,請到SKMacro.h內將#import "Masonry.h"的注釋打開,並注釋掉下面一行的#import
6.如果遇到其它問題,歡迎提交issues,我會及時回復
二.實現思路
1.設計思路
首先,在總體設計上我們采取模塊化的思路,主要分為兩部分:SKPopView(視圖)和SKPopAnimationManage(動畫管理),各司其職。
SKPopView負責處理界面控件的創建和布局約束、外部對彈窗配置信息設置的響應(如是否開啟動畫效果、點擊效果、選擇記錄、動畫類型/方向、需要顯示的行/列等)、已選擇的選項回調等。
SKPopAnimationManage則負責動畫的相關管理,如對動畫進場方向的軌跡控制、動畫效果的具體實現等。
2.功能實現
布局
在整體上,SKPopView充當了一個父UIView的角色,在其內部添加grayBackground1(灰色的背景)和popView(HUD彈窗部分),總體結構簡單明了,所以在調用的時候我們是直接將SKPopView整個添加到我們需要顯示的界面當中來使用的。
在SKPopView中,grayBackground作為灰色背景率先addSubview到SKPopView中[self addSubview:grayBackground],而彈窗則作為插入部分,插入到grayBackground之上[self insertSubview:self.popView aboveSubview:grayBackground], 而在popView內部,我們內嵌了一個UICollectionView,作為選項按鈕的展示。
彈窗的出現與消失
彈窗的出現原理:當彈窗被調用時,SKPopView整體便會添加到當前視圖的圖層之上,而彈窗popView此時會根據調用時在初始化方法裡配置的SK_TYPE(動畫類型)和SK_SUBTYPE(動畫方向),在屏幕外選擇一個入場前的坐標和入場時的動畫效果,當初始化完成開始調用SKPopView的show方法時,popView便開始入場、完成動畫。
#pragma mark - 外部調用
- (void)show
{
    if (self.enableAnimation == YES) {// 如果開啟動畫效果
        [self displayAnimation];
    }
}
#pragma mark - 動畫設置
- (void)displayAnimation
{
self.animationManage = [[SKPopAnimationManage alloc] init];
switch (self.animationType) {// 動畫類型
case SK_TYPE_SPRING:
self.animationManage.type = SK_ANIMATION_TYPE_SPRING;
break;
case SK_TYPE_ROTATION:
self.animationManage.type = SK_ANIMATION_TYPE_ROTATION;
break;
case SK_TYPE_FADE:
self.animationManage.type = SK_ANIMATION_TYPE_FADE;
break;
case SK_TYPE_LARGEN:
self.animationManage.type = SK_ANIMATION_TYPE_LARGEN;
break;
case SK_TYPE_ROTATION_LARGEN:
self.animationManage.type = SK_ANIMATION_TYPE_ROTATION_LARGEN;
break;
case SK_TYPE_TRANSFORMATION:
self.animationManage.type = SK_ANIMATION_TYPE_TRANSFORMATION;
break;
}
switch (self.animationDirection) {// 動畫進場方向
case SK_SUBTYPE_FROMRIGHT:
self.animationManage.animationDirection = SK_ANIMATION_SUBTYPE_FROMRIGHT;
break;
case SK_SUBTYPE_FROMLEFT:
self.animationManage.animationDirection = SK_ANIMATION_SUBTYPE_FROMLEFT;
break;
case SK_SUBTYPE_FROMTOP:
self.animationManage.animationDirection = SK_ANIMATION_SUBTYPE_FROMTOP;
break;
case SK_SUBTYPE_FROMBOTTOM:
self.animationManage.animationDirection = SK_ANIMATION_SUBTYPE_FROMBOTTOM;
break;
case SK_SUBTYPE_FROMCENTER:
self.animationManage.animationDirection = SK_ANIMATION_SUBTYPE_FROMCENTER;
break;
default:
break;
}
// 對進場動畫進行設置
[self.animationManage animateWithView:self.popView Duration:self.animationDuration animationType:self.animationManage.type animationDirection:self.animationManage.animationDirection];
}由於支持對已選擇的按鈕進行記錄保存,所以在使用上,用戶僅能通過對灰色背景的點擊來達到讓彈窗消失的目的,我們通過對grayBackground添加點擊手勢來達到目的, 注意:grayBackground在這裡是一個UIImageView,在添加手勢時,一定要將userInteractionEnabled = YES,開啟用戶交互,否則手勢將失效。
// 灰色背景
UIImageView * grayBackground = [UIImageView new];
[self addSubview:grayBackground];
grayBackground.backgroundColor = [UIColor colorWithWhite:0.3 alpha:0.5];;
grayBackground.userInteractionEnabled = YES;
[grayBackground mas_makeConstraints:^(MASConstraintMaker *make) {
    make.edges.equalTo(self).with.insets(UIEdgeInsetsMake(0, 0, 0, 0));
}];
// 添加手勢
UITapGestureRecognizer * dismissGesture = [[UITapGestureRecognizer alloc] initWithTarget:self action:@selector(cancel)];
[grayBackground addGestureRecognizer:dismissGesture];
#pragma mark - 手勢響應
- (void)cancel
{
[self dismissAnimation];
}- (void)dismissAnimation
{
if (self.enableAnimation == YES) {// 如果開啟動畫效果
[self.animationManage dismissAnimationForRootView:self];// 使用離場動畫
} else {
[self removeFromSuperview];// 直接移除整個SKPopView
}
}如果需求上有取消按鈕,可以在取消按鈕的點擊方法內手動調用SKPopView的dismiss方法,十分方便。
如
- (void)clickCancel // 取消按鈕方法
{
    [popView dismiss];
}
選項的數量與顯示把控
因為我們在popView中鑲嵌了一個UICollectionView,而UICollectionView提供了幾個很好的方法可以讓我們相對輕松的對選項的數量及在彈窗內的顯示方式進行把控,我們主要應用了下面幾個方法
// 設置item的size
- (CGSize)collectionView:(UICollectionView *)collectionView layout:(UICollectionViewLayout*)collectionViewLayout sizeForItemAtIndexPath:(NSIndexPath *)indexPath
// 最小列(橫向)間距
- (CGFloat)collectionView:(UICollectionView *)collectionView layout:(UICollectionViewLayout *)collectionViewLayout minimumInteritemSpacingForSectionAtIndex:(NSInteger)section
// 最小行(縱向)間距
- (CGFloat)collectionView:(UICollectionView *)collectionView layout:(UICollectionViewLayout *)collectionViewLayout minimumLineSpacingForSectionAtIndex:(NSInteger)section
然後根據我們在SKPopView的頭文件中暴露的外部配置信息optionsLine(顯示的行數)、optionsRow(顯示的列數)、minLineSpacing(最小行間距)、minRowSpacing(最小列間距),來對具體的樣式進行修改,具體轉換算法請參考SKPopView.m中外部配置標簽下的代碼段
動畫
動畫部分我們分為:進場動畫、撤場動畫和選項點擊動畫三個部分
1.進場動畫:
首先我們要弄明白一點,進場動畫,顧名思義:就是由進場+動畫兩個效果部分組成的
由於默認集成了來自5個方向的6種不同效果的動畫,導致動畫在進行相應配置時,對於每種動畫效果都需要考慮5種不同的進場起始坐標,所以,我們用一個統一的方法對動畫的進場方向進行統一管理,同樣的,考慮到一些動畫效果需要使用動畫組, 對動畫在進場過程中的位移路徑也需要做一個統一管理
    #pragma mark - 動畫方向初始化
    - (void)animationDirectionInitialize
    {
        if (_animationDirection == SK_ANIMATION_SUBTYPE_FROMRIGHT) {// 從右側進場
            _animationView.center = CGPointMake(MyWidth + 1000, WindowCenter.y);
        } else if (_animationDirection == SK_ANIMATION_SUBTYPE_FROMLEFT) {// 從左側進場
            _animationView.center = CGPointMake(MyWidth - 1000, WindowCenter.y);
        } else if (_animationDirection == SK_ANIMATION_SUBTYPE_FROMTOP) {// 從頂部進場
            _animationView.center = CGPointMake(WindowCenter.x, MyHeight - 1000);
        } else if (_animationDirection == SK_ANIMATION_SUBTYPE_FROMBOTTOM) {// 從底部進場
            _animationView.center = CGPointMake(WindowCenter.x, MyHeight + 1000);
        } else {// 中間進場
            _animationView.center = WindowCenter;
        }
    }
    #pragma mark - 動畫通用位移
    - (CAKeyframeAnimation *)partOfTheAnimationGroupPosition:(CGPoint)startPosition
    {
        CAKeyframeAnimation * animation = [CAKeyframeAnimation animationWithKeyPath:@"position"];// 創建關鍵幀位移動畫
        NSValue * startValue, * endValue;
        startValue = [NSValue valueWithCGPoint:startPosition];// 起始坐標
        endValue = [NSValue valueWithCGPoint:WindowCenter];// 結束坐標
        animation.values = @[startValue, endValue];// 設置動畫路徑
        animation.duration = _animationDuration;// 持續時間
        return animation;
    }
其中彈簧效果的動畫由於不是並發動畫效果,所以是沒有用到通用位移的,所以它的位移方法是獨立出來的
    #pragma mark - 彈簧效果
    - (void)springAnimation
    {
        [self animationDirectionInitialize];// 初始化方向
        [self displacementWithStartPosition:_animationView.center];
    }
    /** 彈簧效果位移部分
    * @param startPosition 位移起始坐標
    */
    - (void)displacementWithStartPosition:(CGPoint)startPosition{
        CAKeyframeAnimation * animation = [CAKeyframeAnimation animationWithKeyPath:@"position"];// 創建關鍵幀動畫
        NSValue * startValue, * endValue;
        startValue = [NSValue valueWithCGPoint:startPosition];
        endValue = [NSValue valueWithCGPoint:WindowCenter];
        animation.values = @[startValue, endValue];
        animation.duration = _animationDuration;
        animation.delegate = self;// 設置CAAnimationDelegate
        [_animationView.layer addAnimation:animation forKey:@"pathAnimation"];
    }
    /** 彈簧效果晃動部分
    */
    - (void)partOfTheSpringGroupShaking
    {
        NSString * keyPath = @"";
    if (_animationDirection == SK_ANIMATION_SUBTYPE_FROMLEFT || _animationDirection == SK_ANIMATION_SUBTYPE_FROMRIGHT) {// 判斷彈窗的來向
        keyPath = @"transform.translation.x";
    } else {
        keyPath = @"transform.translation.y";
    }
        CABasicAnimation * animation = [CABasicAnimation animationWithKeyPath:keyPath];
        animation.fromValue = [NSNumber numberWithFloat:-20.0];
        animation.toValue = [NSNumber numberWithFloat:20.0];
        animation.duration = 0.1;
        animation.autoreverses = YES;// 是否重復
        animation.repeatCount = 2;// 重復次數
        [_animationView.layer addAnimation:animation forKey:@"shakeAnimation"];
    }
    - (void)animationDidStop:(CAAnimation *)anim finished:(BOOL)flag// 監聽動畫停止
    {
        [self partOfTheSpringGroupShaking];
    }
2.撤場動畫
撤場動畫就相對簡單很多, 由於撤場方式是統一的,只需要對撤出坐標做處理,然後removeFromSuperview
- (void)dismissAnimationForRootView:(UIView *)view
{
   [UIView animateWithDuration:0.5 animations:^{
       _animationView.center = CGPointMake(WindowCenter.x, MyHeight + 1000);
   } completion:^(BOOL finished) {
       [view removeFromSuperview];
   }];
}
3.選項點擊動畫
當點擊動畫效果被開啟時,才會調用這個方法,即enableClickEffect = YES時, SKPopViewCollectionViewCell中會調用點擊動畫
- (void)setEnableClickEffect:(BOOL)enableClickEffect
{
    _enableClickEffect = enableClickEffect;
    if (enableClickEffect == YES) {
        SKPopAnimationManage * animationManage = [[SKPopAnimationManage alloc] init];
        [animationManage clickEffectAnimationForView:self.basementView];
    }
}
而在SKPopAnimationManger中,我們只是巧妙的對其做了一個縮放的效果,即可達到果凍式的觸感
- (void)clickEffectAnimationForView:(UIView *)view
{
    CABasicAnimation * scaleAnimation = [CABasicAnimation animationWithKeyPath:@"transform.scale"];
    scaleAnimation.fromValue = [NSNumber numberWithFloat:1];
    scaleAnimation.toValue = [NSNumber numberWithFloat:0.8];
    scaleAnimation.duration = 0.1;
    scaleAnimation.timingFunction = [CAMediaTimingFunction functionWithName:kCAMediaTimingFunctionEaseInEaseOut];
    [view.layer addAnimation:scaleAnimation forKey:nil];
}
感謝你花時間閱讀以上內容, 如果這個項目能夠幫助到你,記得告訴我
Email: [email protected]
或者直接在文章下留言哦~
- git 設置不需要輸入密碼, 去除 fetch / pull 代碼每次都需要輸入密碼的煩惱
- UICollectionView代碼創建.以及和 TableView 的區別
- 代碼簽名的價值是什麼?
- iOS DropDown下拉按鈕效果代碼分享
- iOS輕點、觸摸和手勢代碼開辟
- 值得珍藏的iOS開辟經常使用代碼塊
- Objective-C 代碼與Javascript 代碼互相挪用實例
- Xcode進步開辟效力的代碼塊分享
- iOS開辟之(APNS)長途推送完成代碼 附證書與真機調試
- 僅幾行iOS代碼限制TextField輸出長度
- 手把手教你完成微信藐視頻iOS代碼完成
- iOS經常使用加密算法引見和代碼理論
- iOS用兩行代碼完善處理數據耐久化
- 用iOS代碼獲得APP啟動頁圖片
- IOS代碼筆記之勾選記住暗碼全體button


