iOS 多線程(二)NSThread
iOS 使用NSThread來代表線程,創建新線程也就是創建一個NSThread對象。
1 創建和啟動線程
在iOS10之前提供了兩種方法開啟線程。
- (instancetype)initWithTarget:(id)target selector:(SEL)selector object:(nullable id)argument NS_AVAILABLE(10_5, 2_0);
+ (void)detachNewThreadSelector:(SEL)selector toTarget:(id)target withObject:(nullable id)argument;
第一種方法是實例方法,返回一個NSThread對象,必須調用start方法來啟動線程。
第二種方法是類方法,不會返回NSThread對象,直接創建並啟動線程。
iOS10增加了兩種創建啟動線程的方法
- (instancetype)initWithBlock:(void (^)(void))block API_AVAILABLE(macosx(10.12), ios(10.0), watchos(3.0), tvos(10.0));
+ (void)detachNewThreadWithBlock:(void (^)(void))block API_AVAILABLE(macosx(10.12), ios(10.0), watchos(3.0), tvos(10.0));
這兩個方法與上述類似,也是一個實例方法,一個類方法。只是執行方法體不一樣了。
具體使用如下:
#import "ZPYViewController.h"

@interface ZPYViewController ()

@end

@implementation ZPYViewController

- (void)viewDidLoad {
    [super viewDidLoad];
    // Do any additional setup after loading the view, typically from a nib.

    [self makeThread1beforeIOS10];
    [self makeThread2beforeIOS10];
    [self makeThread1FromIOS10];
    [self makeThread2FromIOS10];
}
-(void)run{
    for(int i=0;i<10;i++){
        NSLog(@"%@,----i=%d",[NSThread currentThread],i);
        NSLog(@"isMainThread=%d",[NSThread isMainThread]);
    }
}

//iOS 10 之前NSThread兩種方法創建線程。如下:
-(void) makeThread1beforeIOS10{
    //第一種創建方式 實例方法 最多可以傳一個參數
    NSThread *thread1 = [[NSThread alloc] initWithTarget:self selector:@selector(run) object:nil];
    [thread1 setName:@"fisrt blood"];
    //啟動線程
    [thread1 start];
    BOOL isMain = [NSThread isMainThread];
    NSLog(@"isMain=%d,thread1=%d",isMain,[thread1 isMainThread]);
}
//第二種創建方式 類方法。 最多可以傳一個參數
-(void) makeThread2beforeIOS10{
    //類方法,不會返回NSThread對象,直接啟動線程
    [NSThread detachNewThreadSelector:@selector(run) toTarget:self withObject:nil];
}
//iOS 10又添加了兩個方法創建線程。
// 需要iOS 10 才可以運行下面兩個方法。否則會出錯。
//第三種創建方式 實例方法
-(void) makeThread1FromIOS10{
    NSThread *thread3 = [[NSThread alloc] initWithBlock:^{
        for(int i=0;i<10;i++){
            NSLog(@"%@,第三種 i=%d",[NSThread currentThread],i);
        }
    }];
    thread3.name = @"triple kill";
    //調用start方法啟動線程
    [thread3 start];
}
//第四種創建方式 類方法
-(void) makeThread2FromIOS10{
    //類方法,不會返回NSThread對象,直接啟動線程
    [NSThread detachNewThreadWithBlock:^{
        for(int i=0;i<10;i++){
            NSLog(@"%@,第四種 i=%d",[NSThread currentThread],i);
        }
    }];
}
@end
2 常用方法
主線程相關:
+ (NSThread *)mainThread; // 獲得主線程
- (BOOL)isMainThread; // 是否為主線程
+ (BOOL)isMainThread; // 是否為主線程
其他方法:
獲得當前線程
NSThread *current = [NSThreadcurrentThread];
線程的調度優先級
+ (double)threadPriority;
+ (BOOL)setThreadPriority:(double)p;
- (double)threadPriority;
- (BOOL)setThreadPriority:(double)p;
調度優先級的取值范圍是0.0 ~ 1.0,默認0.5,值越大,優先級越高
自己開發時,建議一般不要修改優先級
線程的名字
- (void)setName:(NSString *)n;
- (NSString *)name;
3 線程的狀態
NSThread *thread1 = [[NSThreadalloc]initWithTarget:selfselector:@selector(run)object:nil];
//啟動線程
[thread1 start];

五種狀態:新建、就緒、運行、阻塞、死亡。
新建:當程序建立一個線程後,該線程就處於新建狀態,此時它和其他OC對象一樣,僅僅有系統分配了內存,初始化了成員變量。
就緒:當線程對象調用start方法後,該線程處於就緒狀態。處於該狀態的線程並沒有開始運行,至於何時運行,取決於系統的調度。
運行:當系統調度到該線程時,進入運行狀態。調用到其他線程則該線程就又重新回到就緒狀態。
阻塞:當線程調用了sleep方法或等待同步鎖時進入阻塞狀態。
死亡:當線程執行完畢,或異常/強制退出,則該線程進入死亡狀態。
啟動線程
- (void)start;//進入就緒狀態-> 運行狀態。當線程任務執行完畢,自動進入死亡狀態
阻塞(暫停)線程
+ (void)sleepUntilDate:(NSDate *)date;
+ (void)sleepForTimeInterval:(NSTimeInterval)ti;
// 進入阻塞狀態
強制停止線程
+ (void)exit;
// 進入死亡狀態
注意:一旦線程停止(死亡)了,就不能再次開啟任務
4 停止線程
有時我們需要將子線程結束,這該怎麼辦呢?
線程結束方式又三種:
1 線程執行體方法執行完成,線程正常結束。
2 線程執行過程中發生了異常。
3 調用NSThread的exit方法類停止當前正在執行的線程。
由於exit方法為類方法,所以只能停止正在執行的線程。
我們可以在主線程或者其他線程中調用[thread cancel]。而子線程的執行體中可以判斷是否cancel來停止線程。
//結束線程
    if([[NSThread currentThread] isCancelled]){
        [NSThread exit];
    }
5 多線程安全
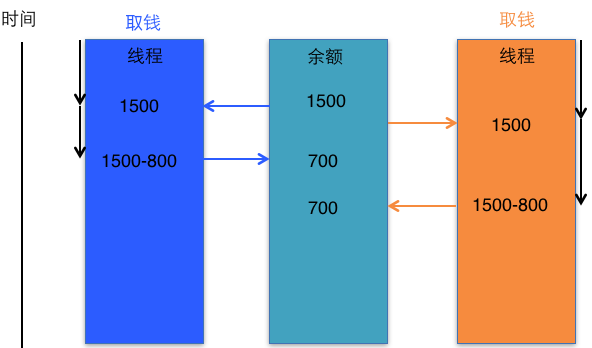
在多線程中,必然會涉及到線程安全點問題,比如資源共享(多個線程訪問同一個對象、同一個變量、同一個文件),這時很容易發生數據錯亂、數據安全問題。
如下經典問題,取錢

如上圖:1500取出1600,還剩余700,這樣顯然是不合理的(雖然對於用戶來說很樂意了)。
-(void)takeMoney:(NSNumber *)count{
    [_account take:count.doubleValue];
}
- (IBAction)actionTest:(id)sender {
    _account = [[ZPYAccount alloc] initWithCardId:@"1234567" andBalance:1500];
    NSThread *thread1 = [[NSThread alloc] initWithTarget:self selector:@selector(takeMoney:) object:[NSNumber numberWithInt:800]];
    [thread1 setName:@"first thread"];
    NSThread *thread2 = [[NSThread alloc] initWithTarget:self selector:@selector(takeMoney:) object:[NSNumber numberWithInt:800]];
    [thread2 setName:@"second thread"];
    [thread1 start];
    [thread2 start];
}
兩個線程去做取錢的操作。
ZPYAccount中的take方法:
-(void)take:(double)count{
    double money = _balance;
    if(count <= money){
        [NSThread sleepForTimeInterval:0.001];
        _balance = money - count;
        NSLog(@"thread:%@,取錢成功,余額為%f",[[NSThread currentThread] name],_balance);
        }else{
            NSLog(@"thread:%@,余額不足!",[[NSThread currentThread] name]);
        }
}
輸出如下:
2016-10-11 11:40:09.052 NSThread使用[553:386755] thread:second thread,取錢成功,余額為700.000000
2016-10-11 11:40:09.051 NSThread使用[553:386754] thread:first thread,取錢成功,余額為700.000000
1 @synchronized實現同步:
-(void)take:(double)count{
    @synchronized (self) {
        //將需要同時執行的放入同步代碼塊中。查錢、取錢。
        double money = _balance;
        if(count <= money){
            [NSThread sleepForTimeInterval:0.001];
            _balance = money - count;
            NSLog(@"thread:%@,取錢成功,余額為%f",[[NSThread currentThread] name],_balance);
        }else{
            NSLog(@"thread:%@,余額不足!",[[NSThread currentThread] name]);
        }
    }
}
打印:
2016-10-11 18:45:52.135 NSThread使用[556:387839] thread:first thread,取錢成功,余額為700.000000
2016-10-11 18:45:52.137 NSThread使用[556:387840] thread:second thread,余額不足!
這樣就合理了,當余額不足時就不再讓取錢,並且余額也沒有問題。
2 NSLock 同步鎖
使用NSLock也可以保證線程安全。
_lock = [[NSLockalloc]init];
-(void)takelock:(double)count{
    [_lock lock];
    double money = _balance;
    if(count <= money){
        [NSThread sleepForTimeInterval:0.001];
        _balance = money - count;
        NSLog(@"thread:%@,取錢成功,余額為%f",[[NSThread currentThread] name],_balance);
    }else{
        NSLog(@"thread:%@,余額不足!",[[NSThread currentThread] name]);
    }
    [_lock unlock];
}
打印:
2016-10-11 18:52:09.216 NSThread使用[559:388860] thread:first thread,取錢成功,余額為700.000000
2016-10-11 18:52:09.217 NSThread使用[559:388861] thread:second thread,余額不足!


