IOS-—UICollectionView使用綜述(一 )(基礎篇--垂直列表方式,橫向相冊方式)
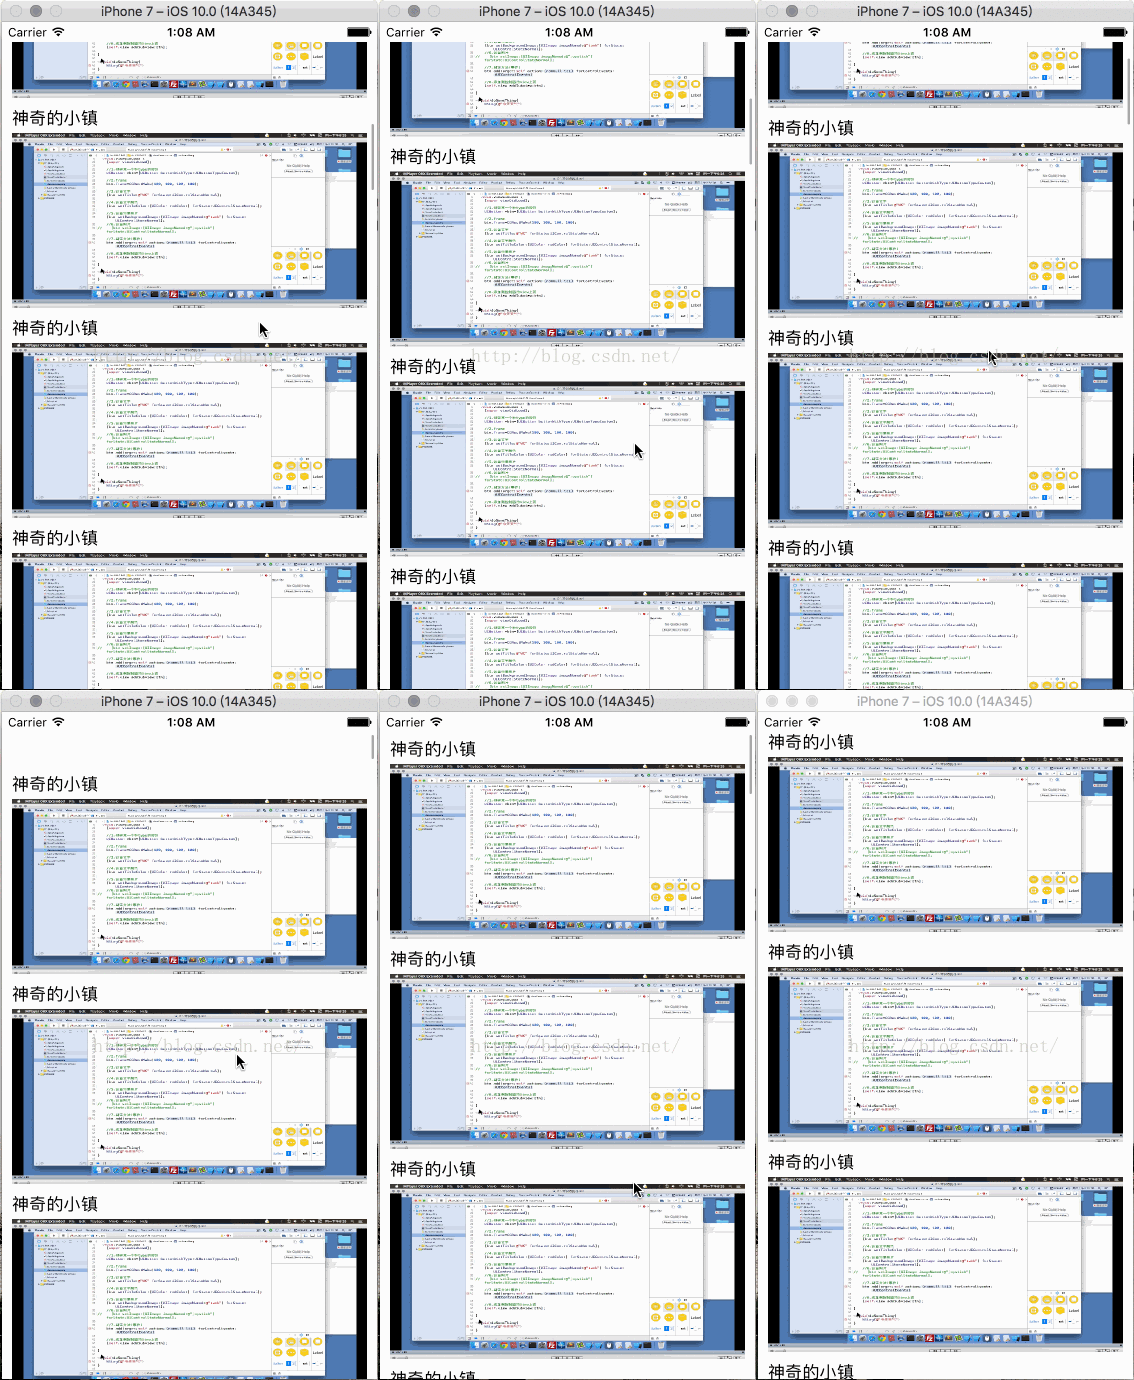
效果展示 :
1、簡述
這裡使用的是UICollectionView來實現的這種效果
2、storyboard與自定義cell方式實現
基本實現思路是:使用storyboard布局方式(結合自定義CellView)來實現列表展示數據2.1 首先定義storyboard文件中的內容
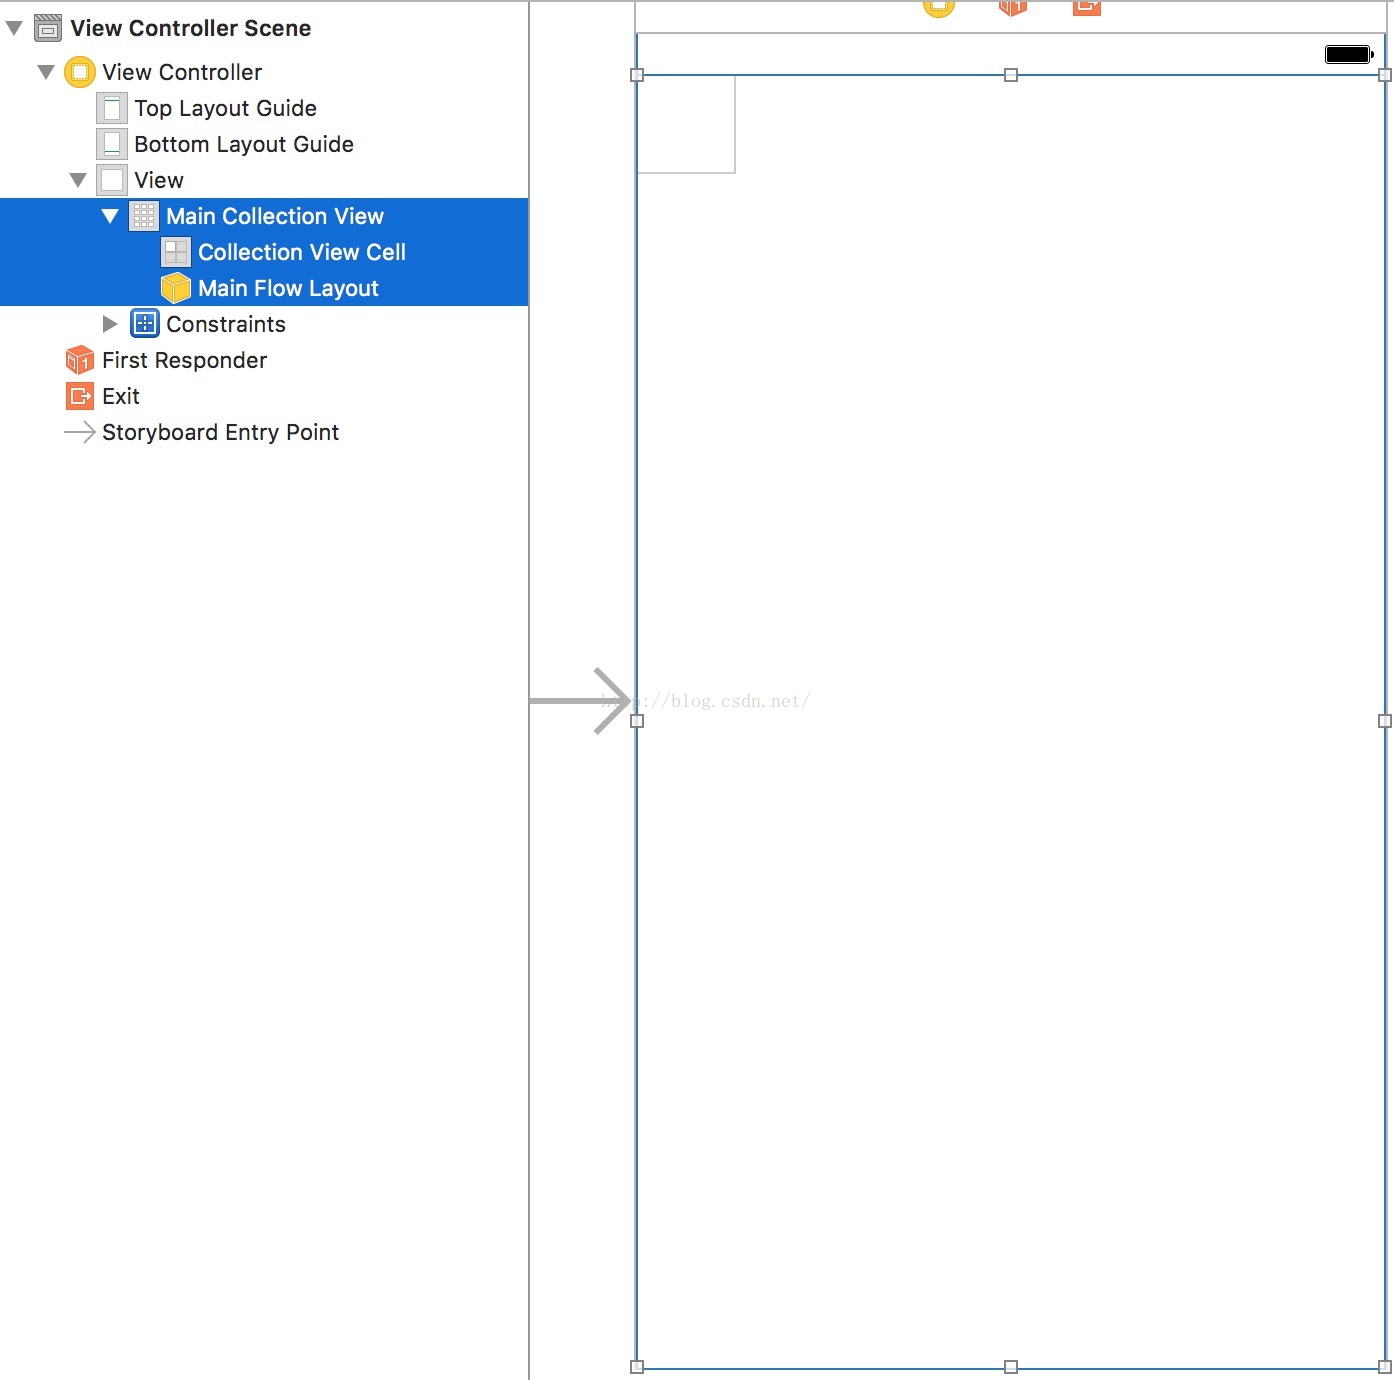
在這裡,我們在主視圖中直接拖入一個UICollcetionView控件,其實它就相當一個容器,同時它會被默認設置一種流水方式的布局格式 UICollectionViewFlowLayout
在對應的主視圖控制器中分別設置 對應的UICollectionView 和UICollcetionViewFlowLayout的引用
2.2、自定義CellView展示條目
創建AppCell.h文件 ,繼承於UICollcetionViewCell
在AppCell.m文件中實現初始化方法
#import "AppCell.h"

@implementation AppCell

-(instancetype)initWithFrame:(CGRect)frame{
    if (self = [super initWithFrame:frame]) {
        //1、獲取Cell的Size
        CGSize cellSize = self.contentView.frame.size;
        //2、添加一個顯示標題的Title
        //2.1、創建Label
        UILabel *titleLabel = [[UILabel alloc]initWithFrame:CGRectMake(0, 0, cellSize.width, 20)];
        //2.2、設置默認顯示標題
        titleLabel.text=@"神奇的小鎮";
        //2.3、添加到Cell中去
        [self.contentView addSubview:titleLabel];


        //3、添加一個ImageView顯示圖片
        //3.1、創建ImageView
        UIImageView *imageView =[[UIImageView alloc]initWithFrame:CGRectMake(0,25, cellSize.width, cellSize.height-25)];
        //3.2、設置默認顯示的圖片
        imageView.image = [UIImage imageNamed:@"aqs"];
        //3.3、添加到Cell中
        [self.contentView addSubview:imageView];

    }
    return self;
}
可以看到在這個自定義的Cell中,添加了一個用於顯示圖片的UIImageView 和一個用於顯示文字標題的UILabel,也就是說當我們的條目內容比較復雜的時候,可以使用這種方式來設置添加
2.3、設置視圖顯示
#import "ViewController.h" #import "AppCell.h" @interface ViewController ()//對應storyboard中的UICollcetionView @property (weak, nonatomic) IBOutlet UICollectionView *mainCollectionView; //對應storyboard中UICollectionView 中的流水布局FlowLayout @property (weak, nonatomic) IBOutlet UICollectionViewFlowLayout *mainFlowLayout; @end //重用標識符 static NSString *ident=@"cell"; @implementation ViewController - (void)viewDidLoad { [super viewDidLoad]; //設置代理 self.mainCollectionView.dataSource = self; //注冊Cell [self.mainCollectionView registerClass:[AppCell class] forCellWithReuseIdentifier:ident]; //設置Item的大小 self.mainFlowLayout.itemSize = CGSizeMake(self.view.frame.size.width-20, 200); } //組 -(NSInteger)numberOfSectionsInCollectionView:(UICollectionView *)collectionView{ return 1; } //列 -(NSInteger)collectionView:(UICollectionView *)collectionView numberOfItemsInSection:(NSInteger)section{ return 30; } //視圖 -(UICollectionViewCell *)collectionView:(UICollectionView *)collectionView cellForItemAtIndexPath:(NSIndexPath *)indexPath{ AppCell *cell =[collectionView dequeueReusableCellWithReuseIdentifier:ident forIndexPath:indexPath]; if (cell == nil) { cell = [[AppCell alloc]init]; } cell.backgroundColor = [UIColor colorWithRed:248 green:248 blue:248 alpha:1]; return cell; } @end
2.3.1 視圖引用
首先在這裡定義聲明了mainCollectionView引用 和 mainFlowLayout引用,其分別指向第一步中創建的storyboard文件中的UICollectionView 與UICollectionView中對應的流水布局UICollectionViewFlowLayout
每一個UICollectionView必然對應一個布局方式,其指定了UICollectionView中的Item的排列方式
在這裡默認設置了UICollectionViewFlowLayout流水式布局方式
2.3.2 UICollectionView的相關設置
在4.1中我們談到在storyboard中默認設置了一個流水布局方式,如果我們是在使用代碼創建,那麼必須定義設置一種布局方式,否則會拋出異常;
同時也必須將UICollectionView中對應的Cell條目類型進行注冊,否則會拋出指定異常
在上面我們還設置了UICollectionView的條目顯示大小 ,如果不進行設置,那麼其默認顯示大小 為 50 X 50
2.3.3 UICollectionView分組支持
UICollcetionView同時支持分組顯示功能 ,與UITableView的功能相似
3、storyboard與自定義xib方式實現
使用UICollectionView 與 自定義xib方式來實現的列表展示
其次這裡使用的是storyboard文件方式定義規劃的布局
3.1 自定義條目Cell 對應的XIB文件
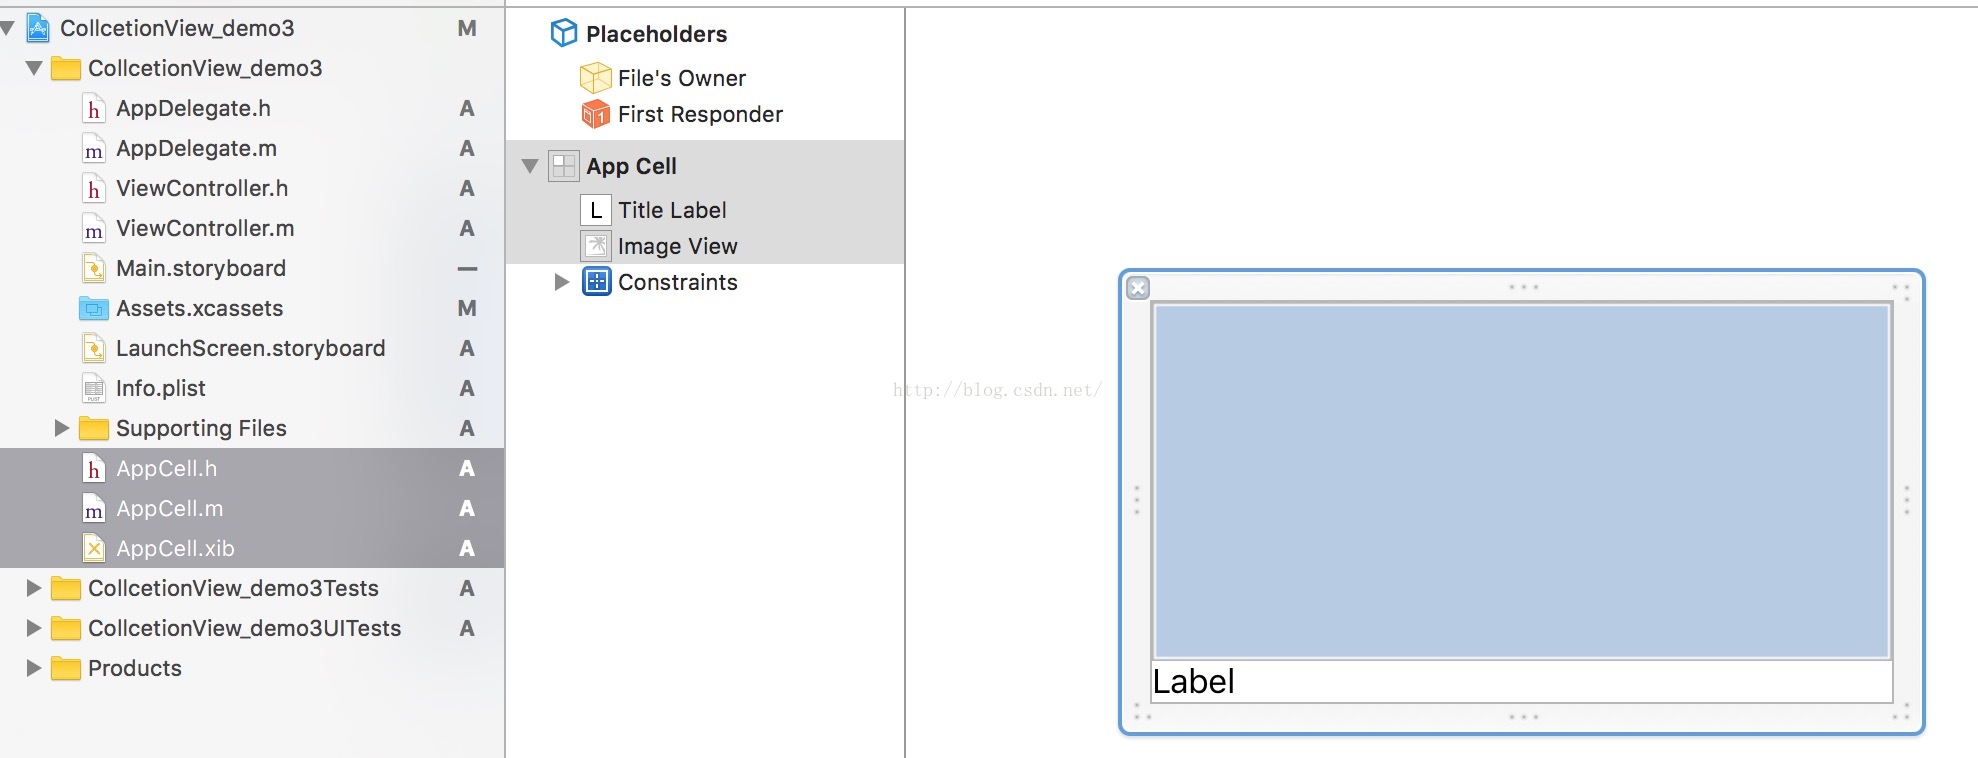
3.1.1 在xib文件中,對應了控制器AppCell
3.1.2 xib文件中分別設置規劃了一個用於顯示圖片的UIImageView 和一個用於顯示圖片標題的 UILabel
3.1.3 對應的控制器中也設置了相應的控件引用
AppCell.h 中
#import "AppCell.h"

@interface AppCell ()
@property (weak, nonatomic) IBOutlet UIImageView *imageView;
@property (weak, nonatomic) IBOutlet UILabel *titleLabel;

@end

@implementation AppCell

- (void)awakeFromNib {
    [super awakeFromNib];
    // Initialization code
}

-(void)setImagPath:(NSString *)imagPath{
    _imagPath = imagPath;
    //設置ImageView
    self.imageView.image = [UIImage imageNamed:imagPath];
    //設置顯示標題
    self.titleLabel.text = @"this is a text";
}

@end
可以看到在這裡重寫了imagPath的set方法,也就是說當調用appCell.imagPath時候,會執行到setImagPath方法,在這個方法中就將對應的數據設置顯示到對應的控件上。
3.2UICollectionView的相關設置
#import "ViewController.h" #import "AppCell.h" @interface ViewController ()//對應storyboard中的UICollcetionView @property (weak, nonatomic) IBOutlet UICollectionView *mainCollcetionView; //對應storyboard中UICollectionView 中的流水布局FlowLayout @property (weak, nonatomic) IBOutlet UICollectionViewFlowLayout *mainFlowLayout; @end //cell重用標識符 static NSString *ident=@"cell"; @implementation ViewController - (void)viewDidLoad { [super viewDidLoad]; //設置Item的大小 self.mainFlowLayout.itemSize = CGSizeMake(self.view.frame.size.width-20, 180); //設置代理 self.mainCollcetionView.dataSource = self; //注冊Cell UINib *cellNib = [UINib nibWithNibName:@"AppCell" bundle:nil]; [self.mainCollcetionView registerNib:cellNib forCellWithReuseIdentifier:ident]; } //組 -(NSInteger)numberOfSectionsInCollectionView:(UICollectionView *)collectionView{ return 1; } //列 -(NSInteger)collectionView:(UICollectionView *)collectionView numberOfItemsInSection:(NSInteger)section{ return 30; } -(UICollectionViewCell *)collectionView:(UICollectionView *)collectionView cellForItemAtIndexPath:(NSIndexPath *)indexPath{ AppCell *cell =[collectionView dequeueReusableCellWithReuseIdentifier:ident forIndexPath:indexPath]; if (cell == nil) { cell = [[AppCell alloc]init]; } //設置背景 cell.backgroundColor = [UIColor colorWithRed:248 green:248 blue:248 alpha:1]; //設置顯示數據 cell.imagPath = @"aqs"; return cell; } @end
3.2.1 我們在使用UICollectionView的時候必須要對條目CellView進行注冊設置,而在這裡,則是先獲取對應的UINib,然後再調用UINib對應的方法對其進行注冊
3.2.2 在cellForItemAtIndexPath方法中,我們調用方法 cell.imagPayh 並對其進行賦值操作,會調用到AppCell對應的setImagPath方法,進行對相應的控件進行了賦值操作
- 上一頁:IOS 動畫設計(4)——maskView與CAGradientLayer相配合實現蒙板動畫
- 下一頁:IOS-—UICollectionView使用綜述(二 )(基礎篇--畫廊展示圖片,瀑布流展示圖片)

