iOS---KVO(Key Value Observing) 觀察者模式之解析與應用
編輯:IOS開發綜合
一、概述
KVO(Key Value Observing) 觀察者設計模式。通過KVO這種機制對象可以通過它得到其他對象的某個屬性的變更通知。KVO可以讓視圖對象經過控制器觀察模型對象的變更從而做出更新等操作。
KVO提供一種機制,指定一個被觀察對象(例如StockData類),當對象某個屬性(如StockData中的變量 price)發生更改時,對象會獲得通知,並作出相應處理;【且不需要給被觀察的對象添加任何額外代碼,就能使用KVO機制】
在MVC設計模式下,KVO機制很適合實現model模型和view視圖之間的通訊。
二、使用方法
1、注冊觀察者,實施監聽。
     [_stockData addObserver:self forKeyPath:@"price" options:NSKeyValueObservingOptionNew|NSKeyValueObservingOptionOld context:@"我觀察的是name的屬性"]; // 注冊觀察者

// 參數說明:
// object: 被觀察的對象 _stockData
// observer: 觀察對象 self
// forKeyPath: 被監測的那個對象的屬性所在的路勁 如"price"
// optons: 有4個值,分別是:
     // NSKeyValueObservingOptionNew 把更改之前的值提供給處理方法
     // NSKeyValueObservingOptionOld 把更改之後的值提供給處理方法
     // NSKeyValueOpservingOptionInitial 把初始化的值提供給處理方法,一旦注冊,立馬就會調用一次。通常它會帶有新值,而不會帶有舊值。
     // NSKerValueOpservingOptionPrior: 分2次調用。在值改變之前和值改變之後。
// context:可以帶入一些參數,任何類型都可以。強制轉就可以。
2、在回調方法中處理屬性發生的變化
//實現回調方法 - (void)observeValueForKeyPath:(NSString *)keyPath ofObject:(id)object change:(NSDictionary*)change context:(void *)context{ NSLog(@"被監測的那個對象的屬性所在的路勁%@", keyPath); NSLog(@"被觀察者:%@", object); NSLog(@"屬性所在狀態下的值:%@", change); NSLog(@"在注冊觀察者的時候,傳過來的context:%@", context); if ([keyPath isEqualToString:@"price"]) { self.myLabel.text = [[_stockData valueForKey:@"price"] stringValue]; } } // 參數說明 // keyPath對應forKeyPath 被監測的那個對象的屬性所在的路勁 // object:被觀察者的對象 // change:對應options裡的NSKeyValueObservingOptionNew/Old/Initial/Prior 屬性所在狀態下的值 // context:在注冊觀察者的時候,傳過來的context
3、移除觀察者
- (void)dealloc
{
    [self.stockData removeObserver:self forKeyPath:@"price"];
//    [super dealloc]; //開啟ARC 此處不需要調用
    NSLog(@"移除觀察者");
    // 移除觀察者

}
三、代碼實例
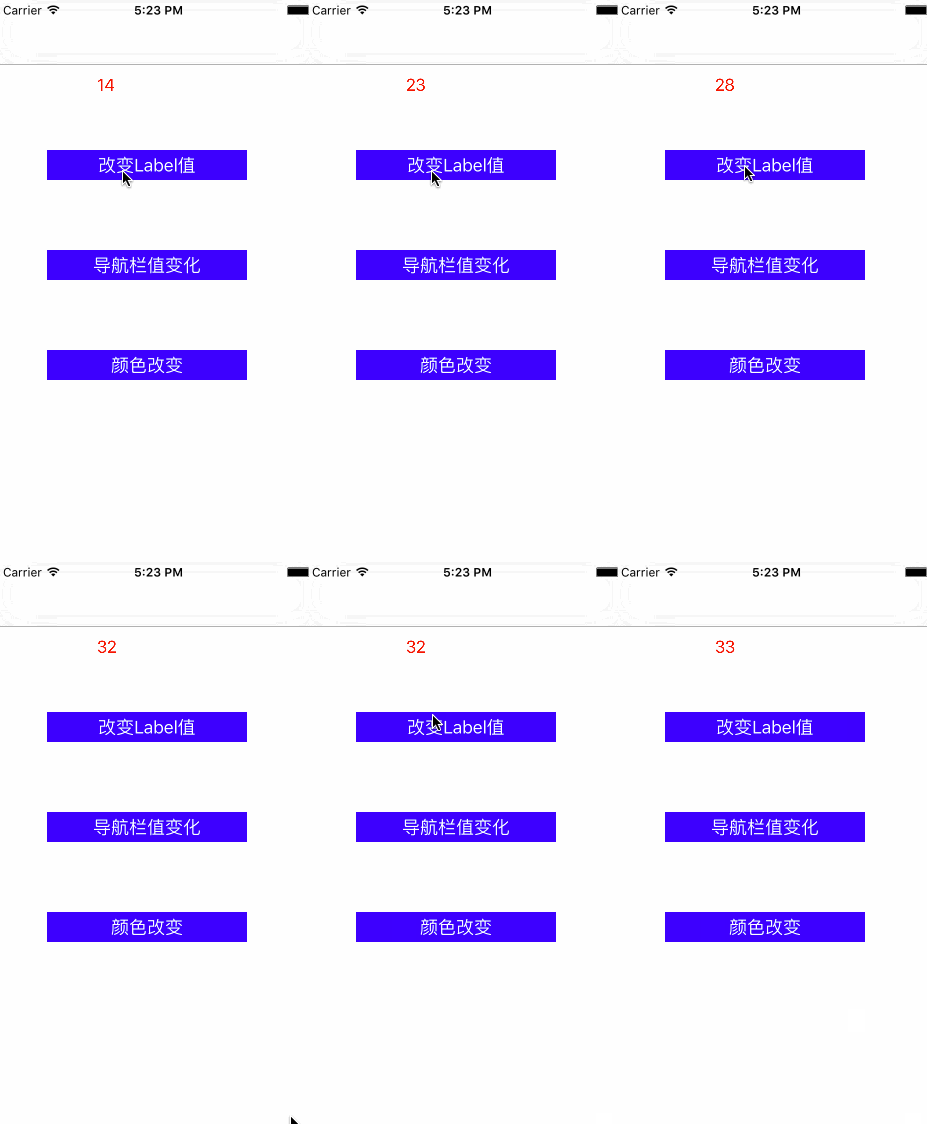
// 1、修改值

 self.stockData = [[StockData alloc] init];
    [_stockData setValue:@"searph" forKey:@"stockName"]; // 這邊使用KVC修改值
    [_stockData setValue:[NSNumber numberWithFloat:10.0] forKey:@"price"]; // 這邊使用KVC修改值
    [_stockData addObserver:self forKeyPath:@"price" options:NSKeyValueObservingOptionNew|NSKeyValueObservingOptionOld context:@"我觀察的是name的屬性"]; // 注冊觀察者

    self.myLabel = [[UILabel alloc]initWithFrame:CGRectMake(100, 70, 100, 30 )];
    _myLabel.textColor = [UIColor redColor];
    _myLabel.text = [[_stockData valueForKey:@"price"] stringValue];
    [self.view addSubview:_myLabel];

    UIButton * c = [UIButton buttonWithType:UIButtonTypeCustom];
    c.frame = CGRectMake(50, 150, 200, 30);
    [c setTitle:@"改變Label值" forState:UIControlStateNormal];
    c.backgroundColor = [UIColor blueColor];
    [c addTarget:self action:@selector(buttonAction) forControlEvents:UIControlEventTouchUpInside];
    [self.view addSubview:c];
/**
 *  點擊按鈕修改對象值
 */
- (void)buttonAction{
    // 修改屬性值
//    _stockData.price = 20.0;
    self.count++;
    [_stockData setValue:[NSNumber numberWithFloat:10.0 + self.count] forKey:@"price"];

}


//實現回調方法
- (void)observeValueForKeyPath:(NSString *)keyPath ofObject:(id)object change:(NSDictionary *)change context:(void *)context{
    NSLog(@"被監測的那個對象的屬性所在的路勁%@", keyPath);
    NSLog(@"被觀察者:%@", object);
    NSLog(@"屬性所在狀態下的值:%@", change);
    NSLog(@"在注冊觀察者的時候,傳過來的context:%@", context);

    if ([keyPath isEqualToString:@"price"]) {
        self.myLabel.text = [[_stockData valueForKey:@"price"] stringValue];
    }


    // 打印結果
    /**
     2016-08-26 14:39:09.093 YJKVODemo[7342:816462] 被監測的那個對象的屬性所在的路勁price
     2016-08-26 14:39:09.093 YJKVODemo[7342:816462] 被觀察者:
     2016-08-26 14:39:09.093 YJKVODemo[7342:816462] 屬性所在狀態下的值:{
     kind = 1;
     new = 20;
     old = 10;
     }
     2016-08-26 14:39:09.093 YJKVODemo[7342:816462] 在注冊觀察者的時候,傳過來的context:我觀察的是name的屬性
     */
}

// dealloc移除觀察者
- (void)dealloc
{
    [self.stockData removeObserver:self forKeyPath:@"price"];
//    [super dealloc]; //開啟ARC 此處不需要調用
    NSLog(@"移除觀察者");
    // 移除觀察者

}
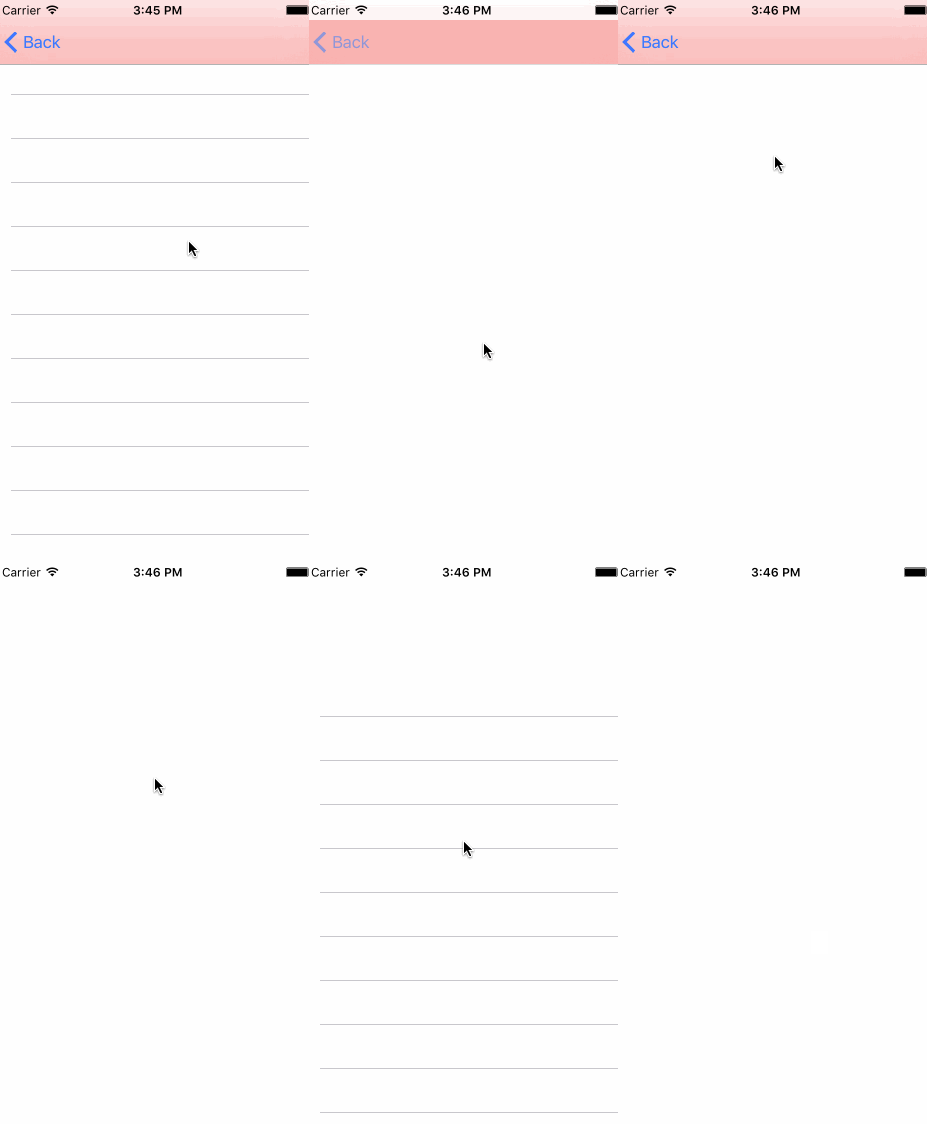
// 2、導航欄顏色漸變 TestViewController

- (void)viewDidLoad {
    [super viewDidLoad];
    self.view.backgroundColor = [UIColor whiteColor];

    // 注冊觀察者
    [self.tableView addObserver:self forKeyPath:@"contentOffset" options:NSKeyValueObservingOptionNew|NSKeyValueObservingOptionOld context:nil];
    self.navigationController.navigationBar.backgroundColor = [UIColor redColor];

}

/**
 *  監聽屬性值發送改變時回調
 *
 *  @param keyPath 被觀察者的屬性路勁
 *  @param object  監聽者
 *  @param change  改變的值
 *  @param context 傳過來的值
 */
- (void)observeValueForKeyPath:(NSString *)keyPath ofObject:(id)object change:(NSDictionary *)change context:(void *)context
{
    NSLog(@"被監測的那個對象的屬性所在的路勁%@", keyPath);
    NSLog(@"被觀察者:%@", object);
    NSLog(@"屬性所在狀態下的值:%@", change);
    NSLog(@"在注冊觀察者的時候,傳過來的context:%@", context);

    CGFloat offset = self.tableView.contentOffset.y;
    CGFloat delta = offset / 64.f + 1.f;

    delta = MAX(0, delta);
    self.navigationController.navigationBar.alpha = MIN(1, delta);

    NSLog(@"offset = %f--delta = %f", offset, delta);
}
- (void)dealloc
{
    // 移除 觀察者
    [self.tableView removeObserver:self forKeyPath:@"contentOffset"];
}
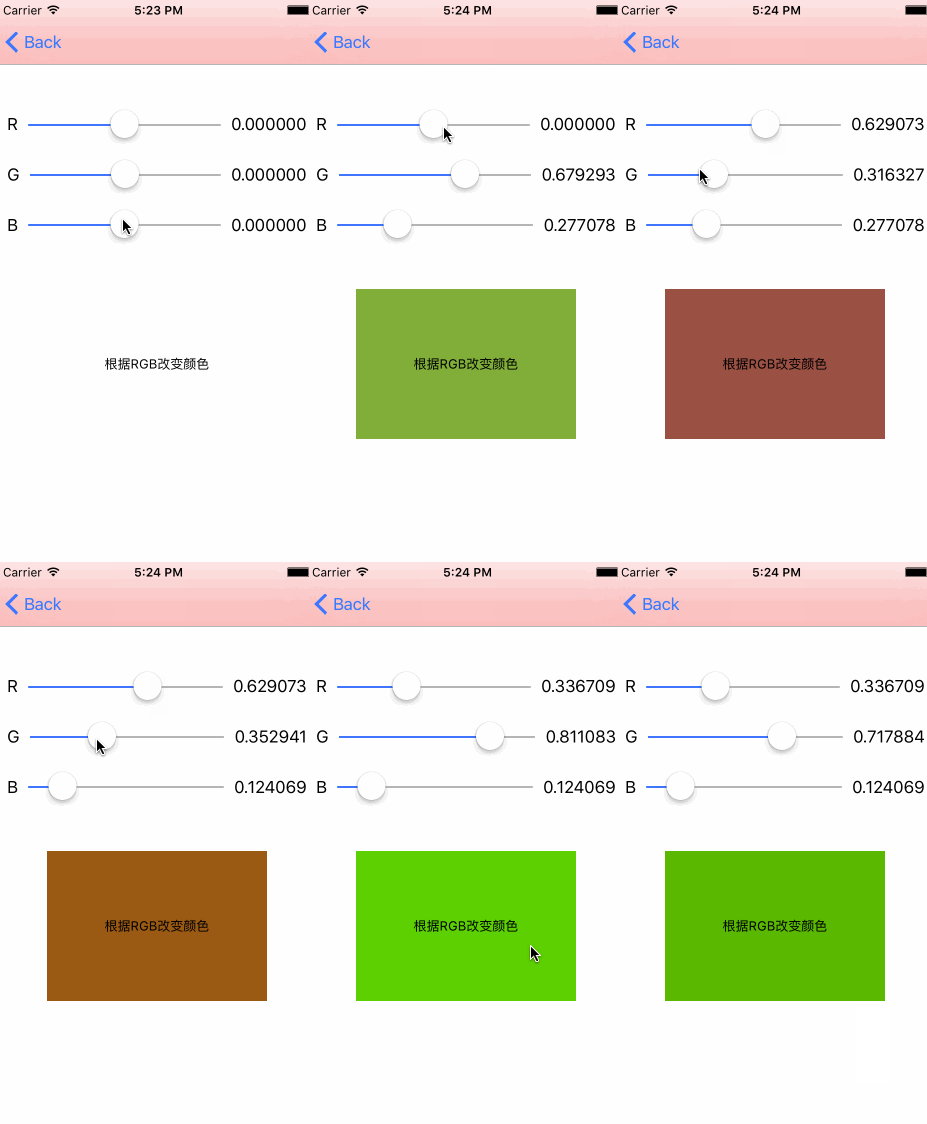
// 3、RGB 顏色變化 ChangeColorViewController

//
//  ChangeColorViewController.m
//  YJKVODemo
//
//  Created by GongHui_YJ on 16/8/26.
//  Copyright ? 2016年 YangJian. All rights reserved.
//

#import "ChangeColorViewController.h"

@interface ChangeColorViewController ()

@property (weak, nonatomic) IBOutlet UISlider *RSider;
@property (weak, nonatomic) IBOutlet UISlider *GSider;
@property (weak, nonatomic) IBOutlet UISlider *BSider;

@property (weak, nonatomic) IBOutlet UILabel *RLabel;
@property (weak, nonatomic) IBOutlet UILabel *GLabel;
@property (weak, nonatomic) IBOutlet UILabel *BLabel;

@property (weak, nonatomic) IBOutlet UILabel *backgroundChangeLabel;

@property (strong, nonatomic) UIColor *changeColor;

@end

@implementation ChangeColorViewController

- (void)viewDidLoad {
    [super viewDidLoad];
    [self.RSider addTarget:self action:@selector(rsiderAtion:) forControlEvents:UIControlEventValueChanged];
    [self.GSider addTarget:self action:@selector(gsiderAction:) forControlEvents:UIControlEventValueChanged];
    [self.BSider addTarget:self action:@selector(bsiderAction:) forControlEvents:UIControlEventValueChanged];

    // 注冊觀察者
    [self addObserver:self forKeyPath:@"changeColor" options:NSKeyValueObservingOptionInitial context:nil];
}

- (void)rsiderAtion:(UISlider *)sider{
    self.changeColor = [UIColor colorWithRed:sider.value green:self.GSider.value blue:self.BSider.value alpha:1];
    self.RLabel.text = [NSString stringWithFormat:@"%f", sider.value];
}

- (void)gsiderAction:(UISlider *)sider{
    self.changeColor = [UIColor colorWithRed:self.RSider.value green:sider.value blue:self.BSider.value alpha:1];
    self.GLabel.text = [NSString stringWithFormat:@"%f", sider.value];
}

- (void)bsiderAction:(UISlider *)sider{
    self.changeColor = [UIColor colorWithRed:self.RSider.value green:self.GSider.value blue:sider.value alpha:1];
    self.BLabel.text = [NSString stringWithFormat:@"%f", sider.value];
}

/**
 *  回調改變
 *
 *  @param keyPath <#keyPath description#>
 *  @param object  <#object description#>
 *  @param change  <#change description#>
 *  @param context <#context description#>
 */
- (void)observeValueForKeyPath:(NSString *)keyPath ofObject:(id)object change:(NSDictionary *)change context:(void *)context
{
    if ([keyPath isEqualToString:@"changeColor"]) {
        self.backgroundChangeLabel.backgroundColor = self.changeColor;
    } else {
        [super observeValueForKeyPath:keyPath ofObject:object change:change context:context];
    }
}


- (void)dealloc
{
    // 移除觀察者
    [self removeObserver:self forKeyPath:@"changeColor"];
}

- (void)didReceiveMemoryWarning {
    [super didReceiveMemoryWarning];
    // Dispose of any resources that can be recreated.
}

/*
#pragma mark - Navigation

// In a storyboard-based application, you will often want to do a little preparation before navigation
- (void)prepareForSegue:(UIStoryboardSegue *)segue sender:(id)sender {
    // Get the new view controller using [segue destinationViewController].
    // Pass the selected object to the new view controller.
}
*/

@end
四、小結
今天對KVO進一步的深入理解,但在實際開發中用的也不多,一般為model層對controller和view進行的改變值。用起來還是蠻簡單,只要三步。
相關文章
+


