CoreText:實現圖文混排、點擊圖片功能(Swift)
編輯:IOS開發綜合
CoreText實現圖文混排其實就是在富文本中插入一個空白的富文本字符串作為圖片占位符,通過代理設置相關的圖片尺寸信息,根據從富文本得到的frame計算圖片繪制的frame然後再繪制圖片的過程。
具體分析: Core Text本身並不支持圖片繪制,圖片的繪制你還得通過Core Graphics來進行。只是Core Text可以通過CTRun的設置為你的圖片在文本繪制的過程中留出適當的空間。這個設置就使用到CTRunDelegate了,CTRunDelegate作為CTRun相關屬性或操作擴展的一個入口,使得我們可以對CTRun做一些自定義的行為。為圖片留位置的方法就是加入一個空白的CTRun,自定義其ascent,descent,width等參數,使得繪制文本的時候留下空白位置給相應的圖片。然後圖片在相應的空白位置上使用Core Graphics接口進行繪制。
使用CTRunDelegateCreate可以創建一個CTRunDelegate,它接收兩個參數,一個是callbacks結構體,一個是所有callback調用的時候需要傳入的對象。callbacks的結構體為CTRunDelegateCallbacks,主要是包含一些回調函數,比如有返回當前run的ascent,descent,width這些值的回調函數,至於函數中如何鑒別當前是哪個run,可以在CTRunDelegateCreate的第二個參數來達到目的,因為CTRunDelegateCreate的第二個參數會作為每一個回調調用時的入參。
CoreText與UIWebView在排版方面的優劣比較 在日常的開發中,對於圖文混排,大部分情況下會選擇使用UIWebView進行操作,這樣我們客戶端開發就相對簡單了,但是如果我們想要較好的性能效果,我們就要能夠自己進行圖文混排,那麼在性能上就要好很多了,看看巧哥的分析: UIWebView也常用於處理復雜的排版,對應排版他們之間的優劣如下:
CoreText占用的內容更少,渲染速度更快。UIWebView占用的內存多,渲染速度慢。
CoreText在渲染界面的前就可以精確地獲得顯示內容的高度(只要有了CTFrame即可),而WebView只有渲染出內容後,才能獲得內容的高度(而且還需要用JavaScript代碼來獲取)。
CoreText的CTFrame可以在後台線程渲染,UIWebView的內容只能在主線程(UI線程)渲染。 基於CoreText可以做更好的原生交互效果,交互效果可以更加細膩。而UIWebView的交互效果都是用JavaScript來實現的,在交互效果上會有一些卡頓的情況存在。例如,在UIWebView下,一個簡單的按鈕按下的操作,都無法做出原生按鈕的即時和細膩的按下效果。 CoreText排版的劣勢:
CoreText渲染出來的內容不能像UIWebView那樣方便地支持內容的復制。 基於CoreText來排版需要自己處理很多復制的邏輯,例如需要自己處理圖片與文字混排相關的邏輯,也需要自己實現連接點擊操作的支持。 在業界有很多應用都采用CoreText技術進行排版,例如新浪微博客戶端,多看閱讀客戶端,猿題庫等等。 接下來,在前面繪制純文本的基礎上,實現圖文混排。自定義UIView進行圖文混排顯示,實現支持本地圖片和網絡圖片的顯示,並響應圖片的點擊事件和獲取點擊文字的位置。 具體的代碼實現部分: 1:首先我們看一下自定義UIView中主體代碼實現部分,主要實現圖文混排的一系列相關操作,對於函數部分,會一一說明。
private let ImageName:String = "boy"
private let UrlImageName:String = "http://img3.3lian.com/2013/c2/64/d/65.jpg"

class FirstViewTwo: UIView {

    var image:UIImage?
    var imageFrameArr:NSMutableArray = NSMutableArray()
    var ctFrame: CTFrame?

    override func drawRect(rect: CGRect) {
        super.drawRect(rect)

        //1 獲取上下文
        let context = UIGraphicsGetCurrentContext()

        //2 轉換坐標
        convertCoordinateSystem(context!)

        //3 繪制區域
        let mutablePath = UIBezierPath(rect: rect)

        //4 創建需要繪制的文字並設置相應屬性
        let mutableAttributeString = settingTextAndAttribute()

        //5 為本地圖片設置CTRunDelegate,添加占位符
        addCTRunDelegateWith(ImageName, indentifier: ImageName, insertIndex: 18,attribute: mutableAttributeString)

        //6 為網絡圖片設置CTRunDelegate
        addCTRunDelegateWith(UrlImageName, indentifier: UrlImageName, insertIndex: 35, attribute: mutableAttributeString)

        //7 使用mutableAttributeString生成framesetter,使用framesetter生成CTFrame
        let framesetter = CTFramesetterCreateWithAttributedString(mutableAttributeString)
        let frame = CTFramesetterCreateFrame(framesetter, CFRangeMake(0, mutableAttributeString.length), mutablePath.CGPath, nil)
        ctFrame = frame

        //8 繪制除圖片以外的部分
        CTFrameDraw(frame,context!)

        //9 處理繪制圖片邏輯
        searchImagePosition(frame, context: context!)
  }
}
2:轉換坐標系,非常簡單,直接上代碼,緊接著創建了繪制的區域。
func convertCoordinateSystem(context: CGContextRef){
        CGContextSetTextMatrix(context, CGAffineTransformIdentity)
        CGContextTranslateCTM(context, 0, self.height)
        CGContextScaleCTM(context, 1.0, -1.0)

       // 或者
       //let transform = CGAffineTransform(a: 1, b: 0, c: 0, d: -1, tx: 0, ty:self.bounds.size.height)
       //CGContextConcatCTM(context, transform)
   }
3:設置文字顯示屬性,主要是創建可變屬性字符串(NSMutableAttributedString)對文字進行相關設置,並獲得該可變屬性字符。這部分可以根據自己的需求進行設置
func settingTextAndAttribute()->NSMutableAttributedString{
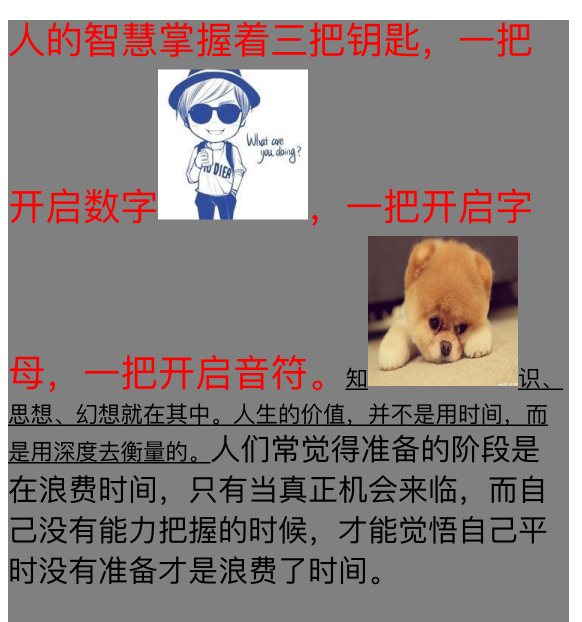
        let attrString = "人的智慧掌握著三把鑰匙,一把開啟數字,一把開啟字母,一把開啟音符。知識、思想、幻想就在其中。人生的價值,並不是用時間,而是用深度去衡量的。人們常覺得准備的階段是在浪費時間,只有當真正機會來臨,而自己沒有能力把握的時候,才能覺悟自己平時沒有准備才是浪費了時間。"

        let mutableAttributeString = NSMutableAttributedString(string: attrString)
        mutableAttributeString.addAttribute(NSFontAttributeName, value: UIFont.systemFontOfSize(20), range: NSMakeRange(0, mutableAttributeString.length))
        mutableAttributeString.addAttributes([NSFontAttributeName:UIFont.systemFontOfSize(25),
            NSForegroundColorAttributeName:UIColor.redColor() ], range: NSMakeRange(0, 33))
        mutableAttributeString.addAttributes([NSFontAttributeName:UIFont.systemFontOfSize(15),NSUnderlineStyleAttributeName: 1], range: NSMakeRange(33,36))

        let style = NSMutableParagraphStyle()
        style.lineSpacing = 6
        mutableAttributeString.addAttributes([NSParagraphStyleAttributeName:style], range: NSMakeRange(0, mutableAttributeString.length))
        return mutableAttributeString
    }
4:為本地、網絡圖片設置CTRunDelegate,這是實現圖文混排的關鍵。在一開始,就指出了CoreText實現圖文混排其實就是在富文本中插入一個空白的富文本字符串作為圖片占位符,通過代理設置相關的圖片尺寸信息,根據從富文本得到的frame計算圖片繪制的frame然後再繪制圖片的過程。對於如何創建CTRunDelegate並設置代理等一系列部分,函數中已經說明。需要關注的一個就是回調結構體CTRunDelegateCallbacks。 CTRunDelegateCallbacks回調結構體,告訴代理該回調那些方法。我們繪制圖片的時候實際上是在一個CTRun中繪制這個圖片,那麼CTRun繪制的坐標系中,會以origin點作為原點進行繪制。基線為過原點的x軸,ascent即為CTRun頂線距基線的距離,descent即為底線距基線的距離。我們通過代理設置CTRun的尺寸間接設置圖片的尺寸,這裡暫時使用默認數據。
func addCTRunDelegateWith(imageStr:String, indentifier:String, insertIndex:Int,attribute:NSMutableAttributedString){
        var imageName = imageStr
        var  imageCallback =  CTRunDelegateCallbacks(version: kCTRunDelegateVersion1, dealloc: { (refCon) -> Void in
                print("RunDelegate dealloc!")
            }, getAscent: { (refCon) -> CGFloat in
                return 100
            }, getDescent: { (refCon) -> CGFloat in
                return 0
        }) { (refCon) -> CGFloat in
                return 100
        }
        //1:設置CTRun的代理,為圖片設置CTRunDelegate,delegate決定留給圖片的空間大小
        let runDelegate  = CTRunDelegateCreate(&imageCallback, &imageName)
        //2:空格用於給圖片留位置
        let imgString = NSMutableAttributedString(string:" ")
        //3:使用rundelegate占一個位置
        imgString.addAttribute(kCTRunDelegateAttributeName as String, value: runDelegate!, range: NSMakeRange(0, 1))
        //4:添加屬性,在CTRun中可以識別出這個字符是圖片
        imgString.addAttribute(indentifier, value: imageName, range: NSMakeRange(0, 1))
        //5:在index處插入圖片
        attribute.insertAttributedString(imgString, atIndex: insertIndex)
    }
5:通過步驟7,8,我們的文本內容已經繪制好了。接下來處理繪制圖片部分,使我們的圖片繪制到對應的地方顯示出來。思路如下:
1:根據當前的CTFrame獲取CTFrame中所有的CTLine,即獲得每一行內容。
2:獲取每一個CTLine的坐標原點,然後對每一個CTLine進行遍歷,獲取對應CTLine中所有的CTRun
3:遍歷CTRun尋找圖片,檢查當前CTRun是不是我們綁定圖片的那個,如果是,根據該CTRun所在CTLine的origin以及CTRun在CTLine中的橫向偏移量計算出CTRun的原點,加上其尺寸即為該CTRun的尺寸大小。
4:通過kvc取得屬性中的代理屬性。接下來判斷代理屬性是否為空。因為圖片的占位符我們是綁定了代理的,而文字沒有。以此區分文字和圖片。如果代理不為空,那麼這就是我們要的那個CTRun。進行後續取值顯示繪制圖片。
 func searchImagePosition(frame: CTFrame, context: CGContextRef){

        let lines = CTFrameGetLines(frame) as Array
        var originsArray = [CGPoint](count:lines.count, repeatedValue: CGPointZero)
        //把frame裡每一行的初始坐標寫到數組裡
        CTFrameGetLineOrigins(frame,CFRangeMake(0, 0),&originsArray)

        //遍歷每一行CTLine
        for i in 0.. 6:繪制圖片,如果能夠進入該方法,說明CTRunDelegateRef代理存在。那麼現在對事先存儲的屬性值進行獲取,如果是本地圖片所對應的CTRun,那麼獲取對應顯示區域大小並進行圖片繪制。而且將對應CTRun的frame添加事先定義的數組中,用於響應圖片點擊。如果是網絡圖片,需要先下載,然後在顯示並調用setNeedsDisplay方法進行刷新。這裡使用NSURLSession下載圖片。func showImageToContextWith(runRect: CGRect,context: CGContextRef,attributes:NSDictionary){

        let image:UIImage?
        let imageDrawRect = CGRectMake(runRect.origin.x, runRect.origin.y, 100, 100)
        imageFrameArr.addObject(NSValue.init(CGRect: imageDrawRect))

        if let imageName = attributes.objectForKey(ImageName) as? String {
             //直接繪制本地圖片
             image = UIImage(named:imageName  as String)
             CGContextDrawImage(context, imageDrawRect, image?.CGImage)
        }else if let urlImageName = attributes.objectForKey(UrlImageName) as? String{
            //網絡圖片的繪制也很簡單如果沒有下載,使用圖占位,然後去下載,下載好了重繪就OK了.
            if self.image == nil{
                image = UIImage(named:"") //灰色圖片占位
                if let url = NSURL(string: urlImageName){
                    let request = NSURLRequest(URL: url)
                     NSURLSession.sharedSession().dataTaskWithRequest(request, completionHandler: { (data, resp, error) -> Void in
                        if let data = data{
                            dispatch_sync(dispatch_get_main_queue(), { () -> Void in
                                self.image = UIImage(data: data)
                                self.setNeedsDisplay()  //下載完成後重繪
                            })
                        }
                    }).resume()
                }
            }else{
                image = self.image
            }
            CGContextDrawImage(context, imageDrawRect, image?.CGImage)
        }
   }

7:最後實現touchesBegan響應對應點擊事件,首先獲取觸摸的點,先進行檢查是否點擊在圖片上,如果在,優先響應圖片事件,如果不在,就響應字符串事件。注意2點:
1:判斷是否是點擊圖片,主要是imageFrameArr數組預先存儲了圖片的frame,在點擊之後遍歷數組,找到對應的圖片的frame,這裡只是簡單使用數組進行學習,真正開發過程中,需要使用對應數據模型然後綁定對應視圖的frame和相應數據,以方便後續事件響應。可以看巧哥為我們提供的例子,這裡。
2:獲取點擊文字的位置,主要是獲取所有的CTLine,然後轉換行起點坐標並與觸摸點進行比較,最後使用CTLineGetStringIndexForPosition方法計算偏移量,得到文字的位置。

//MARK:通過touchBegan方法拿到當前點擊到的點,響應對應的觸摸事件
override func touchesBegan(touches: Set, withEvent event: UIEvent?) {
        let touch = touches.first
        let point = touch?.locationInView(self)
        if let point = point{
            //檢查是否點擊在圖片上,如果在,優先響應圖片事件
            if self.checkIsClickImageViewWith(CGPointMake(point.x, point.y)) {
                return;
            }
        }
        self.checkIsClickStrWith(point!)//響應字符串事件
    }

    //MARK:判斷是否是點擊圖片
    func checkIsClickImageViewWith(point: CGPoint) ->Bool{
        for value in imageFrameArr {
            if let value =  value as? NSValue{
                var imageFrame = value.CGRectValue()
                //在進行判斷之前需要轉換圖片坐標為UIKit坐標
                imageFrame.origin.y = self.height - imageFrame.origin.y - imageFrame.size.height
                if imageFrame.contains(point){
                    print("圖片被點擊了!")
                    return true
                }
            }
        }
        return false
    }

    //MARK:實現獲取點擊的位置文字
    func checkIsClickStrWith(point: CGPoint){

        var location = point
        let lineArr = CTFrameGetLines(ctFrame!)  as NSArray
        let ctLinesArray = lineArr as Array
        var originsArray = [CGPoint](count:ctLinesArray.count, repeatedValue: CGPointZero)
        CTFrameGetLineOrigins(ctFrame!, CFRangeMake(0, 0),&originsArray)

        for i in 0...CFArrayGetCount(lineArr) {
                let origin = originsArray[i]
                //獲取整個CTFrame的大小
                let path = CTFrameGetPath(ctFrame!)
                let rect = CGPathGetBoundingBox(path)

                //坐標轉換,把每行的原點坐標轉換為UIKIt的坐標體系
                let y = rect.origin.y + rect.size.height - origin.y

                //判斷點擊的位置處於那一行范圍內
                if location.y <= y && location.x >= origin.x{
                    let line = lineArr[i] as! CTLineRef
                    //修改偏移量,找到對應的位置
                    location.x -= origin.x
                    let index = CTLineGetStringIndexForPosition(line, location)
                    print("Click index = \(index)")
                    break
            }
        }
    }


最終效果圖如下:當點擊圖片和文字的時候,我們可以看到console中打印對應的信息


相關文章
+- iOS9與XCode7中不克不及應用http銜接的疾速處理方法
- xcode8 封閉掌握台不打印不信息的處理辦法(圖文詳解)
- 史上最具體的CocoaPods裝置教程(圖文)
- IOS Xcode中快捷鍵年夜全
- iOS中處理Xcode 8掌握台亂碼的方法
- IOS開辟之適配iOS10及Xcode8的留意點
- xcode8提交ipa掉敗沒法構建版本成績的處理計劃
- IOS 開辟自界說條形ProgressView的實例
- XCode 加速編譯鏈接速度的辦法
- 2016 cocoapods的裝置和應用辦法和版本進級碰到的成績
- IOS 陀螺儀開辟(CoreMotion框架)實例詳解
- 進修iOS自界說導航掌握器UINavigationController
- Xcode 8打印log日記的成績小結及處理辦法
- iOS10 適配和Xcode8設置裝備擺設總結
- iOS Xcode8更新後輸入log日記封閉的辦法


