iOS開發——響應鏈(Responder Chain)的深入理解和代碼示例(二)
響應鏈機制是開發中很重要的概念,在一些事件的處理中需要對響應鏈的傳遞有深入的了解,我們才能對事件的傳遞有更好的控制。今天我們繼續來研究下響應鏈,並實現一個很簡單的功能。示例代碼已經上傳至 https://github.com/chenyufeng1991/HitTest,可以進行下載調試。要實現的一個很簡單的功能就是:透過頂部視圖,讓底部視圖來響應點擊事件,這也會響應鏈使用中非常重要的應用。下面也會涉及一些不同的案例。用到最常用的方法為hitTest:withEvent和pointInside:withEvent.
【重寫子視圖】
 。
。
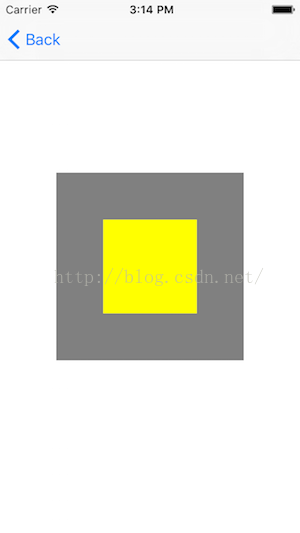
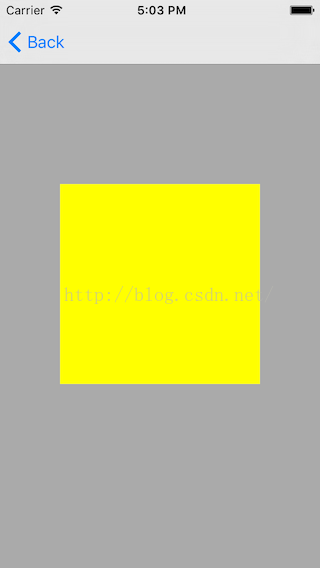
灰色區域是底部視圖,黃色區域是頂部視圖,我分別給這兩個視圖添加了點擊手勢。現在我通過使用hitTest:withEvent:方法來控制響應鏈,無論我點擊黃色區域還是灰色區域,都由底部視圖來響應。其中黃色區域是灰色區域的子視圖。
(1)我自定義頂部黃色視圖,繼承自UIView,然後重寫hitTest,實現如下:
#import "RewriteView.h"

@implementation RewriteView

- (UIView *)hitTest:(CGPoint)point withEvent:(UIEvent *)event
{
    UIView *view = [super hitTest:point withEvent:event];
    if (view == self)
    {
        return nil;
    }

    return [super hitTest:point withEvent:event];
}

@end
簡單解釋下代碼:
當view == self時,表示點擊區域在self上,其中這裡黃色區域是RewriteView的對象,然後返回nil, 表示自己不做響應,交給父視圖去響應。由於這裡父視圖是灰色區域,所以由父視圖來響應點擊。
(2)VC中的實現如下:
#import "RewriteTopViewController.h"
#import "Masonry.h"
#import "RewriteView.h"

@interface RewriteTopViewController ()

@end

@implementation RewriteTopViewController

- (void)viewDidLoad
{
    [super viewDidLoad];

    UIView *bottomView = [[UIView alloc] initWithFrame:CGRectMake(100, 100, 200, 200)];
    bottomView.backgroundColor = [UIColor grayColor];
    bottomView.tag = 101;
    [self.view addSubview:bottomView];
    [bottomView mas_makeConstraints:^(MASConstraintMaker *make) {
        make.center.equalTo(self.view);
        make.width.equalTo(@200);
        make.height.equalTo(@200);
    }];
    UITapGestureRecognizer *bottomTap = [[UITapGestureRecognizer alloc] initWithTarget:self action:@selector(tapBottomView:)];
    [bottomView addGestureRecognizer:bottomTap];

    RewriteView *topView = [[RewriteView alloc] initWithFrame:CGRectMake(100, 100, 100, 100)];
    topView.backgroundColor = [UIColor yellowColor];
    topView.tag = 102;
    [bottomView addSubview:topView];
    [topView mas_makeConstraints:^(MASConstraintMaker *make) {
        make.center.equalTo(bottomView);
        make.height.equalTo(@100);
        make.width.equalTo(@100);
    }];
    UITapGestureRecognizer *topTap = [[UITapGestureRecognizer alloc] initWithTarget:self action:@selector(tapTopView:)];
    [topView addGestureRecognizer:topTap];

}

- (void)tapBottomView:(id)sender
{
    NSLog(@"%s",__FUNCTION__);
}

- (void)tapTopView:(id)sender
{
    NSLog(@"%s",__FUNCTION__);
}

@end
請注意代碼中topView是由RewriteView定義的,bottomView是UIView定義的。 運行以上代碼,我們會發現,最後所有的點擊事件都落在了灰色底部區域,相當於透過了黃色區域。黃色區域必須繼承自UIView,然後重寫hitTest方法。
---------------------------------------------------------------------------------------------------------------------------------------------------------
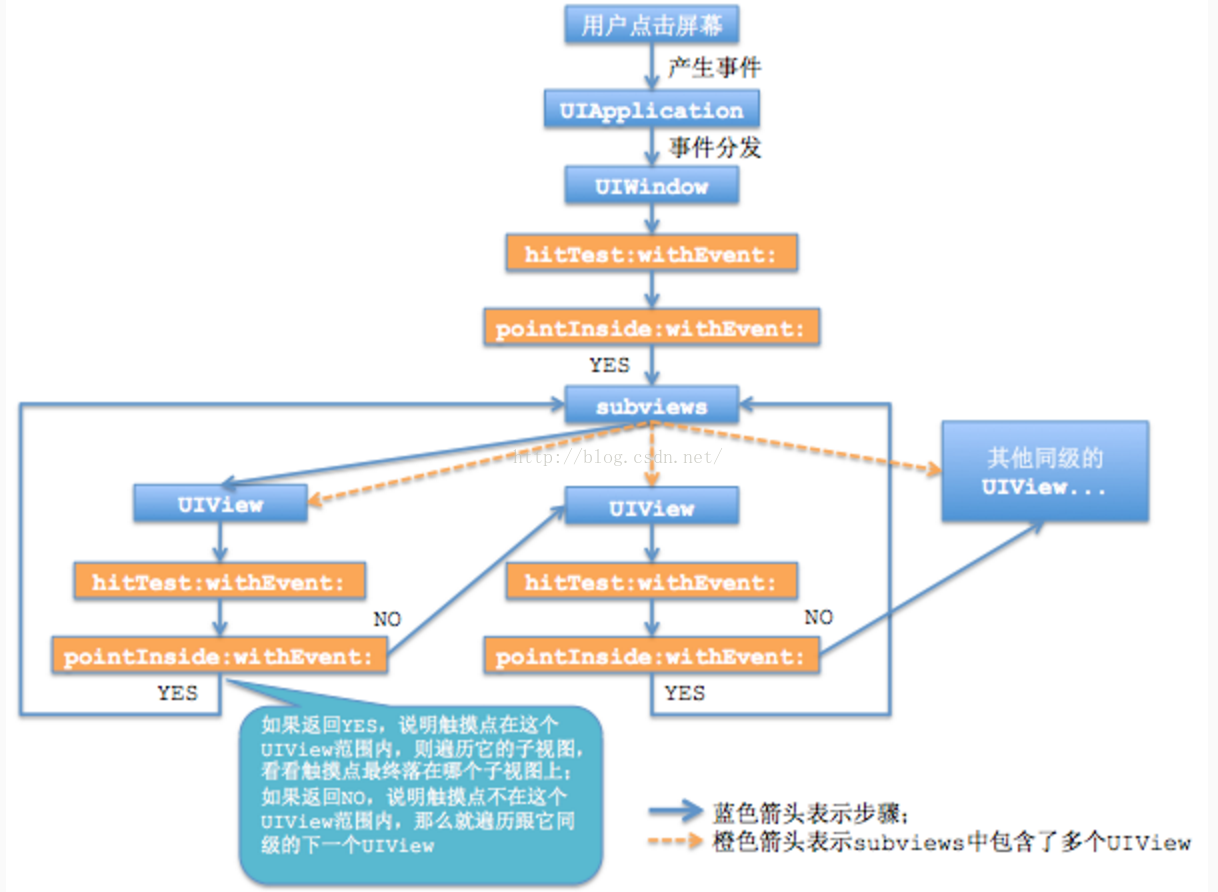
1. 對於觸摸事件,首先要找到能夠響應該事件的對象,iOS是用hit_testing來找到哪個視圖被觸摸了,也就是以keyWindow為起點,hit-test view為終點,逐級調用hitTest:withEvent。 網上大神畫了下面這幅圖:
hitTest:withEvent方法的處理流程:
先調用pointInside:withEvent:判斷觸摸點是否在當前視圖內。
-- 如果返回YES,那麼該視圖的所有子視圖調用hitTest:withEvent,調用順序由層級低到高(top-->bottom)依次調用。
-- 如果返回NO,那麼hitTest:withEvent返回nil,該視圖的所有子視圖的分支全部被忽略(表示根本不可能在該視圖內)。
● 如果某視圖的pointInside:withEvent:返回YES,並且它的所有子視圖hitTest:withEvent:都返回nil,或者該視圖沒有子視圖,那麼該視圖的hitTest:withEvent:返回自己self。
● 如果子視圖的hitTest:withEvent:返回非空對象,那麼當前視圖的hitTest:withEvent也返回這個對象,也就是沿原路回退,最終將hit-test view傳遞給keyWindow進行響應。
● 以下視圖的hitTest-withEvent:方法會返回nil,導致自身和其所有子視圖不能被hit-testing發現,無法響應觸摸事件:
隱藏(hidden=YES)的視圖;
禁止用戶操作(userInteractionEnabled = NO)的視圖;
alpha<0.01的視圖;
視圖超出父視圖的區域;
-- 既然系統通過hitTest:withEvent:做傳遞鏈取回hit-test view,那麼我們可以在其中一環修改傳遞回的對象,從而改變正常的事件響應鏈。
2.觸摸事件的傳遞是從父控件傳遞到子控件。即樹狀結構的根節點向葉子節點遞歸傳遞。
也就是說,如果父控件不能接收觸摸事件那麼子控件就不可能接收到觸摸事件。
3.事件的傳遞是從上到下(父控件到子控件),事件的響應是從下到上(子控件到父控件)。
4.對於一個View,hitTest為什麼會調用兩次?
因為一次是消息傳遞時,還有一次是響應時。分別是入棧出棧操作,父View先入棧,後出棧。
5.不管視圖能不能處理事件,只要點擊了視圖就會產生事件,關鍵看該事件是由誰來處理。也就是說,如果視圖不能處理事件,點擊視圖,還是會產生一個觸摸事件,只是該事件不會由被點擊的視圖處理而已。
6. 如果設置父控件的透明度或者hidden,會直接影響到子控件的透明度的hidden,如果父控件的透明度為0或者hidden=YES,那麼子控件也是不可見的。同上1.
7.技巧:想讓誰成為最合適的view就重寫誰自己的父控件的hitTest:withEvent:方法返回指定的子控件(我下面會實現該案例),或者重寫自己的hitTest:withEvent:方法return self. 但是,建議在父控件的hitTest:withEvent:中返回子控件作為最合適的view。
8.return nil的含義:
hitTest:withEvent:中return nil的意思是調用當前的hitTest:withEvent:方法的view不是合適的view,子控件也不是合適的view。如果同級的兄弟控件也沒有合適的view,那麼最合適的view就是父控件。
9.[self.view convertPoint:point fromView:self]
把self.view的坐標系從self轉換到自己的坐標系。然後就可以通過手動調用pointInside來判斷是否在某個view內。
【重寫父視圖】
重寫父視圖來對子視圖控制響應事件是我們推薦的方式。
(1)RewriteSuperView繼承自UIView,重寫hitTest
RewriteSuperView.h
#import@interface RewriteSuperView : UIView @property (nonatomic, strong) UIView *bottom; @end
其中bottom等下是傳進來的引用。
RewriteSuperView.m
#import "RewriteSuperView.h"

@implementation RewriteSuperView

- (UIView *)hitTest:(CGPoint)point withEvent:(UIEvent *)event
{
    NSLog(@"tag=====%ld",self.tag);
    CGPoint bottomPoint = [self.bottom convertPoint:point fromView:self];
    if ([self.bottom pointInside:bottomPoint withEvent:event])
    {
        return self.bottom;
    }

    return [super hitTest:point withEvent:event];
}


@end
這幾行代碼的意思是:檢測點擊區域是否是在bottom區域,如果是,則直接使用bottom響應點擊,否則調用父類的hitTest,按正常的傳遞響應。
(2)VC實現
#import "RewriteSuperViewController.h"
#import "RewriteSuperView.h"
#import "Masonry.h"

@interface RewriteSuperViewController ()

@end

@implementation RewriteSuperViewController

- (void)viewDidLoad
{
    [super viewDidLoad];

    RewriteSuperView *containerView = [[RewriteSuperView alloc] initWithFrame:CGRectMake(0, 0, 320, 568)];
    containerView.backgroundColor = [UIColor colorWithWhite:0.667 alpha:1.000];
    containerView.tag = 100;
    [self.view addSubview:containerView];
    [containerView mas_makeConstraints:^(MASConstraintMaker *make) {
        make.edges.equalTo(self.view);
    }];

    UIView *bottomView = [[UIView alloc] initWithFrame:CGRectMake(100, 100, 200, 200)];
    bottomView.backgroundColor = [UIColor redColor];
    bottomView.tag = 101;
    [containerView addSubview:bottomView];
    [bottomView mas_makeConstraints:^(MASConstraintMaker *make) {
        make.center.equalTo(containerView);
        make.width.equalTo(@100);
        make.height.equalTo(@100);
    }];
    UITapGestureRecognizer *bottomTap = [[UITapGestureRecognizer alloc] initWithTarget:self action:@selector(tapBottomView:)];
    [bottomView addGestureRecognizer:bottomTap];

    UIView *topView = [[UIView alloc] initWithFrame:CGRectMake(100, 100, 100, 100)];
    topView.backgroundColor = [UIColor yellowColor];
    topView.tag = 102;
    [containerView addSubview:topView];
    [topView mas_makeConstraints:^(MASConstraintMaker *make) {
        make.center.equalTo(containerView);
        make.height.equalTo(@200);
        make.width.equalTo(@200);
    }];
    UITapGestureRecognizer *topTap = [[UITapGestureRecognizer alloc] initWithTarget:self action:@selector(tapTopView:)];
    [topView addGestureRecognizer:topTap];

    containerView.bottom = bottomView;
}

- (void)tapBottomView:(id)sender
{
    NSLog(@"%s",__FUNCTION__);
}

- (void)tapTopView:(id)sender
{
    NSLog(@"%s",__FUNCTION__);
}

@end
注意這裡只有底部灰色區域containerView是RewriteSuperView, 並且傳遞紅色bottomView的引用,讓其可以在hitTest中進行檢測。
(3)看一下實現後的視圖:
 。
。
其中灰色的背景是父視圖,黃色的是頂部視圖,紅色的在底部,黃色和紅色都是灰色的子視圖,黃色覆蓋紅色。我們通過視圖層次調試來看一下:
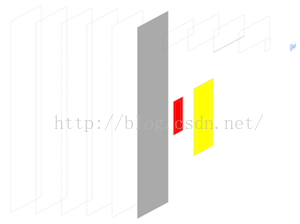 。
。
該案例的實現結果就是在黃色區域點擊,如果點擊區域落在紅色區域,那麼紅色的點擊手勢會響應;如果是在紅色區域之外,黃色區域之內,那麼黃色的點擊手勢會響應。
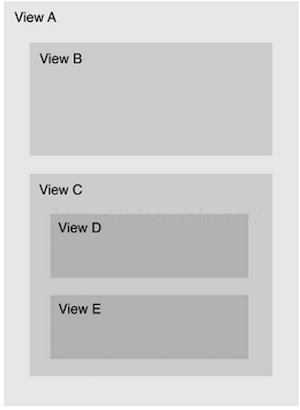
下面這張圖是蘋果官方文檔中的示例圖:
 。
。
官方解釋如下:
- The touch is within the bounds of view A, so it checks subviews B and C.
- The touch is not within the bounds of view B, but it’s within the bounds of view C, so it checks subviews D and E.
- The touch is not within the bounds of view D, but it’s within the bounds of view E.View E is the lowest view in the view hierarchy that contains the touch, so it becomes the hit-test view.英文很簡單,就不給大家翻譯了。大家可以可以根據這幅圖或者結合UIButton、UIImageView、UIView等寫一些案例,相信會對響應鏈有更深入的了解。

