CoreText圖文混排的排版引擎
本章前言
在上一篇《基於 CoreText 的排版引擎:基礎》中,我們學會了排版的基礎知識,現在我們來增加復雜性,讓我們的排版引擎支持圖片和鏈接的點擊。
支持圖文混排的排版引擎
改造模版文件
下面我們來進一步改造,讓排版引擎支持對於圖片的排版。在上一小節中,我們在設置模版文件的時候,就專門在模板文件裡面留了一個名為type的字段,用於表示內容的類型。之前的type的值都是txt,這次,我們增加一個值為img的值,用於表示圖片。
我們將上一節的content.json文件修改為如下內容,增加了 2 個type值為img的配置項。由於是圖片的配置項,所以我們不需要設置顏色,字號這些圖片不具有的屬性,但是,我們另外增加了 3 個圖片的配置屬性:
width的屬性,用於設置圖片顯示的寬度。一個名為height的屬性,用於設置圖片顯示的高度。一個名為name的屬性,用於設置圖片的資源名。
[ {
    "type" : "img",
    "width" : 200,
    "height" : 108,
    "name" : "coretext-image-1.jpg"
  },
  { "color" : "blue",
    "content" : " 更進一步地,實際工作中,我們更希望通過一個排版文件,來設置需要排版的文字的 ",
    "size" : 16,
    "type" : "txt"
  },
  { "color" : "red",
    "content" : " 內容、顏色、字體 ",
    "size" : 22,
    "type" : "txt"
  },
  { "color" : "black",
    "content" : " 大小等信息。\n",
    "size" : 16,
    "type" : "txt"
  },
  {
    "type" : "img",
    "width" : 200,
    "height" : 130,
    "name" : "coretext-image-2.jpg"
  },
  { "color" : "default",
    "content" : " 我在開發猿題庫應用時,自己定義了一個基於 UBB 的排版模版,但是實現該排版文件的解析器要花費大量的篇幅,考慮到這並不是本章的重點,所以我們以一個較簡單的排版文件來講解其思想。",
    "type" : "txt"
  }
]
按理說,圖片本身的內容信息中,是包含寬度和高度信息的,為什麼我們要在這裡指定圖片的寬高呢?這主要是因為,在真實的開發中,應用的模版和圖片通常是通過服務器獲取的,模版是純文本的內容,獲取速度比圖片快很多,而圖片不但獲取速度慢,而且為了省流量,通常的做法是直到需要顯示圖片的時候,再加載圖片內容。
如果我們不將圖片的寬度和高度信息設置在模板裡面,那麼 CoreText 在排版的時候就無法知道繪制所需要的高度,我們就無法設置CoreTextData類中的height信息,沒有高度信息,就會對 UITableView 一類的控件排版造成影響。所以,除非你的應用圖片能夠保證在繪制前都能全部在本地,否則就應該另外提前提供圖片寬度和高度信息。
在完成模板文件修改後,我們選取兩張測試用的圖片,分別將其命名為coretext-image-1.jpg和coretext-image-2.jpg(和模板中的值一致),將其拖動增加到工程中。向 Xcode 工程增加圖片資源是基礎知識,在此就不詳細介紹過程了。
CTLine 與 CTRun
接下來我們需要改造的是CTFrameParser類,讓解析模板文件的方法支持type為img的配置。
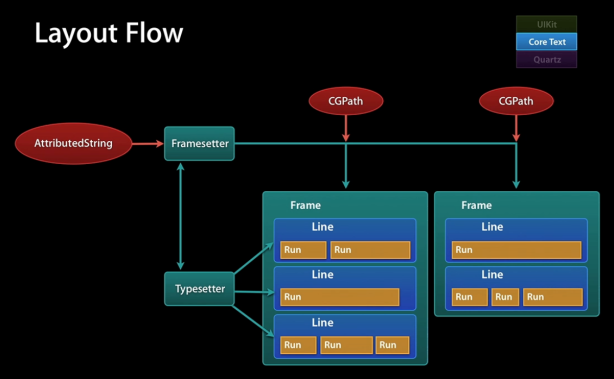
在改造前,我們先來了解一下CTFrame內部的組成。通過之前的例子,我們可以看到,我們首先通過NSAttributeString和配置信息創建 CTFrameSetter,
然後,再通過CTFrameSetter來創建CTFrame。
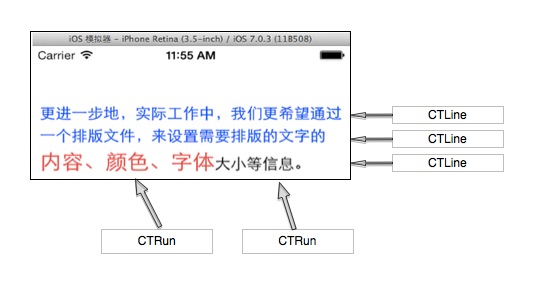
在CTFrame內部,是由多個CTLine來組成的,每個CTLine代表一行,每個CTLine又是由多個CTRun來組成,每個CTRun代表一組顯示風格一致的文本。我們不用手工管理CTLine和CTRun的創建過程。
下圖是一個CTLine和CTRun的示意圖,可以看到,第三行的CTLine是由 2 個CTRun構成的,第一個CTRun為紅色大字號的左邊部分,第二個CTRun為右邊字體較小的部分。
雖然我們不用管理CTRun的創建過程,但是我們可以設置某一個具體的CTRun的CTRunDelegate來指定該文本在繪制時的高度、寬度、排列對齊方式等信息。
對於圖片的排版,其實 CoreText 本質上不是直接支持的,但是,我們可以在要顯示文本的地方,用一個特殊的空白字符代替,同時設置該字體的CTRunDelegate信息為要顯示的圖片的寬度和高度信息,這樣最後生成的CTFrame實例,就會在繪制時將圖片的位置預留出來。
因為我們的CTDisplayView的繪制代碼是在drawRect裡面的,所以我們可以方便地把需要繪制的圖片,用CGContextDrawImage方法直接繪制出來就可以了。
改造模版解析類
在了解了以上原理後,我們就可以開始進行改造了。
我們需要做的工作包括:
改造CTFrameParser的parseTemplateFile:(NSString *)path config:(CTFrameParserConfig*)config;方法,使其支持對type為img的節點解析。並且對type為img的節點,設置其CTRunDelegate信息,使其在繪制時,為圖片預留相應的空白位置。改造CoreTextData類,增加圖片相關的信息,並且增加計算圖片繪制區域的邏輯。改造CTDisplayView類,增加繪制圖片相關的邏輯。
首先介紹對於CTFrameParser的改造:
我們修改了parseTemplateFile方法,增加了一個名為imageArray的參數來保存解析時的圖片信息。
+ (CoreTextData *)parseTemplateFile:(NSString *)path config:(CTFrameParserConfig*)config {
    NSMutableArray *imageArray = [NSMutableArray array];
    NSAttributedString *content = [self loadTemplateFile:path config:config imageArray:imageArray];
    CoreTextData *data = [self parseAttributedContent:content config:config];
    data.imageArray = imageArray;
    return data;
}
接著我們修改loadTemplateFile方法,增加了對於type是img的節點處理邏輯,該邏輯主要做 2 件事情:
imageArray變量中新建一個空白的占位符。
+ (NSAttributedString *)loadTemplateFile:(NSString *)path
                                  config:(CTFrameParserConfig*)config
                              imageArray:(NSMutableArray *)imageArray {
    NSData *data = [NSData dataWithContentsOfFile:path];
    NSMutableAttributedString *result = [[NSMutableAttributedString alloc] init];
    if (data) {
        NSArray *array = [NSJSONSerialization JSONObjectWithData:data
                             options:NSJSONReadingAllowFragments
                               error:nil];
        if ([array isKindOfClass:[NSArray class]]) {
            for (NSDictionary *dict in array) {
                NSString *type = dict[@"type"];
                if ([type isEqualToString:@"txt"]) {
                    NSAttributedString *as =
                        [self parseAttributedContentFromNSDictionary:dict
                                                              config:config];
                    [result appendAttributedString:as];
                } else if ([type isEqualToString:@"img"]) {
                    // 創建 CoreTextImageData
                    CoreTextImageData *imageData = [[CoreTextImageData alloc] init];
                    imageData.name = dict[@"name"];
                    imageData.position = [result length];
                    [imageArray addObject:imageData];
                    // 創建空白占位符,並且設置它的 CTRunDelegate 信息
                    NSAttributedString *as = [self parseImageDataFromNSDictionary:dict config:config];
                    [result appendAttributedString:as];
                }
            }
        }
    }
    return result;
}
最後我們新建一個最關鍵的方法:parseImageDataFromNSDictionary,生成圖片空白的占位符,並且設置其CTRunDelegate信息。其代碼如下:
static CGFloat ascentCallback(void *ref){
    return [(NSNumber*)[(__bridge NSDictionary*)ref objectForKey:@"height"] floatValue];
}

static CGFloat descentCallback(void *ref){
    return 0;
}

static CGFloat widthCallback(void* ref){
    return [(NSNumber*)[(__bridge NSDictionary*)ref objectForKey:@"width"] floatValue];
}

+ (NSAttributedString *)parseImageDataFromNSDictionary:(NSDictionary *)dict
                                                config:(CTFrameParserConfig*)config {
    CTRunDelegateCallbacks callbacks;
    memset(&callbacks, 0, sizeof(CTRunDelegateCallbacks));
    callbacks.version = kCTRunDelegateVersion1;
    callbacks.getAscent = ascentCallback;
    callbacks.getDescent = descentCallback;
    callbacks.getWidth = widthCallback;
    CTRunDelegateRef delegate = CTRunDelegateCreate(&callbacks, (__bridge void *)(dict));

    // 使用 0xFFFC 作為空白的占位符
    unichar objectReplacementChar = 0xFFFC;
    NSString * content = [NSString stringWithCharacters:&objectReplacementChar length:1];
    NSDictionary * attributes = [self attributesWithConfig:config];
    NSMutableAttributedString * space =
       [[NSMutableAttributedString alloc] initWithString:content
                                              attributes:attributes];
    CFAttributedStringSetAttribute((CFMutableAttributedStringRef)space,
              CFRangeMake(0, 1), kCTRunDelegateAttributeName, delegate);
    CFRelease(delegate);
    return space;
}
接著我們對CoreTextData進行改造,增加了imageArray成員變量,用於保存圖片繪制時所需的信息。
#import#import "CoreTextImageData.h" @interface CoreTextData : NSObject @property (assign, nonatomic) CTFrameRef ctFrame; @property (assign, nonatomic) CGFloat height; // 新增加的成員 @property (strong, nonatomic) NSArray * imageArray; @end
在設置imageArray成員時,我們還會調一個新創建的fillImagePosition方法,用於找到每張圖片在繪制時的位置。
- (void)setImageArray:(NSArray *)imageArray {
    _imageArray = imageArray;
    [self fillImagePosition];
}

- (void)fillImagePosition {
    if (self.imageArray.count == 0) {
        return;
    }
    NSArray *lines = (NSArray *)CTFrameGetLines(self.ctFrame);
    int lineCount = [lines count];
    CGPoint lineOrigins[lineCount];
    CTFrameGetLineOrigins(self.ctFrame, CFRangeMake(0, 0), lineOrigins);

    int imgIndex = 0;
    CoreTextImageData * imageData = self.imageArray[0];

    for (int i = 0; i < lineCount; ++i) {
        if (imageData == nil) {
            break;
        }
        CTLineRef line = (__bridge CTLineRef)lines[i];
        NSArray * runObjArray = (NSArray *)CTLineGetGlyphRuns(line);
        for (id runObj in runObjArray) {
            CTRunRef run = (__bridge CTRunRef)runObj;
            NSDictionary *runAttributes = (NSDictionary *)CTRunGetAttributes(run);
            CTRunDelegateRef delegate = (__bridge CTRunDelegateRef)[runAttributes valueForKey:(id)kCTRunDelegateAttributeName];
            if (delegate == nil) {
                continue;
            }

            NSDictionary * metaDic = CTRunDelegateGetRefCon(delegate);
            if (![metaDic isKindOfClass:[NSDictionary class]]) {
                continue;
            }

            CGRect runBounds;
            CGFloat ascent;
            CGFloat descent;
            runBounds.size.width = CTRunGetTypographicBounds(run, CFRangeMake(0, 0), &ascent, &descent, NULL);
            runBounds.size.height = ascent + descent;

            CGFloat xOffset = CTLineGetOffsetForStringIndex(line, CTRunGetStringRange(run).location, NULL);
            runBounds.origin.x = lineOrigins[i].x + xOffset;
            runBounds.origin.y = lineOrigins[i].y;
            runBounds.origin.y -= descent;

            CGPathRef pathRef = CTFrameGetPath(self.ctFrame);
            CGRect colRect = CGPathGetBoundingBox(pathRef);

            CGRect delegateBounds = CGRectOffset(runBounds, colRect.origin.x, colRect.origin.y);

            imageData.imagePosition = delegateBounds;
            imgIndex++;
            if (imgIndex == self.imageArray.count) {
                imageData = nil;
                break;
            } else {
                imageData = self.imageArray[imgIndex];
            }
        }
    }
}
添加對圖片的點擊支持
實現方式
為了實現對圖片的點擊支持,我們需要給CTDisplayView類增加用戶點擊操作的檢測函數,在檢測函數中,判斷當前用戶點擊的區域是否在圖片上,如果在圖片上,則觸發點擊圖片的邏輯。蘋果提供的UITapGestureRecognizer可以很好的滿足我們的要求,所以我們這裡用它來檢測用戶的點擊操作。
我們這裡實現的是點擊圖片後,先用NSLog打印出一行日志。實際應用中,讀者可以根據業務需求自行調整點擊後的效果。
我們先為CTDisplayView類增加UITapGestureRecognizer:
- (id)initWithCoder:(NSCoder *)aDecoder {
    self = [super initWithCoder:aDecoder];
    if (self) {
        [self setupEvents];
    }
    return self;
}

- (void)setupEvents {
    UIGestureRecognizer * tapRecognizer =
          [[UITapGestureRecognizer alloc] initWithTarget:self
                    action:@selector(userTapGestureDetected:)];
    tapRecognizer.delegate = self;
    [self addGestureRecognizer:tapRecognizer];
    self.userInteractionEnabled = YES;
}
然後增加UITapGestureRecognizer的回調函數:
- (void)userTapGestureDetected:(UIGestureRecognizer *)recognizer {
    CGPoint point = [recognizer locationInView:self];
    for (CoreTextImageData * imageData in self.data.imageArray) {
        // 翻轉坐標系,因為 imageData 中的坐標是 CoreText 的坐標系
        CGRect imageRect = imageData.imagePosition;
        CGPoint imagePosition = imageRect.origin;
        imagePosition.y = self.bounds.size.height - imageRect.origin.y
                          - imageRect.size.height;
        CGRect rect = CGRectMake(imagePosition.x, imagePosition.y, imageRect.size.width, imageRect.size.height);
        // 檢測點擊位置 Point 是否在 rect 之內
        if (CGRectContainsPoint(rect, point)) {
            // 在這裡處理點擊後的邏輯
            NSLog(@"bingo");
            break;
        }
    }
}
事件處理
在界面上,CTDisplayView通常在UIView的樹形層級結構中,一個 UIView 可能是最外層 View Controller 的 View 的孩子的孩子的孩子(如下圖所示)。在這種多級層次結構中,很難通過delegate模式將圖片點擊的事件一層一層往外層傳遞,所以最好使用NSNotification,來處理圖片點擊事件。
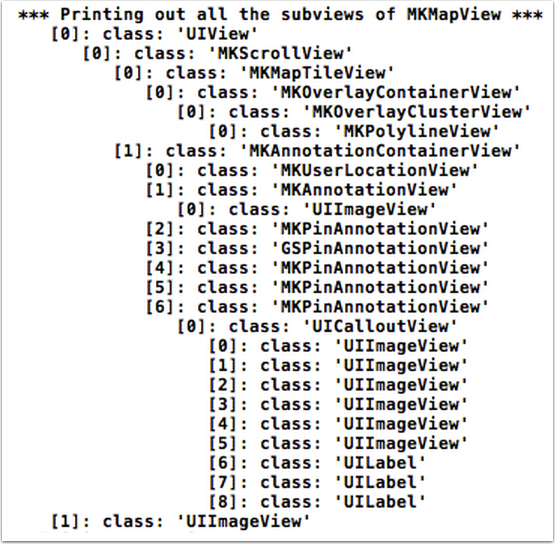
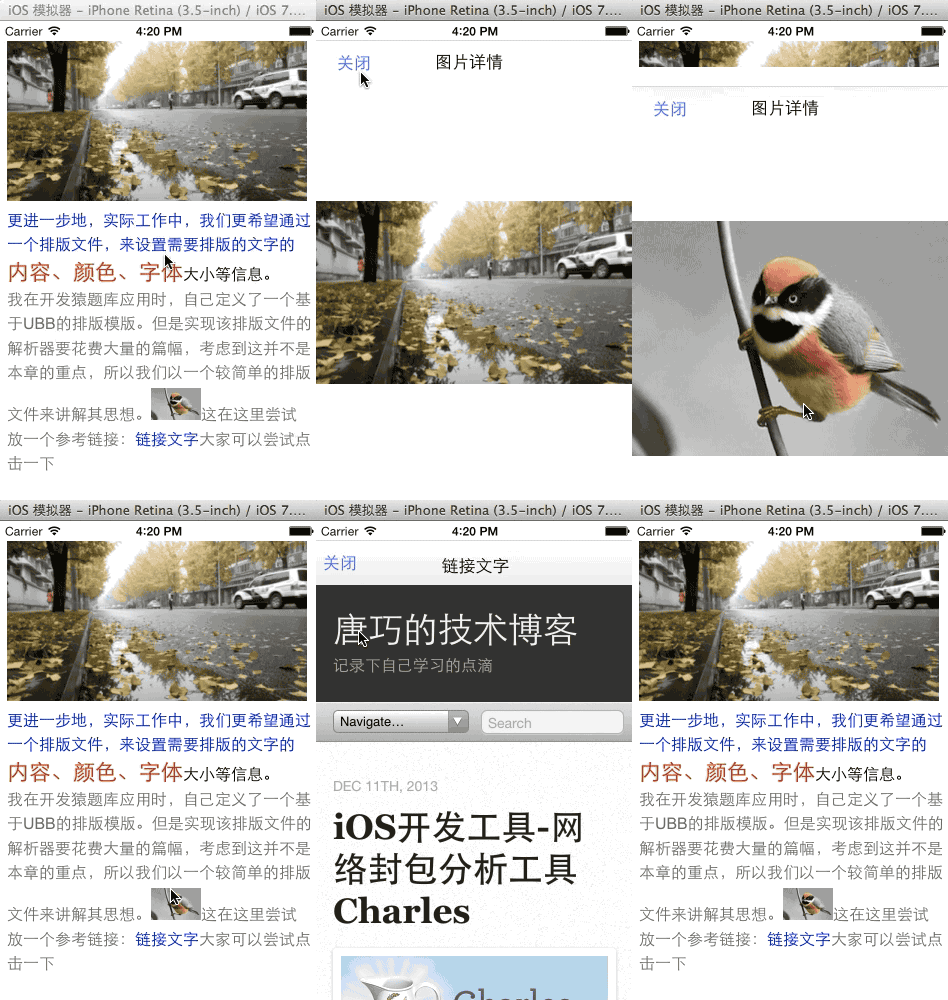
在 Demo 中,我們在最外層的 View Controller 中監聽圖片點擊的通知,當收到通知後,進入到一個新的界面來顯示圖片點擊內容。
注:讀者可以將 demo 工程切換到image_click分支,查看示例代碼。
添加對鏈接的點擊支持
####修改模板文件
我們修改模版文件,增加一個名為 link 的類型,用於表示鏈接內容。如下所示:
[
  { "color" : "default",
    "content" : " 這在這裡嘗試放一個參考鏈接:",
    "type" : "txt"
  },
  { "color" : "blue",
    "content" : " 鏈接文字 ",
    "url" : "http://blog.devtang.com",
    "type" : "link"
  },
  { "color" : "default",
    "content" : " 大家可以嘗試點擊一下 ",
    "type" : "txt"
  }
]
####解析模版中的鏈接信息
我們首先增加一個CoreTextLinkData類,用於記錄解析 JSON 文件時的鏈接信息:
@interface CoreTextLinkData : NSObject

@property (strong, nonatomic) NSString * title;
@property (strong, nonatomic) NSString * url;
@property (assign, nonatomic) NSRange range;

@end
然後我們修改 CTFrameParser 類,增加解析鏈接的邏輯:
+ (NSAttributedString *)loadTemplateFile:(NSString *)path
                                  config:(CTFrameParserConfig*)config
                              imageArray:(NSMutableArray *)imageArray
                               linkArray:(NSMutableArray *)linkArray {
    NSData *data = [NSData dataWithContentsOfFile:path];
    NSMutableAttributedString *result = [[NSMutableAttributedString alloc] init];
    if (data) {
        NSArray *array = [NSJSONSerialization JSONObjectWithData:data
                                        options:NSJSONReadingAllowFragments
                                          error:nil];
        if ([array isKindOfClass:[NSArray class]]) {
            for (NSDictionary *dict in array) {
                NSString *type = dict[@"type"];
                if ([type isEqualToString:@"txt"]) {
                    // 省略
                } else if ([type isEqualToString:@"img"]) {
                    // 省略
                } else if ([type isEqualToString:@"link"]) {
                    NSUInteger startPos = result.length;
                    NSAttributedString *as =
                       [self parseAttributedContentFromNSDictionary:dict
                                                             config:config];
                    [result appendAttributedString:as];
                    // 創建 CoreTextLinkData
                    NSUInteger length = result.length - startPos;
                    NSRange linkRange = NSMakeRange(startPos, length);
                    CoreTextLinkData *linkData = [[CoreTextLinkData alloc] init];
                    linkData.title = dict[@"content"];
                    linkData.url = dict[@"url"];
                    linkData.range = linkRange;
                    [linkArray addObject:linkData];
                }
            }
        }
    }
    return result;
}
然後,我們增加一個 Utils 類來專門處理檢測用戶點擊是否在鏈接上。主要的方法是使用 CTLineGetStringIndexForPosition 函數來獲得用戶點擊的位置與 NSAttributedString 字符串上的位置的對應關系。這樣就知道是點擊的哪個字符了。然後判斷該字符串是否在鏈接上即可。該 Util 在實現邏輯如下:
// 檢測點擊位置是否在鏈接上
+ (CoreTextLinkData *)touchLinkInView:(UIView *)view atPoint:(CGPoint)point data:(CoreTextData *)data {
    CTFrameRef textFrame = data.ctFrame;
    CFArrayRef lines = CTFrameGetLines(textFrame);
    if (!lines) return nil;
    CFIndex count = CFArrayGetCount(lines);
    CoreTextLinkData *foundLink = nil;

    // 獲得每一行的 origin 坐標
    CGPoint origins[count];
    CTFrameGetLineOrigins(textFrame, CFRangeMake(0,0), origins);

    // 翻轉坐標系
    CGAffineTransform transform =  CGAffineTransformMakeTranslation(0, view.bounds.size.height);
    transform = CGAffineTransformScale(transform, 1.f, -1.f);

    for (int i = 0; i < count; i++) {
        CGPoint linePoint = origins[i];
        CTLineRef line = CFArrayGetValueAtIndex(lines, i);
        // 獲得每一行的 CGRect 信息
        CGRect flippedRect = [self getLineBounds:line point:linePoint];
        CGRect rect = CGRectApplyAffineTransform(flippedRect, transform);

        if (CGRectContainsPoint(rect, point)) {
            // 將點擊的坐標轉換成相對於當前行的坐標
            CGPoint relativePoint = CGPointMake(point.x-CGRectGetMinX(rect),
                                                point.y-CGRectGetMinY(rect));
            // 獲得當前點擊坐標對應的字符串偏移
            CFIndex idx = CTLineGetStringIndexForPosition(line, relativePoint);
            // 判斷這個偏移是否在我們的鏈接列表中
            foundLink = [self linkAtIndex:idx linkArray:data.linkArray];
            return foundLink;
        }
    }
    return nil;
}

+ (CGRect)getLineBounds:(CTLineRef)line point:(CGPoint)point {
    CGFloat ascent = 0.0f;
    CGFloat descent = 0.0f;
    CGFloat leading = 0.0f;
    CGFloat width = (CGFloat)CTLineGetTypographicBounds(line, &ascent, &descent, &leading);
    CGFloat height = ascent + descent;
    return CGRectMake(point.x, point.y - descent, width, height);
}

+ (CoreTextLinkData *)linkAtIndex:(CFIndex)i linkArray:(NSArray *)linkArray {
    CoreTextLinkData *link = nil;
    for (CoreTextLinkData *data in linkArray) {
        if (NSLocationInRange(i, data.range)) {
            link = data;
            break;
        }
    }
    return link;
}
最後改造一下CTDisplayView,使其在檢測到用戶點擊後,調用上面的 Util 方法即可。我們這裡實現的是點擊鏈接後,先用NSLog打印出一行日志。實際應用中,讀者可以根據業務需求自行調整點擊後的效果。
- (void)userTapGestureDetected:(UIGestureRecognizer *)recognizer {
    CGPoint point = [recognizer locationInView:self];
    // 此處省略上一節中介紹的,對圖片點擊檢測的邏輯

    CoreTextLinkData *linkData = [CoreTextUtils touchLinkInView:self atPoint:point data:self.data];
    if (linkData) {
        NSLog(@"hint link!");
        return;
    }
}
注:在 Demo 中工程中,我們實現了點擊鏈接跳轉到一個新的界面,然後用 UIWebView 來顯示鏈接內容的邏輯。讀者可以將 demo 工程切換到link_click分支,查看示例代碼。
Demo 工程的 Gif 效果圖如下,讀者可以將示例工程用git checkout image_support切換到當前章節狀態,查看相關代碼邏輯。
- iOS9與XCode7中不克不及應用http銜接的疾速處理方法
- xcode8 封閉掌握台不打印不信息的處理辦法(圖文詳解)
- 史上最具體的CocoaPods裝置教程(圖文)
- IOS Xcode中快捷鍵年夜全
- iOS中處理Xcode 8掌握台亂碼的方法
- IOS開辟之適配iOS10及Xcode8的留意點
- xcode8提交ipa掉敗沒法構建版本成績的處理計劃
- IOS 開辟自界說條形ProgressView的實例
- XCode 加速編譯鏈接速度的辦法
- 2016 cocoapods的裝置和應用辦法和版本進級碰到的成績
- IOS 陀螺儀開辟(CoreMotion框架)實例詳解
- 進修iOS自界說導航掌握器UINavigationController
- Xcode 8打印log日記的成績小結及處理辦法
- iOS10 適配和Xcode8設置裝備擺設總結
- iOS Xcode8更新後輸入log日記封閉的辦法

