如何實現iOS圖書動畫:第1部分(下)
原文鏈接 : How to Create an iOS Book Open Animation: Part 1 原文作者 : Vincent Ngo 譯文出自 : 開發技術前線 www.devtf.cn 譯者 : kmyhy
翻頁布局
最終實現的效果如下:
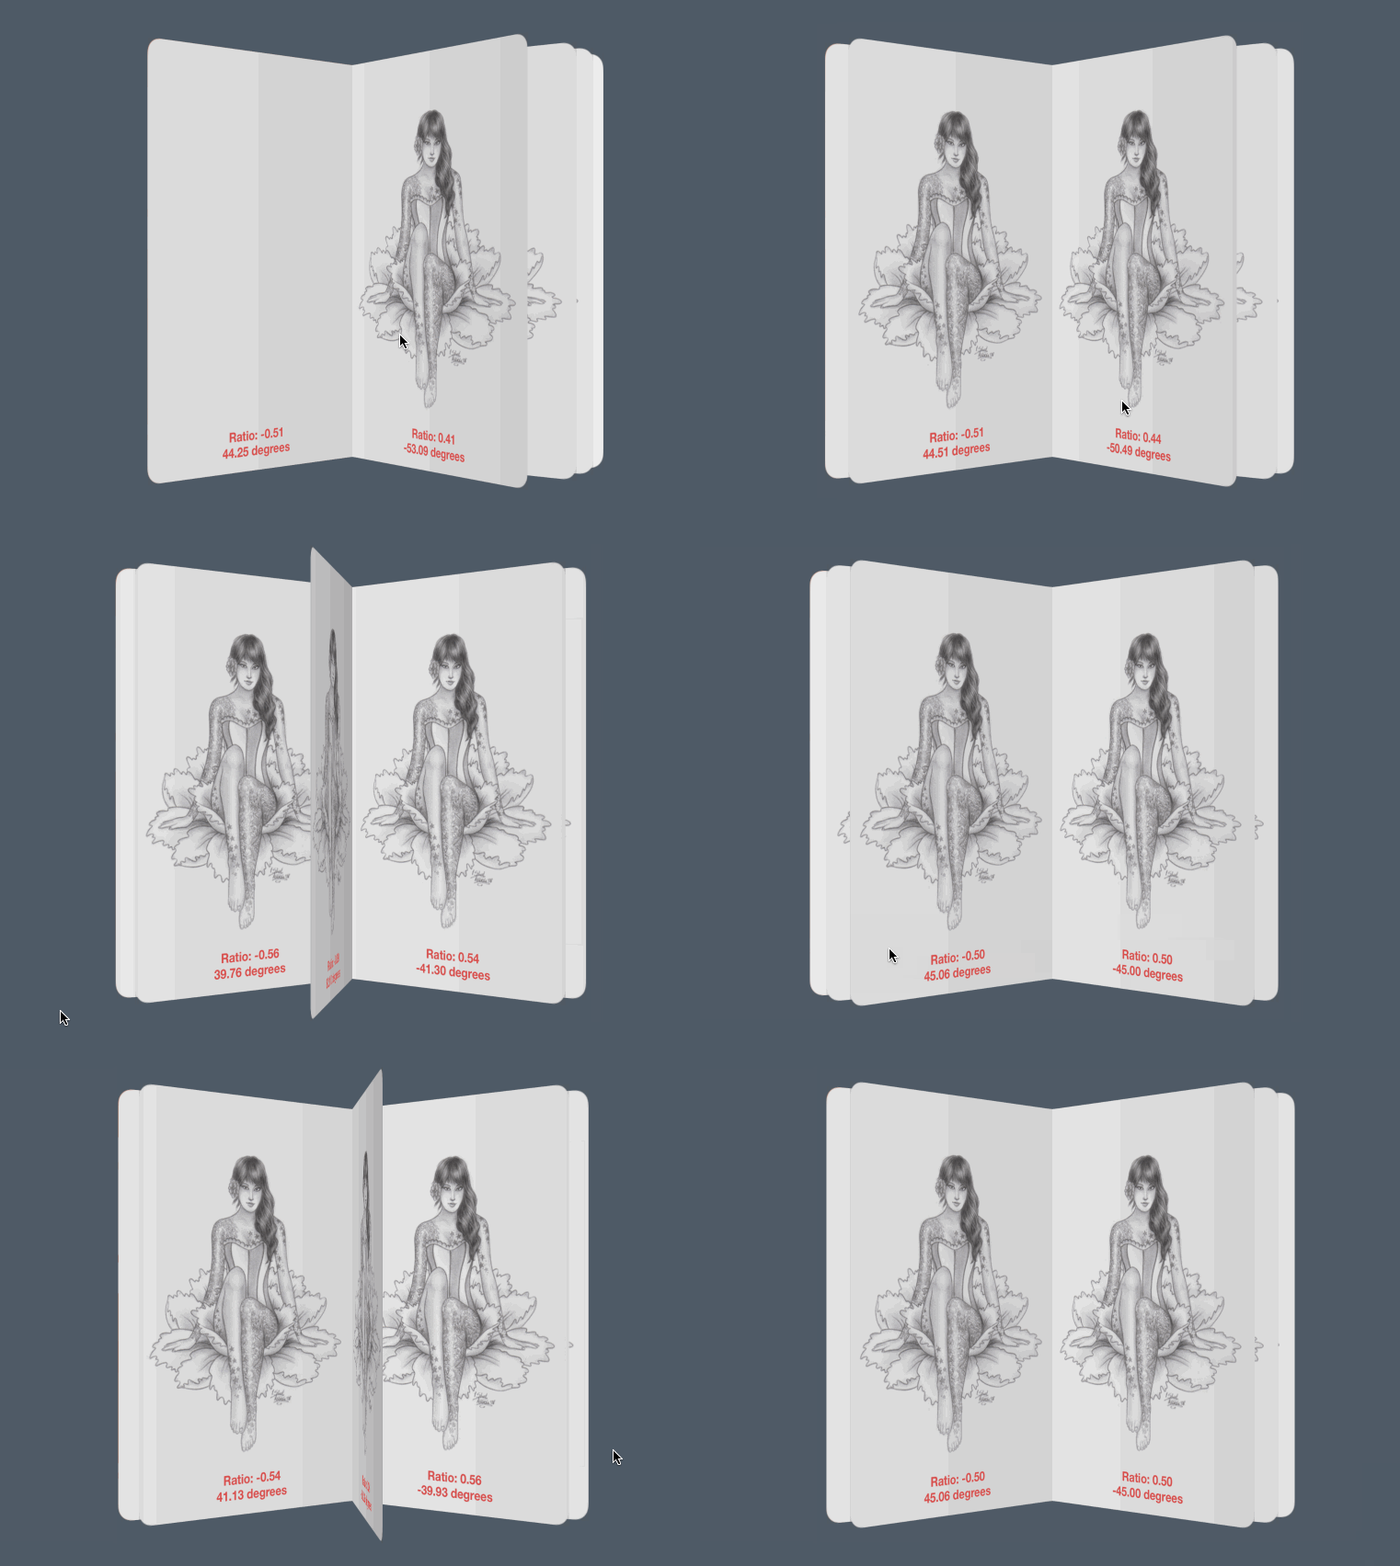
這看起來就像是一本真正的書! :]
在Book文件夾下新建一個Layout文件夾。在Layout文件夾上右鍵,選擇New File…,然後適用iOSSourceCocoa Touch Class模板,然後點Next。類名命名為BookLayout,繼承於UICollectionViewFlowLayout,語言選擇Swift。
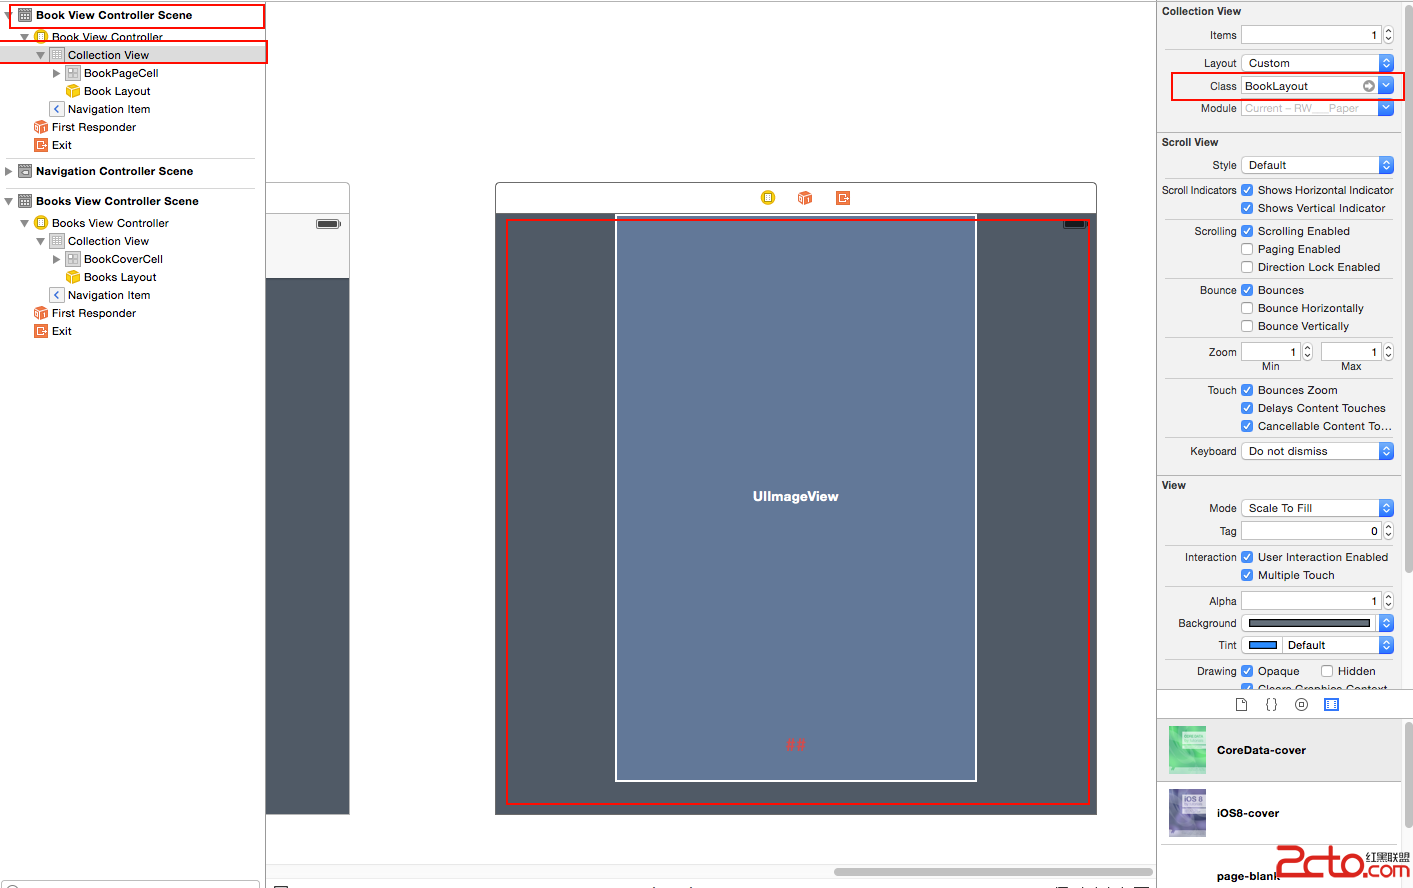
同前面一樣,圖書所使用的Collection View需要適用新的布局。打開Main.storyboard,然後選擇Book View Controller場景,展開並選中其中的Collection View,然後設置Layout屬性為Custom。
然後,將Layout屬性下的 Class屬性設置為BookLayout:
打開BookLayout.swift,在類聲明之上加入如下代碼:
private let PageWidth: CGFloat = 362
private let PageHeight: CGFloat = 568
private var numberOfItems = 0
這幾個常量將用於設置單元格的大小,以及記錄整本書的頁數。
接著,在類聲明內部加入代碼:
override func prepareLayout() {
  super.prepareLayout()
  collectionView?.decelerationRate = UIScrollViewDecelerationRateFast
  numberOfItems = collectionView!.numberOfItemsInSection(0)
  collectionView?.pagingEnabled = true
}
這段代碼和我們在BooksLayout中所寫的差不多,僅有以下幾處差別:
將減速速度設置為UIScrollViewDecelerationRateFast,以加快Scroll View滾動速度變慢的節奏。 記住本書的頁數。 啟用分頁,這樣Scroll View滾動時將以其寬度的固定倍數滾動(而不是持續滾動)。仍然在BookLayout.swift中,加入以下代碼:
override func shouldInvalidateLayoutForBoundsChange(newBounds: CGRect) -> Bool {
  return true
}
跟前面一樣,返回true,以表示用戶每次滾動都會重新計算布局。
然後,覆蓋collectionViewContentSize() ,以指定Collection View的contentSize:
override func collectionViewContentSize() -> CGSize {
  return CGSizeMake((CGFloat(numberOfItems / 2)) * collectionView!.bounds.width, collectionView!.bounds.height)
}
這個方法返回了內容區域的整個大小。內容區域的高度總是不變的,但寬度是隨著頁數變化的——即書的頁數除以2倍,再乘以屏幕寬度。除以2是因為書頁有兩面,內容區域一次顯示2頁。
就如我們在BooksLayout中所做的一樣,我們還需要覆蓋layoutAttributesForElementsInRect(_:)方法,以便我們能夠在單元格上增加翻頁效果。
在collectionViewContentSize()方法後加入:
override func layoutAttributesForElementsInRect(rect: CGRect) -> [AnyObject]? {
  //1
  var array: [UICollectionViewLayoutAttributes] = []

  //2
  for i in 0 ... max(0, numberOfItems - 1) {
    //3
    var indexPath = NSIndexPath(forItem: i, inSection: 0)
    //4
    var attributes = layoutAttributesForItemAtIndexPath(indexPath)
    if attributes != nil {
      //5
      array += [attributes]
    }
  }
  //6
  return array
}
不同於在BooksLayout中的將所有計算布局屬性的代碼放在這個方法裡面,我們這次將這個任務放到layoutAttributesForItemAtIndexPath(_:)中進行,因為在圖書的實現中,所有單元格都是同時可見的。
以上代碼解釋如下:
聲明一個數組,用於保存所有單元格的布局屬性。 遍歷所有的書頁。 對於CollecitonView中的每個單元格,都創建一個NSIndexPath。 通過每個NSIndexPath來獲得單元格的布局屬性,在後面,我們會覆蓋layoutAttributesForItemAtIndexPath(_:)方法。 把每個單元格布局屬性添加到數組。 返回數組。處理頁面的幾何計算
在我們開始實現layoutAttributesForItemAtIndexPath(_:)方法之前,花幾分鐘好好思考一下布局的問題,它是怎樣實現的,如果能夠寫幾個助手方法將會讓我們的代碼更漂亮和模塊化。:]
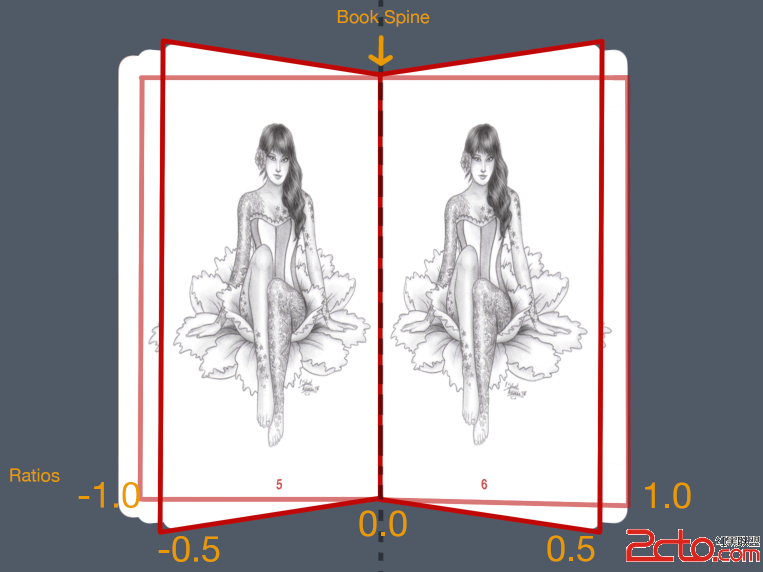
上圖演示了翻頁時以書籍為軸旋轉的過程。圖中書頁的”打開度“用-1到1來表示。為什麼?你可以想象一下放在桌子上的一本書,書脊所在的位置代表0.0。當你從左向右翻動書頁時,書頁張開的程度從-1(最左)到1(最右)。因此,我們可以用下列數字表示“翻頁”的過程:
0.0表示一個書頁翻成90度,與桌面成直角。 +/-0.5表示書頁翻至於桌面成45度角。 +/-1.0表示書頁翻至與桌面平行。注意,因為角度是按照反時針方向增加的,因此角度的符號和對應的打開度是相反的。
首先,在layoutAttributesForElementsInRect(_:)方法後加入助手方法:
//MARK: - Attribute Logic Helpers

func getFrame(collectionView: UICollectionView) -> CGRect {
  var frame = CGRect()

  frame.origin.x = (collectionView.bounds.width / 2) - (PageWidth / 2) + collectionView.contentOffset.x
  frame.origin.y = (collectionViewContentSize().height - PageHeight) / 2
  frame.size.width = PageWidth
  frame.size.height = PageHeight

  return frame
}
對於每一頁,我們都可以計算出相對於Collection View中心的frame。getFrame(_:)方法會將每一頁的一邊對齊到書脊。唯一會變的是Collectoin View的contentOffset在x方向上的改變。
然後,在getFrame(_:)方法後添加如下方法:
func getRatio(collectionView: UICollectionView, indexPath: NSIndexPath) -> CGFloat {
  //1
  let page = CGFloat(indexPath.item - indexPath.item % 2) * 0.5

  //2
  var ratio: CGFloat = -0.5 + page - (collectionView.contentOffset.x / collectionView.bounds.width)

  //3
  if ratio > 0.5 {
    ratio = 0.5 + 0.1 * (ratio - 0.5)

  } else if ratio < -0.5 {
    ratio = -0.5 + 0.1 * (ratio + 0.5)
  }

  return ratio
}
上面的方法計算書頁翻開的程度。對每一段有注釋的代碼分別說明如下:
算出書頁的頁碼——記住,書是雙面的。 除以2就是你真正在翻讀的那一頁。 算出書頁的打開度。注意,這個值被我們加了一個權重。 書頁的打開度必須限制在-0.5到0.5之間。另外乘以0.1的作用,是為位了在頁與頁之間增加一條細縫,以表示它們是上下疊放在一起的。一旦我們計算出書頁的打開度,我們就可以將之轉變為旋轉的角度。
在getRation(_:indexPath:)方法後面加入代碼:
func getAngle(indexPath: NSIndexPath, ratio: CGFloat) -> CGFloat {
  // Set rotation
  var angle: CGFloat = 0

  //1
  if indexPath.item % 2 == 0 {
    // The book's spine is on the left of the page
    angle = (1-ratio) * CGFloat(-M_PI_2)
  } else {
    //2
    // The book's spine is on the right of the page
    angle = (1 + ratio) * CGFloat(M_PI_2)
  }
  //3
  // Make sure the odd and even page don't have the exact same angle
  angle += CGFloat(indexPath.row % 2) / 1000
  //4
  return angle
}
這個方法中有大量計算,我們一點點拆開來看:
判斷該頁是否是偶數頁。如果是,則該頁將翻到書脊的右邊。翻到右邊的頁是反手翻轉,同時書脊右邊的頁其角度必然是負數。注意,我們將打開度定義為-0.5到0.5之間。 如果當前頁是奇數,則該頁將位於書脊左邊,當書頁被翻到左邊時,它的按正手翻轉,書脊左邊的頁其角度為正數。 每頁之間加一個小夾角,使它們彼此分離。 返回旋轉角度。得到旋轉角度之後,我們可以操縱書頁使其旋轉。增加如下方法:
func makePerspectiveTransform() -> CATransform3D {
  var transform = CATransform3DIdentity
  transform.m34 = 1.0 / -2000
  return transform
}
修改轉換矩陣的m34屬性,已達到一定的立體效果。
然後應用旋轉動畫。實現下面的方法:
func getRotation(indexPath: NSIndexPath, ratio: CGFloat) -> CATransform3D {
  var transform = makePerspectiveTransform()
  var angle = getAngle(indexPath, ratio: ratio)
  transform = CATransform3DRotate(transform, angle, 0, 1, 0)
  return transform
}
在這個方法中,我們用到了剛才創建的兩個助手方法去計算旋轉的角度,然後通過一個CATransform3D對象讓書頁在y軸上旋轉。
所有的助手方法都實現了,我們最終需要配置每個單元格的屬性。在layoutAttributesForElementsInRect(_:)方法後加入以下方法:
override func layoutAttributesForItemAtIndexPath(indexPath: NSIndexPath) -> UICollectionViewLayoutAttributes! {
  //1
  var layoutAttributes = UICollectionViewLayoutAttributes(forCellWithIndexPath: indexPath)

  //2
  var frame = getFrame(collectionView!)
  layoutAttributes.frame = frame

  //3
  var ratio = getRatio(collectionView!, indexPath: indexPath)

  //4
  if ratio > 0 && indexPath.item % 2 == 1
     || ratio < 0 && indexPath.item % 2 == 0 {
    // Make sure the cover is always visible
    if indexPath.row != 0 {
      return nil
    }
  }
  //5
  var rotation = getRotation(indexPath, ratio: min(max(ratio, -1), 1))
  layoutAttributes.transform3D = rotation

  //6
  if indexPath.row == 0 {
    layoutAttributes.zIndex = Int.max
  }

  return layoutAttributes
}
在Collection View的每個單元格上,都會調用這個方法。這個方法做了如下工作:
創建一個UICollectionViewLayoutAttributes對象layoutAttributes,供IndexPath所指的單元格使用。 調用我們先前定義的getFrame方法設置layoutAttributes的frame,確保單元格對齊於書脊。 調用先前定義的getRatio方法算出單元格的打開度。 判斷當前頁是否位於正確的打開度范圍之內。如果不,不顯示該單元格。為了優化(也是為了符合常理),除了正面向上的書頁,我們不應當顯示書頁的背面——書的封面例外,那個不管什麼時候都需要顯示。 應用旋轉動畫,使用前面算出的打開度。 判斷是否是第一頁,如果是,將它的zIndex放在其他頁的上面,否則有可能出現畫面閃爍的Bug。編譯,運行。打開書,翻動每一頁……呃?什麼情況?

書被錯誤地從中間裝訂了,而不是從書的側邊裝訂。
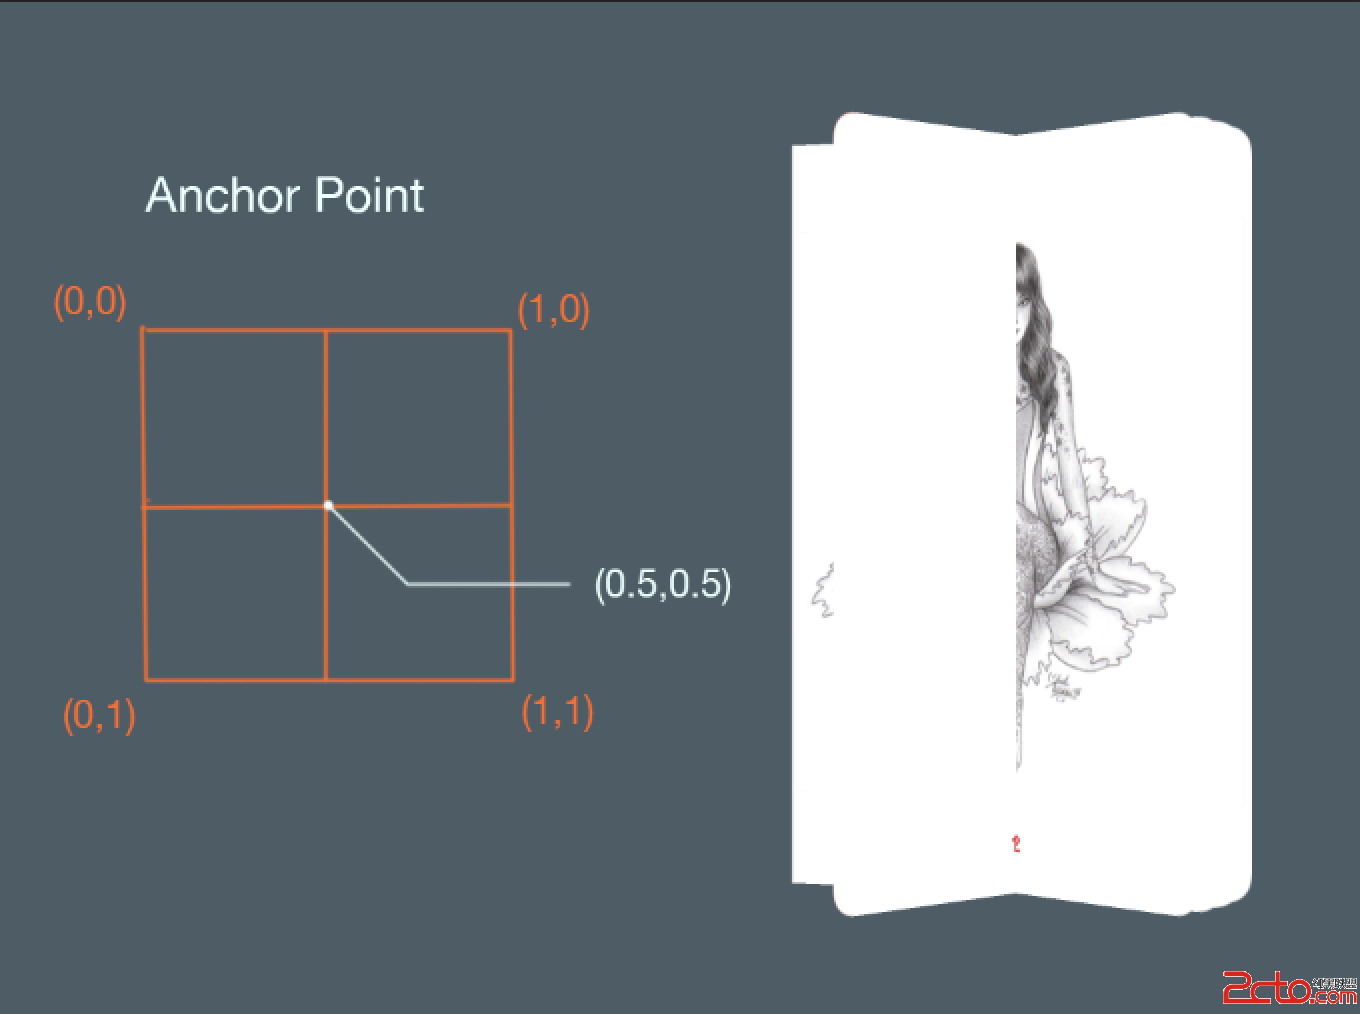
如圖中所示,每個書頁的錨點默認是x軸和y軸的0.5倍處。現在你知道怎麼做了嗎?
很顯然,我們需要修改書頁的錨點為它的側邊緣。如果這個書頁是位於書的右邊,則它的錨點應該是(0,0.5)。如果書頁是位於書的左邊,測錨點應該是(1,0.5)。
打開BookePageCell.swift,添加如下代碼:
override func applyLayoutAttributes(layoutAttributes: UICollectionViewLayoutAttributes!) {
  super.applyLayoutAttributes(layoutAttributes)
  //1
  if layoutAttributes.indexPath.item % 2 == 0 {
    //2
    layer.anchorPoint = CGPointMake(0, 0.5)
    isRightPage = true
    } else { //3
      //4
      layer.anchorPoint = CGPointMake(1, 0.5)
      isRightPage = false
    }
    //5
    self.updateShadowLayer()
}
我們重寫了applyLayoutAttributes(_:)方法,這個方法用於將BookLoayout創建的布局屬性應用到第一個。
上述代碼非常簡單:
編譯,運行。翻動書頁,這次的效果已經好了許多:
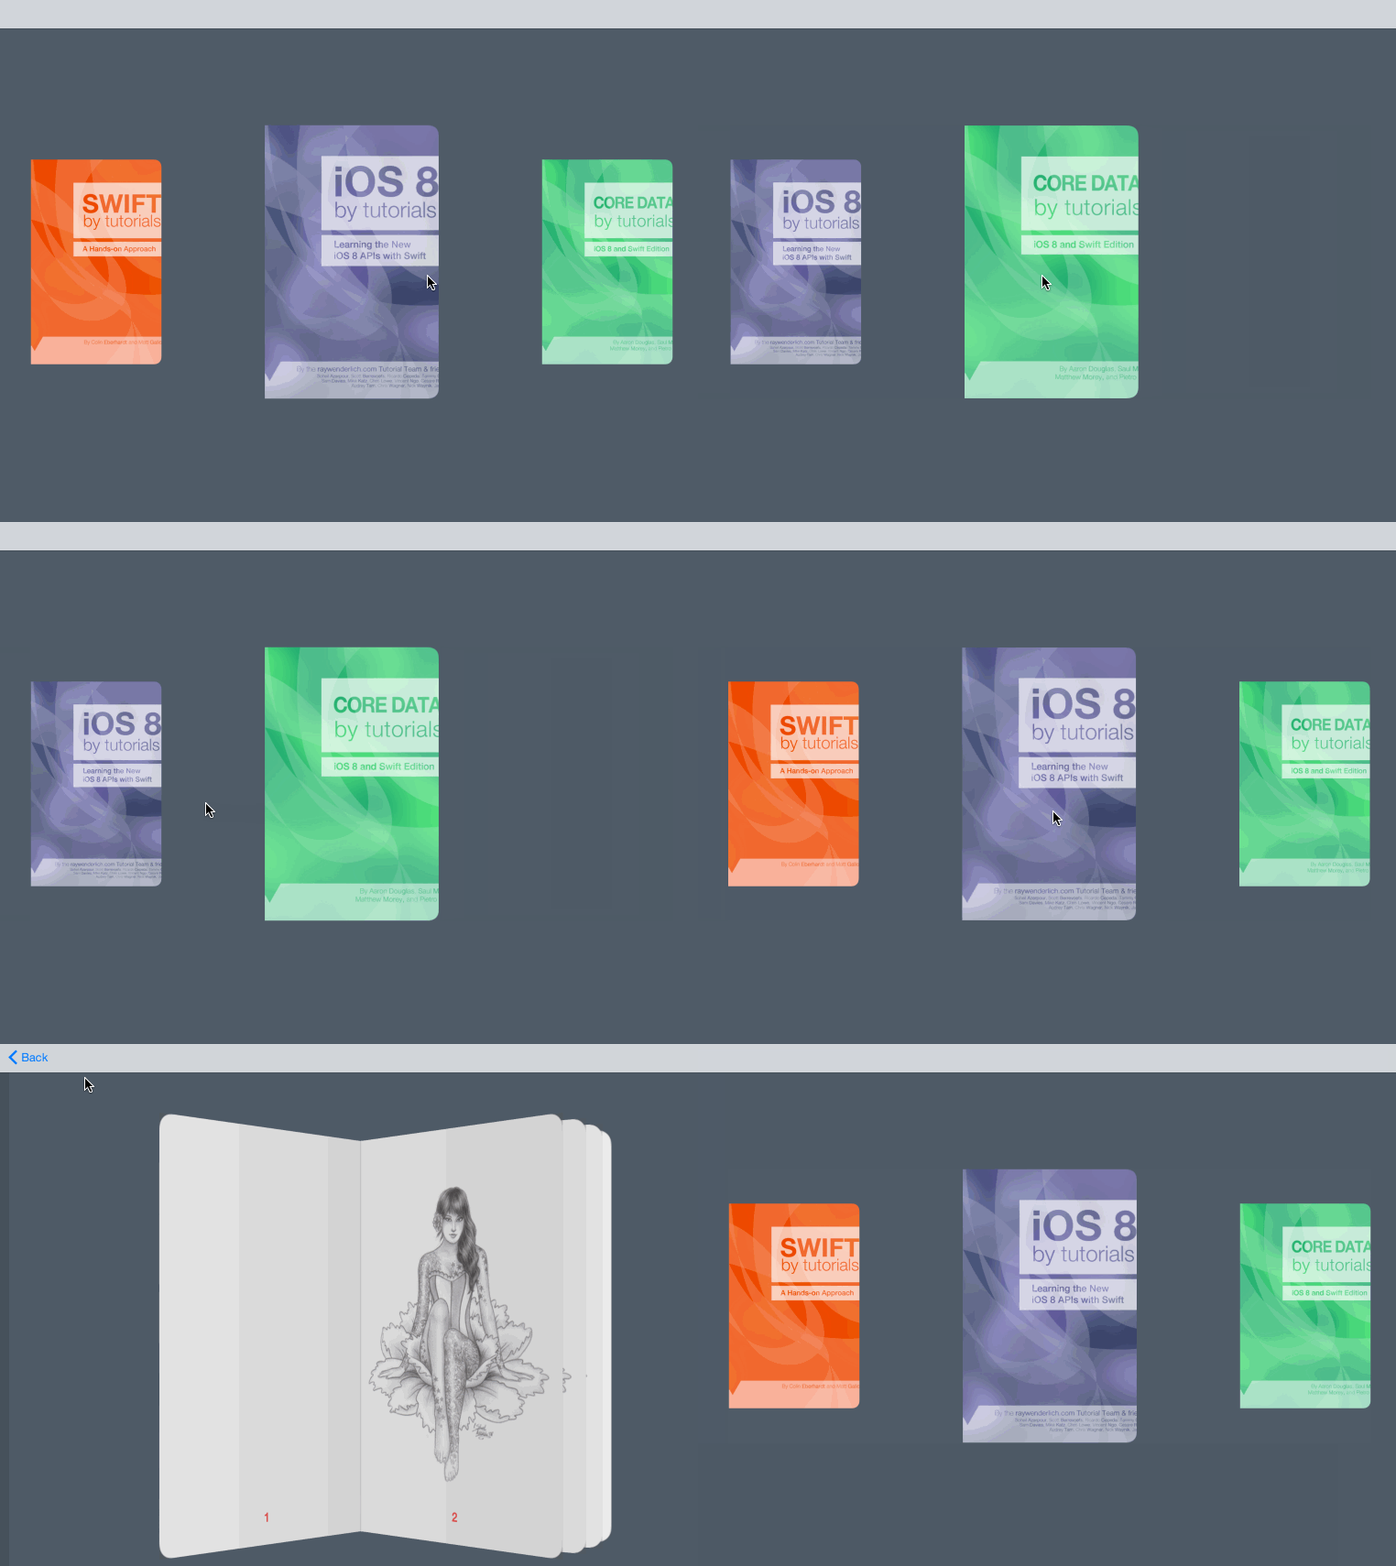
本教程第一部分就到此為止了。你是不是覺得自己干了一件了不起的事情呢——效果做得很棒,不是嗎?
- ReactiveCocoa 4 如何運用冷熱信號
- iOS------教你如何APP怎樣加急審核
- iOS之如何啟動app時全屏顯示Default.png(圖片)
- iOS利用AFNetworking實現文件上傳的示例代碼
- iOS 使用 socket 實現即時通信示例(非第三方庫)
- ios swift3.0實現二維碼掃描、生成、識別示例代碼
- IOS 開發狀態欄隱藏的實現辦法
- IOS購物車界面實現效果示例
- iOS中UITableView Cell實現自定義單選功能
- iOS實現錄音轉碼MP3及轉碼BASE64上傳示例
- PrefixHeader.pch file not found 以及 Xcode 中如何添加pch文件
- AIR Native Extension for iOS 接入第三方sdk 如何實現 AppDelegate 生命周期
- iOS使用分類(category)實現有序字典
- iOS 利用runtime 實現全局字體的改變
- 類比Spring框架來實現OC中的依賴注入


