iOS UI10_tableView的編輯
編輯:IOS開發綜合
//
//  MainViewController.m
//  UI10_tableView的編輯
//
//  Created by dllo on 15/8/11.
//  Copyright (c) 2015年 zhozhicheng. All rights reserved.
//

#import MainViewController.h

@interface MainViewController ()
@property(nonatomic,retain)NSMutableArray *arr;
@property(nonatomic,retain)UITableView *tableView;
@end

@implementation MainViewController
-(void)dealloc
{
    [_arr release];
    [_tableView release];
    [super dealloc];
}

-(instancetype)initWithNibName:(NSString *)nibNameOrNil bundle:(NSBundle *)nibBundleOrNil
{
    self=[super initWithNibName:nibNameOrNil bundle:nibBundleOrNil];
    if (self) {
        self.arr = [NSMutableArray arrayWithObjects:@宋江, @盧俊義, @吳用, @公孫勝, @關勝, @林沖, @秦明 ,@呼延灼 , @花容,@柴進, @李應, @朱仝,@魯智深,@武松,nil];
    }return self;
}

- (void)viewDidLoad {
    [super viewDidLoad];
    // Do any additional setup after loading the view.
    self.navigationController.navigationBar.translucent=NO;

    self.tableView=[[UITableView alloc] initWithFrame:CGRectMake(0, 0, self.view.frame.size.width, self.view.frame.size.height-64) style:UIControlStateNormal];
    [self.view addSubview:self.tableView];
    [self.tableView release];

    self.tableView.delegate=self;
    self.tableView.dataSource=self;
    //編輯按鈕
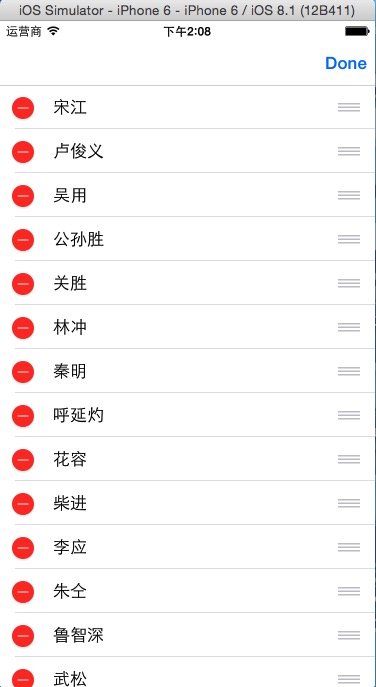
    self.navigationItem.rightBarButtonItem=self.editButtonItem;
//    //直接打開tableview的可編輯模式
//    [self.tableView setEditing:YES animated:YES];


}
#pragma mark 重寫系統的編輯按鈕點擊觸發的方法
-(void)setEditing:(BOOL)editing animated:(BOOL)animated
{
    [super setEditing:editing animated:animated];
    [self.tableView setEditing:editing animated:YES];
}
#pragma mark 設置哪些行可以進行編輯
-(BOOL)tableView:(UITableView *)tableView canEditRowAtIndexPath:(NSIndexPath *)indexPath
{
//    //奇數行可編輯,偶數不可以
//    if (indexPath.row % 2 == 1) {
//        return YES;
//    }else{
//        return NO;
//    }
    return YES;

}
//刪除
-(UITableViewCellEditingStyle)tableView:(UITableView *)tableView editingStyleForRowAtIndexPath:(NSIndexPath *)indexPath
{
    return UITableViewCellEditingStyleDelete;
}

//刪除數據
-(void)tableView:(UITableView *)tableView commitEditingStyle:(UITableViewCellEditingStyle)editingStyle forRowAtIndexPath:(NSIndexPath *)indexPath
{
    if (editingStyle == UITableViewCellEditingStyleDelete) {
        //先刪除數據源
        [self.arr removeObjectAtIndex:indexPath.row];
//        [self.tableView reloadData];

        //通過tableview來刪除上面的cell
        //第一個參數:指定刪除的哪一個分區的哪一行,把它作為一個元素放在數組中
        //第二個參數:刪除動畫
        [self.tableView deleteRowsAtIndexPaths:@[indexPath] withRowAnimation:UITableViewRowAnimationLeft];


    }
}
//修改刪除按鈕的標題
-(NSString *)tableView:(UITableView *)tableView titleForDeleteConfirmationButtonForRowAtIndexPath:(NSIndexPath *)indexPath
{
    return @來點我啊;
}
//置頂和刪除 iOS8.0才有的
-(NSArray *)tableView:(UITableView *)tableView editActionsForRowAtIndexPath:(NSIndexPath *)indexPath
{
    UITableViewRowAction *deleteAction=[UITableViewRowAction rowActionWithStyle:UITableViewRowActionStyleDefault title:@刪除 handler:^(UITableViewRowAction *action, NSIndexPath *indexPath) {
        //按鈕點擊所要觸發的事件,都是寫在block中
        NSLog(@觸發了刪除);

    }];
    deleteAction.backgroundColor=[UIColor cyanColor];


    UITableViewRowAction *topAction=[UITableViewRowAction rowActionWithStyle:UITableViewRowActionStyleDefault title:@置頂 handler:^(UITableViewRowAction *action, NSIndexPath *indexPath) {
        NSLog(@zhiding);

        NSString *temp=self.arr[indexPath.row];
        [self.arr removeObjectAtIndex:indexPath.row];
        [self.arr insertObject:temp atIndex:0];
        [self.tableView reloadData];
    }];
    topAction.backgroundColor=[UIColor redColor];


    return @[deleteAction,topAction];

}

//移動
-(void)tableView:(UITableView *)tableView moveRowAtIndexPath:(NSIndexPath *)sourceIndexPath toIndexPath:(NSIndexPath *)destinationIndexPath
{
    //先獲取到起始位置的數據
    NSString *str=[self.arr[sourceIndexPath.row] retain];
    //2.把起始位置對象從數據源中移除
    [self.arr removeObjectAtIndex:sourceIndexPath.row];
    //3.把數據插入到數組的目的位置上去
    [self.arr insertObject:str atIndex:destinationIndexPath.row];
    [str release];
}

-(NSInteger)tableView:(UITableView *)tableView numberOfRowsInSection:(NSInteger)section
{
        return self.arr.count;


}

-(UITableViewCell *)tableView:(UITableView *)tableView cellForRowAtIndexPath:(NSIndexPath *)indexPath
{


    static NSString *reuse=@reuse;
    UITableViewCell *cell =[tableView dequeueReusableCellWithIdentifier:reuse];
    if (!cell) {
        cell =[[[UITableViewCell alloc] initWithStyle:UITableViewCellStyleValue1 reuseIdentifier:reuse] autorelease];
    }
    cell.textLabel.text=self.arr[indexPath.row];
    return cell;
}


- (void)didReceiveMemoryWarning {
    [super didReceiveMemoryWarning];
    // Dispose of any resources that can be recreated.
}

/*
#pragma mark - Navigation

// In a storyboard-based application, you will often want to do a little preparation before navigation
- (void)prepareForSegue:(UIStoryboardSegue *)segue sender:(id)sender {
    // Get the new view controller using [segue destinationViewController].
    // Pass the selected object to the new view controller.
}
*/

@end

相關文章
+


