ios開發——仿新版QQ側滑導航欄的實現
新版QQ在UI方面做了不少更新,其中一個比較炫酷的效果就是其側滑導航欄。雖然這種UI已經是被模仿來模仿去爛掉牙了,雖然有統計說這種設計的用戶體驗並不好。但是我本人還是非常喜歡這種效果的,於是跑去網上學習了一下。這裡記錄一下其實現。
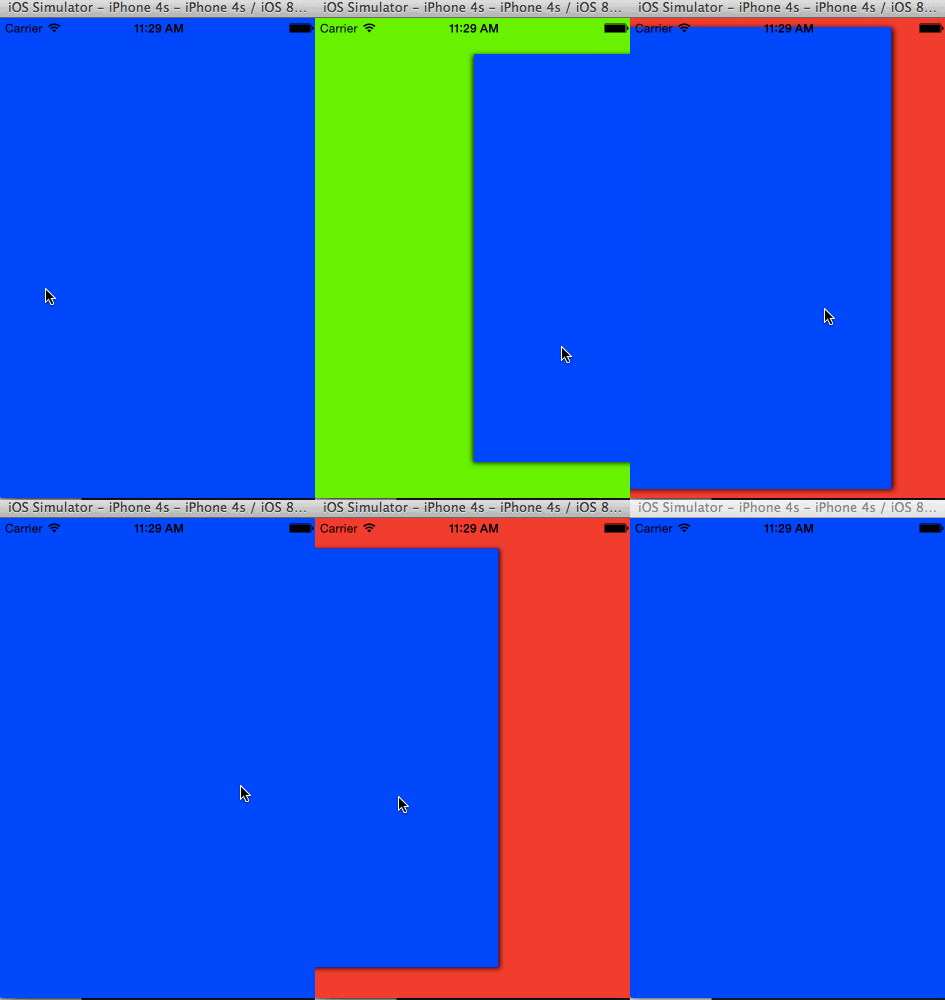
一、效果展示:

二、實現思路
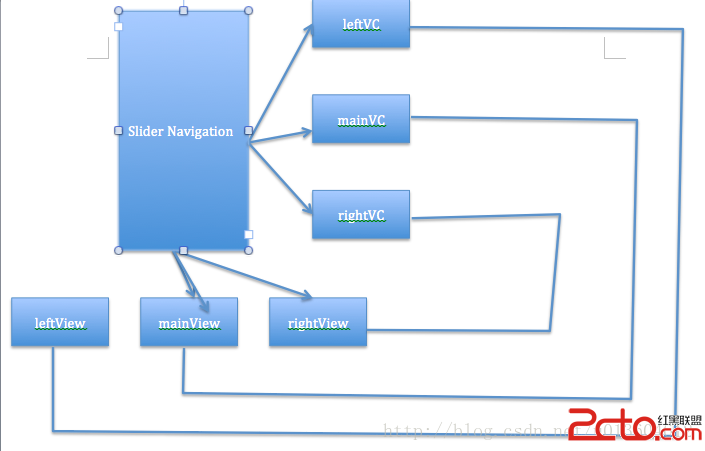
關系圖:

如上圖所示,主要思路如下:
1、SliderNavigation擁有三個子視圖:leftView,rightView,mainView。左右滑動時就通過這三個視圖之間層次關系的切換來實現。
2、其實只有上述三個視圖完全夠了,但是又另外加上了三個屬性:leftVC,rightVC,mainVC。這樣做的目的是簡化操作,同時mainVC還有記錄已展示過的視圖的任務,這樣所有視圖都可以通過左右滑動喚出導航欄來了。這樣每個子視圖上展示的是對應控制器的視圖,即[leftView addSubview:leftVC.view];,其他類似。
3、當向左滑動時,調整視圖層級關系,因為向左滑動是展示右視圖,所以將leftView調整到最底層,同時讓mainView隨手指移動,這樣mainView之下的rightView就展示出來了。
4、有了上述三點,接下來就可以通過給各個環節添加動畫來實現好看的效果了。
三、接口定義
.h文件中定義好外界可以自定義的一些屬性。
首先是三個控制器
//左右控制器與主控制器
@property (strong, nonatomic) UIViewController *leftController;
@property (strong, nonatomic) UIViewController *rightController;
@property (strong, nonatomic) UIViewController *mainController;
其次是左右視圖的一些相關設定,有判斷點、便宜量、動畫時間、能否被拉出等
//左右視圖被拉出以後主視圖的X方向的offset(正值)
@property (assign, nonatomic) CGFloat leftOffsetX;
@property (assign, nonatomic) CGFloat rightOffsetX;

//左右視圖被拉的過程中的判斷點的X值(正值)
@property (assign, nonatomic) CGFloat leftJudgeX;
@property (assign, nonatomic) CGFloat rightJudegX;

//左右視圖拉出所用的時間
@property (assign, nonatomic) NSTimeInterval leftOpenDuration;
@property (assign, nonatomic) NSTimeInterval rightOpenDuration;

//左右視圖收回時所用的時間
@property (assign, nonatomic) NSTimeInterval leftCloseDuration;
@property (assign, nonatomic) NSTimeInterval rightCloseDuration;

//左右視圖被拉出以後主視圖放縮的比例(0到1)
@property (assign, nonatomic) CGFloat rightScale;
@property (assign, nonatomic) CGFloat leftScale;

//左右視圖能否被拉出
@property (assign, nonatomic) BOOL canShowRight;
@property (assign, nonatomic) BOOL canShowLeft;
剛才也說過,mainVC要記下已經展示過的主視圖,可以將這些加入到字典中,這樣做的作用是下次可以方便的展示出來。另外,讓每一個想展示的視圖對應的控制器賦值給mainVC可以實現在所有界面中都能通過左右拉來叫出導航欄的功能。什麼意思呢?最根部的依舊是我們封裝的sliderNavigation類,其上圖的層次依舊存在,只是改變了mainVC的值,這樣給用戶的體驗就是,雖然主界面變了,但依然可以拉出左右導航欄來。
為此我們設置一個字典來保存已經展示過的控制器
//用以記錄被當做主控制器展示主視圖過的控制器
@property (strong, nonatomic) NSMutableDictionary *controllersDict;
接下來是幾個public方法聲明,將這種Manager性質的類作為單例,暴露出其展示左右視圖的功能供按鈕控制,然後是可以讓其展示自定義類作為主界面。
//單例
+ (id)sharedInstance;

//展示左右視圖
- (void)showLeftView;
- (void)showRightView;

//展示自定義類的主視圖,參數:自定義類名
- (void)showContentViewWithModel:(NSString *)className;
四、具體實現
首先定義一些常量
//制造反彈的動態效果,當通過按鈕叫出導航欄時有效
static const CGFloat kOpenSpringDamping = 0.65f;
static const CGFloat kOpenSpringVelocity = 0.10f;

//定義常量表示拉動方向
typedef NS_ENUM(NSUInteger, sliderMoveDirection) {
    SliderMoveDirectionLeft = 0,
    SliderMoveDirectionRight,
};
然後重點這裡講一下關鍵代碼或方法,其余的講一下思路
我們可以在初始化方法中將接口中聲明的變量賦默認值,當用戶沒有為這些值賦值時便可以用這些默認值
首先我們初始化三個子視圖為屏幕大小並根據添加到sliderNavigation的子視圖中,注意添加順序:我們希望讓主視圖在最上方,所以前兩個隨意,主視圖必須最後添加。
- (void)_initSubviews
{
    _rightView = [[UIView alloc] initWithFrame:self.view.bounds];
    [self.view insertSubview:_rightView atIndex:0];

    _leftView = [[UIView alloc] initWithFrame:self.view.bounds];
    [self.view insertSubview:_leftView atIndex:1];

    //主視圖要最後添加(即添加到最上面顯示)
    _mainView = [[UIView alloc] initWithFrame:self.view.bounds];
    [self.view insertSubview:_mainView aboveSubview:_leftView];
}
然後我們初始化左右控制器,將左右控制器視圖分別添加到左右視圖中去。
在實現上述public方法“展示自定義類的主視圖”時,傳入參數為類名,將其作為鍵來從字典中取控制器,如果沒有則以此類名新建一個控制器並加入到字典中。如果當前主視圖上已經有視圖,則將其移除。接著將自定義類的視圖添加到mainView上,並相應賦值。
當然,不要忘了關閉左右導航欄(因為展示的類有可能是通過左右導航欄點出來的)
- (void)showContentViewWithModel:(NSString *)className
{
    [self _closeSliderNavigation];

    UIViewController *controller = [self.controllersDict objectForKey:className];
    if (controller == nil) {
        Class c = NSClassFromString(className);
        controller = [[c alloc] init];
        [self.controllersDict setObject:controller forKey:className];
    }

    //如果當前已經有視圖被顯示,則將其取消
    if (_mainView.subviews.count > 0) {
        [[_mainView.subviews firstObject] removeFromSuperview];
    }

    controller.view.frame = _mainView.frame;
    [_mainView addSubview:controller.view];

    self.mainController = controller;
}
接著是動畫,這裡用到的動畫主要就是改變視圖的大小和位置,用transform即可。獲得transform的方法單獨抽出來,使用concat將大小變換矩陣和位置變換矩陣連接。接著在動畫塊中改變主視圖的transform即可,當然了,也可以設置上陰影效果等。需要注意的是要根據滑動方向將相應視圖調整到最底層。
    CGAffineTransform concat = [self _transformWithMoveDirection:SliderMoveDirectionLeft];

    [self.view sendSubviewToBack:_leftView];				   //將另一個視圖調到最下面
    [self _configureViewShadowWithDirection:SliderMoveDirectionLeft];      //設置陰影

    [UIView animateWithDuration:self.rightOpenDuration
                          delay:0
         usingSpringWithDamping:kOpenSpringDamping			   //彈性效果
          initialSpringVelocity:kOpenSpringVelocity
                        options:UIViewAnimationOptionCurveLinear
                     animations:^{
                         _mainView.transform = concat;
                     }
                     completion:^(BOOL finished) {
                         _showingLeft = NO;
                         _showingRight = YES;
                         self.mainController.view.userInteractionEnabled = NO;
                         _tapGesture.enabled = YES;
                     }];
另一方向的雷同
最主要的還是滑動手勢操作,也是比較麻煩的地方。不過其實思路比較清晰:獲取偏移量,在滑動時計算出對應的變換矩陣並設置,在滑動結束時根據位置與判斷點的關系做出相應的動畫調整。
例如,滑動過程中向右拉時:
        CGFloat translateX = [recognizer translationInView:_mainView].x;
        translateX += currentOffsetX;

        float scale = 0;
        //向右拉,展示的是左視圖
        if (translateX > 0) {
            if (self.canShowLeft == NO || self.leftController == nil) {
                return;
            }

            //將右視圖放到底部以將左視圖顯示出來
            [self.view sendSubviewToBack:_rightView];
            [self _configureViewShadowWithDirection:SliderMoveDirectionRight];

            if (_mainView.frame.origin.x < self.leftOffsetX) {
                scale = 1 - (_mainView.frame.origin.x / self.leftOffsetX) * (1 - self.leftScale);
            } else {
                scale = self.leftScale;
            }

        } else if (translateX < 0) {……}
比較頭痛的十scale的計算。這裡的要求是當view從最初到最末時scale的變化為1.0到self.leftScale,因此利用數學知識推出這個公式即可。上述代碼省略了向左拉的代碼。
而在拉動結束狀態則與左拉右拉動畫實現類似。
        CGFloat translateX = [recognizer translationInView:_mainView].x;
        translateX += currentOffsetX;

        if (translateX > self.leftJudgeX) {
            if (self.canShowLeft == NO || self.leftController == nil) {
                return;
            }

            CGAffineTransform trans = [self _transformWithMoveDirection:SliderMoveDirectionRight];
            [UIView beginAnimations:nil context:nil];
            _mainView.transform = trans;
            [UIView commitAnimations];

            _showingLeft = YES;
            _showingRight = NO;
            self.mainController.view.userInteractionEnabled = NO;
            _tapGesture.enabled = YES;

        } else if (translateX < -self.rightJudgeX) {……}


