iOS Quartz: CGPathAddArc和CGPathAddArcToPoint函數
CGPathAddArc函數是通過圓心和半徑定義一個圓,然後通過兩個弧度確定一個弧線。注意弧度是以當前坐標環境的X軸開始的。
需要注意的是由於iOS中的坐標體系是和Quartz坐標體系中Y軸相反的,所以iOS UIView在做Quartz繪圖時,Y軸已經做了Scale為-1的轉換,因此造成CGPathAddArc函數最後一個是否是順時針的參數結果正好是相反的,也就是說如果設置最後的參數為YES,根據參數定義應該是順時針的,但實際繪圖結果會是逆時針的!
比如,我們設置起點弧度為0,終點弧度為1.5 * PI(等於270角度),然後最後的clockwise參數為NO,代碼:
CGPathAddArc(<#CGMutablePathRef path#>, <#const CGAffineTransform *m#>, <#CGFloat x#>, <#CGFloat y#>, <#CGFloat radius#>, <#CGFloat startAngle#>, <#CGFloat endAngle#>, <#bool clockwise#>)
- (void)viewDidLoad
{
[super viewDidLoad];
//創建CGContextRef
UIGraphicsBeginImageContext(self.view.bounds.size);
CGContextRef gc = UIGraphicsGetCurrentContext();
//=== 繪畫邏輯 ===
//創建用於轉移坐標的Transform,這樣我們不用按照實際顯示做坐標計算
CGAffineTransform transform = CGAffineTransformMakeTranslation(50, 50);
//創建CGMutablePathRef
CGMutablePathRef path = CGPathCreateMutable();
CGPathAddArc(path, &transform, 50, 50, 50, 0, 1.5 * M_PI, NO);
CGPathMoveToPoint(path, &transform, 50, 0);
CGPathAddLineToPoint(path, &transform, 50, 50);
CGPathAddLineToPoint(path, &transform, 100, 50);
//將CGMutablePathRef添加到當前Context內
CGContextAddPath(gc, path);
[[UIColor grayColor] setFill];
[[UIColor blueColor] setStroke];
CGContextSetLineWidth(gc, 2);
//執行繪畫
CGContextDrawPath(gc, kCGPathFillStroke);
//從Context中獲取圖像,並顯示在界面上
UIImage *img = UIGraphicsGetImageFromCurrentImageContext();
UIGraphicsEndImageContext();
UIImageView *imgView = [[UIImageView alloc] initWithImage:img];
[self.view addSubview:imgView];
}
輸出:
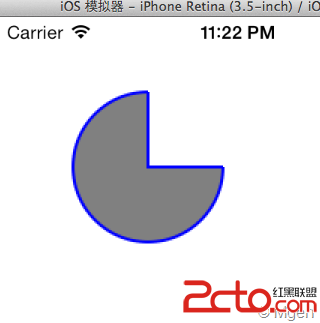
結果會是順時針繪制弧線.
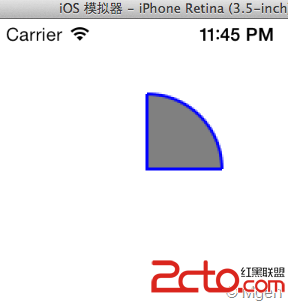
如果把CGPathAddArc函數改成這樣:
//雖然順時針參數是YES,在iOS中的UIView中,這裡實際是逆時針。所以只會畫出1/4。
CGPathAddArc(path, &transform, 50, 50, 50, 0, 1.5 * M_PI, YES);
雖然順時針參數是YES,在iOS中,這裡實際是逆時針。所以只會畫出1/4。結果會是:
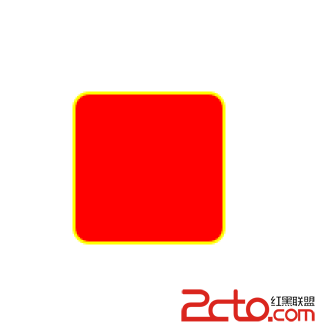
而CGContextAddArcToPoint函數則是另一種繪制弧線的方式,同樣可以參考那個SO回答的截圖.它是通過畫兩個虛擬的線來完成繪圖的,這兩條線是通過當前CGContextRef的點,和CGContextAddArcToPoint函數本身定義的兩個點來完成的。而弧線會從當前CGContextRef的點開始,畫到中心圓與第二條線的交點處。這樣的畫弧方式,在某些情況下可以使CGContextAddArcToPoint函數比CGPathAddArc用起來更加方便些。比如花圓角矩形。
//創建CGContextRef
UIGraphicsBeginImageContext(self.view.bounds.size);
CGContextRef gc = UIGraphicsGetCurrentContext();
//=== 繪畫邏輯 ===
//創建用於轉移坐標的Transform,如許我們不消遵守實際顯示做坐標策畫
CGAffineTransform transform = CGAffineTransformMakeTranslation(100,200);
//創建CGMutablePathRef
CGMutablePathRef path = CGPathCreateMutable();
//半徑為30
CGFloat radius = 10;
//初始點為(0, 0)
CGPathMoveToPoint(path, &transform, 10, 0);
//右上角和右下角兩個點,畫出半個圓角
CGPathAddArcToPoint(path, &transform, 100, 0, 100, 100, radius);
//右下角和左下角兩個點,畫出別的半個圓角
CGPathAddArcToPoint(path, &transform, 100, 100, 0, 100, radius);
CGPathAddArcToPoint(path, &transform, 0, 100, 0, 0, radius);
CGPathAddArcToPoint(path, &transform, 0, 0, 100, 0, radius);
//將CGMutablePathRef添加到當前Context內
CGContextAddPath(gc, path);
[[UIColor grayColor] setFill];
[[UIColor blueColor] setStroke];
CGContextSetLineWidth(gc, 2);
//履行繪畫
CGContextDrawPath(gc, kCGPathFillStroke);
//從Context中獲取圖像,並顯示在界面上
UIImage *img = UIGraphicsGetImageFromCurrentImageContext();
UIGraphicsEndImageContext();
UIImageView *imgView = [[UIImageView alloc] initWithImage:img];
[self.view addSubview:imgView];
如下圖說:
- 上一頁:iOS開發動態計算cell的高度
- 下一頁:IOS判斷是否有效銀行卡號


