iOS實現電商購物車界面示例
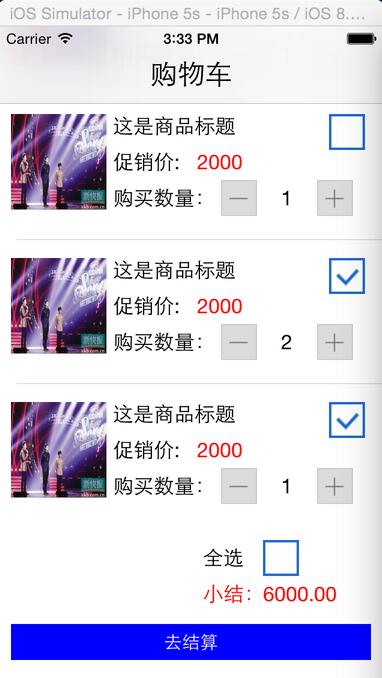
先看界面效果圖:
主要實現了商品的展示,並且可以對商品進行多選操作,以及改變商品的購買數量。與此同時,計算出,選中的總價格。

做此類型項目:要注意的:視圖與數據要分離開來。視圖的展現來源是數據模型層。所以我做的操作就是改變數據層的內容,在根據數據內容,去更新視圖界面。
已下是具體實現思路與代碼:
1. 實現步驟
- 在AppDelegate.m中包含ViewController.h頭文件,創建ViewController對象(vc),接著創建一個UINavigationController對象(nVC)將vc設置為自己的根視圖,最後設置self.window.rootViewController為nVC。
- 在ViewController.m中創建一個全局的可變數組,並往裡面添加表格需要的數據字典對象。
- 創建一個GoodsInfoModel 類,繼承於NSObject 類,用於做數據模型
- 創建一個MyCustomCell 類 ,繼承於UITableViewCell,自定義單元格類
- 在MyCustomCell.m 類中,實現單元格的布局
- 在 ViewController.m 創建表格視圖,並且創建表格尾部視圖
- MyCustomCell 類中定義協議,實現代理,完成加、減的運算。
- 在 ViewController.m 實現全選運算。
2. 代碼實現
2.1 完成界面的導航欄創建
在AppDelegate.m中包含ViewController.h頭文件,創建ViewController對象(vc),接著創建一個UINavigationController對象(nVC)將vc設置為自己的根視圖,最後設置self.window.rootViewController為nVC。
2.1.1 代碼
在AppDelegate.m的 - (BOOL)application:(UIApplication)application didFinishLaunchingWithOptions:(NSDictionary )launchOptions方法中實現以下代碼(記得包含#import "ViewController.h"):
 //創建窗口
self.window = [[UIWindow alloc]initWithFrame:[UIScreen mainScreen].bounds];
self.window.backgroundColor = [UIColor whiteColor];

//創建一個導航控制器,成為根視圖

UINavigationController *nav = [[UINavigationController alloc]initWithRootViewController:[ViewController new]];
self.window.rootViewController = nav;

//顯示窗口
[self.window makeKeyAndVisible];
在ViewController.m 的 viewDidLoad 中去設置,導航欄標題
 self.title = @"購物車";
 //設置標題的屬性樣式等
[self.navigationController.navigationBar setTitleTextAttributes:@{NSForegroundColorAttributeName : [UIColor blackColor],NSFontAttributeName:[UIFont systemFontOfSize:23.0f]}];
2.2 創建一個模型類用於存放數據模型
創建一個GoodsInfoModel 類 ,繼承於 NSObject
實現代碼如下: GoodsInfoModel.h 中
@interface GoodsInfoModel : NSObject
@property(strong,nonatomic)NSString *imageName;//商品圖片
@property(strong,nonatomic)NSString *goodsTitle;//商品標題
@property(strong,nonatomic)NSString *goodsPrice;//商品單價
@property(assign,nonatomic)BOOL selectState;//是否選中狀態
@property(assign,nonatomic)int goodsNum;//商品個數

-(instancetype)initWithDict:(NSDictionary *)dict;

@end
GoodsInfoModel.m 中
-(instancetype)initWithDict:(NSDictionary *)dict
{
if (self = [super init])
{
 self.imageName = dict[@"imageName"];
 self.goodsTitle = dict[@"goodsTitle"];
 self.goodsPrice = dict[@"goodsPrice"];
 self.goodsNum = [dict[@"goodsNum"]intValue];
 self.selectState = [dict[@"selectState"]boolValue];

}

return self;

}
2.3 創建設置表格數據的數據
在ViewController.m中創建一個全局的可變數組,並往裡面添加表格需要的數據字典對象。
2.3.1 代碼
在ViewController.m的- (void)viewDidLoad中實現以下代碼(先在ViewController.m中聲明infoArr對象)。代碼如下
@interface ViewController ()<UITableViewDataSource,UITableViewDelegate,MyCustomCellDelegate>
{
 UITableView *_MyTableView;
 float allPrice;
 NSMutableArray *infoArr;
}

@property(strong,nonatomic)UIButton *allSelectBtn;
@property(strong,nonatomic)UILabel *allPriceLab;

@end

---------------------------------------------------------------
//初始化數據
allPrice = 0.0;
infoArr = [[NSMutableArray alloc]init];

/**

 * 初始化一個數組,數組裡面放字典。字典裡面放的是單元格需要展示的數據

 */

for (int i = 0; i<7; i++)

{
 NSMutableDictionary *infoDict = [[NSMutableDictionary alloc]init];
 [infoDict setValue:@"img6.png" forKey:@"imageName"];
 [infoDict setValue:@"這是商品標題" forKey:@"goodsTitle"];
 [infoDict setValue:@"2000" forKey:@"goodsPrice"];
 [infoDict setValue:[NSNumber numberWithBool:NO] forKey:@"selectState"];
 [infoDict setValue:[NSNumber numberWithInt:1] forKey:@"goodsNum"];


 //封裝數據模型

 GoodsInfoModel *goodsModel = [[GoodsInfoModel alloc]initWithDict:infoDict];
 //將數據模型放入數組中

 [infoArr addObject:goodsModel];

}
2.4 創建表格視圖
代碼如下:
/* 創建表格,並設置代理 /
_MyTableView = [[UITableView alloc]initWithFrame:CGRectMake(0, 0, self.view.frame.size.width, self.view.frame.size.height) style:UITableViewStylePlain];
_MyTableView.dataSource = self;
_MyTableView.delegate = self;

//給表格添加一個尾部視圖

_MyTableView.tableFooterView = [self creatFootView];

[self.view addSubview:_MyTableView];
2.5 創建尾部視圖
代碼如下:
/* * 創建表格尾部視圖 * * @return 返回一個UIView 對象視圖,作為表格尾部視圖/
-(UIView *)creatFootView{
UIView *footView = [[UIView alloc]initWithFrame:CGRectMake(0, 0, self.view.frame.size.width, 150)];
//添加一個全選文本框標簽
UILabel *lab = [[UILabel alloc]initWithFrame:CGRectMake(self.view.frame.size.width - 150, 10, 50, 30)];
lab.text = @"全選";
[footView addSubview:lab];

//添加全選圖片按鈕
_allSelectBtn = [UIButton buttonWithType:UIButtonTypeCustom];
_allSelectBtn.frame = CGRectMake(self.view.frame.size.width- 100, 10, 30, 30);
[_allSelectBtn setImage:[UIImage imageNamed:@"復選框-未選中"] forState:UIControlStateNormal];
[_allSelectBtn addTarget:self action:@selector(selectBtnClick:) forControlEvents:UIControlEventTouchUpInside];
[footView addSubview:_allSelectBtn];

//添加小結文本框
UILabel *lab2 = [[UILabel alloc]initWithFrame:CGRectMake(self.view.frame.size.width - 150, 40, 60, 30)];
lab2.textColor = [UIColor redColor];
lab2.text = @"小結:";
[footView addSubview:lab2];

//添加一個總價格文本框,用於顯示總價
_allPriceLab = [[UILabel alloc]initWithFrame:CGRectMake(self.view.frame.size.width - 100, 40, 100, 30)];
_allPriceLab.textColor = [UIColor redColor];
_allPriceLab.text = @"0.0";
[footView addSubview:_allPriceLab];

//添加一個結算按鈕
UIButton *settlementBtn = [UIButton buttonWithType:UIButtonTypeRoundedRect];
[settlementBtn setTitle:@"去結算" forState:UIControlStateNormal];
[settlementBtn setTitleColor:[UIColor whiteColor] forState:UIControlStateNormal];
settlementBtn.frame = CGRectMake(10, 80, self.view.frame.size.width - 20, 30);
settlementBtn.backgroundColor = [UIColor blueColor];
[footView addSubview:settlementBtn];

return footView;
}
2.6 創建自定義cell類,並實現初始化方法
創建一個類名叫MyCustomCell繼承UITableViewCell,在MyCustomCell.m中實現重寫的初始化方法。
2.6.1 代碼:
MyCustomCell.h :
#import <UIKit/UIKit.h>
#import "GoodsInfoModel.h"

//添加代理,用於按鈕加減的實現
@protocol MyCustomCellDelegate <NSObject>

-(void)btnClick:(UITableViewCell *)cell andFlag:(int)flag;

@end

@interface MyCustomCell : UITableViewCell

@property(strong,nonatomic)UIImageView *goodsImgV;//商品圖片
@property(strong,nonatomic)UILabel *goodsTitleLab;//商品標題
@property(strong,nonatomic)UILabel *priceTitleLab;//價格標簽
@property(strong,nonatomic)UILabel *priceLab;//具體價格
@property(strong,nonatomic)UILabel *goodsNumLab;//購買數量標簽
@property(strong,nonatomic)UILabel *numCountLab;//購買商品的數量
@property(strong,nonatomic)UIButton *addBtn;//添加商品數量
@property(strong,nonatomic)UIButton *deleteBtn;//刪除商品數量
@property(strong,nonatomic)UIButton *isSelectBtn;//是否選中按鈕
@property(strong,nonatomic)UIImageView *isSelectImg;//是否選中圖片
@property(assign,nonatomic)BOOL selectState;//選中狀態
@property(assign,nonatomic)id<MyCustomCellDelegate>delegate;


//賦值
-(void)addTheValue:(GoodsInfoModel *)goodsModel;
MyCustomCell.m :先寫一個宏定義寬度。#define WIDTH ([UIScreen mainScreen].bounds.size.width)
-(instancetype)initWithStyle:(UITableViewCellStyle)style reuseIdentifier:(NSString *)reuseIdentifier
{
if (self = [super initWithStyle:style reuseIdentifier:reuseIdentifier])
{
 //布局界面
 UIView * bgView = [[UIView alloc]initWithFrame:CGRectMake(5, 5, WIDTH-10, 95)];
 bgView.backgroundColor = [UIColor whiteColor];
 //添加商品圖片
 _goodsImgV = [[UIImageView alloc]initWithFrame:CGRectMake(5, 10, 80, 80)];
 _goodsImgV.backgroundColor = [UIColor greenColor];
 [bgView addSubview:_goodsImgV];
 //添加商品標題
 _goodsTitleLab = [[UILabel alloc]initWithFrame:CGRectMake(90, 5, 200, 30)];
 _goodsTitleLab.text = @"afadsfa fa";
 _goodsTitleLab.backgroundColor = [UIColor clearColor];
 [bgView addSubview:_goodsTitleLab];
 //促銷價
 _priceTitleLab = [[UILabel alloc]initWithFrame:CGRectMake(90, 35, 70, 30)];
 _priceTitleLab.text = @"促銷價:";
 _priceTitleLab.backgroundColor = [UIColor clearColor];
 [bgView addSubview:_priceTitleLab];
 //商品價格
 _priceLab = [[UILabel alloc]initWithFrame:CGRectMake(160, 35, 100, 30)];
 _priceLab.text = @"1990";
 _priceLab.textColor = [UIColor redColor];
 [bgView addSubview:_priceLab];
 //購買數量
 _goodsNumLab = [[UILabel alloc]initWithFrame:CGRectMake(90, 65, 90, 30)];
 _goodsNumLab.text = @"購買數量:";
 [bgView addSubview:_goodsNumLab];
 //減按鈕
 _deleteBtn = [UIButton buttonWithType:UIButtonTypeCustom];
 _deleteBtn.frame = CGRectMake(180, 65, 30, 30);
 [_deleteBtn setImage:[UIImage imageNamed:@"按鈕-.png"] forState:UIControlStateNormal];
 [_deleteBtn addTarget:self action:@selector(deleteBtnAction:) forControlEvents:UIControlEventTouchUpInside];
 _deleteBtn.tag = 11;
 [bgView addSubview:_deleteBtn];
 //購買商品的數量
 _numCountLab = [[UILabel alloc]initWithFrame:CGRectMake(210, 65, 50, 30)];
 _numCountLab.textAlignment = NSTextAlignmentCenter;
 [bgView addSubview:_numCountLab];
 //加按鈕
 _addBtn = [UIButton buttonWithType:UIButtonTypeCustom];
 _addBtn.frame = CGRectMake(260, 65, 30, 30);
 [_addBtn setImage:[UIImage imageNamed:@"按鈕+.png"] forState:UIControlStateNormal];
 [_addBtn addTarget:self action:@selector(addBtnAction:) forControlEvents:UIControlEventTouchUpInside];
 _addBtn.tag = 12;
 [bgView addSubview:_addBtn];
 //是否選中圖片
 _isSelectImg = [[UIImageView alloc]initWithFrame:CGRectMake(WIDTH - 50, 10, 30, 30)];
 [bgView addSubview:_isSelectImg];
 [self addSubview:bgView];

}

return self;

}


/**
 * 給單元格賦值
 * @param goodsModel 裡面存放各個控件需要的數值
 */

-(void)addTheValue:(GoodsInfoModel *)goodsModel
{
_goodsImgV.image = [UIImage imageNamed:goodsModel.imageName];
_goodsTitleLab.text = goodsModel.goodsTitle;
_priceLab.text = goodsModel.goodsPrice;
_numCountLab.text = [NSString stringWithFormat:@"%d",goodsModel.goodsNum];

if (goodsModel.selectState)
{
 _selectState = YES;
 _isSelectImg.image = [UIImage imageNamed:@"復選框-選中"];

}else{

 _selectState = NO;
 _isSelectImg.image = [UIImage imageNamed:@"復選框-未選中"];

}

}

/**
 * 點擊減按鈕實現數量的減少
 *
 * @param sender 減按鈕
 */
-(void)deleteBtnAction:(UIButton *)sender
{
//判斷是否選中,選中才能點擊

if (_selectState == YES)

{
 //調用代理
 [self.delegate btnClick:self andFlag:(int)sender.tag];
}


}
/**
 * 點擊加按鈕實現數量的增加
 *
 * @param sender 加按鈕
 */
-(void)addBtnAction:(UIButton *)sender
{
//判斷是否選中,選中才能點擊

if (_selectState == YES)
{
 //調用代理
 [self.delegate btnClick:self andFlag:(int)sender.tag];
}


}
2.7 實現表格的代理方法
//返回單元格個數
- (NSInteger)tableView:(UITableView *)tableView numberOfRowsInSection: (NSInteger)section
{
 return infoArr.count;
}
//定制單元格內容
- (UITableViewCell *)tableView:(UITableView *)tableView cellForRowAtIndexPath:(NSIndexPath *)indexPath
{
 static NSString *identify = @"indentify";
 MyCustomCell *cell = [tableView dequeueReusableCellWithIdentifier:identify];
 if (!cell)
 {
 cell = [[MyCustomCell alloc]initWithStyle:UITableViewCellStyleDefault reuseIdentifier:identify];
 cell.delegate = self;
 }
 //調用方法,給單元格賦值
 [cell addTheValue:infoArr[indexPath.row]];
return cell;
}

//返回單元格的高度
-(CGFloat)tableView:(UITableView *)tableView heightForRowAtIndexPath:(NSIndexPath *)indexPath
{
 return 120;
}

//單元格選中事件
-(void)tableView:(UITableView *)tableView didSelectRowAtIndexPath:(NSIndexPath *)indexPath
{
/**
 * 判斷當期是否為選中狀態,如果選中狀態點擊則更改成未選中,如果未選中點擊則更改成選中狀態
 */
GoodsInfoModel *model = infoArr[indexPath.row];
if (model.selectState)
{
 model.selectState = NO;

}
else
{
 model.selectState = YES;
}
//刷新整個表格

// [_MyTableView reloadData];

//刷新當前行
[_MyTableView reloadRowsAtIndexPaths:@[indexPath] withRowAnimation:UITableViewRowAnimationAutomatic];


[self totalPrice];

}
2.8 實現單元格加、減按鈕代理
先要再ViewController.m 中導入MyCustomCellDelegate 協議
@interface ViewController ()<UITableViewDataSource,UITableViewDelegate,MyCustomCellDelegate>
然後實現代碼如下:
#pragma mark -- 實現加減按鈕點擊代理事件

/**
* 實現加減按鈕點擊代理事件
*
* @param cell 當前單元格
* @param flag 按鈕標識,11 為減按鈕,12為加按鈕
*/

-(void)btnClick:(UITableViewCell *)cell andFlag:(int)flag
{
 NSIndexPath *index = [_MyTableView indexPathForCell:cell];

switch (flag) {
 case 11:
 {
 //做減法
 //先獲取到當期行數據源內容,改變數據源內容,刷新表格
 GoodsInfoModel *model = infoArr[index.row];
 if (model.goodsNum > 1)
 {
  model.goodsNum --;
 }
 }
 break;
 case 12:

 {
 //做加法
 GoodsInfoModel *model = infoArr[index.row];

 model.goodsNum ++;

 }

 break;

 default:

 break;

}
//刷新表格
[_MyTableView reloadData];

//計算總價
[self totalPrice];

}
2.9 全選方法的實現
/**
* 全選按鈕事件
*
* @param sender 全選按鈕
*/
-(void)selectBtnClick:(UIButton *)sender
{
 //判斷是否選中,是改成否,否改成是,改變圖片狀態
 sender.tag = !sender.tag;
 if (sender.tag)
 {
 [sender setImage:[UIImage imageNamed:@"復選框-選中.png"] forState:UIControlStateNormal];

}else{
 [sender setImage:[UIImage imageNamed:@"復選框-未選中.png"] forState:UIControlStateNormal];
}
//改變單元格選中狀態
for (int i=0; i<infoArr.count; i++)
{
 GoodsInfoModel *model = [infoArr objectAtIndex:i];
 model.selectState = sender.tag;

}
//計算價格
[self totalPrice];
//刷新表格
[_MyTableView reloadData];

}
2.10 計算總價格
#pragma mark -- 計算價格
-(void)totalPrice
{
 //遍歷整個數據源,然後判斷如果是選中的商品,就計算價格(單價 * 商品數量)
 for ( int i =0; i<infoArr.count; i++)
{
 GoodsInfoModel *model = [infoArr objectAtIndex:i];
 if (model.selectState)
 {
 allPrice = allPrice + model.goodsNum *[model.goodsPrice intValue];
 }
}
//給總價文本賦值
_allPriceLab.text = [NSString stringWithFormat:@"%.2f",allPrice];
NSLog(@"%f",allPrice);

//每次算完要重置為0,因為每次的都是全部循環算一遍
allPrice = 0.0;
}
短時間手寫:代碼比較粗糙,沒有完全整理;
源碼下載:http://xiazai.jb51.net/201612/yuanma/AndroidShoppingList(jb51.net).rar
以上就是本文的全部內容,希望對大家的學習有所幫助,也希望大家多多支持本站。


