高仿IOS的Android彈出框
編輯:IOS開發綜合
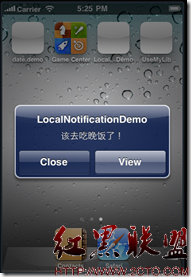
先看一下效果圖,不過這是網上的圖片。

效果不錯,就借此拿來與大伙分享分享。
github源碼地址:https://github.com/saiwu-bigkoo/Android-AlertView.
1.怎麼用:添加依賴。
compile 'com.bigkoo:alertview:1.0.3'
2.實例demo(大家可以根據需要來選擇自己需要的框框)。
package com.example.my.androidalertview;


import android.app.Activity;
import android.content.Context;
import android.os.Bundle;
import android.view.KeyEvent;
import android.view.LayoutInflater;
import android.view.View;
import android.view.ViewGroup;
import android.view.inputmethod.InputMethodManager;
import android.widget.EditText;
import android.widget.Toast;

import com.bigkoo.alertview.AlertView;
import com.bigkoo.alertview.OnDismissListener;
import com.bigkoo.alertview.OnItemClickListener;

/**
 * 精仿iOSAlertViewController控件Demo
 */
public class MainActivity extends Activity implements OnItemClickListener, OnDismissListener {

  private AlertView mAlertView;//避免創建重復View,先創建View,然後需要的時候show出來,推薦這個做法
  private AlertView mAlertViewExt;//窗口拓展例子
  private EditText etName;//拓展View內容
  private InputMethodManager imm;

  @Override
  protected void onCreate(Bundle savedInstanceState) {
    super.onCreate(savedInstanceState);
    setContentView(R.layout.activity_main);
    imm = (InputMethodManager) getSystemService(Context.INPUT_METHOD_SERVICE);
    mAlertView = new AlertView("標題", "內容", "取消", new String[]{"確定"}, null, this, AlertView.Style.Alert, this).setCancelable(true).setOnDismissListener(this);
    //拓展窗口
    mAlertViewExt = new AlertView("提示", "請完善你的個人資料!", "取消", null, new String[]{"完成"}, this, AlertView.Style.Alert, this);
    ViewGroup extView = (ViewGroup) LayoutInflater.from(this).inflate(R.layout.alertext_form, null);
    etName = (EditText) extView.findViewById(R.id.etName);
    etName.setOnFocusChangeListener(new View.OnFocusChangeListener() {
      @Override
      public void onFocusChange(View view, boolean focus) {
        //輸入框出來則往上移動
        boolean isOpen = imm.isActive();
        mAlertViewExt.setMarginBottom(isOpen && focus ? 120 : 0);
        System.out.println(isOpen);
      }
    });
    mAlertViewExt.addExtView(extView);
  }

  public void alertShow1(View view) {
    mAlertView.show();
  }

  public void alertShow2(View view) {
    new AlertView("標題", "內容", null, new String[]{"確定"}, null, this, AlertView.Style.Alert, this).show();
  }

  public void alertShow3(View view) {
    new AlertView(null, null, null, new String[]{"高亮按鈕1", "高亮按鈕2", "高亮按鈕3"},
        new String[]{"其他按鈕1", "其他按鈕2", "其他按鈕3", "其他按鈕4", "其他按鈕5", "其他按鈕6",
            "其他按鈕7", "其他按鈕8", "其他按鈕9", "其他按鈕10", "其他按鈕11", "其他按鈕12"},
        this, AlertView.Style.Alert, this).show();
  }

  public void alertShow4(View view) {
    new AlertView("標題", null, "取消", new String[]{"高亮按鈕1"}, new String[]{"其他按鈕1", "其他按鈕2", "其他按鈕3"}, this, AlertView.Style.ActionSheet, this).show();
  }

  public void alertShow5(View view) {
    new AlertView("標題", "內容", "取消", null, null, this, AlertView.Style.ActionSheet, this).setCancelable(true).show();
  }

  public void alertShow6(View view) {
    new AlertView("上傳頭像", null, "取消", null,
        new String[]{"拍照", "從相冊中選擇"},
        this, AlertView.Style.ActionSheet, this).show();
  }

  public void alertShowExt(View view) {
    mAlertViewExt.show();
  }

  private void closeKeyboard() {
    //關閉軟鍵盤
    imm.hideSoftInputFromWindow(etName.getWindowToken(), 0);
    //恢復位置
    mAlertViewExt.setMarginBottom(0);
  }

  @Override
  public void onItemClick(Object o, int position) {
    closeKeyboard();
    //判斷是否是拓展窗口View,而且點擊的是非取消按鈕
    if (o == mAlertViewExt && position != AlertView.CANCELPOSITION) {
      String name = etName.getText().toString();
      if (name.isEmpty()) {
        Toast.makeText(this, "啥都沒填呢", Toast.LENGTH_SHORT).show();
      } else {
        Toast.makeText(this, "hello," + name, Toast.LENGTH_SHORT).show();
      }

      return;
    }
    Toast.makeText(this, "點擊了第" + position + "個", Toast.LENGTH_SHORT).show();
  }

  @Override
  public void onDismiss(Object o) {
    closeKeyboard();
    Toast.makeText(this, "消失了", Toast.LENGTH_SHORT).show();
  }

  @Override
  public boolean onKeyDown(int keyCode, KeyEvent event) {
    if (keyCode == KeyEvent.KEYCODE_BACK && event.getRepeatCount() == 0) {
      if (mAlertView != null && mAlertView.isShowing()) {
        mAlertView.dismiss();
        return false;
      }
    }

    return super.onKeyDown(keyCode, event);

  }
}
布局文件:
<LinearLayout xmlns:android="http://schemas.android.com/apk/res/android"
  android:layout_width="match_parent"
  android:orientation="vertical"
  android:layout_height="match_parent" android:paddingLeft="@dimen/activity_horizontal_margin"
  android:paddingRight="@dimen/activity_horizontal_margin"
  android:paddingTop="@dimen/activity_vertical_margin"
  android:paddingBottom="@dimen/activity_vertical_margin">

  <Button android:text="hey,alert !!!click here~~~" android:layout_width="match_parent"
    android:layout_marginTop="5dp"
    android:layout_height="50dp"
    android:onClick="alertShow1"/>
  <Button android:text="hey,alert !!!click here~~~" android:layout_width="match_parent"
    android:layout_marginTop="5dp"
    android:layout_height="50dp"
    android:onClick="alertShow2"/>
  <Button android:text="hey,alert !!!click here~~~" android:layout_width="match_parent"
    android:layout_marginTop="5dp"
    android:layout_height="50dp"
    android:onClick="alertShow3"/>
  <Button android:text="hey,actionsheet !!!click here~~~" android:layout_width="match_parent"
    android:layout_marginTop="5dp"
    android:layout_height="50dp"
    android:onClick="alertShow4"/>
  <Button android:text="hey,actionsheet !!!click here~~~" android:layout_width="match_parent"
    android:layout_marginTop="5dp"
    android:layout_height="50dp"
    android:onClick="alertShow5"/>
  <Button android:text="hey,actionsheet !!!click here~~~" android:layout_width="match_parent"
    android:layout_marginTop="5dp"
    android:layout_height="50dp"
    android:onClick="alertShow6"/>
  <Button android:text="窗口拓展點這裡" android:layout_width="match_parent"
    android:layout_marginTop="5dp"
    android:layout_height="50dp"
    android:onClick="alertShowExt"/>

</LinearLayout>
以上就是本文的全部內容,希望對大家的學習有所幫助,也希望大家多多支持本站。
相關文章
+


