手把手教你實現微信小視頻iOS代碼實現
前段時間項目要求需要在聊天模塊中加入類似微信的小視頻功能,這邊博客主要是為了總結遇到的問題和解決方法,希望能夠對有同樣需求的朋友有所幫助。
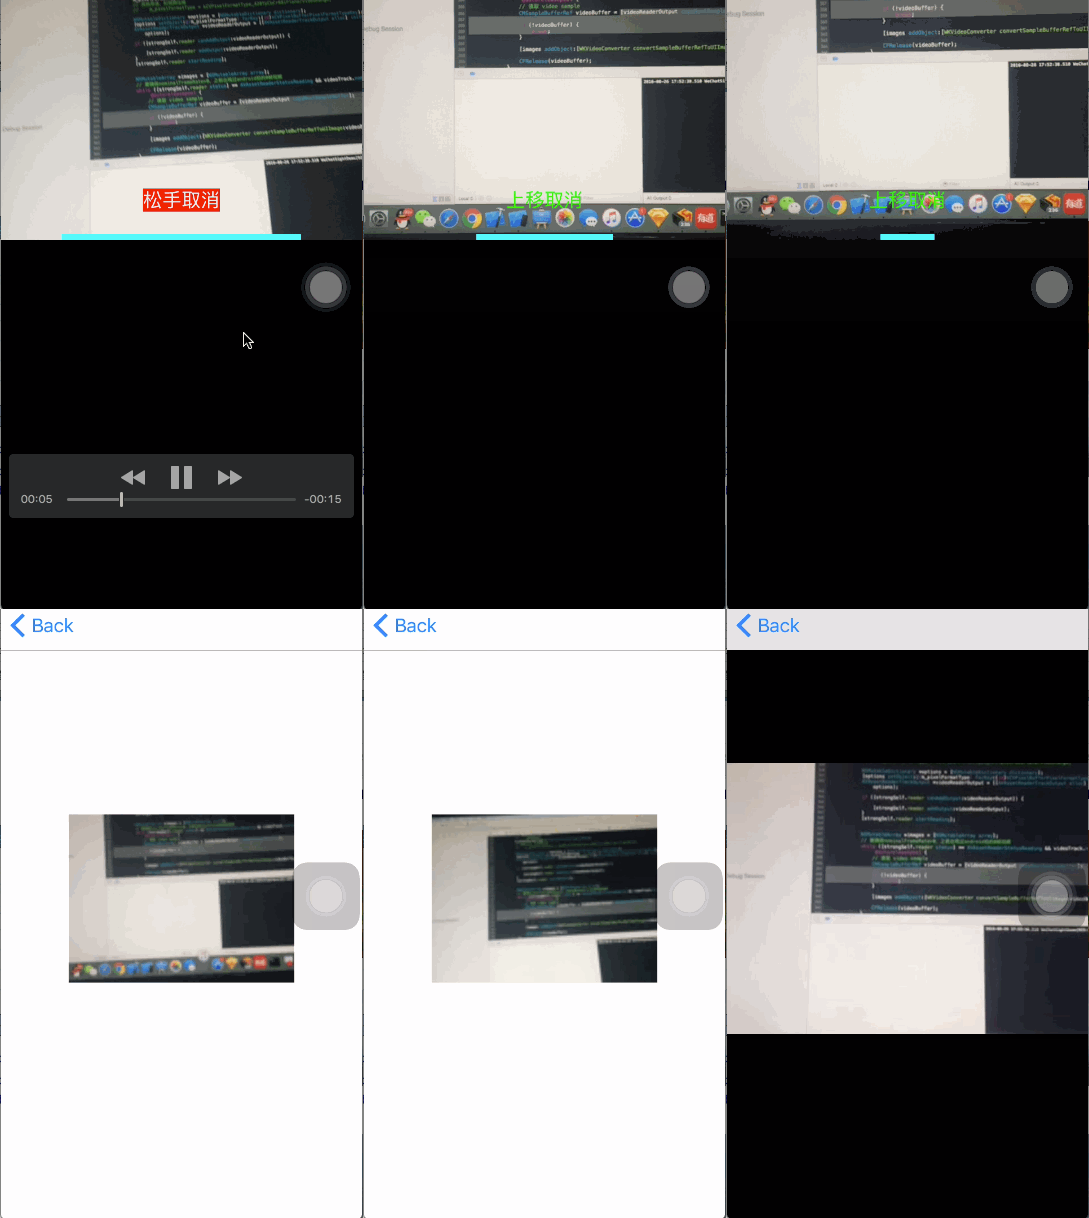
效果預覽:

這裡先羅列遇到的主要問題:
1.視頻剪裁 微信的小視頻只是取了攝像頭獲取的一部分畫面
2.滾動預覽的卡頓問題 AVPlayer播放視頻在滾動中會出現很卡的問題
接下來讓我們一步步來實現。
Part 1 實現視頻錄制
1.錄制類WKMovieRecorder實現
創建一個錄制類WKMovieRecorder,負責視頻錄制。
@interface WKMovieRecorder : NSObject

+ (WKMovieRecorder*) sharedRecorder;
 - (instancetype)initWithMaxDuration:(NSTimeInterval)duration;
 @end
定義回調block
/**
 * 錄制結束
 *
 * @param info   回調信息
 * @param isCancle YES:取消 NO:正常結束
 */
typedef void(^FinishRecordingBlock)(NSDictionary *info, WKRecorderFinishedReason finishReason);
/**
 * 焦點改變
 */
typedef void(^FocusAreaDidChanged)();
/**
 * 權限驗證
 *
 * @param success 是否成功
 */
typedef void(^AuthorizationResult)(BOOL success);

@interface WKMovieRecorder : NSObject
//回調
@property (nonatomic, copy) FinishRecordingBlock finishBlock;//錄制結束回調
@property (nonatomic, copy) FocusAreaDidChanged focusAreaDidChangedBlock;
@property (nonatomic, copy) AuthorizationResult authorizationResultBlock;
@end
定義一個cropSize用於視頻裁剪
@property (nonatomic, assign) CGSize cropSize;
接下來就是capture的實現了,這裡代碼有點長,懶得看的可以直接看後面的視頻剪裁部分
錄制配置:
@interface WKMovieRecorder ()
<
AVCaptureVideoDataOutputSampleBufferDelegate,
AVCaptureAudioDataOutputSampleBufferDelegate,
WKMovieWriterDelegate
>

{
  AVCaptureSession* _session;
  AVCaptureVideoPreviewLayer* _preview;
  WKMovieWriter* _writer;
  //暫停錄制
  BOOL _isCapturing;
  BOOL _isPaused;
  BOOL _discont;
  int _currentFile;
  CMTime _timeOffset;
  CMTime _lastVideo;
  CMTime _lastAudio;

  NSTimeInterval _maxDuration;
}

// Session management.
@property (nonatomic, strong) dispatch_queue_t sessionQueue;
@property (nonatomic, strong) dispatch_queue_t videoDataOutputQueue;
@property (nonatomic, strong) AVCaptureSession *session;
@property (nonatomic, strong) AVCaptureDevice *captureDevice;
@property (nonatomic, strong) AVCaptureDeviceInput *videoDeviceInput;
@property (nonatomic, strong) AVCaptureStillImageOutput *stillImageOutput;
@property (nonatomic, strong) AVCaptureConnection *videoConnection;
@property (nonatomic, strong) AVCaptureConnection *audioConnection;
@property (nonatomic, strong) NSDictionary *videoCompressionSettings;
@property (nonatomic, strong) NSDictionary *audioCompressionSettings;
@property (nonatomic, strong) AVAssetWriterInputPixelBufferAdaptor *adaptor;
@property (nonatomic, strong) AVCaptureVideoDataOutput *videoDataOutput;


//Utilities
@property (nonatomic, strong) NSMutableArray *frames;//存儲錄制幀
@property (nonatomic, assign) CaptureAVSetupResult result;
@property (atomic, readwrite) BOOL isCapturing;
@property (atomic, readwrite) BOOL isPaused;
@property (nonatomic, strong) NSTimer *durationTimer;

@property (nonatomic, assign) WKRecorderFinishedReason finishReason;

@end
實例化方法:
+ (WKMovieRecorder *)sharedRecorder
{
  static WKMovieRecorder *recorder;
  static dispatch_once_t onceToken;
  dispatch_once(&onceToken, ^{
    recorder = [[WKMovieRecorder alloc] initWithMaxDuration:CGFLOAT_MAX];
  });

  return recorder;
}

- (instancetype)initWithMaxDuration:(NSTimeInterval)duration
{
  if(self = [self init]){
    _maxDuration = duration;
    _duration = 0.f;
  }

  return self;
}

- (instancetype)init
{
  self = [super init];
  if (self) {
    _maxDuration = CGFLOAT_MAX;
    _duration = 0.f;
    _sessionQueue = dispatch_queue_create("wukong.movieRecorder.queue", DISPATCH_QUEUE_SERIAL );
    _videoDataOutputQueue = dispatch_queue_create( "wukong.movieRecorder.video", DISPATCH_QUEUE_SERIAL );
    dispatch_set_target_queue( _videoDataOutputQueue, dispatch_get_global_queue( DISPATCH_QUEUE_PRIORITY_HIGH, 0 ) );
  }
  return self;
}
2.初始化設置
初始化設置分別為session創建、權限檢查以及session配置
1).session創建
self.session = [[AVCaptureSession alloc] init];
self.result = CaptureAVSetupResultSuccess;
2).權限檢查
//權限檢查
    switch ([AVCaptureDevice authorizationStatusForMediaType:AVMediaTypeVideo]) {
      case AVAuthorizationStatusNotDetermined: {
        [AVCaptureDevice requestAccessForMediaType:AVMediaTypeVideo completionHandler:^(BOOL granted) {
          if (granted) {
            self.result = CaptureAVSetupResultSuccess;
          }
        }];
        break;
      }
      case AVAuthorizationStatusAuthorized: {

        break;
      }
      default:{
        self.result = CaptureAVSetupResultCameraNotAuthorized;
      }
    }

    if ( self.result != CaptureAVSetupResultSuccess) {

      if (self.authorizationResultBlock) {
        self.authorizationResultBlock(NO);
      }
      return;
    }
3).session配置
session配置是需要注意的是AVCaptureSession的配置不能在主線程, 需要自行創建串行線程。
3.1.1 獲取輸入設備與輸入流
AVCaptureDevice *captureDevice = [[self class] deviceWithMediaType:AVMediaTypeVideo preferringPosition:AVCaptureDevicePositionBack];
 _captureDevice = captureDevice;

 NSError *error = nil;
 _videoDeviceInput = [[AVCaptureDeviceInput alloc] initWithDevice:captureDevice error:&error];

 if (!_videoDeviceInput) {
  NSLog(@"未找到設備");
 }
3.1.2 錄制幀數設置
幀數設置的主要目的是適配iPhone4,畢竟是應該淘汰的機器了
int frameRate;
      if ( [NSProcessInfo processInfo].processorCount == 1 )
      {
        if ([self.session canSetSessionPreset:AVCaptureSessionPresetLow]) {
          [self.session setSessionPreset:AVCaptureSessionPresetLow];
        }
        frameRate = 10;
      }else{
        if ([self.session canSetSessionPreset:AVCaptureSessionPreset640x480]) {
          [self.session setSessionPreset:AVCaptureSessionPreset640x480];
        }
        frameRate = 30;
      }

      CMTime frameDuration = CMTimeMake( 1, frameRate );

      if ( [_captureDevice lockForConfiguration:&error] ) {
        _captureDevice.activeVideoMaxFrameDuration = frameDuration;
        _captureDevice.activeVideoMinFrameDuration = frameDuration;
        [_captureDevice unlockForConfiguration];
      }
      else {
        NSLog( @"videoDevice lockForConfiguration returned error %@", error );
      }
3.1.3 視頻輸出設置
視頻輸出設置需要注意的問題是:要設置videoConnection的方向,這樣才能保證設備旋轉時的顯示正常。
 //Video
      if ([self.session canAddInput:_videoDeviceInput]) {

        [self.session addInput:_videoDeviceInput];
        self.videoDeviceInput = _videoDeviceInput;
        [self.session removeOutput:_videoDataOutput];

        AVCaptureVideoDataOutput *videoOutput = [[AVCaptureVideoDataOutput alloc] init];
        _videoDataOutput = videoOutput;
        videoOutput.videoSettings = @{ (id)kCVPixelBufferPixelFormatTypeKey : @(kCVPixelFormatType_32BGRA) };

        [videoOutput setSampleBufferDelegate:self queue:_videoDataOutputQueue];

        videoOutput.alwaysDiscardsLateVideoFrames = NO;

        if ( [_session canAddOutput:videoOutput] ) {
          [_session addOutput:videoOutput];

          [_captureDevice addObserver:self forKeyPath:@"adjustingFocus" options:NSKeyValueObservingOptionNew context:FocusAreaChangedContext];

          _videoConnection = [videoOutput connectionWithMediaType:AVMediaTypeVideo];

          if(_videoConnection.isVideoStabilizationSupported){
            _videoConnection.preferredVideoStabilizationMode = AVCaptureVideoStabilizationModeAuto;
          }


          UIInterfaceOrientation statusBarOrientation = [UIApplication sharedApplication].statusBarOrientation;
          AVCaptureVideoOrientation initialVideoOrientation = AVCaptureVideoOrientationPortrait;
          if ( statusBarOrientation != UIInterfaceOrientationUnknown ) {
            initialVideoOrientation = (AVCaptureVideoOrientation)statusBarOrientation;
          }

          _videoConnection.videoOrientation = initialVideoOrientation;
        }

      }
      else{
        NSLog(@"無法添加視頻輸入到會話");
      }
3.1.4 音頻設置
需要注意的是為了不丟幀,需要把音頻輸出的回調隊列放在串行隊列中
//audio
      AVCaptureDevice *audioDevice = [AVCaptureDevice defaultDeviceWithMediaType:AVMediaTypeAudio];
      AVCaptureDeviceInput *audioDeviceInput = [AVCaptureDeviceInput deviceInputWithDevice:audioDevice error:&error];


      if ( ! audioDeviceInput ) {
        NSLog( @"Could not create audio device input: %@", error );
      }

      if ( [self.session canAddInput:audioDeviceInput] ) {
        [self.session addInput:audioDeviceInput];

      }
      else {
        NSLog( @"Could not add audio device input to the session" );
      }

      AVCaptureAudioDataOutput *audioOut = [[AVCaptureAudioDataOutput alloc] init];
      // Put audio on its own queue to ensure that our video processing doesn't cause us to drop audio
      dispatch_queue_t audioCaptureQueue = dispatch_queue_create( "wukong.movieRecorder.audio", DISPATCH_QUEUE_SERIAL );
      [audioOut setSampleBufferDelegate:self queue:audioCaptureQueue];

      if ( [self.session canAddOutput:audioOut] ) {
        [self.session addOutput:audioOut];
      }
      _audioConnection = [audioOut connectionWithMediaType:AVMediaTypeAudio];
還需要注意一個問題就是對於session的配置代碼應該是這樣的
[self.session beginConfiguration];
...配置代碼
[self.session commitConfiguration];
由於篇幅問題,後面的錄制代碼我就挑重點的講了。
3.2 視頻存儲
現在我們需要在AVCaptureVideoDataOutputSampleBufferDelegate與AVCaptureAudioDataOutputSampleBufferDelegate的回調中,將音頻和視頻寫入沙盒。在這個過程中需要注意的,在啟動session後獲取到的第一幀黑色的,需要放棄。
3.2.1 創建WKMovieWriter類來封裝視頻存儲操作
WKMovieWriter的主要作用是利用AVAssetWriter拿到CMSampleBufferRef,剪裁後再寫入到沙盒中。
這是剪裁配置的代碼,AVAssetWriter會根據cropSize來剪裁視頻,這裡需要注意的一個問題是cropSize的width必須是320的整數倍,不然的話剪裁出來的視頻右側會出現一條綠色的線
 NSDictionary *videoSettings;
  if (_cropSize.height == 0 || _cropSize.width == 0) {

    _cropSize = [UIScreen mainScreen].bounds.size;

  }

  videoSettings = [NSDictionary dictionaryWithObjectsAndKeys:
           AVVideoCodecH264, AVVideoCodecKey,
           [NSNumber numberWithInt:_cropSize.width], AVVideoWidthKey,
           [NSNumber numberWithInt:_cropSize.height], AVVideoHeightKey,
           AVVideoScalingModeResizeAspectFill,AVVideoScalingModeKey,
           nil];
至此,視頻錄制就完成了。
接下來需要解決的預覽的問題了
Part 2 卡頓問題解決
1.1 gif圖生成
通過查資料發現了這篇blog 介紹說微信團隊解決預覽卡頓的問題使用的是播放圖片gif,但是博客中的示例代碼有問題,通過CoreAnimation來播放圖片導致內存暴漲而crash。但是,還是給了我一些靈感,因為之前項目的啟動頁用到了gif圖片的播放,所以我就想能不能把視頻轉成圖片,然後再轉成gif圖進行播放,這樣不就解決了問題了嗎。於是我開始google功夫不負有心人找到了,圖片數組轉gif圖片的方法。
gif圖轉換代碼
static void makeAnimatedGif(NSArray *images, NSURL *gifURL, NSTimeInterval duration) {
  NSTimeInterval perSecond = duration /images.count;

  NSDictionary *fileProperties = @{
                   (__bridge id)kCGImagePropertyGIFDictionary: @{
                       (__bridge id)kCGImagePropertyGIFLoopCount: @0, // 0 means loop forever
                       }
                   };

  NSDictionary *frameProperties = @{
                   (__bridge id)kCGImagePropertyGIFDictionary: @{
                       (__bridge id)kCGImagePropertyGIFDelayTime: @(perSecond), // a float (not double!) in seconds, rounded to centiseconds in the GIF data
                       }
                   };

  CGImageDestinationRef destination = CGImageDestinationCreateWithURL((__bridge CFURLRef)gifURL, kUTTypeGIF, images.count, NULL);
  CGImageDestinationSetProperties(destination, (__bridge CFDictionaryRef)fileProperties);

  for (UIImage *image in images) {
    @autoreleasepool {

      CGImageDestinationAddImage(destination, image.CGImage, (__bridge CFDictionaryRef)frameProperties);
    }
  }

  if (!CGImageDestinationFinalize(destination)) {
    NSLog(@"failed to finalize image destination");
  }else{


  }
  CFRelease(destination);
}
轉換是轉換成功了,但是出現了新的問題,使用ImageIO生成gif圖片時會導致內存暴漲,瞬間漲到100M以上,如果多個gif圖同時生成的話一樣會crash掉,為了解決這個問題需要用一個串行隊列來進行gif圖的生成
1.2 視頻轉換為UIImages
主要是通過AVAssetReader、AVAssetTrack、AVAssetReaderTrackOutput 來進行轉換
//轉成UIImage
- (void)convertVideoUIImagesWithURL:(NSURL *)url finishBlock:(void (^)(id images, NSTimeInterval duration))finishBlock
{
    AVAsset *asset = [AVAsset assetWithURL:url];
    NSError *error = nil;
    self.reader = [[AVAssetReader alloc] initWithAsset:asset error:&error];

    NSTimeInterval duration = CMTimeGetSeconds(asset.duration);
    __weak typeof(self)weakSelf = self;
    dispatch_queue_t backgroundQueue = dispatch_get_global_queue(DISPATCH_QUEUE_PRIORITY_HIGH, 0);
    dispatch_async(backgroundQueue, ^{
      __strong typeof(weakSelf) strongSelf = weakSelf;
      NSLog(@"");


      if (error) {
        NSLog(@"%@", [error localizedDescription]);

      }

      NSArray *videoTracks = [asset tracksWithMediaType:AVMediaTypeVideo];

      AVAssetTrack *videoTrack =[videoTracks firstObject];
      if (!videoTrack) {
        return ;
      }
      int m_pixelFormatType;
      //   視頻播放時,
      m_pixelFormatType = kCVPixelFormatType_32BGRA;
      // 其他用途,如視頻壓縮
      //  m_pixelFormatType = kCVPixelFormatType_420YpCbCr8BiPlanarVideoRange;

      NSMutableDictionary *options = [NSMutableDictionary dictionary];
      [options setObject:@(m_pixelFormatType) forKey:(id)kCVPixelBufferPixelFormatTypeKey];
      AVAssetReaderTrackOutput *videoReaderOutput = [[AVAssetReaderTrackOutput alloc] initWithTrack:videoTrack outputSettings:options];

      if ([strongSelf.reader canAddOutput:videoReaderOutput]) {

        [strongSelf.reader addOutput:videoReaderOutput];
      }
      [strongSelf.reader startReading];


      NSMutableArray *images = [NSMutableArray array];
      // 要確保nominalFrameRate>0,之前出現過android拍的0幀視頻
      while ([strongSelf.reader status] == AVAssetReaderStatusReading && videoTrack.nominalFrameRate > 0) {
         @autoreleasepool {
        // 讀取 video sample
        CMSampleBufferRef videoBuffer = [videoReaderOutput copyNextSampleBuffer];

        if (!videoBuffer) {
          break;
        }

        [images addObject:[WKVideoConverter convertSampleBufferRefToUIImage:videoBuffer]];

        CFRelease(videoBuffer);
      }


     }
      if (finishBlock) {
        dispatch_async(dispatch_get_main_queue(), ^{
          finishBlock(images, duration);
        });
      }
    });


}
在這裡有一個值得注意的問題,在視頻轉image的過程中,由於轉換時間很短,在短時間內videoBuffer不能夠及時得到釋放,在多個視頻同時轉換時任然會出現內存問題,這個時候就需要用autoreleasepool來實現及時釋放
@autoreleasepool {
 // 讀取 video sample
 CMSampleBufferRef videoBuffer = [videoReaderOutput copyNextSampleBuffer];
   if (!videoBuffer) {
   break;
   }

   [images addObject:[WKVideoConverter convertSampleBufferRefToUIImage:videoBuffer]];
    CFRelease(videoBuffer); }
至此,微信小視頻的難點(我認為的)就解決了,至於其他的實現代碼請看demo就基本實現了,demo可以從這裡下載。
視頻暫停錄制 http://www.gdcl.co.uk/2013/02/20/iPhone-Pause.html
視頻crop綠邊解決 http://stackoverflow.com/questions/22883525/avassetexportsession-giving-me-a-green-border-on-right-and-bottom-of-output-vide
視頻裁剪:http://stackoverflow.com/questions/15737781/video-capture-with-11-aspect-ratio-in-ios/16910263#16910263
CMSampleBufferRef轉image https://developer.apple.com/library/ios/qa/qa1702/_index.html
微信小視頻分析 http://www.jianshu.com/p/3d5ccbde0de1
感謝以上文章的作者
以上就是本文的全部內容,希望對大家的學習有所幫助,也希望大家多多支持本站。
- 上一頁:iOS實現百度外賣頭像波浪的效果
- 下一頁:iOS直播類APP開發流程解析
- iphone6防盜如何設置
- iPhone6怎麼導入通訊錄?
- 詳解iOS多線程GCD的應用
- UISearchDisplayController UISearchBar
- ios8通訊錄的備份與導入 iphone6通訊錄的備份與導入教程
- ios9越獄插件BytaFont3更新:可以自定義字體[圖]
- iphone怎麼開啟免打擾
- 每日一技:iPhone設置電子郵件定時提醒
- iPhone開發筆記 (6) [UIColor colorWithRed:(CGFloat) green:(CGFloat) blue:(CGFloat) alpha:(CGFloat)]
- 使用iFunBox上傳iPhone壁紙和鈴聲
- 手把手教你完成微信藐視頻iOS代碼完成
- 手把手帶你學Git
- 新手教程:如何在iPad上使用iOS10的Safari分屏功能?
- 新手教程:升級開發者預覽版/公測版後如何改回蘋果iOS10.2正式版?
- 手把手教你怎樣轉換iPhone高清晰電影
- 手把手教你iphone上顯示lrc格式歌詞
- iphone新手教程什麼導入音樂
- 蘋果手機新手教程:怎樣打電話?
- iTunes軟件導入同步助手教程
- iOS7新手教程:Facetime視頻通話
- iOS7新手教程:使用iPhone5字典功能
- iOS7新手教程:拍照時調整焦距
- iOS7插件來電歸屬地kuaidial新手教程
- iOS 8手把手教你降級到iOS 7版本
- 快用蘋果助手教你玩轉iOS8相冊


