IOS代碼筆記之左右滑動效果
編輯:IOS開發綜合
本文實例為大家分享了ios實現左右滑動操作代碼,供大家參考,具體內容如下
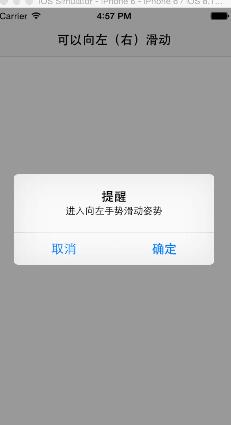
一、效果圖

二、代碼
RootViewController.m
 - (void)viewDidLoad
{
  [super viewDidLoad];
  // Do any additional setup after loading the view.

  self.title=@"可以向左(右)滑動";

  //向右滑動
  UISwipeGestureRecognizer *recognizerLeft;
  recognizerLeft = [[UISwipeGestureRecognizer alloc] initWithTarget:self action:@selector(handleSwipeFromLeft:)];
  [recognizerLeft setDirection:(UISwipeGestureRecognizerDirectionLeft)];
  [self.view addGestureRecognizer:recognizerLeft];

  //向左滑動
  UISwipeGestureRecognizer *recognizerRight;
  recognizerRight = [[UISwipeGestureRecognizer alloc] initWithTarget:self action:@selector(handleSwipeFromRight:)];
  [recognizerRight setDirection:(UISwipeGestureRecognizerDirectionRight)];
  [self.view addGestureRecognizer:recognizerRight];

}
#pragma -mark -手勢滑動
//向左滑動
-(void)handleSwipeFromLeft:(UISwipeGestureRecognizer *)recognizer {

  NSLog(@"-------進入向左手勢滑動姿勢-------------");
  if (recognizer.direction==UISwipeGestureRecognizerDirectionLeft) {

    UIAlertView *alert=[[UIAlertView alloc]initWithTitle:@"提醒" message:@"進入向左手勢滑動姿勢" delegate:self cancelButtonTitle:@"取消" otherButtonTitles:@"確定", nil];
    [alert show];


  }
}
//向右滑動
-(void)handleSwipeFromRight:(UISwipeGestureRecognizer *)recognizer {

  NSLog(@"-------進入向右手勢滑動姿勢-------------");
  if (recognizer.direction==UISwipeGestureRecognizerDirectionRight) {

    UIAlertView *alert=[[UIAlertView alloc]initWithTitle:@"提醒" message:@"進入向右手勢滑動姿勢" delegate:self cancelButtonTitle:@"取消" otherButtonTitles:@"確定", nil];
    [alert show];

  }
}
以上就是本文的全部內容,希望對大家的學習有所幫助,也希望大家多多支持本站。
- 上一頁:IOS代碼筆記之文字走馬燈效果
- 下一頁:IOS代碼筆記之下拉選項cell
相關文章
+


