詳解iOS App中UISwitch開關組件的基本創建及使用方法
一、第一種創建UISwitch組件的方法,在代碼中動態創建。
1、打開Xcode, 新建項目Switch,選擇Single View Application。
2、打開ViewController.m文件在viewDidLoad方法裡添加代碼:
復制代碼 代碼如下:
(void)viewDidLoad
{
[super viewDidLoad];
UISwitch *switchButton = [[UISwitch alloc] initWithFrame:CGRectMake(50, 100, 20, 10)];
[switchButton setOn:YES];
[switchButton addTarget:self action:@selector(switchAction:) forControlEvents:UIControlEventValueChanged];
[self.view addSubview:switchButton];
// Do any additional setup after loading the view, typically from a nib.
}
[switchButton addTarget:selfaction:@selector(switchAction:)forControlEvents:UIControlEventValueChanged];
代碼中selector中的switchAction:需要我們自己實現,就是按下時接收到的事件。
記得把switchButton加到當前view,調用[self.viewaddSubview:switchButton];
3、監聽UISwitch按下事件
實現代碼如下:
復制代碼 代碼如下:
(void)switchAction:(id)sender
{
UISwitch *switchButton = (UISwitch*)sender;
BOOL isButtonOn = [switchButton isOn];
if (isButtonOn) {
showSwitchValue.text = @"是";
}else {
showSwitchValue.text = @"否";
}
}
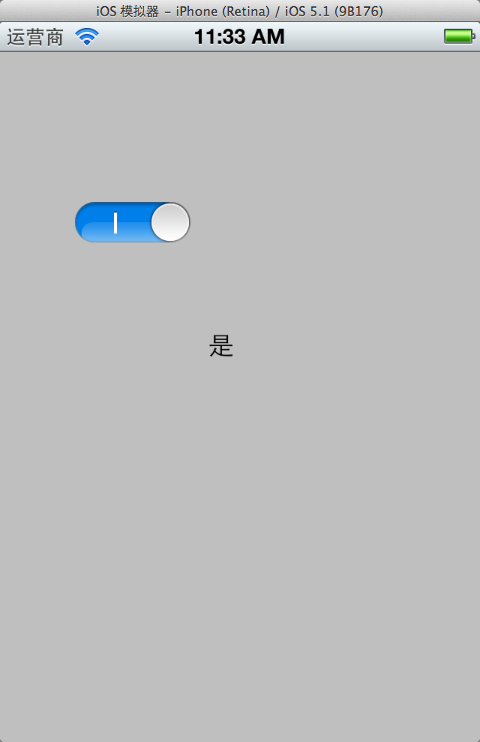
showSwitchValue是我通過拖拽控件方法放到界面上的Label,方便顯示效果
運行,效果:
二、通過拖拽方法使用UISwitch
1、往xib文件上拖拽一個UISwitch控件。
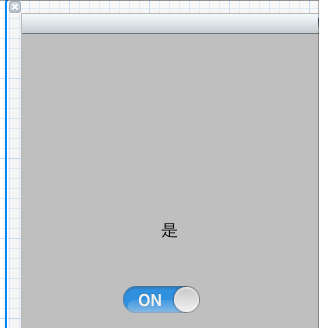
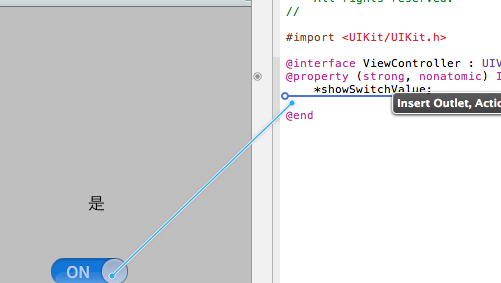
2、按alt+command + return鍵開啟Assistant Editor模式,選中UISwitch控件,按住Control鍵,往ViewController.h拖拽
3、選Action方式
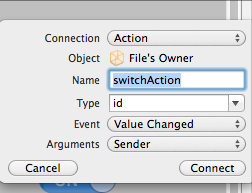
4、.m文件中實現switchAction 。剛才動態創建的時候也用到這個方法名稱,可以先注釋掉剛才的。
復制代碼 代碼如下:
(IBAction)switchAction:(id)sender {
UISwitch *switchButton = (UISwitch*)sender;
BOOL isButtonOn = [switchButton isOn];
if (isButtonOn) {
showSwitchValue.text = @"是";
}else {
showSwitchValue.text = @"否";
}
}
三、自定義UISwitch
1.使用類別擴展UISwitch。
如下:
下面是UISwitch.h文件:
復制代碼 代碼如下:
#import
@interface UISwitch (tagged)
+ (UISwitch *) switchWithLeftText: (NSString *) tag1 andRight: (NSString *) tag2;
@property (nonatomic, readonly) UILabel *label1;
@property (nonatomic, readonly) UILabel *label2;
@end
UISwitch.m文件:
復制代碼 代碼如下:
#import "UISwitch-Extended.h"
#define TAG_OFFSET 900
@implementation UISwitch (tagged)
- (void) spelunkAndTag: (UIView *) aView withCount:(int *) count
{
for (UIView *subview in [aView subviews])
{
if ([subview isKindOfClass:[UILabel class]])
{
*count += 1;
[subview setTag:(TAG_OFFSET + *count)];
}
else
[self spelunkAndTag:subview withCount:count];
}
}
- (UILabel *) label1
{
return (UILabel *) [self viewWithTag:TAG_OFFSET + 1];
}
- (UILabel *) label2
{
return (UILabel *) [self viewWithTag:TAG_OFFSET + 2];
}
+ (UISwitch *) switchWithLeftText: (NSString *) tag1 andRight: (NSString *) tag2
{
UISwitch *switchView = [[UISwitch alloc] initWithFrame:CGRectZero];
int labelCount = 0;
[switchView spelunkAndTag:switchView withCount:&labelCount];
if (labelCount == 2)
{
[switchView.label1 setText:tag1];
[switchView.label2 setText:tag2];
}
return [switchView autorelease];
}
@end
2.還有一種方法,這種方法比較簡單,但比較難懂,我不甚理解。
復制代碼 代碼如下:
UISwitch *isFooOrBar=[[UISwitch alloc] init];
((UILabel )[[[[[[isFooOrBar subviews] lastObject] subviews] objectAtIndex:2] subviews]objectAtIndex:0]).text = @"Foo";
((UILabel *)[[[[[[isFooOrBar subviews] lastObject] subviews] objectAtIndex:2] subviews]objectAtIndex:1]).text = @"Bar";*
四、一些常用方法
獲得開關狀態
復制代碼 代碼如下:
BOOL setting = switchView.isOn;
NSLog(@"%d",setting);
設置開關狀態 NO關閉狀態,YES打開狀態
復制代碼 代碼如下:
[switchView setOn:setting animated:YES];
設置開光的切換
復制代碼 代碼如下:
switchView.onTintColor = [UIColor orangeColor];
設置按鈕的顏色
復制代碼 代碼如下:
switchView.thumbTintColor = [UIColor redColor];
開關控件邊框的顏色
復制代碼 代碼如下:
switchView.tintColor = [UIColor purpleColor];
添加觸發事件
復制代碼 代碼如下:
[switchView addTarget:self action:@selector(switchAction:) forControlEvents:UIControlEventValueChanged];

