iOS開發融雲即時通訊集成詳細步驟
這裡講述的是IOS開發融雲即時通訊集成詳細步驟的相關內容,具體內容請看下面
IOS開發融雲即時通訊集成詳細步驟1.融雲即時通訊IOS SDK下載地址 http://rongcloud.cn/downloads 選擇iOS SDK下載
2.進行應用開發之前,需要先在融雲開發者平台創建應用,如果您已經注冊了融雲開發者帳號,請前往 融雲開發者平台 創建應用;如果您還沒有注冊融雲開發者帳號,請前往 融雲官方網站 首先注冊開發者帳號,注冊後創建應用。注冊地址 https://developer.rongcloud.cn/signup
3.登陸融雲開發者平台 https://developer.rongcloud.cn/signin 創建應用
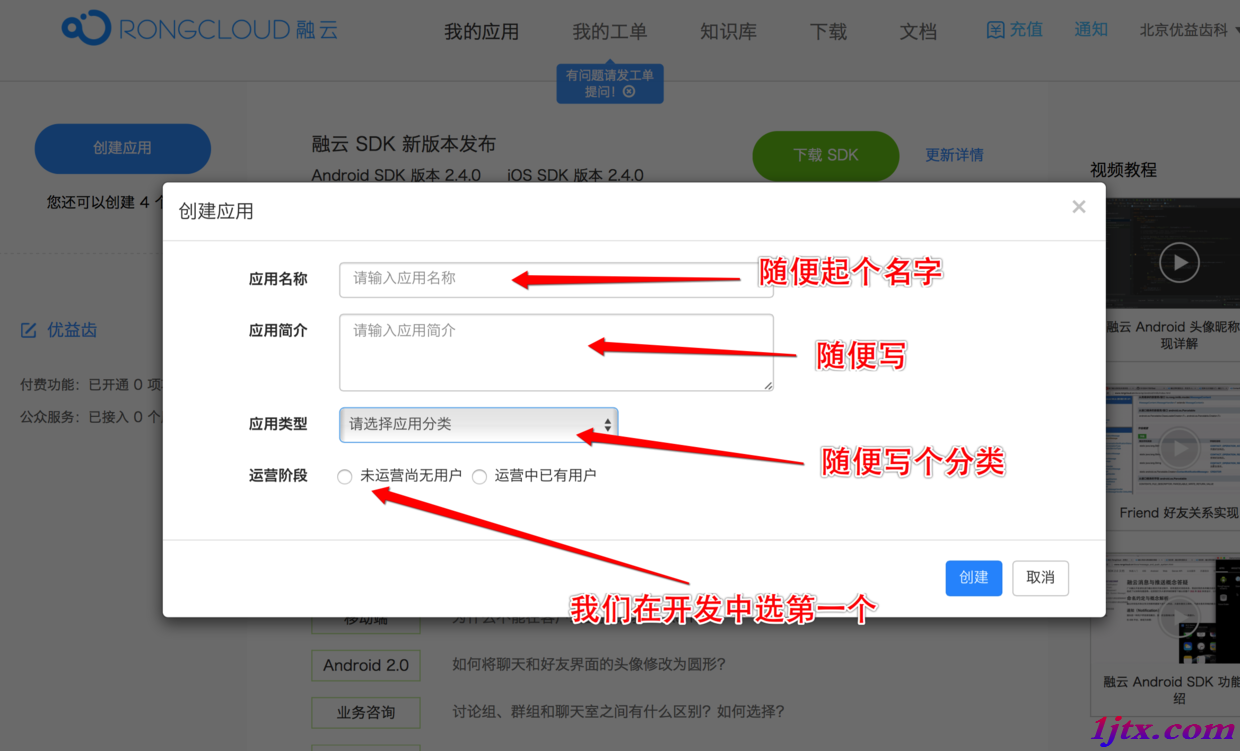
4.進入後台之後點擊創建應用,進入這樣一個創建界面
圖1
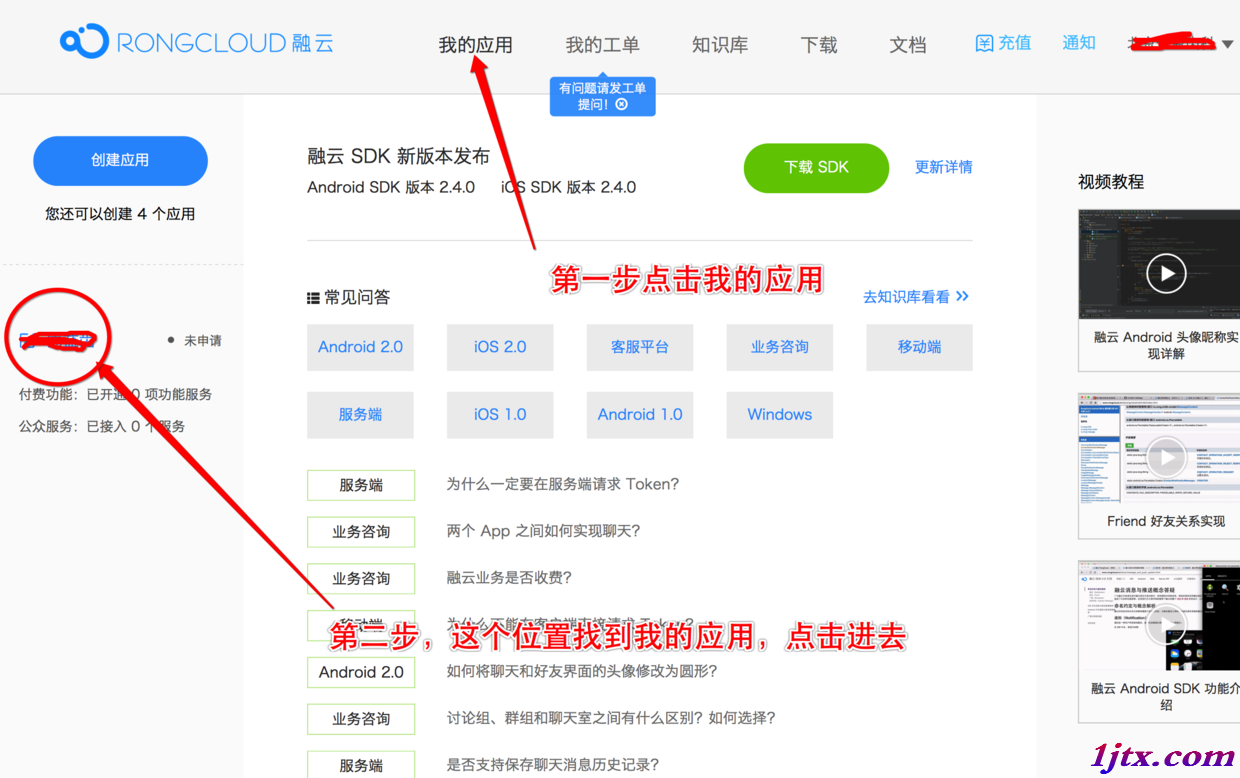
5.最後點擊創建 點擊我的應用 然後在左邊點擊我的應用名稱
圖2
6.點擊AppKey進入
圖3
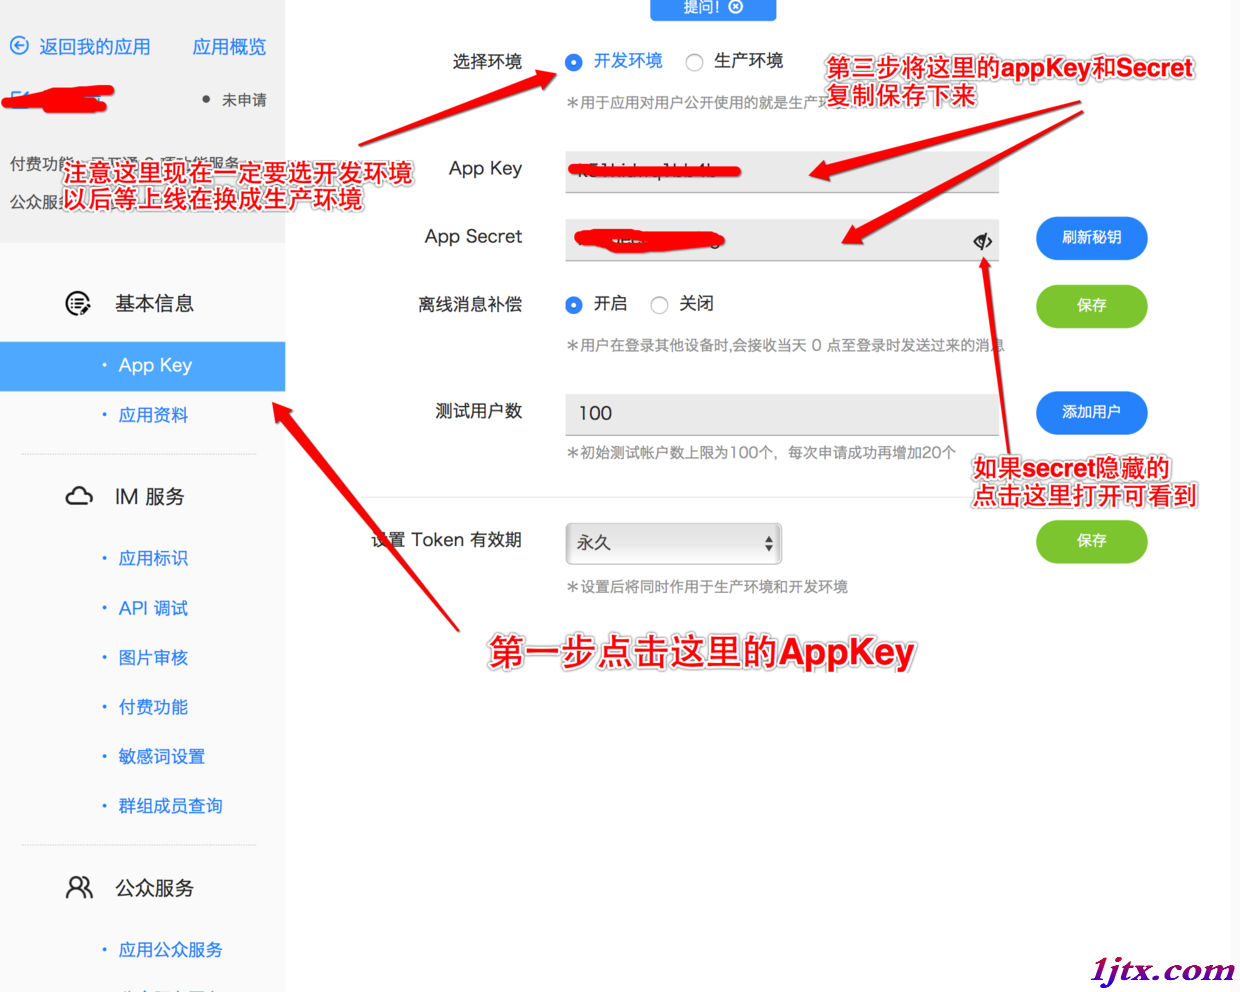
7.手動安裝融雲即時通訊SDK
7.1將下載好的最新的融雲SDK導入到自己的項目中
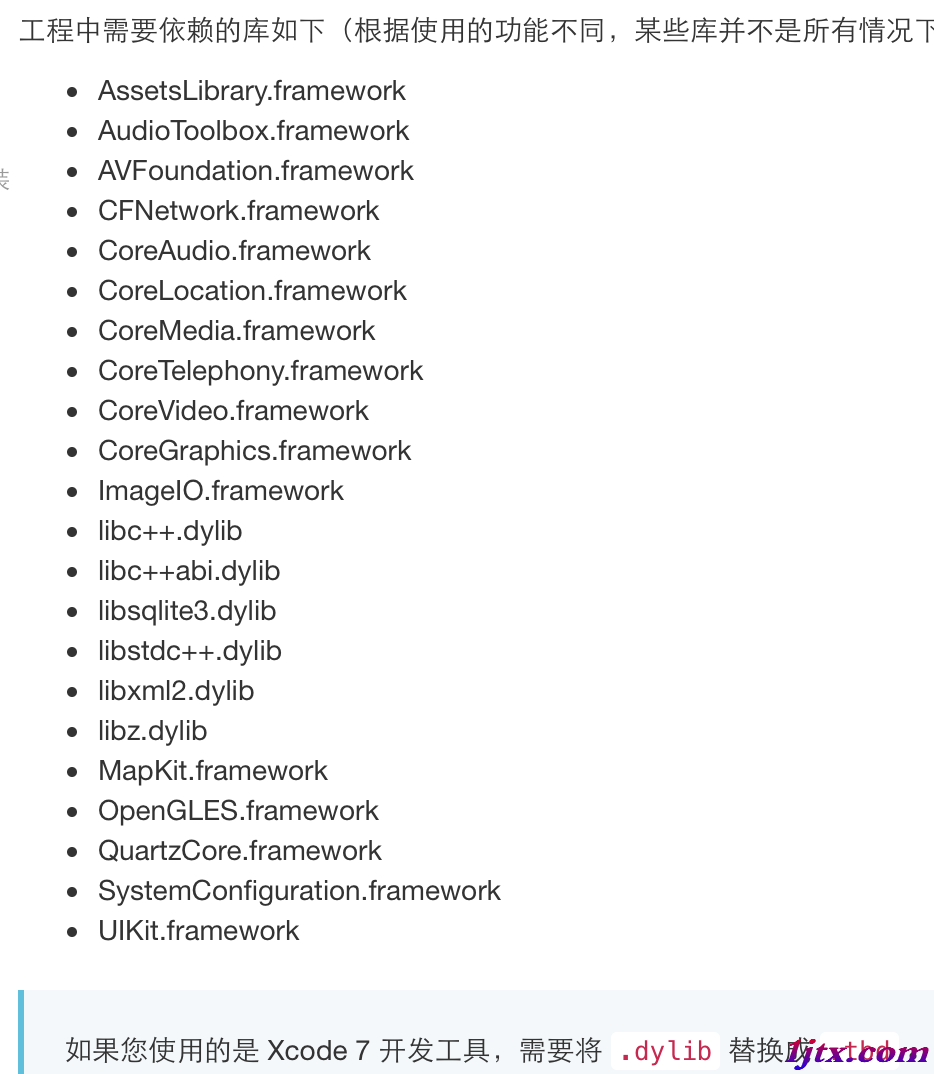
7.2添加依賴庫 在Build Phases中第三個選項link中點擊左下角+號添加依賴庫
所需的依賴庫
圖4
8.獲取Token
和第五步一樣,進入融雲後台點擊我的應用—>自己的應用名稱—>IM服務—>API調試
右邊會進入一個界面,在這裡獲取調試Token
圖5
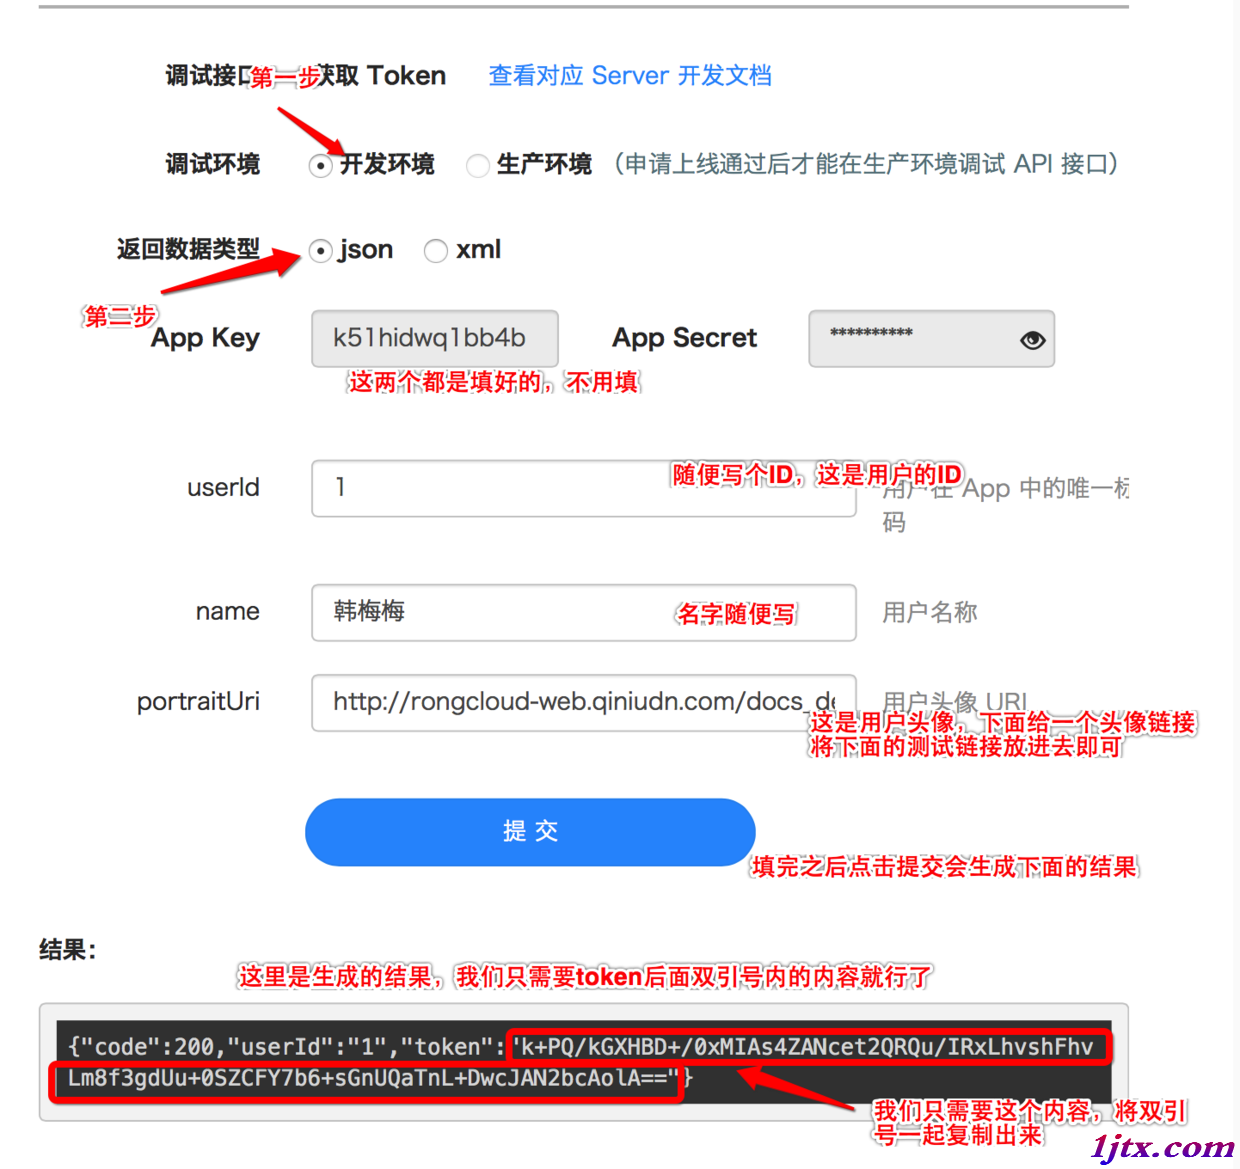
用戶 Id:
userId = "1" // 用戶在融雲系統中唯一的身份 Id,可為任意數字或字符串,但必須保證全局唯一。
用戶名稱:
name = "韓梅梅" // 用戶的顯示名稱,用來在 Push 推送時,或者客戶端沒有提供用戶信息時,顯示用戶的名稱。
用戶頭像圖片:
portraitUri = "http://rongcloud-web.qiniudn.com/docs_demo_rongcloud_logo.png"
現在我們獲得了AppKey和Token了
9.下面就開始快速集成了
9.1在自己的項目中AppDelegate.h文件中導入頭文件
#import<RongIMLib/RongIMLib.h>
#impor<RongIMKit/RongIMKit.h>
然後遵守RCIMConnectionStatusDelegate這個代理方法,即變成這樣@interface AppDelegate : UIResponder<UIApplicationDelegate,RCIMConnectionStatusDelegate>
9.2在AppDelegate.m文件中導入頭文件
//融雲即時通訊
#import<RongIMKit/RongIMKit.h>
#import<RongIMLib/RongIMLib.h>
#import<UIKit/UIKit.h>
然後將獲得的融雲的AppKey 寫成一個宏 如下 將自己的AppKey 替換即可\
k51hidwq1bbcdds4b將這個換成自己的即可
//融雲即時通訊AppKey
#define RONGCLOUD_IM_APPKEY @"k51hidwq1bbcdds4b"
10.在AppDelegate.m的文件中的
- (BOOL)application:(UIApplication *)application didFinishLaunchingWithOptions:(NSDictionary *)launchOptions
{
}
方法中加入以下代碼
//融雲即時通訊
//初始化融雲SDK。
[[RCIM sharedRCIM] initWithAppKey:RONGCLOUD_IM_APPKEY];
/**
* 推送處理1
*/
if ([application
respondsToSelector:@selector(registerUserNotificationSettings:)]) {
//注冊推送, iOS 8
UIUserNotificationSettings *settings = [UIUserNotificationSettings
settingsForTypes:(UIUserNotificationTypeBadge |
UIUserNotificationTypeSound |
UIUserNotificationTypeAlert)
categories:nil];
[application registerUserNotificationSettings:settings];
} else {
UIRemoteNotificationType myTypes = UIRemoteNotificationTypeBadge |
UIRemoteNotificationTypeAlert |
UIRemoteNotificationTypeSound;
[application registerForRemoteNotificationTypes:myTypes];
}
//融雲即時通訊
[[NSNotificationCenter defaultCenter]
addObserver:self
selector:@selector(didReceiveMessageNotification:)
name:RCKitDispatchMessageNotification
object:nil];
[[RCIM sharedRCIM] setConnectionStatusDelegate:self];
加入到方法中的代碼到這裡
下面是單獨的方法 直接加在AppDelegate.m的文件中即可
/**
* 將得到的devicetoken 傳給融雲用於離線狀態接收push ,您的app後台要上傳推送證書
*
* @param application <#application description#>
* @param deviceToken <#deviceToken description#>
*/
- (void)application:(UIApplication *)application
didRegisterForRemoteNotificationsWithDeviceToken:(NSData *)deviceToken {
NSString *token =
[[[[deviceToken description] stringByReplacingOccurrencesOfString:@"<"
withString:@""]
stringByReplacingOccurrencesOfString:@">"
withString:@""]
stringByReplacingOccurrencesOfString:@" "
withString:@""];
[[RCIMClient sharedRCIMClient] setDeviceToken:token];
}
/**
* 網絡狀態變化。
*
* @param status 網絡狀態。
*/
- (void)onRCIMConnectionStatusChanged:(RCConnectionStatus)status {
if (status == ConnectionStatus_KICKED_OFFLINE_BY_OTHER_CLIENT) {
UIAlertView *alert = [[UIAlertView alloc]
initWithTitle:@"提示"
message:@"您"
@"的帳號在別的設備上登錄,您被迫下線!"
delegate:nil
cancelButtonTitle:@"知道了"
otherButtonTitles:nil, nil];
[alert show];
//注意這裡下面的4行,根據自己需要修改 也可以注釋了,但是只能注釋這4行,網絡狀態變化這個方法一定要實現
ViewController *loginVC = [[ViewController alloc] init];
UINavigationController *_navi =
[[UINavigationController alloc] initWithRootViewController:loginVC];
self.Window.rootViewController = _navi;
}
}
- (void)didReceiveMessageNotification:(NSNotification *)notification {
[UIApplication sharedApplication].applicationIconBadgeNumber =
[UIApplication sharedApplication].applicationIconBadgeNumber + 1;
}
11.開始創建會話先創建一個繼承RCConversationListViewController名為ChatListViewController的控制器創建之後的控制器.h文件即為
#import<UIKit/UIKit.h>
#import<RongIMKit/RongIMKit.h>
@interface ChatListViewController : RCConversationListViewController
@end
這樣的樣式
在你要創建即時會話的界面的控制器的.h文件中導入頭文件//融雲即時通訊
#import<RongIMKit/RongIMKit.h>
並遵守數據源方法RCIMUserInfoDataSource即變成了
#import<RongIMKit/RongIMKit.h>
@interface ViewController : UIViewController<RCIMUserInfoDataSource>
在.m文件中導入頭文件
//融雲即時通訊
#import "ChatListViewController.h"
#import<RongIMKit/RCConversationViewController.h>
將我們獲取的Token定義成宏 就像這樣的格式 換成自己的Token即可
//融雲即時通訊Token
#define RONGCLOUD_IM_Token @"LU0IpXzEeYXUxuJi5n9hAwNcet2QRQu/IRxLhvshFhvLm8f3gdUu+y4TIhufZfJ/fIXRJrQyBu8cJAN2bcAolA=="
比如在我所在的控制器我有一個開始回答按鈕
我想在這個控制器點擊開始回答按鈕就想讓他創建即時會話
這樣來實現,點擊開始回答按鈕
/**
* 點擊開始回答執行的方法
*/
-(void)startAnswer
{
//登陸融雲
//登錄融雲服務器,開始階段可以先從融雲API調試網站獲取,之後token需要通過服務器到融雲服務器取。
NSString *token=RONGCLOUD_IM_Token;
[[RCIM sharedRCIM] connectWithToken:token success:^(NSString *userId) {
//設置用戶信息提供者,頁面展現的用戶頭像及昵稱都會從此代理取 這裡會跳到會話列表界面 就是我們平常QQ聊天都有一個
會話的列表 如果想直接跳到聊天界面 下面再說
[[RCIM sharedRCIM] setUserInfoDataSource:self];
NSLog(@"Login successfully with userId: %@.", userId);
dispatch_async(dispatch_get_main_queue(), ^{
ChatListViewController *chatListViewController = [[ChatListViewController alloc]init];
[self.navigationController pushViewController:chatListViewController animated:YES];
});
} error:^(RCConnectErrorCode status) {
NSLog(@"login error status: %ld.", (long)status);
} tokenIncorrect:^{
NSLog(@"token 無效 ,請確保生成token 使用的appkey 和初始化時的appkey 一致");
}];
} error:^(RCConnectErrorCode status) {
NSLog(@"login error status: %ld.", (long)status);
} tokenIncorrect:^{
NSLog(@"token 無效 ,請確保生成token 使用的appkey 和初始化時的appkey 一致");
}];
YYCLog(@"點擊了開始回答");
}
然後在這個控制器再實現一個方法 就是下面這個方法
/**
*此方法中要提供給融雲用戶的信息,建議緩存到本地,然後改方法每次從您的緩存返回
*/
- (void)getUserInfoWithUserId:(NSString *)userId completion:(void(^)(RCUserInfo* userInfo))completion
{
//此處為了演示寫了一個用戶信息
if ([@"1" isEqual:userId]) {
RCUserInfo *user = [[RCUserInfo alloc]init];
user.userId = @"1";
user.name = @"測試1";
user.portraitUri = @"https://ss0.baidu.com/73t1bjeh1BF3odCf/it/u=1756054607,4047938258&fm=96&s=94D712D20AA1875519EB37BE0300C008";
return completion(user);
}else if([@"2" isEqual:userId]) {
RCUserInfo *user = [[RCUserInfo alloc]init];
user.userId = @"2";
user.name = @"測試2";
user.portraitUri = @"https://ss0.baidu.com/73t1bjeh1BF3odCf/it/u=1756054607,4047938258&fm=96&s=94D712D20AA1875519EB37BE0300C008";
return completion(user);
}
}
這個方法也要在這個.m文件中實現
這裡都是測試 先這樣寫 我到後面再寫怎麼具體實現
下面代碼都一樣
下面就是在我們的ChatListViewController.h文件中
#import<RongIMKit/RongIMKit.h>
#import<RongIMKit/RongIMKit.h>
@interface ChatListViewController : RCConversationListViewController
@end
[db:作者簡介][db:原文翻譯及解析]【iOS開發融雲即時通訊集成詳細步驟】的相關資料介紹到這裡,希望對您有所幫助! 提示:不會對讀者因本文所帶來的任何損失負責。如果您支持就請把本站添加至收藏夾哦!

