iOS中對圖片縮放(拉伸)的四種方式
編輯:IOS開發綜合
1. UIImageView全體拉伸
方式一是經過設置容器UIImageView中圖片的顯示形式:UIImageView-contentMode,使容器內的圖片依照需求的拉伸方式在容器中顯示。
typedef NS_ENUM(NSInteger, UIViewContentMode) {
    UIViewContentModeScaleToFill,         // 默許 拉伸(會變形)
    UIViewContentModeScaleaspectFit,      // 等比例拉伸
    UIViewContentModeScaleaspectFill,     // 等比例填充
    UIViewContentModeRedraw,              // redraw on bounds change (不清楚)
    UIViewContentModeCenter,              // 上面的是不拉伸按地位顯示了
    UIViewContentModeTop,
    UIViewContentModeBottom,
    UIViewContentModeLeft,
    UIViewContentModeRight,
    UIViewContentModeTopLeft,
    UIViewContentModeTopRight,
    UIViewContentModeBottomLeft,
    UIViewContentModeBottomRight,
};// 按4邊間距顯示不拉伸的區域
- (UIImage *)resizableImageWithCapInsets:(UIEdgeInsets)capInsets NS_AVAILABLE_IOS(5_0);
// 按2點拉伸
- (UIImage *)stretchableImageWithLeftCapWidth:(NSInteger)leftCapWidth topCapHeight:(NSInteger)topCapHeight;- (UIImage *)resizableImageWithCapInsets:(UIEdgeInsets)capInsets resizingMode:(UIImageResizingMode)resizingMode;
// 拉伸形式
typedef NS_ENUM(NSInteger, UIImageResizingMode) {
UIImageResizingModeTile,//停止區域復制形式拉伸
UIImageResizingModeStretch,//停止突變復制形式拉伸
};//圖片按比例內縮放,使一條邊等於需求的一邊長,另外一條邊小於等於需求的另一邊邊長
- (UIImage *)scaleToSize:(CGSize)newSize {
CGFloat width = self.size.width;
CGFloat height= self.size.height;
CGFloat newSizeWidth = newSize.width;
CGFloat newSizeHeight= newSize.height;
if (width <= newSizeWidth &&
height <= newSizeHeight) {
return self;
}
if (width == 0 || height == 0 || newSizeHeight == 0 || newSizeWidth == 0) {
return nil;
}
CGSize size;
if (width / height > newSizeWidth / newSizeHeight) {
size = CGSizeMake(newSizeWidth, newSizeWidth * height / width);
} else {
size = CGSizeMake(newSizeHeight * width / height, newSizeHeight);
}
return [self drawImageWithSize:size];
}
- (UIImage *)drawImageWithSize: (CGSize)size {
CGSize drawSize = CGSizeMake(floor(size.width), floor(size.height));
UIGraphicsBeginImageContext(drawSize);
[self draWinRect:CGRectMake(0, 0, drawSize.width, drawSize.height)];
UIImage *newImage = UIGraphicsGetImageFromCurrentImageContext();
UIGraphicsEndImageContext();
return newImage;
}經過Xcode中Asset Catalog的slice和dice,我們不需求代碼也能拉伸圖片。首先在Xcode中選中圖片,然後點擊右下角的Show Slicing:

我們能看到slicing 面板和一個按鈕”Start Slicing”。

在你點擊按鈕之後,會顯示上面的三個選項:

右邊的按鈕用於horizontal edge insets,左邊的按鈕用於vertical edge insets,兩頭的則是兩個都有。在我們的例子中要保存圓角,所以我們按兩頭的按鈕,通知零碎我們想要按鈕的兩頭在程度和垂直方向拉伸。在按下按鈕之後,就能看到一些可以拖動的細條,這可以設置從哪裡開端拉伸圖片。
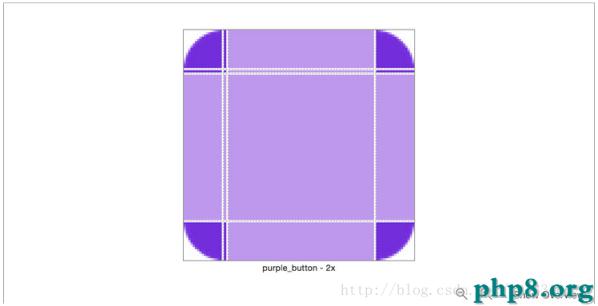
零碎會保存深紫色的區域,淺紫色的區域會被拉伸。
更凶猛的是,Xcode自動找到了圓角,所以我們不需求設置從哪裡開端拉伸圖片。最後別忘了在Attribtues pane中設置圖片是可拉伸的。
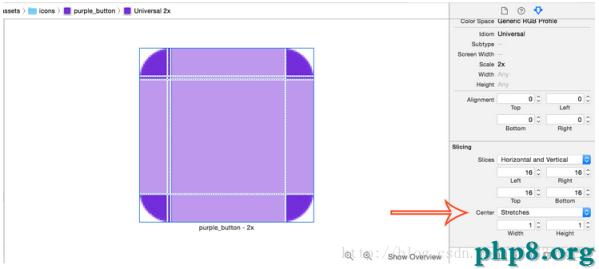
假如我是你的話,我就會嘗試並習氣這個功用。有了這個價值連城,你就不必再在resizableImageWithCapInsets辦法中填寫那些神奇的數字了,也能協助你別離view邏輯和app邏輯。
轉自: 余成海的博客 https://my.oschina.net/iq19900204/blog/514371
【iOS中對圖片縮放(拉伸)的四種方式】的相關資料介紹到這裡,希望對您有所幫助! 提示:不會對讀者因本文所帶來的任何損失負責。如果您支持就請把本站添加至收藏夾哦!
- 上一頁:iOS 證書請求和運用步驟(詳細版)
- 下一頁:iOS圖片緊縮辦法
相關文章
+
