IOS 開發中畫扇形圖實例詳解
編輯:IOS開發綜合
IOS 開發中畫扇形圖實例詳解
昨天在做項目中,遇到一個需要顯示扇形圖的功能,網上搜了一下,發現code4app裡面也沒有找到我想要的那種類似的效果,沒辦法了,只能自己學習一下如何畫了。
首先我們需要了解一個uiview的方法
-(void)drawRect:(CGRect)rect
我們知道了這個方法,就可以在自定義UIView的子類的- (void)drawRect:(CGRect)rect裡面繪圖了,關於drawrect的調用周期,網上也是一找一大堆,等下我會整理一下,轉載一篇供你們參考。
廢話少說,下面直接開始代碼
首先我們自定義一個繼承字uiview的子類,我這裡就起名字叫pieview了
首先我們試試先畫一個圓
#import "pieview.h"
//直徑,其實radius是半徑的意思吧,哈哈 算了先用著,demo都寫好了就不改了,你們知道就行了
#define radius 50

@implementation pieview

-(void)drawRect:(CGRect)rect
{
    CGContextRef ctx = UIGraphicsGetCurrentContext();//獲取圖形上下文
    CGPoint cent=CGPointMake((self.frame.size.width/2)-radius/2, (self.frame.size.height/2)-radius/2);//設置圖形開始畫的坐標原點,根據實際需要設置,我這是隨便寫的
    CGContextAddEllipseInRect(ctx, CGRectMake(cent.x, cent.y, 100, 100));這個是核心函數,在這裡設置圖形的開始從哪裡畫,畫的寬度和高度是多少。如果寬高不一樣 可就是橢圓了啊
     [[UIColor greenColor] set];//設置顏色
    CGContextFillPath(ctx);//實心的
    //CGContextStrokePath(ctx);空心的
}

@end
然後我們創建一個控制器 pieViewController 引用我們的pieview,展示一下效果
#import "pieViewController.h"
//#import "myview.h"
//#import "JYpieview.h"
#import "pieview.h"
@interface pieViewController ()

@end

@implementation pieViewController

- (void)viewDidLoad {
  [super viewDidLoad];
  pieview *view=[[pieview alloc]init];
  view.frame=CGRectMake(4, 150, 150, 300);
  [self.view addSubview:view];

}
- (void)didReceiveMemoryWarning {
  [super didReceiveMemoryWarning];
  // Dispose of any resources that can be recreated.
}
@end
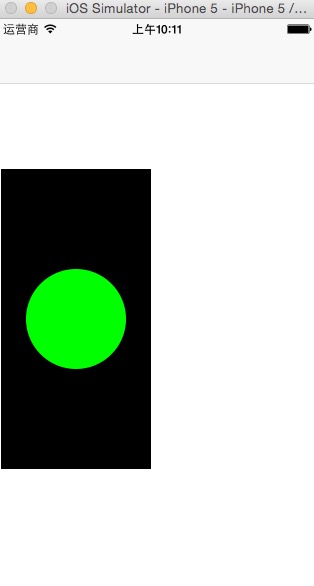
好了看一下效果吧
好了,下面讓我們開始扇形圖的制作吧
#import "pieview.h"
//直徑
#define radius 50
#define PI 3.14159265358979323846

@implementation pieview
//計算度轉弧度
static inline float radians(double degrees) {
  return degrees * PI / 180;
}
-(void)drawRect:(CGRect)rect
{
  CGPoint cent=CGPointMake((self.frame.size.width/2)-radius/2, (self.frame.size.height/2)-radius/2);
  CGContextRef ctx = UIGraphicsGetCurrentContext();
  CGContextClearRect(ctx, rect);

  float angle_start = radians(0.0);
  float angle_end = radians(120.0);
  CGContextMoveToPoint(ctx, cent.x, cent.y);
  CGContextSetFillColor(ctx, CGColorGetComponents( [[UIColor greenColor] CGColor]));
  CGContextAddArc(ctx, cent.x, cent.y, radius, angle_start, angle_end, 0);
  CGContextFillPath(ctx);

  angle_start = angle_end;
  angle_end = radians(360.0);
  CGContextMoveToPoint(ctx, cent.x, cent.y);
  CGContextSetFillColor(ctx, CGColorGetComponents( [[UIColor blueColor] CGColor]));
  CGContextAddArc(ctx, cent.x, cent.y, radius, angle_start, angle_end, 0);
  CGContextFillPath(ctx);
}
@end
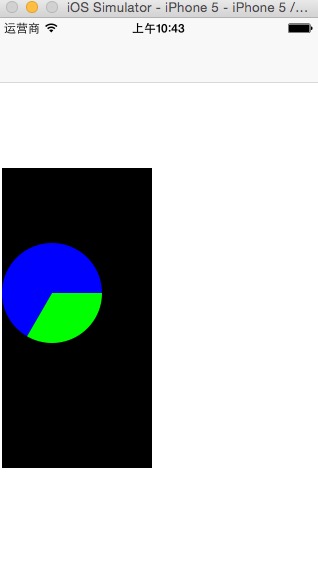
在運行一下,我們看下效果
可使有沒有覺得上面的代碼很多重復的?對的,我們可以封裝一個方法 那麼重構後的代碼我就一次性的貼上去了
#import "pieview.h"
//直徑
#define radius 50
#define PI 3.14159265358979323846

@implementation pieview
//計算度轉弧度
static inline float radians(double degrees) {
  return degrees * PI / 180;
}
static inline void drawArc(CGContextRef ctx, CGPoint point, float angle_start, float angle_end, UIColor* color) {
  CGContextMoveToPoint(ctx, point.x, point.y);
  CGContextSetFillColor(ctx, CGColorGetComponents( [color CGColor]));
  CGContextAddArc(ctx, point.x, point.y, radius, angle_start, angle_end, 0);
  //CGContextClosePath(ctx);
  CGContextFillPath(ctx);
}
-(void)drawRect:(CGRect)rect
{
  CGPoint cent=CGPointMake((self.frame.size.width/2)-radius/2, (self.frame.size.height/2)-radius/2);
  CGContextRef ctx = UIGraphicsGetCurrentContext();
  CGContextClearRect(ctx, rect);

  float angle_start = radians(0.0);
  float angle_end = radians(121.0);
  drawArc(ctx, cent, angle_start, angle_end, [UIColor yellowColor]);

  angle_start = angle_end;
  angle_end = radians(228.0);
  drawArc(ctx, cent, angle_start, angle_end, [UIColor greenColor]);

  angle_start = angle_end;
  angle_end = radians(260);
  drawArc(ctx, cent, angle_start, angle_end, [UIColor orangeColor]);

  angle_start = angle_end;
  angle_end = radians(360);
  drawArc(ctx, cent, angle_start, angle_end, [UIColor purpleColor]);

}
@end
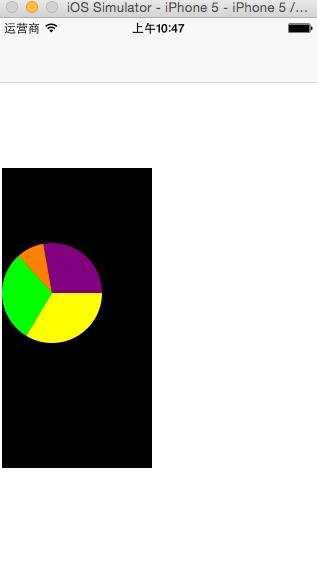
看下運行效果圖
如果我們中途數據變了 想要改一下圖形怎麼辦呢?
那麼我們就需要用到這個
  //通知自定義的view重新繪制圖形
//  [self setNeedsDisplay];
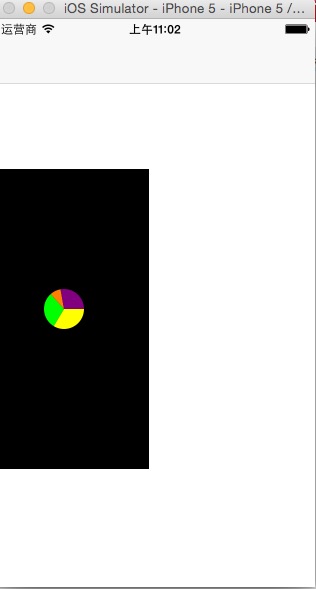
這時候我們就要pieview向外界提供一個接口屬性,這是我做的模擬5面之後改變圓形的直徑大小
.h文件
#import <UIKit/UIKit.h>

@interface pieview : UIView
//直徑
@property(nonatomic,assign)float radius;
@end
.m文件
#import "pieview.h"
#define PI 3.14159265358979323846

@implementation pieview
//計算度轉弧度
static inline float radians(double degrees) {
  return degrees * PI / 180;
}
static inline void drawArc(CGContextRef ctx, CGPoint point, float angle_start, float angle_end, UIColor* color,float radius) {
  CGContextMoveToPoint(ctx, point.x, point.y);
  CGContextSetFillColor(ctx, CGColorGetComponents( [color CGColor]));
  CGContextAddArc(ctx, point.x, point.y, radius, angle_start, angle_end, 0);
  //CGContextClosePath(ctx);
  CGContextFillPath(ctx);
}
-(void)drawRect:(CGRect)rect
{
  CGPoint cent=CGPointMake((self.frame.size.width/2)-self.radius/2, (self.frame.size.height/2)-self.radius/2);
  CGContextRef ctx = UIGraphicsGetCurrentContext();
  CGContextClearRect(ctx, rect);

  float angle_start = radians(0.0);
  float angle_end = radians(121.0);
  drawArc(ctx, cent, angle_start, angle_end, [UIColor yellowColor],self.radius);

  angle_start = angle_end;
  angle_end = radians(228.0);
  drawArc(ctx, cent, angle_start, angle_end, [UIColor greenColor],self.radius);

  angle_start = angle_end;
  angle_end = radians(260);
  drawArc(ctx, cent, angle_start, angle_end, [UIColor orangeColor],self.radius);

  angle_start = angle_end;
  angle_end = radians(360);
  drawArc(ctx, cent, angle_start, angle_end, [UIColor purpleColor],self.radius);

}
-(void)setRadius:(float)radius
{
  _radius=radius;
  [self setNeedsDisplay];
}
@end
pieViewController.m文件
@implementation pieViewController

- (void)viewDidLoad {
  [super viewDidLoad];
  pieview *view=[[pieview alloc]init];
  view.radius=50;
  view.frame=CGRectMake(4, 150, 150, 300);
  [self.view addSubview:view];
  //view.backgroundColor=[UIColor clearColor];
  //模擬5秒後執行這個段代碼
  dispatch_after(dispatch_time(DISPATCH_TIME_NOW, (int64_t)(5.0 * NSEC_PER_SEC)), dispatch_get_main_queue(), ^{
    view.radius=20;
  });
}
- (void)didReceiveMemoryWarning {
  [super didReceiveMemoryWarning];
  // Dispose of any resources that can be recreated.
}
@end
效果
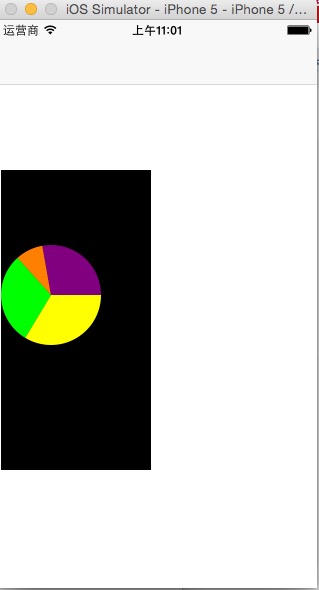
5秒之後
感謝閱讀,希望能幫助到大家,謝謝大家對本站的支持!
- 上一頁:iOS實現視頻壓縮上傳實例代碼
- 下一頁:iOS中遍歷的方法總結
相關文章
+
