iOS中設置清除緩存功能的實現方法
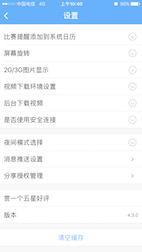
絕大多數應用中都存在著清楚緩存的功能,形形色色,各有千秋,現為大家介紹一種最基礎的清除緩存的方法。清除緩存基本上都是在設置界面的某一個Cell,於是我們可以把清除緩存封裝在某一個自定義Cell中,如下圖所示:
具體步驟
使用注意:過程中需要用到第三方庫,請提前安裝好:SDWebImage、SVProgressHUD。
1. 創建自定義Cell,命名為GYLClearCacheCell
重寫initWithStyle:(UITableViewCellStyle)style reuseIdentifier:(NSString *)reuseIdentifier方法,設置基本內容,如文字等等;主要代碼如下:
- (instancetype)initWithStyle:(UITableViewCellStyle)style reuseIdentifier:(NSString *)reuseIdentifier
 {
  if (self = [super initWithStyle:style reuseIdentifier:reuseIdentifier]) {
    // 設置加載視圖
    UIActivityIndicatorView *loadingView = [[UIActivityIndicatorView alloc] initWithActivityIndicatorStyle:UIActivityIndicatorViewStyleGray];
    [loadingView startAnimating];
    self.accessoryView = loadingView;
    //設置文字
    self.textLabel.text = @"清楚緩存";
    self.detailTextLabel.text = @"正在計算";
 }
  return self;
}
2. 計算緩存文件大小
緩存文件包括兩部分,一部分是使用SDWebImage緩存的內容,其次可能存在自定義的文件夾中的內容(視頻,音頻等內容),於是計算要分兩部分,主要代碼如下:
unsigned long long size =
[NSSearchPathForDirectoriesInDomains(NSCachesDirectory, NSUserDomainMask, YES).lastObject stringByAppendingPathComponent:@"CustomFile"].fileSize;
//fileSize是封裝在Category中的。
size += [SDImageCache sharedImageCache].getSize;  //CustomFile + SDWebImage 緩存
//設置文件大小格式
NSString sizeText = nil;
if (size >= pow(10, 9)) {
 sizeText = [NSString stringWithFormat:@"%.2fGB", size / pow(10, 9)];
}else if (size >= pow(10, 6)) {
 sizeText = [NSString stringWithFormat:@"%.2fMB", size / pow(10, 6)];
}else if (size >= pow(10, 3)) {
 sizeText = [NSString stringWithFormat:@"%.2fKB", size / pow(10, 3)];
}else {
 sizeText = [NSString stringWithFormat:@"%zdB", size];
}
上述兩個方法都是在主線程中完成的,如果緩存文件大小非常大的話,計算時間會比較長,會導致應用卡死,考慮到該問題,因此需要將上述代碼放到子線程中完成。
3. 添加手勢監聽
對於監聽點擊Cell可以使用代理也可以使用手勢監聽,為了將完整的功能封裝到自定義Cell中,於是我們使用手勢監聽的方法來監聽點擊Cell。
//計算完成後,回到主線程繼續處理,顯示文件大小,除去加載視圖,顯示箭頭,添加點擊事件
dispatch_async(dispatch_get_main_queue(), ^{
 self.detailTextLabel.text = [NSString stringWithFormat:@"%@",sizeText];
 self.accessoryView = nil;
 self.accessoryType = UITableViewCellAccessoryDisclosureIndicator;
 [self addGestureRecognizer:[[UITapGestureRecognizer alloc] initWithTarget:self action:@selector(clearCacheClick)]];
 });
4. 清除緩存
清除緩存也是分為兩部分,一是清除SDWebImage的緩存,二是清除自定義文件緩存,主要代碼如下:
- (void)clearCacheClick
{
  [SVProgressHUD showWithStatus:@"正在清除緩存···"];
  [SVProgressHUD setDefaultMaskType:SVProgressHUDMaskTypeBlack];
  [[SDImageCache sharedImageCache] clearDiskOnCompletion:^{
    dispatch_async(dispatch_get_global_queue(0, 0), ^{
      NSFileManager *mgr = [NSFileManager defaultManager];
      [mgr removeItemAtPath:GYLCustomFile error:nil];
      [mgr createDirectoryAtPath:GYLCustomFile withIntermediateDirectories:YES attributes:nil error:nil];
      dispatch_async(dispatch_get_main_queue(), ^{
        [SVProgressHUD dismiss];
        // 設置文字
        self.detailTextLabel.text = nil;
      });
    });
  }];
}
注意點:SDWebImage清除緩存是在子線程中進行的,清除自定義文件內容應該也放在子線程中(刪除大文件可能比較耗時),為了保證兩者不沖突,可以將刪除自定義文件內容放在SDWebImage緩存清除完畢之後進行,然後再回到主線程操作。
5. 其他注意點
a. 在計算文件大小過程中應該是不允許點擊Cell的,如果有設置Cell的didSelectRowAtIndexPath方法,那麼會導致手勢監聽不能使用。於是需要在計算時不能點擊Cell。
b. 設置userInteractionEnabled=NO應放在設置文字之後,否則textLabel將顯示為灰色。
c. 當計算文件大小沒有結束的時,這個時候點擊返回,自定義Cell不會被銷毀,他會執行完剩下的代碼,可以使用dealloc方法來驗證,在此情況下,可以使用弱引用的self來解決。
d. 當設置界面的cell比較多時,如果還在計算緩存大小時,清除緩存的cell從視圖中消失,那麼加載視圖動畫就會被停止,當返回到清除緩存cell時,看不到加載動畫。解決方案兩種方法:一個是在cell創建的代理方法中重新開啟動畫;另一個是封裝到layoutSubviews方法中。
6. 使用
創建GYLSettingViewController繼承自UITableViewController;首先為自定義Cell注冊;其次在數據源方法中使用自定義Cell;具體代碼如下:
#import "GYLSettingViewController.h"
#import "GYLClearCacheCell.h"
@implementation GYLSettingViewController
static NSString * const GYLClearCacheCellID = @"ClearCache";
static NSString * const GYLSettingCellID = @"Setting";
- (instancetype)init
{
  return [self initWithStyle:UITableViewStyleGrouped];
}
- (void)viewDidLoad
{
  [super viewDidLoad];
  self.view.backgroundColor = GYLBGColor;
  self.navigationItem.title = @"設置";
  [self.tableView registerClass:[GYLClearCacheCell class] forCellReuseIdentifier:GYLClearCacheCellID];
  [self.tableView registerClass:[UITableViewCell class] forCellReuseIdentifier:GYLSettingCellID];
}
- (NSInteger)numberOfSectionsInTableView:(UITableView *)tableView
{
  return 3;
}
- (NSInteger)tableView:(UITableView *)tableView numberOfRowsInSection:(NSInteger)section
{
  return 1;
}
- (UITableViewCell *)tableView:(UITableView *)tableView cellForRowAtIndexPath:(NSIndexPath *)indexPath
{
  if (indexPath.section == 0 && indexPath.row == 0) {
    return [[GYLClearCacheCell alloc] initWithStyle:UITableViewCellStyleValue1 reuseIdentifier:GYLClearCacheCellID];
  }
  UITableViewCell *cell = [tableView dequeueReusableCellWithIdentifier:GYLSettingCellID];
  cell.textLabel.text = [NSString stringWithFormat:@"section-%zd,row--%zd",indexPath.section,indexPath.row];
  return cell;
}
@end
7. 效果
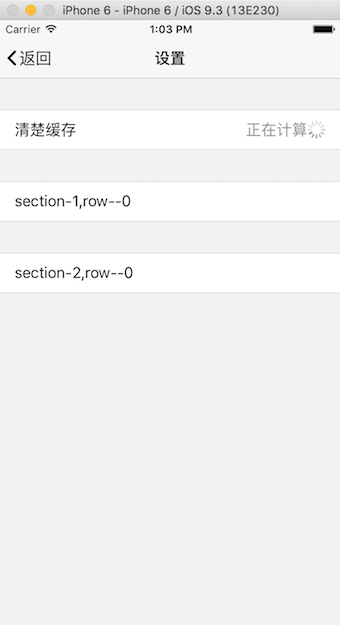
計算文件大小
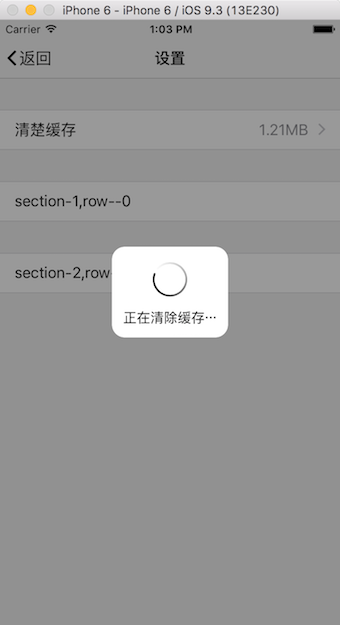
正在清除緩存
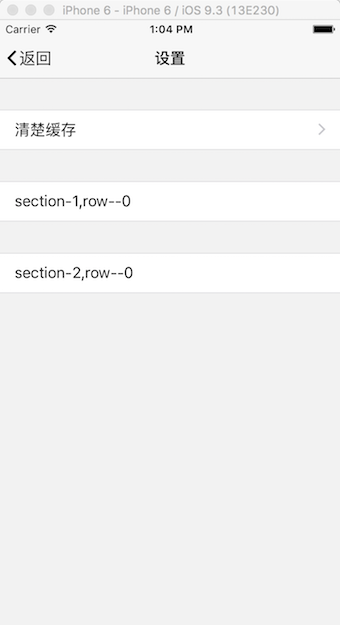
清除完畢
總結
以上所述是小編給大家介紹的iOS中設置清除緩存功能的實現方法,希望對大家有所幫助,如果大家有任何疑問請給我留言,小編會及時回復大家的。在此也非常感謝大家對本站網站的支持!
- 上一頁:iOS模仿微信長按識別二維碼的多種方式
- 下一頁:iOS中仿QQ側滑菜單功能

