iOS瀑布流視圖控件quilt的用法
編輯:關於IOS
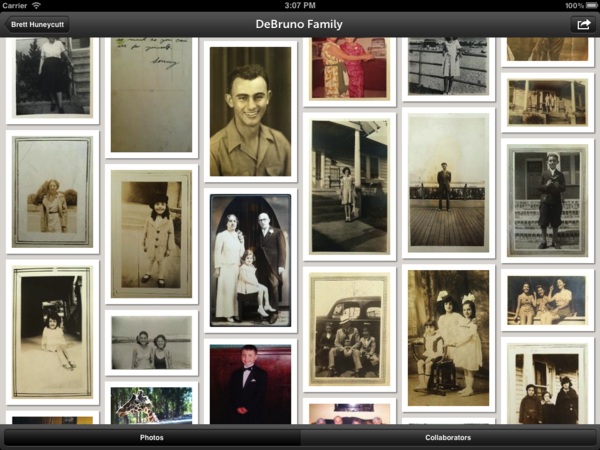
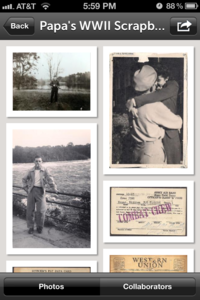
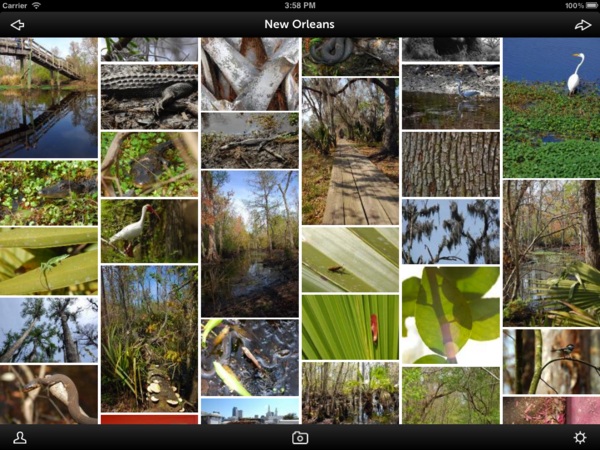
瀑布流的樣式在移動應用中比較常見也比較流行像Pinterest, 500px和Fab。TMQuiltView可能是能iOS開發者的一個新的選擇帶來相同的體驗。
廢話少說直接先上幾個圖讓大家看看

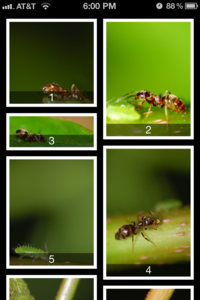
- 為開發者提供簡單友好的接口
- 平滑的滾動性能,即使有成千上萬個單元
1.首先去github上下載開源的代碼吧。
2.你會發現下載下來的代碼中有好幾個文件夾,將下面路徑下的6個文件直接拖拽到你的工程裡(不用像demo中添加那麼多):
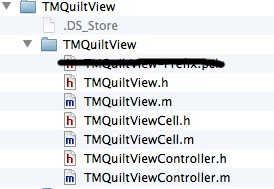
3.去往你要實現的類,在頭文件中添加如下代碼:
#import <UIKit/UIKit.h>
#import "TMQuiltView.h"
@interface WaterFlowVC : UIViewController<TMQuiltViewDataSource,TMQuiltViewDelegate>
{
    TMQuiltView *_tmQuiltView;
    NSMutableArray *_images;
}
@property (nonatomic,retain)TMQuiltView *tmQuiltView;
@property (nonatomic,retain)NSMutableArray *images;
@end

#import <UIKit/UIKit.h>
#import "TMQuiltView.h"
@interface WaterFlowVC : UIViewController<TMQuiltViewDataSource,TMQuiltViewDelegate>
{
    TMQuiltView *_tmQuiltView;
    NSMutableArray *_images;
}
@property (nonatomic,retain)TMQuiltView *tmQuiltView;
@property (nonatomic,retain)NSMutableArray *images;
@end
       其中tmQuiltView就是1000memories他們定義的瀑布流控件了,類似於tableView(從添加的協議就可以看的出來很像),_images是個數據源,存放圖片的數組。

       4.再去.m文件實現數據源和代理:
[csharp]
#pragma mark -
#pragma mark TMQuiltViewDataSource
-(NSInteger)quiltViewNumberOfCells:(TMQuiltView *)TMQuiltView
{
    return [self.images count];
}

-(TMQuiltViewCell *)quiltView:(TMQuiltView *)quiltView cellAtIndexPath:(NSIndexPath *)indexPath
{
    NSString *identifierStr = @"photoIdentifier";
    TMPhotoQuiltViewCell *cell = (TMPhotoQuiltViewCell *)[quiltView dequeueReusableCellWithReuseIdentifier:identifierStr];
    if (!cell)
    {
        cell = [[[TMPhotoQuiltViewCell alloc] initWithReuseIdentifier:identifierStr] autorelease];
    }
    cell.photoView.image = [self imageAtIndexPath:indexPath];
    cell.titleLabel.text = [NSString stringWithFormat:@"%d", indexPath.row + 1];
    return cell;
}
#pragma mark -
#pragma mark TMQuiltViewDelegate
//列數
- (NSInteger)quiltViewNumberOfColumns:(TMQuiltView *)quiltView
{
    return 2;
}
//單元高度
- (CGFloat)quiltView:(TMQuiltView *)quiltView heightForCellAtIndexPath:(NSIndexPath *)indexPath {

    float height = [self imageAtIndexPath:indexPath].size.height / [self quiltViewNumberOfColumns:quiltView];
    return height;
}

#pragma mark -
#pragma mark TMQuiltViewDataSource
-(NSInteger)quiltViewNumberOfCells:(TMQuiltView *)TMQuiltView
{
    return [self.images count];
}

-(TMQuiltViewCell *)quiltView:(TMQuiltView *)quiltView cellAtIndexPath:(NSIndexPath *)indexPath
{
    NSString *identifierStr = @"photoIdentifier";
    TMPhotoQuiltViewCell *cell = (TMPhotoQuiltViewCell *)[quiltView dequeueReusableCellWithReuseIdentifier:identifierStr];
    if (!cell)
    {
        cell = [[[TMPhotoQuiltViewCell alloc] initWithReuseIdentifier:identifierStr] autorelease];
    }
    cell.photoView.image = [self imageAtIndexPath:indexPath];
    cell.titleLabel.text = [NSString stringWithFormat:@"%d", indexPath.row + 1];
    return cell;
}
#pragma mark -
#pragma mark TMQuiltViewDelegate
//列數
- (NSInteger)quiltViewNumberOfColumns:(TMQuiltView *)quiltView
{
    return 2;
}
//單元高度
- (CGFloat)quiltView:(TMQuiltView *)quiltView heightForCellAtIndexPath:(NSIndexPath *)indexPath {

    float height = [self imageAtIndexPath:indexPath].size.height / [self quiltViewNumberOfColumns:quiltView];
    return height;
}
         數據源和代理方法需要的就這麼多,有其它需求可以跳轉到定義數據源和代理的類看一下。給出的demo中將
-(NSArray *)images和- (UIImage *)imageAtIndexPath:(NSIndexPath *)indexPath兩個方法也寫在了數據源中,注意這兩個方法不是數據源的方法。

        其中TMPhotoQuiltViewCell是我直接從demo中拷貝出來的自定義的單元,你可以根據自己的需求將其改成你想要的外觀。

        代理方法與tableview的代理很是相似,所以也很容易懂。


        5.最後是一些需要定義的變量了:
[csharp]
- (void)viewDidLoad
{
    [super viewDidLoad];
    self.view.backgroundColor = [UIColor blackColor];

    _tmQuiltView = [[TMQuiltView alloc] init];
    _tmQuiltView.frame = CGRectMake(0, 0, 320, [[UIScreen mainScreen] bounds].size.height-20-44);
    _tmQuiltView.delegate = self;
    _tmQuiltView.dataSource = self;

    [self.view addSubview:_tmQuiltView];
    [_tmQuiltView reloadData];

    NSMutableArray *imageNames = [[NSMutableArray alloc] init];
    for (int i = 0; i< kNumberOfCells;i++ )
    {
        [imageNames addObject:[NSString stringWithFormat:@"%d.jpeg",i % 10 + 1]];
    }
    self.images = imageNames;
    [imageNames release];

    [_tmQuiltView reloadData];
}
- 上一頁:iOS圖片等比例拉伸拉伸不變形
- 下一頁:IOS實現本地通知
相關文章
+


