iOS TableView實現QQ好友列表(三)
編輯:關於IOS
接下來我們將分組點擊的時候折疊起來。
首先新建一個可變字典用來存儲當前列表是否展示
- NSMutableArray *selectedArr;//控制列表是否被打開
- selectedArr=[[NSMutableArray alloc]init];
根據前兩節所講,我們講分組名稱放在section的header上了,但是Header 不像cell一樣有點擊方法
此時我們可以考慮給header上添加一個button來實現點擊的時候打開列表和關閉列表
- -(UIView *)tableView:(UITableView *)tableView viewForHeaderInSection:(NSInteger)section
- {
- UIView *view=[[UIView alloc]initWithFrame:CGRectMake(0, 0, SCREEN_WIDTH, 30)];
- view.backgroundColor=[UIColor whiteColor];
- UILabel *titleLabel=[[UILabel alloc]initWithFrame:CGRectMake(30, 5, SCREEN_WIDTH, 30)];
- titleLabel.text=[titleArray objectAtIndex:section];
- [view addSubview:titleLabel];
- UIImageView *imageView=[[UIImageView alloc]initWithFrame:CGRectMake(5, 5, 20, 20)];
- imageView.tag=20000+section;
- imageView.image=[UIImage imageNamed:@"arrow_down.png"];
- [view addSubview:imageView];
- //添加一個button 用來監聽點擊分組,實現分組的展開關閉。
- UIButton *btn=[UIButton buttonWithType:UIButtonTypeCustom];
- btn.frame=CGRectMake(0, 0, SCREEN_WIDTH, 50);
- btn.tag=10000+section;
- [btn addTarget:self action:@selector(btnOpenList:) forControlEvents:UIControlEventTouchDown];
- return view;
- }
此處設置button的tag為10000+section 是為了 保證通過button 的 tag 識別出當前點擊的是哪個分組(沒有直接設置成section 而是設置為10000+section 是為了保證左側的圖片也能通過tag確定是哪個分組的,所以他的tag被設置為 20000+section 這樣就保證了 section不超過10000的時候兩個都可以通過tag確定,而且不相互影響)
實現剛才添加的button的方法
- -(void)btnOpenList:(UIButton *)sender
- {
- NSString *string = [NSString stringWithFormat:@"%d",sender.tag-10000];
- //數組selectedArr裡面存的數據和表頭想對應,方便以後做比較
- if ([selectedArr containsObject:string])
- {
- [selectedArr removeObject:string];
- }
- else
- {
- [selectedArr addObject:string];
- }
- [tableViewList reloadData];
- }
上邊的方法是在點擊了分組之後跟新一下 selectedArr數組,
下來我們就實現table跟新的時候 讀取selectedArr 決定是否展開分組
- -(UITableViewCell *)tableView:(UITableView *)tableView cellForRowAtIndexPath
 NSIndexPath *)indexPath
 - {
- NSString *indexStr = [NSString stringWithFormat:@"%d",indexPath.section];
- NSString *str=[titleArray objectAtIndex:indexPath.section];
- NSArray *arr=[dataDic objectForKey:str];
- static NSString *CellIdentifier = @"UserCell";
- UserTableViewCell *cell = [tableView dequeueReusableCellWithIdentifier:CellIdentifier];
- cell=nil;
- if (cell == nil) {
- cell = [[UserTableViewCell alloc]initWithStyle:UITableViewCellStyleDefault reuseIdentifier:CellIdentifier];
- cell.selectionStyle = UITableViewCellSelectionStyleGray;
- }
- //只需要給當前分組展開的section 添加用戶信息即可
- if ([selectedArr containsObject:indexStr]) {
- NSDictionary *dic=[arr objectAtIndex:indexPath.row];
- cell.headerphoto.image=[UIImage imageNamed:[dic valueForKey:@"usericon"]];
- cell.nameLabel.text=[dic valueForKey:@"name"];
- cell.isOnLine.text=@"[在線]";
- cell.introductionLabel.text=@"無動態";
- cell.networkLabel.text=@"4G";
- }
- return cell;
- }
到此位置 展開關閉可以了 但是左側的剪頭還沒有變換過來(展開的時候為向下的剪頭,關閉時為超有的剪頭)

此時 我們需要調整方法
- -(UIView *)tableView:(UITableView *)tableView viewForHeaderInSection:(NSInteger)section
- {
- UIView *view=[[UIView alloc]initWithFrame:CGRectMake(0, 0, SCREEN_WIDTH, 30)];
- view.backgroundColor=[UIColor whiteColor];
- UILabel *titleLabel=[[UILabel alloc]initWithFrame:CGRectMake(30, 5, SCREEN_WIDTH, 30)];
- titleLabel.text=[titleArray objectAtIndex:section];
- [view addSubview:titleLabel];
- UIImageView *imageView=[[UIImageView alloc]initWithFrame:CGRectMake(5, 5, 20, 20)];
- imageView.tag=20000+section;
- //更具當前是否展開設置圖片
- NSString *string = [NSString stringWithFormat:@"%d",section];
- if ([selectedArr containsObject:string]) {
- imageView.image=[UIImage imageNamed:@"arrow_down.png"];
- }else{
- imageView.image=[UIImage imageNamed:@"arrow_right.png"];
- }
- [view addSubview:imageView];
- //添加一個button 用來監聽點擊分組,實現分組的展開關閉。
- UIButton *btn=[UIButton buttonWithType:UIButtonTypeCustom];
- btn.frame=CGRectMake(0, 0, SCREEN_WIDTH, 50);
- btn.tag=10000+section;
- [btn addTarget:self action:@selector(btnOpenList:) forControlEvents:UIControlEventTouchDown];
- [view addSubview:btn];
- return view;
- }
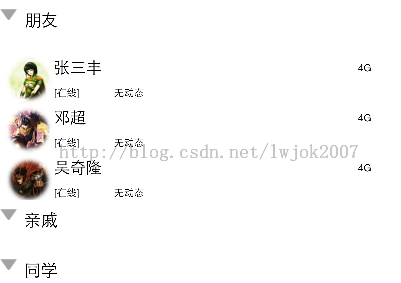
最終效果如下
到此為止基本上完成了 模仿qq好友列表的簡單功能。
相關文章
+


